Sunday, December 30, 2012

The Difference Between a Cookstove and a Range

I have been preparing a post (actually, what may become a series of posts) about regulating the heat of a wood cookstove's oven.  During my research, I was reminded of a technicality that I think perhaps I ought to address, especially since I always say that I want this blog to be about "all things cookstove."

I always use the word "cookstove" to denote a stove which is used for cooking and is fueled by wood or coal.  This is a common use of the word, and most people know exactly what I mean when I use the word this way.  However, our ancestors used this word to indicate only the small stoves which looked like the picture below.  The Original Fannie Farmer 1896 Cook Book notes that the ovens on these stoves could usually be opened from both sides.  One of the oven doors is open in the picture below.  The door to the upper left of the oven door would have been one way to access the firebox, which jutted into the top left area of the oven.

Photo from amberghistory.org

 A kitchen "range" was so named because of the larger range of different heat levels that it allowed the cook.  A range, or "set range," was a built-in affair which usually had its firebox in the center.  Ovens would appear on each side of the firebox, or might appear above the cooktop altogether, as in the picture below. 

Photo of a range at the Culinary Arts Museum in Providence, RI,
from abetterbagofgroceries.com
In 1896, Fannie Farmer wrote: "Set ranges, as they consume so large an amount of fuel, are being replaced by portable ones."  She further states that "A portable range is a cooking-stove with one oven door."  Thus, what I am always referring to as a cookstove is technically a "portable range."

Enterprise-Fawcett's Monarch Range.  This picture
is from their website: www.enterprise-fawcett.com.
This is a "portable range."
Something tells me that I might have a hard time convincing the four men who helped us move the Margin Gem into our kitchen that it is "portable."  I'm going to continue to refer to the portable range as a cookstove, and you'll all just have to forgive me for being technically incorrect. 

Phew!  I'm glad we've got this all cleared up.

Tuesday, December 25, 2012

A Christmas Card from Our House to Yours

Merry Christmas!  I wanted to share some pictures which were taken at our house over the last four or five days and a bit of verse to go with them.

The kitchen chimney on a very cold morning.

The view toward our little house next door that same morning.
 
Recalling Christmas the Old-Fashioned Way
 
Charles P. Isley
 
Yellow lamplight flickering
On frosted windowpane . . .
Sound of sleigh bells echoing
From every country lane . . .
 
Holly wreath with crimson bow,
Fastened to the door . . .
Yule log sending fireshine
Across a polished floor . . .
 
Fragrance from the kitchen range
Permeates the place . . .
And a sort of hungry look
Comes to every face . . .
 
Paper chains and popcorn strings
Decorate the tree . . .
Lighted candles will reveal
The sweet nativity.
 
May your joys be manifold
This Christmas Holiday . . .
As we recall His holy birth
In the old-fashioned way.
 
Poem from Ideals magazine, Vol 18, No. 4.  October, 1961.
 
Marjorie the Margin Gem cooking Christmas goodies.
 
Our Christmas tree.
 
 
And let us not forget this very important verse:
 
 
"For unto you is born this day in the city of David a Saviour, which is Christ the Lord."  Luke 2:11
 
 
Merry Christmas!


Monday, December 24, 2012

A Fat-Free Vintage Candy Perfect for the Wood Cookstove

My great-great aunt Meme, who is mentioned in the "About Me" section to the left, had a copy of the 1926 West Pottawattamie County Farm Bureau Women's Cookbook to which she and her sister and cousins had been contributors.  When I was young, it was old and yellowed and tattered and falling apart.  I've inherited it now, and it is still old and yellowed and tattered and falling apart.  It is filled with recipes that take one back to when diets were limited by what you could grow yourself, what you could catch and kill, and what few exotics came by train to rural Iowa's tiny grocery stores.

My family has lived in West Pottawattamie County for over one hundred and fifty years, so it is fun to read over the recipes which were contributed by family members whom I've only heard about or seen in ancient black and white photographs.  However, some of the names in the cookbook also belong to people that I knew in my childhood, people of the generation born in the late 1890s who had been considered elderly for a score of years before I came along.  I'm sure that I would recognize even more of the names, except that in 1926 the women had the habit of calling themselves "Mrs. Geo. Galloway" or "Mrs. S. S. Wymore."  What was Mrs. Galloway's first name?  For that matter, what did Mr. Wymore's "S. S." stand for? 

In addition to the challenges with the names, the recipes themselves are challenging at times.  They assume quite a lot, and you definitely have to have been cooking a wide variety of foods for quite awhile before you can even begin to make sense of some of the directions.  They are all also clearly written for people who were cooking on wood or coal-fired ranges.  In fact, in our area of Iowa, most rural cooks (and many in small towns) did not part with their wood cookstoves until after World War II when, after so many years of scraping by, the push for upgrading and buying everything new was at its peak. 

While Nancy and I have been home getting ready for Christmas, I decided to branch out a little this year and make a few things that weren't on our traditional lists.  Mrs. S. S. Wymore's recipe for "Orange Squares" caught my eye (p. 274).  These are certainly a different sort of candy than what is standard fare around here, but I like them.  An additional benefit is that they are fat free, and they certainly would add a new dimension to a tray of homemade goodies.  They are also a recipe that took advantage of the cookstove's features.

To make them, you first soften 2 Tbsp. granulated Knox gelatin (this worked out to be three envelopes) in 4 Tbsp. of cold water for 10 minutes. 

The gelatin dissolving in the cold water.  Note the cookstove
on the Rice Krispies vintage recipe tin.  Mom ordered that for me
when I was about five years old.  As you can see, my fascination
is an old one.
 
Then, you pour 3/4 c. of boiling water over this.  There's that use of the teakettle again.  Add 1 pound of sugar and 1/8 tsp. salt.  Then bring it to a boil and boil for ten minutes.


 As it is boiling, it looks like egg whites that have been beaten for just a couple of seconds.


Remove from the fire, partly cool, then stir in 1/2 tsp. orange extract and the grated rind of one orange.  Pour into a shallow pan that has been dipped in cold water.  Later in her directions, Mrs. Wymore says that you can add coconut and chopped nuts, so we did that.
 

These need to be set aside overnight to congeal.  Then the interesting and challenging part comes because you have to cut them and get them out of the dishes.  Though Mrs. Wymore didn't say so, here is what you have to do: dip your sharp paring knife into cold water and dip the pans into the hot water of the reservoir in order to soften the candy around the edges and bottom.

Holding the pan of candy in the hot water reservoir
to free it from the edges of the pan.
Cut into squares and roll in sifted powdered sugar.

A picture of the candy with light behind it so that you can see
how clear it is.

The finished product.

 
These have been met with mixed reviews at our house.  My mom disliked the texture, saying that they felt like "eyeballs."  Really, they're very similar to finger Jello but they have a much more natural taste.  I'm not a nut or coconut lover, but I think that the pan with the coconut and pecans is probably the better quality candy.  They're novel if nothing else.
 
Here is the way the recipe originally appeared in 1926:
 
 
Orange Squares
 
Mrs. S. S. Wymore
 
2 Tbsp. granulated gelatine [sic]
4 Tbsp. cold water
3/4 c. boiling water
1 orange rind grated
1 lb. sugar
1/8 tsp. salt
1/2 tsp. orange extract
 
Soften the gelatine by allowing it to tand for ten minutes in the cold water, then pour the boiling water over it.  Add sugar and salt, bring to a boiling point and boil for 10 minutes.  Remove from fire, partly cool, then stir in orange rind and flavoring.  Pour in a shallow pan that has been dipped in cold water.  Set aside over night, cut in squares and roll in powdered sugar.  If desired pour half in small pan and to remaining half add chopped nuts and cocoanut [sic].


As homemade candies go, this one is light and refreshing.  Give it a try!

Sunday, December 23, 2012

Keeping a Christmas Tradition Alive: Ford's Suet Pudding

Well, I've gone and done it again.  Grandma told me that I shouldn't do it, but I disobeyed her and did it anyway.  The process was gruesome, and the results were...hmmm...let's say "undesirable."  But it is finished, and I 'm glad it's over.  Yes indeed, I have made the suet pudding.

Before I go any further with this post, I feel that it is necessary to put a few disclaimers here in the beginning:

1) What you are about to read is true to the best of my knowledge.  Yes, it is sprinkled with a great deal of my own unfavorable personal opinion, but I'm being honest here, folks.

2) No matter what I may write here, I mean no disrespect to my elders, ancestors, or forebears, nor their elders, ancestors, forebears, and kin, no matter how poor their culinary preferences may have been.

3) No matter what I write here, I mean no disrespect to anyone who enjoys this sort of food.  I'm just too narrow minded to understand it.

4) Finally, I'd like to apologize for including this recipe on my blog.  I try to present foods here that I think are good.  This is a complete departure from that focus.

Perhaps some of you are wondering what in the world suet is.  Suet is the fat which is found around the kidneys of cattle, and it is where beef tallow comes from.  It is also the stuff that some of my family members have been making Christmas pudding out of for as long as anyone living or dead could remember.  My grandma's grandma made this pudding every year at Christmas.  Her maiden name was O'Donald, and she was Scotch-Irish.  I don't know whether her Scotch-Irish ancestors made this pudding, or whether it was a responsibility that was foisted on her by her husband's family whose surname was Ford.  My copy of the recipe is labeled "Ford's Suet Pudding," so I'd like to believe that Grandma (O'Donald) Ford, whom my own grandmother has romanticized into the epitome of grandmotherdom, is not the person who is responsible for this gastronomical travesty.  Either way, the recipe obviously originated in the British Isles, and I imagine it is chief among the reasons that the English are not generally revered for their cuisine.

I did a little research before writing this post and confirmed my suspicion that what we have always called suet pudding is the same as plum pudding, which is a very close cousin to the "figgy" pudding mentioned in "We Wish You a Merry Christmas."  For some droll and informative reading about this historic dessert, I recommend visiting this site about figgy pudding and this site about plum pudding.  The first site mentions the "interminably long" cooking time for these puddings and notes that they are steamed because this method was "very popular in the days before regulated heating."  Sounds like a recipe that is tailor-made for the woodburning cookstove, doesn't it?

My grandma still has and uses the kettle that Grandma Ford used to steam this pudding on her wood cookstove many years ago.  After Grandma Ford, my great-grandma Gladys made the pudding.  She passed away in 1975, and then my grandma took up the job.  Grandma taught me how to make it, not because I like to eat it, but because--as anyone who knows me will concur--I am interested in tradition.  Grandma has retired from making the suet pudding, but I have taken up the job in the interest of giving my great-uncles an annual taste of their childhood.

I have to say, though, that my tenure as the pudding maker is probably destined to be fairly brief because I don't think that anyone in the younger generations much cares for this stuff.  I've introduced it to friends and in-laws on Nancy's side, and I have yet to run across anyone who likes it--and I can totally understand why.

To commit this heinous bit of cookery, the first thing that you must do is locate some suet.  Unfortunately, both of our local meat markets are more than willing to part with the stuff.  Judging from the price that they charge, demand is not very great.  Some years, they have just given it to me free with an expression on their faces which causes me to suspicion that they have tasted this pudding and feel pity for anyone who has judgment poor enough to willingly make it on his own.  The recipe only calls for a cup of suet, but once you see the stuff, that seems like way too much.

This cup of suet is ground together with a cup of currants and a cup of raisins.  My grandma likes to use golden raisins to prevent the pudding from being so dark.


I am a raisin lover--have been since I was a toddler--and this seems to me a cruel thing to do to a raisin.


Grandma told me that the pudding is improved (as if that were really possible) by grinding this mixture three times.  She almost always did this by hand, and I have done it by hand, but I have to tell you that it is work.  This is a thick, sticky mess.  The worst problem with this process, though, is cleaning the grinder afterward.  Grandma's hand grinder is from the days when Methuselah was a teenager, but it is cleverly engineered and opens up for easy cleaning.  Mine does not, and getting the last remnants of this sludge out of it is not easy.  Therefore, I don't regret using my Goodwill Warehouse grinder, even though it is electric.

The raisin, currant, and suet mixture after three grindings.  You
don't need to tell me what it looks like.  Trust me, I already know.
To the ground fruit and fat mixture, you add 1/2 c. molasses, 1 c. brown sugar, 1 1/2 cups sour milk, 2 1/2 c. flour, 1 tsp. salt, 1 1/2 tsp. soda, 1 tsp. baking powder, 1 tsp. nutmeg, and 1 tsp. cloves.

Because the ground fruit and fat mixture is so
sticky and difficult to incorporate, Grandma
always used her mixer for this task.
The complete mixture.  Don't say it.  I know what this looks like, too.

I'm sure that my great-great grandmother probably put this pudding into some sort of metal mold and then steamed it in the big kettle.  I understand that originally it would be suspended from a cloth bag along the side of the large iron kettles in which the English would cook their entire meal simultaneously.  However, we grease a few metal food cans and fill them halfway full.  I also used a wide mouth pint jar successfully.

The pudding ready to be covered with foil and steamed.

I cover these with foil and then steam them in our little water bath canner.  To steam in this fashion, you just have to have about an inch and a half of boiling water in the bottom of the canner.  The puddings rest on the jar trivet in the water.  The original recipe says to steam for three hours.  This would be necessary if the pudding were all cooked in one container.  Since we cook it in small cans so that it can be easily divided among those who will receive it, steaming for an hour and a half is all that is needed.

Remove from the steam when they are done.  The cooked pudding keeps in the refrigerator indefinitely. 

As if the pudding weren't bad enough, when you go to serve this, you are supposed to pour a little hard sauce over it.  I'm not a fan of hard sauce either.  To make it, you cook 2 cups of water, 1/2 cup sugar, and 2 Tablespoons of cornstarch together until it is thick, stirring pretty much constantly.  Grandma Gladys always put a tablespoon of butter into this as it cooked also (terrible waste of good butter, in my opinion).  When it has thickened, you remove from the heat and add a 1/4 tsp. of lemon flavoring and a dash of nutmeg.


Perhaps if you click on this picture to enlarge it, you can see the
sauce better. This plate belonged to Grandma Gladys and has very
likely held suet pudding in years past.


There you have it: Ford's Suet Pudding, our family's traditional Christmas "treat."  All I can say is, you've been fairly warned.


Saturday, December 22, 2012

Christmas Caramels

Marjorie the Margin Gem and I have been bonding over the last three days. Winter storm Draco hit our area on Wednesday afternoon, causing my drive home from school to be rather scary. Things proceeded to get worse for those who were traveling, but Nancy and I hunkered down and rode out the storm with no difficulties. We had filled both of the woodboxes on Wednesday morning, pumped the cistern full of water, and purchased the groceries which were necessary for our plans. We were set.

The wind blew, and a heavy, wet snow fell during the night, putting our electricity out for a period of two and a half hours.  I love it when the power goes out, but ours rarely does, and I was disappointed that it happened in the middle of the night when I couldn't enjoy it.  However, at 9:30 on Thursday morning our power went out again and remained out until after four o'clock in the afternoon.  Other than the fact that we had to bathe instead of shower (our basement shower uses a sump pump to drain), a snow day without electricity was pretty much the same as a snow day with electricity for us.  I was terribly disappointed when the power came on before nightfall, though, because we weren't forced to use our oil lamps.  Next time maybe.

On Thursday, I checked papers because I honestly thought that we'd be in school on Friday.  We didn't get nearly the amount of snow that was forecast for us, and the sun was shining brightly.  What we couldn't see in our protected little valley was how windy it was everywhere else and what havoc that was playing with the roadways.  Thus, Friday was a snow day also, and while I should have been checking papers, I abandoned that task in favor of beginning to make goodies for Christmas.

I started by making caramels.  I remember when my dad first made these.  When he announced that he was going to be making caramels, I was excited because I love caramel anything (so long as it isn't contaminated with nuts).  I know that I was pretty young when he first did it.  I also suspicion that I was sick because I remember that he handed me the spoon to lick after I woke up from a nap.  I remember being colossally disappointed with that spoon.  You see, when Dad said that he was making caramels, my youthful mind assumed that the result of his efforts would taste exactly like the golden nuggets of goodness that came from Kraft. 

Dad was delighted with them, however, and they have been a tradition at Christmas for a number of years now.  I think that they are my brother's favorite Christmas candy.  They are not difficult to make, and they are particularly well-suited to being cooked on a wood cookstove because of their long cooking time.  The recipe comes from the Kitchen Klatter Cookbook, a southwestern Iowa go-to cookbook which is a compilation of recipes from the radio homemaker show and magazine of the same name.  I give more details about the Kitchen Klatter legacy in my post about apricot bars.  I can't say enough good things about this mid-twentieth century cookbook.  It doesn't include a lot of beautiful photographs, and the directions are obviously written for people who have had some experience in the kitchen, but I haven't yet run across a recipe in it that I didn't like.  Many of the recipes have personal notes on them, and, having milked a cow for ten years, I appreciate the fact that they are very conscientious about telling you whether you can use "country sour cream" or "commercial sour cream" in the recipes which call for it.

This recipe appears on p. 457 in the candy section and is simply labeled "Caramels." To make them, you first combine 2 cups of sugar, 1 cup of cream, 1 3/4 cup corn syrup, a dash of salt, and 1 cup butter in a heavy-bottomed pan which has a capacity of at least four quarts.  Bring to a boil directly over the fire.

Bringing the ingredients to boil over the firebox.
Once it has come to a boil, move the kettle to a cooler part of the range where it will continue to boil, and let it do so for a half hour.  Stir occasionally to make sure that it isn't scorching.

The mixture boiling on the reservoir side of the stove.
As the mixture cooks, it turns a pretty amber color.
 After the thirty minutes is up, add another cup of cream.  Put the mixture back over the fire until it returns to a boil.

Coming back to a boil after the second cup of cream was added.
Return the kettle to a cooler part of the range where it will continue to boil until it has reached the consistency you desire.


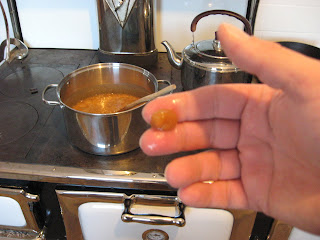
Here is where things get a little interesting.  You can use a candy thermometer to decide when the caramel is done cooking, but I prefer the cold water test because I have better luck with it.  What I do is put very cold tap water (not difficult to come by at this time of year) into a coffee cup.  Then I let a few drops of the candy fall off of the stirring spoon into the cold water.  When it isn't yet done, it makes a beige puddle at the bottom of the cup.

I'm sorry that this is blurry.  I don't think that I know how to take
close-ups with our camera.

I take these caramels off the stove when they are at the softball stage.  At that point, the drops of caramel in the cold water look like this:


 When you stick your finger down at the bottom of the cup and stir everything around, the caramel forms a soft ball--hence the "soft ball stage."

The soft ball of caramel after I stirred it around in the cold water.
If you want your caramels to be a harder finished product, you can cook the caramels longer.  When they are done, pour the caramels into a buttered 9 x 13 pan.


When they are most of the way cooled, cut and wrap.

A couple of the caramels removed from the pan.
Here is the way the recipe appeared in the original cookbook:

Caramels
2 cups sugar
2 cups cream
1 3/4 cups corn syrup
1/8 tsp. salt
1 cup butter (may be half margarine)
1 cup chopped nuts
 
  Combine sugar, 1 cup of the cream, corn syrup, sal and butter
or margarine.  Boil 30 minutes.  Then add the second cup of
cream and boil until it makes a firm ball when dropped into
cold water or until it reaches 260 degrees on the candy
thermometer.  Add nuts and pour without beating into well-
buttered pan.  Cut into squares when still slighly warm.
 
 
These have an old-fashioned, homemade taste that I hope you'll enjoy.


Saturday, December 15, 2012

Boiled Cider Glazed Pork Loin

When people ask me what my favorite Christmas memory is, I have to say that Christmas 2002 was my favorite.  My grandparents on my dad's side passed away within a week of each other in June of 2001.  At the time of their deaths, they owned the farm where I live now.  I was raised here; my dad was raised here, and my grandfather was raised here.  I had been living in our house since 1998, but as the farm passed from my grandparents' ownership into their estate, unfortunate circumstances beyond my control dictated that I leave the farm while it was sold.

To make a long and emotionally exhausting story very short, in early 2002 my brother and I were able to buy our farm from my grandparents' estate with the incredibly generous help of my parents.  I would just like to take this opportunity to publicly admit that at the time, I was so caught up in the turmoil of the year's events that I did not even begin to realize how great a sacrifice that my parents--escpecially my dad--made for us.  A decade later, I'm still only beginning to realize the magnitude of what he did, and, though I would find it awkward to tell him face-to-face, I've got to say that I stand in awe of my dad's colossal charity toward his children, and I am totally humbled by it.

Needless to say, Christmas 2001 was a stressful one, and I was feeling the loss of our family home quite keenly.  So when Christmas 2002 was approaching and I was back at home and the farm was still in the family, I asked to host Christmas for my immediate family so that we could be back celebrating in the house where everyone except my mom had grown up.  I was celebrating the birth of my Savior that Christmas, but I was also celebrating being home for Christmas.

Preparations began right after Thanksgiving.  Every day after I got home from the bank where I worked at the time, I cleaned, decorated, planned, or cooked something in preparation for the big day.  At the bank, my co-workers asked every morning about the progress that had been made the night before and kept tabs on my activities.  Susan, the teller, was quite interested in the dietary aspects of the whole prospect and brought in her favorite holiday cookbook.  It was a vintage Ideals publication with beautiful 1960s-style photographs of various foods made from the recipes within, and it further spurred me on. 

I dug out old family recipes and pored over cookbooks after I had gotten too tired for physical labor in the evenings.  It has always been my family's tradition to have a large breakfast together on Christmas morning, so I was making decisions for both meals, trying to seek the right blend of familiar traditions and appropriate new additions to the Christmas menus.  In the days immediately preceding Christmas, the Qualified Range was busy with boiling candies and baking various sweets.  For the main Christmas dinner, I had carefully selected foods and pans that could all fit in the Qualified's oven because the oven on the electric stove that I had then was on the blink.

I used a couple of the recipes from Susan's cookbook, but I used its recipe for pork loin roast as a launch point for my own creation that turned out surprisingly good.  This recipe was such a hit that we used it for our church's annual Valentine's Dinner in February of 2003, and I made it again last Sunday for dinner. 

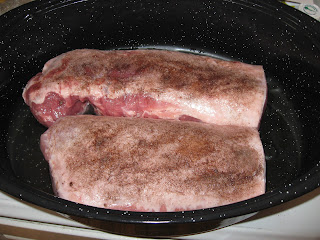
First, prepare an approximately eight-pound pork loin by rubbing it with a combination of 1 tsp. allspice and 2 tsp. salt.  Place the loin in a covered roaster with about a 1/4 c. of water, and roast it in whatever combination of time and temperature you prefer.  I had to cut the loin in half so that it would fit in our large enamel roaster.


I took advantage of the Margin Gem's ability to hold a constant fire while we are gone to church, and cooked the loin "automatically" by filling the firebox with as much wood as I could and then dampering it down.  When we got home, the internal temperature of the meat registered one hundred seventy-two degrees--done! 


I still needed to make and add the glaze, but since the pork was already cooked, I put the lid back on the roaster and slid the whole thing back in the oven, leaving the oven door open.

To make the glaze, I combined 3/4 c. boiled cider, 1 c. red plum jam (or you could use currant jelly), 1/2 tsp. allspice, and 3 TBLS. ketchup (I used some of our homemade).  Bring to a boil and simmer two minutes.  I spread part of this glaze on the loin, covered it again, and put it back in the oven with the door closed while I finished mashing the potatoes and making the other last minute meal preparations.  The rest of the glaze was moved to the coolest part of the cooktop to remain warm so that it could be served at the table.

Unfortunately, in the rush of getting the other foods finished and to the table at the same time for the ten of us who were eating together, I forgot to take pictures of the pork loin once it was glazed and of the glaze itself.  Sorry.  As a consolation, I will show you the picture that I did manage to take of the honey-kissed carrots which had baked alongside the pork loin in the oven while we were gone.


Here is the recipe in a more accessible form:

Boiled Cider Glazed Pork Loin
 
8 lb. pork loin
 
Rub with:
1 tsp. allspice
2 tsp. salt
 
Roast pork loin using your preferred method.
During last half hour of cooking time, glaze
with the following:
 
3/4 c. thick boiled cider
1 c. red plum jam (or currant jelly)
1/2 tsp. allspice
3 Tblsp. ketchup
 
Simmer glaze ingredients for two minutes.  Pour
about half of the glaze on the pork loin during the
last half hour of the cooking time, reserving the rest
to be served at the table.


I mentioned my earthly father's sacrifices for his children earlier.  As we prepare for the Christmas season, I urge you to remember that the reason that we celebrate Christmas is because of the sacrifice that our Heavenly Father made when He sent His Son to become one of us, to die for us, and to offer us the gift of eternal life with Him.  Hope you are having a blessed Christmas season!


Tuesday, December 11, 2012

Boiled Cider: A Task I Wouldn't Try on a Modern Stove

These colder days when the cookstove is being fired constantly are the perfect time to try those old-fashioned recipes which demand long, slow cooking.  Boiled cider is one of those foods which hearken back to bygone days when various foods could cook for hours, if not days, on the back of the woodburning range.   The gentle heat of a wood fire seems to have a unique way of intertwining aromas and marrying flavors which is lost in today's rushed cooking. 

Crock pots or slow cookers do their jobs well, but they are, in my opinion anyway, not quite the same as a kettle simmering on a stovetop.  Furthermore, during the short intervals of my culinary life when a wood cookstove was not available, leaving a kettle to cook all day over a gas flame or electric burner was simply never an option because I am bothered by the energy consumption that these methods involve.  (Disclaimer: I was accused the other day at the lunch table of being an environmentalist because we heat with wood and have only used our clothes dryer twice since February.  I'm not an environmentalist; I think of myself as just old-fashioned.  My wife tries to put a more humorous spin on the situation and likes to tell people that I'm allergic to the use of gas and electricity, and my students at school think that I'm Amish because they don't know the first thing about the Amish.  The whole unvarnished truth of the matter is that I'm just a raging skinflint, and I don't like to see our hard-earned money fall unnecessarily into the hands of the power company or the propane provider--especially when we've got more firewood available to us than we know what to do with.)

At any rate, boiled cider is quite simple to make, and the end product is fascinating and versatile, though I haven't spent nearly enough time experimenting with it, and it is one of those foods which is perfect for a wood cookstove.

What I do is this:

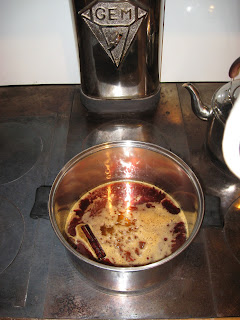
1. Pour a 1/2 gallon of apple cider into a large, wide kettle.

2. Add a cinnamon stick.

3. Place on the back of the stove and let simmer slowly until it is reduced to 3/4 of a cup of liquid.  Only occasional stirring is necessary toward the end of the cooking time.

The cider just after being put on the stove to simmer.
This takes several hours.  In Jane Cooper's Woodstove Cookery: At Home on the Range, the recipe for boiled cider says that a gallon of apple cider may take as many as twenty-four hours to reduce to one quart.  The batch of boiled cider that I made using the above measurements in the pot that you see in the pictures took approximately six hours.  In both pictures, you see the kettle in the center of the stovetop, but it migrated further away from the firebox for a while too.

The boiled cider a few minutes before I removed
it from the fire.  By this time, it was only a thin layer
covering the bottom of the kettle.

What happens as the cider boils is that it becomes a syrup, the thickness of which is totally dependent upon how long it is left to cook.  A thinner syrup can be canned and later diluted with water to make "a refreshing drink," according to Ms. Cooper, so basically, you've made a cider concentrate.

If you use the proportions that I have listed above, however, what you will end up with once it is cool is a very thick syrup which is not unlike molasses or corn syrup on a very, very cold day.  It is thick, and the flavor is intense and delicious.  A side benefit of boiling cider is that your house smells lovely during the process, too. 

"So now what do you do with it?" you may be asking. 

My answer is, "Whatever you want to."  I'm going to try using it in places where I would have ordinarily reached for the honey jar.  However, in my next post, I'll share a recipe that I devised ten years ago this month which calls for the whole 3/4 of a cup of boiled cider.  Stay tuned!  I promise that it will be worth it.

Note 10/19/2017: Made sticky rolls using this instead of dark corn syrup.  It worked well but was met with mixed reviews.  Some didn't like it, others raved about it.  I think I'd try it again.

Saturday, December 8, 2012

Century-old Recipe for Meatloaf

Not too many years ago, Nancy, her mother, and I had all gone down to Clearfield, Iowa, to visit Nancy's grandparents.  Nancy's grandma Ruth, an avid cook in her day and still a food aficionada at age 97, had apparently been rummaging through old cookbooks and had decided to send a couple home with Nancy's mom.  I was not the driver on the two-hour return trip, so I sat in the back seat and read the cookbooks.  One of them was the 1915 Clearfield Presbyterian Church Cookbook.  The Clearfield Presbyterian Church is long gone, but a recipe that caught my eye needs to be carried into the future.

The recipe was simply labeled "Beef Loaf," but what made me pay attention to it was the ingredient list.  Most meatloaf recipes are fairly similar in nature: meat, meat stretcher, an egg or two, some moisture, and your seasonings.  What caught my eye about the ingredients was that this recipe included ground bacon.  Now, I'm an unashamed meatloaf lover, and I've had meatloaf that was draped in bacon, but the idea of grinding bacon and including it inside the meatloaf was intriguing to me.  Furthermore, with not nearly enough shame, I will admit that I believe the following verse: "Bacon and butter make everything better."  Thus, I definitely had to try this recipe! 

The first try was a success; the second try earned me an "I sure wish I could make a meatloaf like you" at a church dinner.  Thus, this recipe has now become one of my "go to" recipes when cooking for a potluck, so I pulled it out for the Nightingale Circle Christmas Potluck which we hosted at our house last Wednesday evening.  Here is what you do:


1. First crush enough saltine crackers to make a cup of cracker crumbs.


2. Grind one pound of bacon and set aside.

Normally, I would be ashamed to show you that we have an electric
food grinder.  (We have a hand-cranked one that I have used many times
for this recipe.)  However, we bought this grinder a few weeks ago at the
Goodwill Warehouse in Omaha.  You pay for your merchandise by the
pound there, so I estimate that this vintage deluxe Kenmore grinder cost
us less than $6.70.  Aren't you impressed?  You'll see why I wanted it if I
write a post about making suet pudding for Christmas.

3. Mix cracker crumbs, eggs, milk, dried onion, and salt and pepper.


4. Add the ground bacon.


5. Add the ground beef and mix thoroughly.


6. Shape into a loaf and put into a baking dish. 

Keep in mind that you've got four pounds of meat here,
so you need a big pan.  This Pyrex dish is 11" x 14" and
holds 4.8 quarts.
7. Bake in a moderate oven for approximately 1 1/2 hours.

You see the meatloaf cooking here in the stovetop oven.  I actually started it in
the Margin Gem's oven, but I had to finish it on top of the stove
because the dinner rolls wouldn't fit in the stovetop oven, so they had
to be baked in Marjorie's oven.  This stovetop oven is coming in handy!

8. During the last ten minutes, I like to glaze it with two cups of homemade ketchup, about 3/4 of a cup of brown sugar, and two teaspoons of dry mustard.


Mix all of that together until it is smooth and poor over the top of the meatloaf.

The finished product with about half of it gone.
Notes:

a) At first glance, one might think that this meatloaf is bound to be greasy since it has a pound of bacon in it.  Surprisingly, most of the bacon fat cooks out during baking, and there is no greasy texture or taste.

b) Because the bacon fat cooks out, the hot fat tends to sputter a lot in the oven, so be prepared to run a damp cloth over the inside of the oven after it has cooled down to being just warm.

c) The original recipe did not call for the dried onion or the glaze, but it was quite bland without them.  The original recipe also called for a tablespoon of butter.  Despite my mantra above, I leave that out because it seems superfluous even to me.

The recipe:
 
Beef Loaf
 
3 lbs. ground beef
1 lb. ground bacon
2 eggs
1 cup cracker crumbs
1 cup rich milk
3/4 cup dried onion (or to taste)
Salt and pepper to taste.
 
Mix all together and shape into loaf.  Bake approximately 1 1/2 hours in moderate oven.
During last ten minutes, glaze with the following:
 
2 cups ketchup
3/4 c. brown sugar
2 tsp. dried mustard


I hope you enjoy this one as much as I do.