Friday, November 25, 2022

Monarch Brochure from 1980

Occasionally, I find some very interesting things on Ebay, and this little brochure from the Monarch division of the Malleable Iron Range Company is one of them.

I have a special affinity for Monarch ranges.  When I was growing up, the Monarch range that had belonged to my great-great grandparents on my mother's side rested comfortably in the dilapidated summer kitchen on the original home place.  It had been my great-great aunt Meme's last woodburning range before she moved off the farm to her home on Grace Street in Council Bluffs, and it had been my grandma Marian's first range after getting married in 1947.  

Both Meme and Grandma Marian sang the praises of that large cookstove, which had reigned supreme in the spacious kitchen of the original home place.  Fortunately, it had been moved out of the house into the summer kitchen a few years before the house burned to the ground from an electrical fire.  Whenever we were at "the other place" to work cattle or cut thistles or simply have a picnic, I would go in and visit that old range.

When I was about five years old, I drew up plans in red crayon to have a summer kitchen built between the two houses here on our farm using four old cedar trees as the corner posts.  I wanted to move that Monarch range over here and put it to use.  I distinctly remember having Granny come and look over the plans--even at that age I knew that if anything was going to get done on our place, Granny was the one who would spearhead the operation.  She listened with that feigned interest that we give children who amuse us, but I could tell at the end of the conversation that no summer kitchen was in the foreseeable future.

During my high school days, I was certain that I would be putting that range back into service someday, so I purchased a can of stove black and coated it well in order to protect it as much as I could.  Though I would guess it to be about seventy years old at that point, it was in pristine condition except for surface rust and a temperamental oven cleanout door.

Well, when I was in my freshman year at Iowa State University, someone--actually a group of someones, I'm sure--absconded with that precious stove.  I've kept my eyes peeled for it ever since, but Grandma and Grandpa were told at the time they filed a report with the county sheriff's department that it had been very likely shipped to Colorado since that was the hot spot for antiques during that time.

Monarchs seem to have been a particular favorite among our family members.  The last kitchen stove my great-grandma Ruth (the daughter-in-law and next door neighbor of the aforementioned great-great grandmother) had on the farm before moving to Council Bluffs was a Monarch combination stove with a woodburning left side and an electric right side.  That stove still rests in the basement of my Grandma Marian's house.  On the other side of the family, my great-great aunt Donald's Edna Klopping had an electric Monarch range purchased in the 1940s and used until the 1960s.  It was the 40" deluxe model that had an electric roaster built into the right side of the cooktop.  I actually think that it was Auntie Edna's first electric range, and I know she liked that stove very much.

Even the last woodburning range that was in our farmhouse before I put the Qualified range in was a Monarch.  Its remains still haunt the banks of our creek where my grandparents deposited it sometime in the late 1950s or 60s.

As I said earlier, Monarch was a division of the Malleable Iron Range Company of Beaver Dam, Wisconsin.  Much information about them is available online, but two important details stick out: a) the company was in business from 1896 to 1985 and b) Monarch ranges "were recognized as being [of] much better quality and easier to use than the typical range."  Perhaps Meme and Grandma knew what they were talking about when they bragged about that old Monarch!

The brochure was sold on Ebay as having been published in 1980, but I am unable to find a dated printed on it anywhere.  From the pictures, I would say that 1980 is believable, but if that isn't accurate, I would put it slightly earlier.  There were many pictures of the woodburning heating stoves and furnaces they sold as well, but I only included the pictures that had to do with cooking appliances.  (As I always say, if it doesn't have an oven, I'm not interested.)


The cover of the brochure.

The first picture of a range is the later version of the
combination stove that my great-grandmother had
in the late 1930s.


The gas version of the same stove.

 
The wood/coal range that they were manufacturing at
that time.


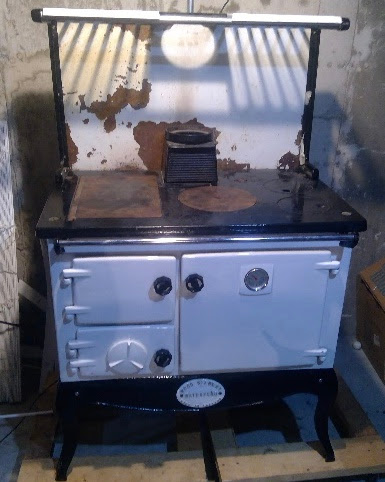
The dual-fuel range that Monarch made for many, many
years. This stove went through many different iterations
over the nearly forty years that it was manufactured.  This
was truly a dual-fuel range in that you could cook on the 
surface with heat from a wood or coal fire or with electricity.
The single oven was heated with either the wood or coal fire
or electricity or a combination of both.  If your wood fire
wasn't hot enough to heat the oven to baking temperature, 
you could supplement that heat with electricity.


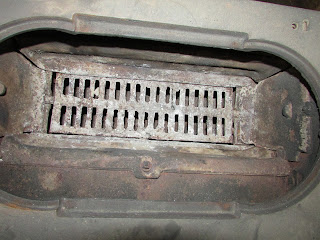
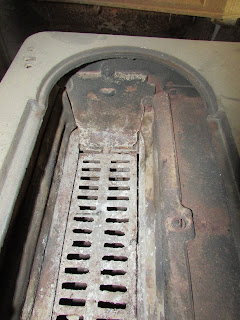
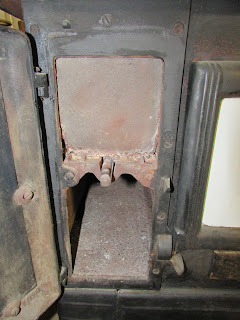
Information about the woodburning firebox, clearances,
and the waterfront to heat running water.

I've not personally seen any of the ranges advertised in this brochure up close, but the earlier versions of these stoves were high quality appliances with a high standard of fit and finish.  If any of you readers have had or are currently using any of the ranges pictured in this post, please fill the comments section with your opinions about them and whatever other information you can share.

Friday, August 12, 2022

Readers' Cookstoves Post VII

Brett, a longtime blog reader and fellow Midwesterner, has become a great email friend over the last few years.  Though he heats his home with a Kitchen Queen, he completed the restoration of a Waterford Stanley cookstove earlier this year and shared the following account with me and gave permission to share it with all of you.

Waterford Stanley Cookstove

We heat our home with a Kitchen Queen 380 cookstove.  We live in northern Indiana and our house is a 2200 cu. ft. ranch.  The Kitchen Queen in the basement does an admirable job of keeping the house warm.  When it is very cold and/or windy, we have a small Hearthstone stove in the living room to help the Kitchen Queen out.  We do almost no cooking on the Kitchen Queen.


All that, notwithstanding, this article is not about the aforementioned stoves.  It is about our Waterford Stanley cookstove.  I recently renovated this stove and this article is about that renovation.  Note: we have never fired this stove.


Background

From what I have been able to find, the company that became Waterford Stanley began manufacturing cookstoves in 1936.  I have seen at least one claim on the Internet that the poster’s Waterford stove was “antique.”  In another post, someone claimed her Waterford Stanley cookstove was made in “the late 1920s.”  That seems a little impossible.  I am less sure about this, but the best estimate I have is the company began exporting cookstoves to the U.S. about 1982.  I do not know how old our stove is, but I am guessing it was new in the late 1980s.


Our Stove

I purchased the Waterford cookstove in March of 2016.  When I purchased it, the stove was in rough shape, as the following photos show.


Everything shown in the above photos was included.  A new water jacket was also included.


Despite the rough appearance, the stove, from the hob (cooking surface) down, was in pretty good shape – with the exception of the sheet metal side panels.  The left side panel is shown in the figure below.  The discoloration toward the bottom is rust.


I had a variety of plans when I bought the stove, and more came to mind along the way.

  • I wanted to replace the “platerack” (the slotted warming shelf) with a warming closet.
  • I wanted side shelves.
  • I wanted the option to burn coal.
  • I wanted a plurality of hooks available for hanging tools, trivets, etc.


For the warming oven, I made a pair of new standards using one-inch square tubing.  I had a local welding shop make a stainless steel backsplash for me.  I also had them build a warming oven, which I did not use, as detailed, below.


I purchased a pair of cast iron grates from Tractor Supply to use as side-shelves.  To support the side shelves, I had to fabricate some bracing members.


The first major hitch came when I had my new parts porcelain coated.  The job was not done very professionally.  The owner of the porcelain coating business claimed many of the parts would not take a porcelain coating due to being inferior quality steel.  The warming oven was coated in black, whereas I had specified white.  The backsplash and side-panels came back terribly warped.  The standards were coated in the right color and were not too badly done.  The cast iron side-shelves came back looking very good.  I ended up using the standards, backsplash, side-panels, and the side-shelves.  The company did not coat the braces for the side shelves, so I had to paint those.


In considering what to do about the warming closet, I found that Margin sold a package comprising a warming oven, backsplash, and standards.  I reached out to Jim R. who operates the woodcookstovecooking blog, and he was very helpful in providing me Margorie’s warming oven dimensions.  Based on those, I decided to order a white warming oven assembly to substitute for the miscolored one I already had.  The overall width of the Margin warming oven is greater than the width of the Waterford stove, so I stripped off the Margin standards and backsplash and used my own.  Because the Margin backsplash extends up to form the back of the warming oven, I had to fabricate a replacement back for my installation.  I used stainless steel for that purpose.


As you can see in many photographs on Jim’s blog, the flue exiting Margin’s stoves is oval in cross section.  So the hole in the bottom shelf of the Margin warming oven is also oval-shaped.  Waterford Stanley stoves, on the other hand, make use of a circular flue.  I had considered reshaping a flue pipe to pass through the warming closet, but I chose, instead, to cut the lower shelf of the Margin warming closet.  The shelf is porcelain coated, making cutting it a challenge.  To overcome that challenge, I made a clamp for my die grinder, and welded a short piece of rod stock to the bottom of the clamp.  Then, I drilled a board and put the board under the lower warming oven shelf.  The rod engaged in the hole and the die grinder could pivot around that axis of rotation.  The next two photos illustrate the die grinder with its clamp.  In the first one, the rod is engaged in the hole in the board.  In the second, the rod can be seen on the right side of the photo.  With that, I was able to cut an arc and make room for the circular flue.  In the third photo, below, the modified hole in the bottom of the warming oven is illustrated.  A flue pipe is shown passing through that hole.


The top shelf of the warming oven already had a hole permitting the circular flue to pass.  This facet was introduced by Woody Chain of Obadiah’s Woodstoves.


I ordered all the parts for converting to coal from Lehman’s Hardware in Kidron, Ohio.  Those included firebrick, a cast iron frame with a gate just inside the firebox door, and a coal riddling grate.  Although these stoves seem to hold up very well, one of the things that does, occasionally, go wrong is the cast iron firebox lining breaks.  Replacements are still available, but very expensive.  So I decided I would build forms (a few of which are shown in the first illustration, below) so I could cast my own refractory cement firebrick (see the second photo, below).  I used the firebricks from Lehman’s as patterns.  A new, complete set of cast iron liners would run over $1100, today.  I can cast a full set of refractory cement firebricks for less than $50.  Also, if I choose to burn coal, I would be closer to being ready for that with the firebox lined with firebrick.  At this time, my plan is to use the stove with the firebrick installed.  I still have the cast iron liners that came with the stove, and they are in good condition, so I can revert to them if I decide firebrick is not the way to go.


I removed the hob (cook-top).  The stove cement in all the seams had long ago failed, so the stove would not have been air tight.  I sealed up the seams inside the stove, and after I had cast the firebrick, I recemented the hob into place.  Hopefully, it is airtight, now.


To brace the side shelves – shown below – I used half inch solid square stock, pivotally connected to the side shelves and then pinned to cross-braces between the stove legs at each side of the stove.  I had to drill the legs to provide a way to attach the cross braces.  The legs, like most of the rest of the stove, are porcelain coated.  I made a jig that allowed me to drill, using a diamond drill bit, from both sides of the leg, eliminating the porcelain coating in a circle 5/16” in diameter so I could use a high-speed drill bit to drill the cast iron.  It all worked well.


The trivets, attached to the backsplash, were an eBay find.  I drilled the backsplash for them before I had the backsplash porcelain coated.  Because the backsplash was so badly warped after it was porcelain coated, I made some vertical braces extending the entire height of the backsplash.  I then screwed the trivets to the braces, thus straightening the backsplash and providing very stable anchorage for the trivets.


Also from eBay, I purchased two cast iron oven racks that fit the Stanley.  The two lower racks in the photo are from eBay.  The top one is original to the cookstove.  These cookstoves came with one cast iron rack and one sheet metal shelf that was to be inserted above the cast iron rack.  Our stove came to us with both.


There are two cookie sheets in the next photo, though it may be hard to tell.  I purchased two pieces of 14 gage stainless steel sheet.  I bent one edge of each up about 45°.  They are made to slide into the oven without a rack to support them.  The material is sufficiently heavy so the cookie sheets will not sag, and their dimensions are such that they engage the same guides that support the cast iron racks.  I made them so they can be inserted frontwards or backwards – so they can be rotated to deal with higher firebox-side temperatures, when necessary.


Online, it is common to see cookstove tools – lid lifter, poker, soot rake, etc. – sitting on the warming shelf or in the warming oven, or just in the way, somewhere.  I wanted a place to store these items so they will be out of the way, yet accessible.  So I fabricated a set of hooks to hang beneath one of the side shelves, as shown, below.  I also made hooks for the back of the warming oven (not shown).


For the most part, this was a fun project.  We look forward to using this Waterford Stanley cookstove someday.


After reading everything that Brett sent, two things are abundantly clear: a) He and his wife have a beautiful and unique cookstove to use, and b) Brett has a very useful set of skills that I only dream of having!


I have heard very good things about Waterford Stanley cookstoves, and when I was at Lehman's last and had a chance to examine one, I was quite impressed with the standard of workmanship that went into these ranges.


Thanks, Brett, for your contribution to my blog!

Still Cooking with Wood

I'm not dead.

I wonder how many blogposts I've started with that sentence.  

No matter.  I'm not dead, just busy.

Never fear, though.  I am still cooking with wood.

I've been using the Hayes-Custer cookstove out in the summer kitchen several times per week.  With the exception of a batch of ketchup and tomato juice, I've done all of our canning so far this summer out there, too.  

In the picture below, you can see my red cast iron skillet with a batch of chicken frying in it.  Potatoes are simmering in the taller Saladmaster kettle on the back of the stove, and a vegetable is steaming in the small Saladmaster saucepan on the far right side in front of the teakettle.

Astute Saladmaster fans will recognize that both of those pans should have long handles on them.  My grandmother purchased these pans in the 1960s, and they have been well-used.  The handles had started falling off before I inherited them, but I come from a long line of cooks who have continued to use cookware with missing handles, and I'm not about to get rid of a perfectly functional piece of Saladmaster just because the handle is no longer there!

Due to the high price of propane, I have been studiously avoiding using it for cooking purposes since we quit firing the Margin Gem on a regular basis back in May.  Thus, any cooking not done on the Hayes-Custer has been done on an electric hot plate or on the vintage electric stove we have in our basement.  To date, the electric rates in our area have not risen, but I imagine that may just a matter of time.  We do have to use propane for the baking we do for the Monday Markets, however.  

I don't want to start a political debate here, but I have been following the prices of propane and heating oil across the nation, and I predict that a lot of wood is going to be burned to heat homes this coming winter.  Because of that, I just want to take this opportunity to once again tout the benefits of a woodturning cookstove.  These amazing appliances are made to cook and bake, but they can also heat your hot water and warm your home, and they can do it very economically.

Of course, along with wood heat comes concerns about safe installations, chimneys, insurance, and in some places zoning regulations.  Please remember that with the exception of the zoning rules, the other concerns are surmountable and, in my opinion, easily offset by the cost-savings of heating with wood.

Another benefit of the woodburning cookstove is your increased independence.  If you have any means whatsoever of gathering your own fuel, you are much less dependent upon whatever other energy systems the majority of Americans use to prepare their food to eat.  In this day and age, I feel that is very important, and it contributes greatly to my peace of mind.  Because you can easily waterbath or pressure can on a cookstove, you also have the means to preserve food too--so long as you have access to water and the necessary supplies.

All right, I'll get off my soapbox now as I need to get outside and shut up my chickens.  

Sunday, February 27, 2022

Answers to Questions about the Montgomery Ward Economy Cookstove

I've received a couple of comments from readers who have Montgomery Ward Economy Cook Stoves just like the one my brother has.  One stove is missing the oven cleanout door, and the other's grates are disassembled.  Thus, I've had requests for pictures of Kevin's stove.  

The first picture that you see is the inside of the firebox with the left side of the stove at the top of the frame.  You can see all four of the firebox liners win place as well as the dump grate.


The next picture is taken while standing at the front of the stove to provide a better view of the rear firebox liner.


The picture below is taken from behind the stove and shows the front firebox liner.


This picture is also taken from the rear of the stove so that the flue path is on the left.


Below, you see what is behind the firebox door.  Kevin's stove does not have an ash pan, but I imagine the stove originally had one.  You can also see how the central pin on the dump grate rests in the frame.


Now, the pictures below show the door that covers the oven cleanout.  The first picture is a sideview which shows the lower part of the door.  The door is made of cast iron, and the weight of the horizontal lower portion is what holds the door in place when it is in the opening beneath the oven door.


This is a view of the front of the door.  This is what is visible when it is in place on the front of the stove.


The final picture is of what the back side of the door looks like.  All of this is inside the stove when it is in place.


You can see more pictures of this stove at this post, and you can see it in use in this post and this post.

I hope this helps!


Sunday, January 30, 2022

Bread Pudding Baked in the Wood Cookstove

I try very hard to control food waste around here.  With a farm dog, a pile of barn cats, and a flock of chickens, there isn't much beyond a few vegetable scraps that doesn't get consumed by someone or something.  However, I think of feeding leftovers to our animals as wasting them, so I am always on the lookout for ways to turn leftovers into something different for their second appearance on our table.  Bread pudding is one of those wonderful comfort foods that I really enjoy, and it is a great way to convert stale bread or rolls into something new.

I like bread pudding best when it is made with old cinnamon rolls, and that is what you will see in the pictures below.  The best bread pudding is made with sticky rolls or rolls that had maple frosting on them. About six 3" x 3" cinnamon rolls torn into shreds are shown in the red and white bowl, two of them were sticky rolls.  Set them aside for a minute while you take care of the wet ingredients.


I always use seven eggs and start with about 3/4 cup milk and a splash of vanilla.


Beat the eggs and milk and vanilla together until well combined.


I pour the egg and milk mixture over the dry shredded rolls, add a couple handfuls of raisins and begin gently mixing it all together.


I add milk until the mixture is wet enough to be as soupy as what you see in the picture below.


Next, I transfer all of it to a greased baking dish.


Slide the dish into a moderately slow oven (about 300 to 325 degrees F).  Don't let your fire get too brisk.  My mother-in-law bakes her bread pudding in a bain-marie, and one could certainly do that for this pudding too. 


Bake until the middle of the pudding is set and a table knife inserted near the middle comes out clean.


You will note that except for the topping on the two sticky rolls, there was no sugar added to this pudding.  Therefore, when it was still warm from the oven, I poured a couple tablespoons of leftover frosting on the top, and then just before serving, a little leftover caramel rum sauce which had been using up valuable real estate in the refrigerator for months was drizzled on top.


In my opinion, this is a dessert that is fit for a king, and the main ingredient is something that could have just been thrown to the chickens.  Let me know in the comments how you make your bread pudding!


Sunday, January 9, 2022

Iowa State University's Minnesota Wild Rice Soup

When I was a student at Iowa State University back in the mid-1990s, the school's food service system in the dormitories was outstanding.  The food was truly excellent, and most of it was made onsite at the various dormitory complexes.  In retrospect, the variety available to us was amazing, too.

At that time, any student who ate at the dining hall could request any of the recipes for the foods we were served.  After eating this soup for two years and loving it from the start, I marched myself into the kitchen one day and asked for the recipe.  I'm so glad I did!  I have a niece and nephew who have been part of the dormitory system at ISU within the last two years, and they tell me that this soup is no longer served there.  I find that very sad because this is my favorite soup of all time.

The recipe that the food service people gave me was in huge quantities, of course, but I gave the recipe to my aunt Ellen, who is a fabulous cook, and she reduced it to proportions that are manageable in a home kitchen.  However, as always, I have altered the recipe since then to make it a little simpler and easier to make; however, the flavor is exactly the same as what we ate at ISU.  Here is what you need to do:

1. Bring four cups of chicken broth to a boil directly over the firebox.  I've used homemade broth, store-bought canned broth, and broth made from bouillon paste or cubes.  In the pictures below, you see four cups of water with four Herb Ox chicken bouillon cubes in them.


2. To the boiling broth, add 1/2 cup white rice and two or three tablespoons of wild rice.  I used three in this batch, and I prefer that amount.


3. Cover the broth and rice mixture with a tight-fitting lid.  

4. While the rice and broth are boiling over the firebox, chop a scant cup of onion, a stalk of celery, and a carrot into small pieces.


4. Add the onion, celery, and carrot to the rice and broth.  By this time, some of the liquid will have cooked off and been absorbed by the rice, and you need to begin watching the soup kettle carefully.  Keep your teakettle of boiling water handy because I have never made this soup but what I've had to supplement the liquid with water from the teakettle.  You can see in the picture below that I also had to move the kettle away from the fire.  Stir this occasionally, adding water as needed to keep it from sticking to the bottom of the soup kettle.

5. While the rice and vegetables are cooking, melt four tablespoons of butter over a cool part of the cooktop.


6. Sift six tablespoons of all-purpose flour (1/2 cup minus 2 tablespoons).


7. Move the melted butter directly over the firebox, add the flour to it, and cook it into a roux.


8. I didn't get any pictures of this, but once you have cooked the roux, remove it from the heat.  Measure 3 3/4 cups of milk.  Stir enough of this milk into the roux to make it into a white sauce.  When the carrots are soft, add the remaining milk and the white sauce to the rice, broth, and vegetable mixture.  

9. At this point, add two tablespoons of slivered almonds and 1 1/2 cups of cubed ham.  (I just add a whole one-pound package of ham because the few pieces of ham that are left always spoil in the refrigerator before I get them used.)  The ham and the almonds add a surprising amount of flavor, and the almonds add a nice crunch to the soup.


10. Move the soup kettle back over the firebox and return everything to a boil while stirring constantly to prevent it from scorching.

11. At this point, season the soup with a dash of pepper, a couple dashes of celery salt, and a couple dashes of garlic salt.  Be very careful about not over salting as there can be quite a bit of salt in the chicken broth depending on what kind you used, and the ham adds salt, too.


12. Once the completed soup comes to a full boil again, it will have thickened too, and it is ready to serve.

Since our stovetop was cluttered with our teakettle and another pot of water to add humidity to the air in the house, I put the soup kettle up on a trivet to keep it hot while I made some toast to serve with the soup.

You can see the finished soup in the picture below.  It is fantastic!  As you can tell from the description, the person cooking this soup is constantly occupied with the process for a good forty minutes or so, and with the ham, wild rice, and almonds, I wouldn't call this an economical dish, either.  Thus, I don't make it often, but when I do, it is worth every bit of time and money.