Saturday, April 15, 2023

Cole's Hot Blast Ranges and Cookstoves

In my occasional trollings through Ebay, I sometimes run across some interesting cookstove ephemera that I want to share here on the blog. Tonight, we have a catalog from the Cole Manufacturing Company of Chicago, Illinois.  There is not date on the catalog, and a search of the Internet did not yield much information about this particular stove company at all.  However, I did find a site that said that the company closed down around 1920.  That information coupled with images from their 1916-1917 catalog, which was for sale at a different antique site, cause me to date this catalog at around 1920, thus making it one of the company's last.

The cover of the Cole catalog.

I've blown up the next view large enough that I think you'll be able to read it yourselves.  I'm entertained by the text on the left side and wonder whether there was some kind of "energy crisis" at the time that caused the price of coal to skyrocket like the price of heating oil did last fall.  There may not have been anything like that going on, though, as fuel economy is a topic often addressed in sales brochures for wood/coal cookstoves no matter the date of their publication.


Now, the next pictures are the ones that really caught my eye for this brochure.  Anytime I see a model of wood cookstove with the oven located somewhere other than the traditional spot to the right or left of the firebox, I am intrigued.  Before purchase, I think I had only seen a picture of the model on the left, and I couldn't help but think that this stove must have been a source of great frustration to those gallant souls who tried to cook on its stovetop.  You will note the barrel-shaped firepot at the base with four cooking lids arranged over its top.  This configuration is quite similar to the old-fashioned "laundry stoves" that were used to heat a pair of wash boilers before that advent of hot-running water.  

When I was in my very early teens, I purchased one of those laundry stoves at an antique store and hooked it up to an abandoned flue in the old school bus carcass that used to be here on our farm.  My brother and I had many, many fires in that stove while we cooked a variety of grass soups, popped field corn, and various other concocted "foods."  Although we never cooked any real foods on that stove, one of the things I learned quite quickly was that it didn't have the range of cooking temperatures that the surface of a cookstove has.  It was hottest over the center of the firepot, but beyond that, each of the four lids were of equal temperature.

I'm sure it would have been the same across the cooktop of the stove in the left picture.  The cook would have had to employ a variety of trivets and heat diffusers to create the varied temperatures that are needed for cooking most meals.  You may even notice that the text brags about this cookstove's room heating ability more than its ease of use for cooking.


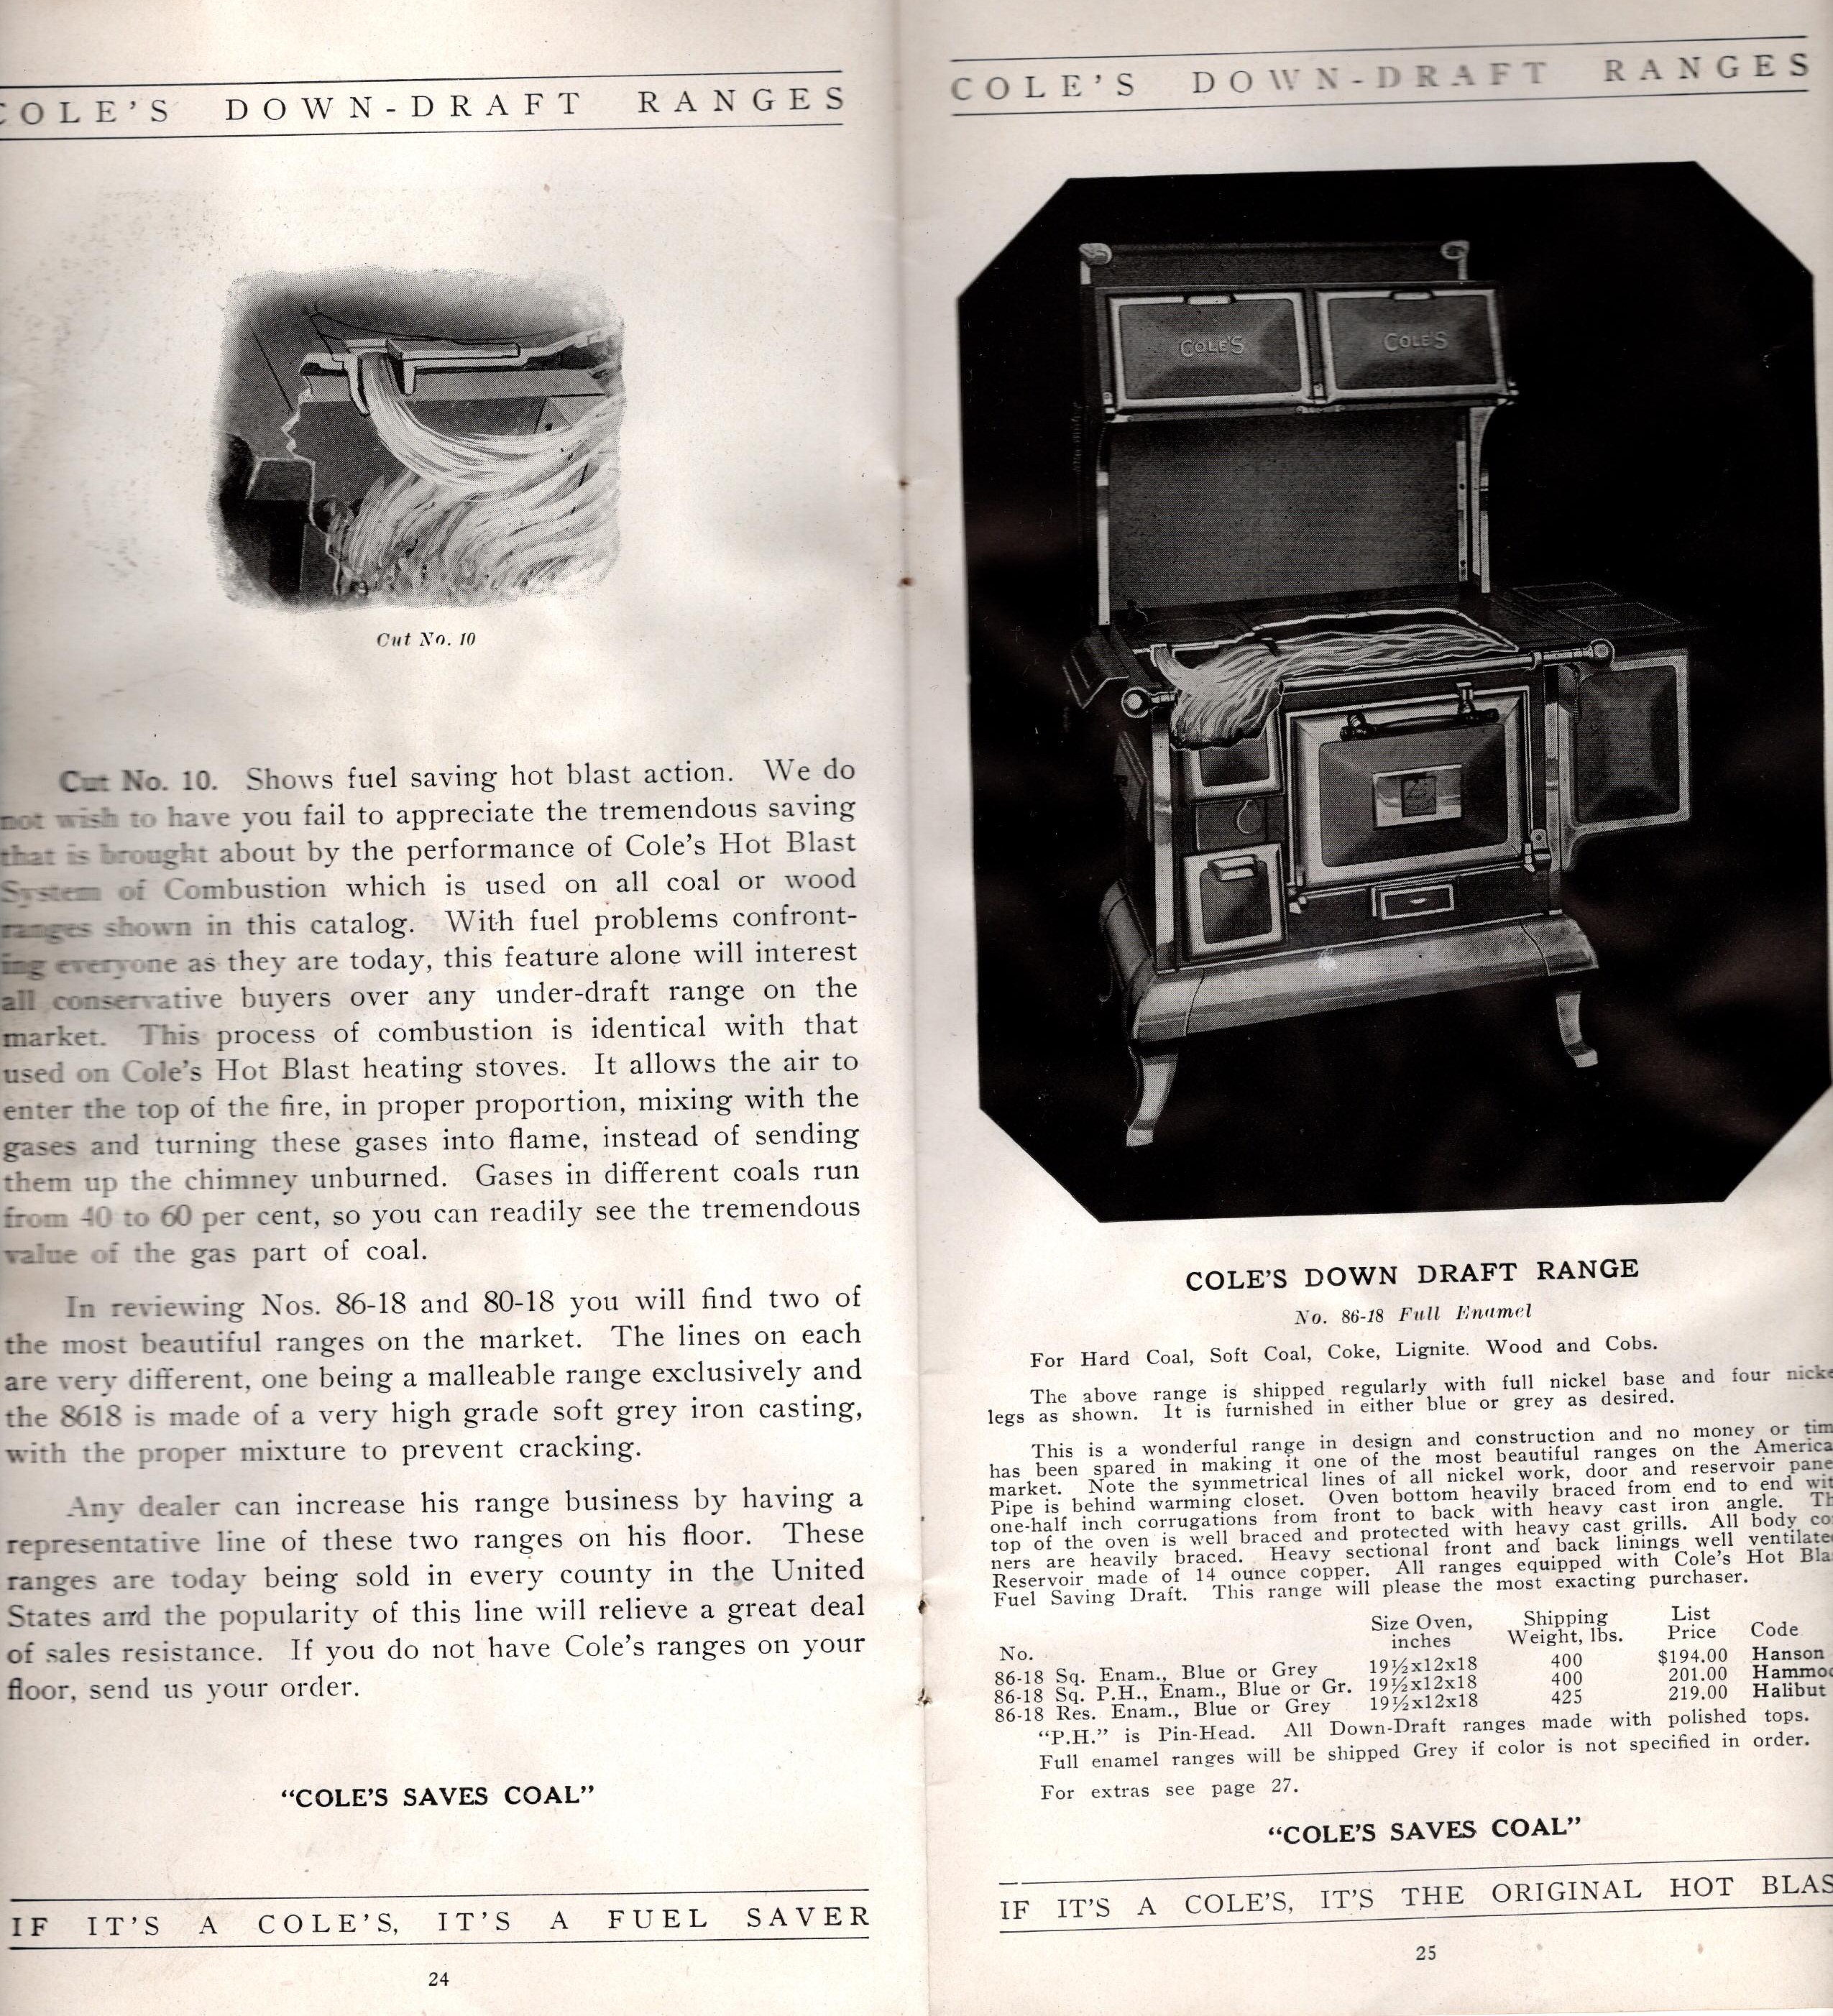
The cookstove on the right in the scan above seems to have the answers to all of my suspicions about the one on the left.  You can see in the picture below, that the firebox is only at the front part of the base, thus creating a cooler surface at the back of the stove.  Granted, this still would have been a bit of a challenge because it wouldn't have been a lot cooler than the two front lids which are directly over the firebox, but some temperature difference would have existed.


Though this cookstove only had four cooking lids, I wonder if the high oven would have been bigger than the ovens on the little cookstoves that engineered like the one below.  I would think that it would certainly have been more even-heating with the flue gases hitting it squarely in the bottom rather than having the firebox occupy about a quarter of the surface area of the oven box.


That said, I wonder if "Cole's Square Base High Oven Range" would have been a popular choice with apartment dwellers of that time period.  This stove would have had a nice sized square oven while occupying a much smaller footprint in the kitchen than standard style range.

Speaking of standard style ranges, I find the range on the right side of the scan below to be extremely attractive.  The clean lines and angular trim just scream 1918 or 1919, and I think it is beautiful.  I might even use the word "masculine" to describe its solid, reliable appearance.


The next pages are interesting because they show Cole's line of "down-draft ranges."  As you can see, the Cole Manufacturing Company had designed a range where the drafts delivered air into the top of the firebox (hence the name "Hot Blast").  They advertise that this new technology is what allows their ranges to be so fuel-efficient.  What fascinates me about this is that delivering air into the top of the fire has been proven to create the most efficient combustion of wood, but not necessarily coal.  For this reason, the Margin Gem and other wood cookstoves that are being manufactured today use this technology, but they tout it as something that was discovered within the last thirty years.  It appears that the Cole Manufacturing Company was far ahead of its time.  

As you can see, Cole's offered three styles of downdraft ranges.


The rest of the catalog features their heating stoves, furnaces, and schoolhouse heaters--most of which feature the down draft air delivery system.  I would love to know what caused this company to close its doors so long before the Great Depression hit, so if you have any information to add, please do so in the comments section below.


Sunday, March 19, 2023

A Couple of Family Recipes Specific to the Wood Cookstove: Laundry Soap and Boiled Potatoes

Back in 2010, one of my distant cousins on my mom's side of the family decided to put together a cookbook of the recipes from my Great-Grandma Ruth's family.  Grandma Ruth was the second of nine children, and she came from a family who knew their way around a kitchen.

The cookbook was a grand idea, and I find myself going to it for several family recipes.  While I was searching for the recipe for Aunt Tod's Lemon Filling to spread between the layers of a sponge cake I baked yesterday in the Margin Gem, I ran across a couple of treasures that I'd like to document here.  Both of these recipes have specific instructions for how to use the wood cookstove to accomplish the desired result, and they both come with stories that give today's reader some insight into what life used to be like in rural southwest Iowa in the first half of the twentieth century.

The first recipe is for laundry soap and comes from a book that my Great-Great Aunt "Tod" had.  It reads as follows:

4 pounds grease or cracklings

1 can lye

2 quarts water

Mix.  Let stand on back of stove, preferably the reservoir, from one morning until the next.  Stir in a tea kettle of hot water or until the consistency of honey.  Pour into a mold.  Let cool and cut into bars.


Aunt Tod's daughter remembers her mother making homemade soap in a big iron cooking pot over a fire outdoors.  That would have been as late as the 1940s or early 50s.


The second recipe comes with the following story written by my grandpa's first cousin:

"A three-ring recipe book was given to Mom for a shower gift by friends of hers.  Guests were to write recipes in it, and it was presented to her.  I have the book now, and I often read this page and laugh over it.  I wonder if the shower guests did too.  Date was June 19, 1930."

I can just see a group of farmwives in their best cotton summer dresses and with their bobbed hair done in waves gathering together to celebrate Aunt Martha's upcoming wedding.  A delicious homemade cake waited to be cut and placed on the hostess's best china while the women laughed at jokes about a bride's lumpy potatoes or her not knowing how to boil water.

The following is what was handwritten on the page, complete with the errors still present:

Boiled potatoes

        will serve nine

     Go to your potatoe [sic] patch or basement and get thirty five large potatoes and wash in water.

     Now get a basket of cobs and kerosene over a few of them, before you put them in the range.  put in the kitchen range.  Get a match and light the fire.  First being sure that your drafts are open, as the fire may go out if they are closed.  Now go to the pump or windmill and get a bucket of water.  Fill the teakettle and put over the fire.  Close the drafts.

     Next peel your potatoes, being sure to get all the eyes, unless Art [her fiancĂ©] likes eye soup for dinner. Wash the peeled potatoes and pour off water.  By this time it will be eleven-fifteen.  It is now time to pour the water which has reached the boiling stage, on the potatoes.  Salt to taste but don't burn your tongue.  Remove from fire when done.  They will be sure to please the hungry better half.


Notice the mention of the ever-present teakettle in both of these recipes. These bits of history are reminders of the hard work that filled the "good old days."  Speaking of that, Nancy and I are headed out to the wood splitter, so I'll sign off for this afternoon!

Monday, February 20, 2023

Homemade English Muffins on the Wood Cookstove

My dad and I have always enjoyed English muffins.  I remember Dad making English muffins from scratch a couple of times when I was young. I remember one time particularly well because we invited my paternal grandparents (and also our next door neighbors) down for supper so they could enjoy them with us.  We ate Dad's English muffins hot off the griddle, slathered with butter and homemade black raspberry jelly.

Years ago, I made English muffins using the same recipe that my dad used, and while they were delicious, they were dense and a bit on the rubbery side.  I remember that an engaged couple came to the house while I was making them.  I was going to be the organist at their wedding, and they had come to choose the music.  The muffins were ready to be baked as they were leaving, and I mentioned to them that I was disappointed in the texture.  The bride-to-be, in what appeared to me like an exaggerated attempt to impress her future husband, was telling me that I needed to have beaten the batter very hard for quite a while so as to get air into it.  She was sure that I would then have the nooks and crannies in the English muffins that I desired.

Well, fast forward nearly twenty years.  I've done a great deal more baking with yeast doughs, and I can tell you that the advice the young lady gave me would have worked for cake batter, but not English muffins.  With yeast doughs, to get nooks and crannies is an entirely different matter.  First, you don't want to work the dough for a long time because that activates the gluten in the flour, which will create a finer crumb texture.  Secondly, you want a very soft dough so that large bubbles can easily form; and finally, you want the dough to rise as quickly as possible because that will create bigger bubbles of gas too.

Thus, when I came across a recipe which was such a soft dough that the muffins had to be dropped rather than rolled and cut out, I knew I was getting closer to my desired result.  I've tweaked the recipe that I found and gotten the results I desired.  Now, when I buy English muffins in the grocery store, it will be for the sake of convenience, not because I can't make an equally desirable product.  What's more, for reasons that will be obvious in a moment, this is recipe that takes full advantage of a wood cookstove.  Here is what you do:

Into a large mixing bowl, pour one cup of warm water.  To it, add 2 tsp. of yeast, 1 tsp. of sugar, and a 1/2 tsp. of salt.

You can see that Granny's ugly avocado green Sunbeam Mixmaster
that I inherited 28 years ago and was going to "use until it quit" 
still hasn't quit.  In the picture above, it is outfitted with Sunbeam's
answer to the Kitchenaid dough hook.

While the yeast is proofing, put a tablespoon of butter in the measuring cup you used for the water and put it into the warming oven of the cookstove to melt.


By the time the butter is melted, the yeast and water mixture should be foamy.  Add the melted butter to it.


To the liquid mixture, add 2 cups plus 2 tablespoons sifted all-purpose flour.  Mix just until dough is stringy.


Scrape the dough from the edges so that it is shaped into a ball in the middle of the bowl.


Cover with a plate and put in a very warm place to rise.  This is key to getting the big nooks and crannies. Usually, I think the warming oven of the Margin Gem is a little too warm for yeast doughs to rise there, but it is perfect for this because you want this dough to rise quickly to achieve those big bubbles.


Let use until double in size.  It will be EXTREMELY soft dough.


Sprinkle cornmeal lightly on a jelly roll pan.  Using a greased ice cream scoop (I sprayed mine with Pam), drop the muffins onto the cornmeal in the size you desire.


Sprinkle the tops of each muffin with a little more cornmeal and return them to the warming oven door to rise quickly again.  This is why a wood cookstove is the perfect tool to make English muffins.


Just a little before you think the muffins will be ready to bake, preheat a griddle and melt a tablespoon of butter on it.  

Depending on how hot your fire is burning at this point, you may need to do this directly over the fire or slightly away from it.  Initially, my fire was quite hot, so my griddle started to the right of the fire.  However, just before baking, I put a couple of large split pieces on the fire that didn't take right away and cooled the stovetop a little.  That is why you will see my griddle move in the pictures below.


When you are ready to bake the English muffins, quickly slide a pancake turner under them to pick them up, using the cornmeal as the means to slide them onto the turner without deflating them.  Place them on the hot buttered griddle and bake until the bottoms are nicely browned and set enough that they can be turned.


Turn them when you can and continue baking on the other side until as brown as the first side.  You want to be sure to bake these for quite a while to get as much moisture out of them as possible, and they can become quite brown without being burnt.  Just watch them carefully.


When done, remove to a cooling rack to cool completely.


When the muffins are completely cool, you can split them and they are ready for toasting.  To toast them on the wood cookstove, I lightly butter the inside of the muffin and place them buttered side down on a small griddle directly over the fire. 

An English muffin half, toasting buttered side down.

The same English muffin turned so that the outside
is toasting and the toasted, buttered side is now up.

I slathered a dab of my homemade strawberry preserves on the buttered side, and it was wonderfully tasty!  These keep well in a plastic bag on the countertop until you are ready to toast them.

Saturday, February 18, 2023

Meals out of a Ham

Since there are only two of us in our household, when we bake a ham, there is a lot of leftover meat.  Nancy doesn't like leftovers as a general rule, but she doesn't mind having leftover ham because we turn it into so many other very different dishes as we work to finish it.

The first thing she always asks for is a ham pot pie.  I've never heard of anyone else making one of these, so maybe they are a creation that is unique to us.  The process for making this pie is almost identical to what I do to make a chicken pot pie, which I have written about in this previous post.  I make gravy out of the drippings from the bottom of the roaster, adding some heavy cream and mixed vegetables.  Nancy cuts a few slices of ham into chunks, and everything goes into the meat pie pastry that I blogged in the other post.  The only real difference other than the type of meat and the color of the gravy is that we like to cover the top of the meat filling with Swiss cheese before adding the top crust.  Also, because of the salt that is already in the ham and the cheese, we add no additional seasoning to the gravy.

The Swiss cheese (two different kinds) on top of the
meat filling, waiting for the top crust to be added.

There is nothing quite like the feeling of taking a flaky
meat pie out of the oven of a woodburning cookstove. 
Loaves of golden brown bread and meat pies just make
a woodburning cookstove cook's heart sing.

The finished potpie removed from the oven to the
countertop for serving.

Ham pot pie.  Delectable!

The next meal might be something really fast.  One of the things I like is ham and sweet potatoes.  In the picture below, I had just used a can of sweet potatoes, some pecan syrup leftover from sweet rolls, and a couple of slices of ham placed on top.  I covered it and let it boil until all was hot. Some leftover green beans were warming in the small saucepan up next to the stovepipe.


Nancy's other usual request is ham and scalloped potatoes.  For years, I would occasionally attempt homemade ham and scalloped potatoes with no good results.  Then, a couple of years ago, I ran onto a video from Brenda Hall of the Youtube channel Appalachian Cooking with Brenda.  I now make scalloped potatoes and ham just the way she teaches in this video.    

If you've ever made scalloped potatoes, you know that they take a long time in the oven to get the potatoes cooked through.  Brenda starts her potatoes on the stovetop to shave some of that oven time.  This is a particularly efficient thing to do on a wood cookstove because while the oven is coming up to temperature, you can use the hot cooktop to get the meal jump started.

The pot of homegrown potatoes beginning to cook
in milk on top of the cookstove.  The secret here (as
Brenda continually reminds you in her video) is to 
keep them moving so they don't scorch.

You can see that this boiled over in the oven.  This was the first
time that I've had a really smoky boil-over in the oven of a
wood cookstove.  I shouldn't have filled the dish so full!  After
I saw what was happening, I added the foil and the pie tin to
catch any further spills.

After cutting the ham for the scalloped potatoes, there was not much meat left on the bone, so the hambone and its remains went into the soup kettle that was about half full of water.  I brought it to a good quick boil while the scalloped potatoes were in the oven.  Then, I let it simmer and reduce on the back of the range overnight.  This resulted in about an inch or so of some intense ham broth that was perfect for ham and bean soup--the final dish that came out of this particular ham.

The hambone boiling on the back of the range with the scalloped potatoes
resting on the open door to the warming oven.

Now, I don't know about the rest of the world, but in my particular area of Iowa, ham and bean soup is made with ham broth, Navy or Great Northern Beans, a paltry little bit of onion, carrot, and celery, and a whatever morsels of ham were left on the bone.  I've made that soup before, and I'm told that mine was pretty good, but to me it tastes like dirty water.  By that I mean that it has a distinct lack of flavor and doesn't do justice to the ham, the beans, or the vegetables.

You can see from the photo below, that my version of ham and bean soup is totally different.  I used all of the traditional ingredients, but my beans came in the form of two cans of Van Camp's Pork and Beans, some ketchup, some potatoes (sometime I'm going to try adding pasta instead of the potatoes), and pearl barley. This, for me, is much more satisfying and delicious!  Again, the ham and its broth along with the canned beans and ketchup are salty enough that I added no further seasoning of any kind.

Now, there is one other dish that we love to make with leftover ham, and that is ham balls.  These are a favorite dish in the southern two tiers of counties in Iowa, but an "immigrant" from Mount Ayr brought these up to our area fifty years ago, and they remain a family favorite.  They really deserve their own blog post, though, so you'll have to look for that in the future.

In these days of high food costs, I think a ham is money well spent because of the number of different meals that can be made from it--even the bone was a source of joy to our dog after we had picked it clean of the meat that we could use.  Further, each of these dishes is extremely easy to make on a wood cookstove since no specific times and temperatures are needed for any of them.

Please use the comments section below to let me know what you do with leftover ham.

May your kitchen cookstove fire be burning brightly!