
Brett, a longtime blog reader and fellow Midwesterner, has become a great email friend over the last few years. Though he heats his home with a Kitchen Queen, he completed the restoration of a Waterford Stanley cookstove earlier this year and shared the following account with me and gave permission to share it with all of you.
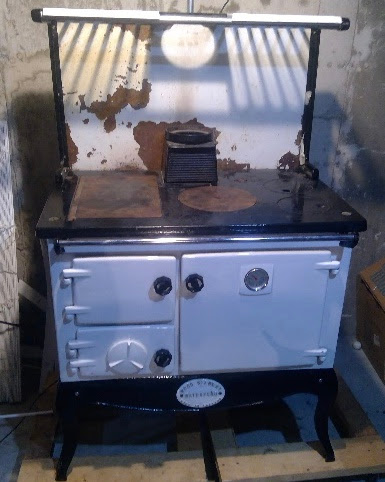
Waterford Stanley Cookstove
We heat our home with a Kitchen Queen 380 cookstove. We live in northern Indiana and our house is a 2200 cu. ft. ranch. The Kitchen Queen in the basement does an admirable job of keeping the house warm. When it is very cold and/or windy, we have a small Hearthstone stove in the living room to help the Kitchen Queen out. We do almost no cooking on the Kitchen Queen.
All that, notwithstanding, this article is not about the aforementioned stoves. It is about our Waterford Stanley cookstove. I recently renovated this stove and this article is about that renovation. Note: we have never fired this stove.
Background
From what I have been able to find, the company that became Waterford Stanley began manufacturing cookstoves in 1936. I have seen at least one claim on the Internet that the poster’s Waterford stove was “antique.” In another post, someone claimed her Waterford Stanley cookstove was made in “the late 1920s.” That seems a little impossible. I am less sure about this, but the best estimate I have is the company began exporting cookstoves to the U.S. about 1982. I do not know how old our stove is, but I am guessing it was new in the late 1980s.
Our Stove
I purchased the Waterford cookstove in March of 2016. When I purchased it, the stove was in rough shape, as the following photos show.


Everything shown in the above photos was included. A new water jacket was also included.
Despite the rough appearance, the stove, from the hob (cooking surface) down, was in pretty good shape – with the exception of the sheet metal side panels. The left side panel is shown in the figure below. The discoloration toward the bottom is rust.

I had a variety of plans when I bought the stove, and more came to mind along the way.
- I wanted to replace the “platerack” (the slotted warming shelf) with a warming closet.
- I wanted side shelves.
- I wanted the option to burn coal.
- I wanted a plurality of hooks available for hanging tools, trivets, etc.
For the warming oven, I made a pair of new standards using one-inch square tubing. I had a local welding shop make a stainless steel backsplash for me. I also had them build a warming oven, which I did not use, as detailed, below.
I purchased a pair of cast iron grates from Tractor Supply to use as side-shelves. To support the side shelves, I had to fabricate some bracing members.
The first major hitch came when I had my new parts porcelain coated. The job was not done very professionally. The owner of the porcelain coating business claimed many of the parts would not take a porcelain coating due to being inferior quality steel. The warming oven was coated in black, whereas I had specified white. The backsplash and side-panels came back terribly warped. The standards were coated in the right color and were not too badly done. The cast iron side-shelves came back looking very good. I ended up using the standards, backsplash, side-panels, and the side-shelves. The company did not coat the braces for the side shelves, so I had to paint those.
In considering what to do about the warming closet, I found that Margin sold a package comprising a warming oven, backsplash, and standards. I reached out to Jim R. who operates the woodcookstovecooking blog, and he was very helpful in providing me Margorie’s warming oven dimensions. Based on those, I decided to order a white warming oven assembly to substitute for the miscolored one I already had. The overall width of the Margin warming oven is greater than the width of the Waterford stove, so I stripped off the Margin standards and backsplash and used my own. Because the Margin backsplash extends up to form the back of the warming oven, I had to fabricate a replacement back for my installation. I used stainless steel for that purpose.
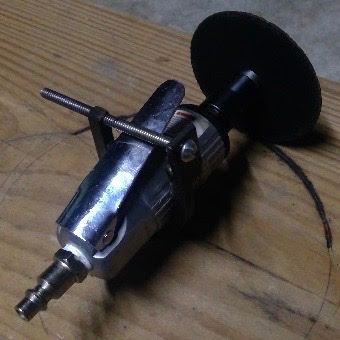
As you can see in many photographs on Jim’s blog, the flue exiting Margin’s stoves is oval in cross section. So the hole in the bottom shelf of the Margin warming oven is also oval-shaped. Waterford Stanley stoves, on the other hand, make use of a circular flue. I had considered reshaping a flue pipe to pass through the warming closet, but I chose, instead, to cut the lower shelf of the Margin warming closet. The shelf is porcelain coated, making cutting it a challenge. To overcome that challenge, I made a clamp for my die grinder, and welded a short piece of rod stock to the bottom of the clamp. Then, I drilled a board and put the board under the lower warming oven shelf. The rod engaged in the hole and the die grinder could pivot around that axis of rotation. The next two photos illustrate the die grinder with its clamp. In the first one, the rod is engaged in the hole in the board. In the second, the rod can be seen on the right side of the photo. With that, I was able to cut an arc and make room for the circular flue. In the third photo, below, the modified hole in the bottom of the warming oven is illustrated. A flue pipe is shown passing through that hole.

The top shelf of the warming oven already had a hole permitting the circular flue to pass. This facet was introduced by Woody Chain of Obadiah’s Woodstoves.
I ordered all the parts for converting to coal from Lehman’s Hardware in Kidron, Ohio. Those included firebrick, a cast iron frame with a gate just inside the firebox door, and a coal riddling grate. Although these stoves seem to hold up very well, one of the things that does, occasionally, go wrong is the cast iron firebox lining breaks. Replacements are still available, but very expensive. So I decided I would build forms (a few of which are shown in the first illustration, below) so I could cast my own refractory cement firebrick (see the second photo, below). I used the firebricks from Lehman’s as patterns. A new, complete set of cast iron liners would run over $1100, today. I can cast a full set of refractory cement firebricks for less than $50. Also, if I choose to burn coal, I would be closer to being ready for that with the firebox lined with firebrick. At this time, my plan is to use the stove with the firebrick installed. I still have the cast iron liners that came with the stove, and they are in good condition, so I can revert to them if I decide firebrick is not the way to go.


I removed the hob (cook-top). The stove cement in all the seams had long ago failed, so the stove would not have been air tight. I sealed up the seams inside the stove, and after I had cast the firebrick, I recemented the hob into place. Hopefully, it is airtight, now.
To brace the side shelves – shown below – I used half inch solid square stock, pivotally connected to the side shelves and then pinned to cross-braces between the stove legs at each side of the stove. I had to drill the legs to provide a way to attach the cross braces. The legs, like most of the rest of the stove, are porcelain coated. I made a jig that allowed me to drill, using a diamond drill bit, from both sides of the leg, eliminating the porcelain coating in a circle 5/16” in diameter so I could use a high-speed drill bit to drill the cast iron. It all worked well.

The trivets, attached to the backsplash, were an eBay find. I drilled the backsplash for them before I had the backsplash porcelain coated. Because the backsplash was so badly warped after it was porcelain coated, I made some vertical braces extending the entire height of the backsplash. I then screwed the trivets to the braces, thus straightening the backsplash and providing very stable anchorage for the trivets.

Also from eBay, I purchased two cast iron oven racks that fit the Stanley. The two lower racks in the photo are from eBay. The top one is original to the cookstove. These cookstoves came with one cast iron rack and one sheet metal shelf that was to be inserted above the cast iron rack. Our stove came to us with both.

There are two cookie sheets in the next photo, though it may be hard to tell. I purchased two pieces of 14 gage stainless steel sheet. I bent one edge of each up about 45°. They are made to slide into the oven without a rack to support them. The material is sufficiently heavy so the cookie sheets will not sag, and their dimensions are such that they engage the same guides that support the cast iron racks. I made them so they can be inserted frontwards or backwards – so they can be rotated to deal with higher firebox-side temperatures, when necessary.

Online, it is common to see cookstove tools – lid lifter, poker, soot rake, etc. – sitting on the warming shelf or in the warming oven, or just in the way, somewhere. I wanted a place to store these items so they will be out of the way, yet accessible. So I fabricated a set of hooks to hang beneath one of the side shelves, as shown, below. I also made hooks for the back of the warming oven (not shown).

For the most part, this was a fun project. We look forward to using this Waterford Stanley cookstove someday.

After reading everything that Brett sent, two things are abundantly clear: a) He and his wife have a beautiful and unique cookstove to use, and b) Brett has a very useful set of skills that I only dream of having!
I have heard very good things about Waterford Stanley cookstoves, and when I was at Lehman's last and had a chance to examine one, I was quite impressed with the standard of workmanship that went into these ranges.
Thanks, Brett, for your contribution to my blog!
Your blog never fails to impress! The meticulous attention to detail and the comprehensive analysis provided are simply outstanding. Keep sharing such valuable content!
ReplyDeletehttps://www.discountdrift.com/promotions/
This blog post is simply outstanding! The thorough research and the engaging narrative make it both informative and enjoyable. Keep up the excellent work!
ReplyDeletehttps://www.couponsstudio.com/all-stores
Rich History
ReplyDeleteThe background you provided about Waterford Stanley stoves adds so much depth to the story. It's intriguing to learn how these stoves made their way into American homes.
Industrial Dust Cleaner
Centralized Dust Collector
Dual Stove Setup
ReplyDeleteUsing a Kitchen Queen and a Hearthstone in tandem is a clever way to tackle northern Indiana winters. I’d love to hear how they compare in performance.
Fume Scrubber
Dust Collector India
Amazing Craftsmanship
ReplyDeleteEven in rough shape, the Waterford Stanley looks like a beautifully crafted piece. Can’t wait to see the "after" photos!
Industrial Dust Removal India
Cyclone Dust Collector India
Historical Gem
ReplyDeleteThe estimated manufacturing timeline is helpful. It’s remarkable that a stove from possibly the 1980s can still hold so much charm and functionality.
Centrifugal Blowers India
Shrink Packing Machine Supplier
Restoration Challenges
ReplyDeleteI’d love to know what challenges you faced during the renovation. Any tips for others embarking on similar projects?
Shrink Wrapping Machine Supplier
Centrifugal Blower in Delhi
Modern vs. Antique
ReplyDeleteIt’s interesting that you use the Kitchen Queen for heating but not cooking. Did you consider cooking on the Waterford Stanley once restored?
Pulse Jet Bag Filter India
Centrifugal Blower in Manufacturer
Community Knowledge
ReplyDeleteYour research about the Waterford Stanley company is impressive. It’s always fun to uncover the stories behind these vintage items.
Invest in Brands
Dust Collector
Personal Connection
ReplyDeleteThe personal touch in this story makes it even more engaging. Brett’s journey with the Waterford Stanley shows the value of preserving history.
Industrial Dust Removal
Manual Dust Collector
Looking Forward
ReplyDeleteI’m excited to see the completed renovation and to hear if you decide to fire it up! Please share more about its functionality once it's fully operational.
Paint Booth
Pulse Jet Filter India
The structure looks well planned for winter and expedition style camping tent with stove tent with stove
ReplyDelete