Monday, May 28, 2018

Waving the White Flag on the 2017-2018 Heating Season

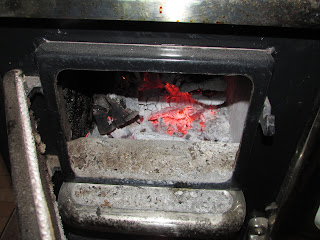
Well, after having a fire in the Margin Gem every day since Sept. 27, 2017, which was when we turned the electric hot water heater off for the season, we finally decided to tie a bow on the 2017-2018 wood heating season this morning.

I know several of you just gasped and shook your head at the discovery that over the last few days we had still been using the wood cookstove daily when our temperatures have been soaring into the upper nineties, even reaching 100 on Saturday.  Other readers who know me just had their suspicions regarding my sanity confirmed with this revelation.

To use the cookstove exclusively for hot water from Sept. 27 - May 27th ties our record which was set during the 2013-2014 heating season. During this time, not only was all hot water heated with wood, but I think all but about five of the meals which were cooked at home were also cooked over wood heat.  One of those five meals was a regular meal a couple of days ago.  The others were just boiled eggs or frozen pizza.

Some of you may be wondering how we were able to use the stove for so long in such warm weather without suffering too much.  Many factors contributed to our endurance:

1) Our century-old farmhouse was designed to have a woodburning cookstove in the kitchen.  This is a major factor in our ability to use the stove in warm weather.  The kitchen has six doors that open into other areas of the house, but all of these except for the pantry doorway can be closed in order to keep the heat out of the rest of the house.  The large east windows are double-hung, so the top sashes can be lowered in order to facilitate heat escape.

The kitchen windows with the top sashes open.

Also, since it is a two-story house and the stairway opens into the kitchen, we can open the upstairs door and let a great deal of the heat escape up the stairs where a fan was positioned in a window at the top of the stairs blowing hot air out of the house.

When our kitchen re-model is finished, yet another way to exhaust heat from the stove will be restored, so stay tuned for another blog post about that.

2) Our house is surrounded by large old shade trees.  Our shade is not as dense as it once was, but we still have a lot of it, and this makes our house stay much cooler in general.

3) We don't have to have a long-running fire in order to have sufficient hot water to meet our needs.  A fire which burns briskly for less than an hour creates more than enough hot water for a good shower in the morning. This also means that I used small pieces of wood which burned hot but not long.

4) We closed the "hyper-heat" reservoir damper and often opened the oven damper so that the stove itself wasn't radiating so much heat into the kitchen.

The reservoir damper in the open position.  When it is closed,
it is in the vertical position.

5) I would also fill the teakettle and our 40-cup coffee pot and put them directly over the firebox while the fire was burning.  These, coupled with the water in the reservoir, supplemented the hot water in the boiler and provided enough hot water to wash dishes and do a little laundry when necessary.  Of course, water in the kettles and the reservoir was used in the wringer washer and in hand washed laundry only.  It would have been difficult to get it into the high-efficiency front-loader. Anyway, heating water in this way absorbed the majority of the BTU's which would have emanated into the house from the cooktop.


6) Though we had some extremely warm days, the nights were still getting cool, so we could pull all of the heat out of the house during the night. Then we would shut the windows in the morning before the outdoor temperature got warmer than the indoor temperature.

7) The weather we have been having has been extremely dry.  This is not a bit good for any of our crops, but it made it so that the high temperatures were more bearable than they usually are in our area of the country.

Q. So what changed between yesterday and today?

A. Last night the outdoor temperature did not fall as low as it has been.  It was 67º outside when I woke up a little before 6:30 a.m.  The living room temperature was still at 77º.  This was only four degrees lower than the high temperature that we observed yesterday afternoon.  I always kind of figure that 70º is roughly our breaking point for comfort.  If the outdoor temperature doesn't dip sufficiently below that during the night,  we are uncomfortable.

Thus, after draining the electric water heater and flushing it out (the water in it always sours), we are back to paying for hot water, and I even broke down and turned on the air conditioning.  I'm feeling pretty weak today, but I'm comfortable!

Now, don't think I won't have anything to blog about over the next few months.  My goal is to get the summer kitchen moved from the end of the driveway up to the north side of the house within the month (we'll see if that happens), and I have a raft of wood cookstove literature to review, too, so check in frequently.  We'll be in touch!

Sunday, May 27, 2018

Cooking Rhubarb/Pineapple Jam on the Wood Cookstove

I like to say that Nancy's grandmother was the Rhubarb Queen.  In her repertoire of spring recipes, some of her most famous foods featured rhubarb.  I've already blogged her Rhubarb Cobbler, and today I want to share her recipe for Rhubarb/Pineapple Jam.  By far and away, this is Nancy's favorite spread for toast, etc., and it is very good. 

Ingredients:
4 cups rhubarb, cut into 1/4" pieces
4 cups sugar
1 can (20 oz.) crushed pineapple
1 package (3 oz.) strawberry gelatin
1 tsp. powdered fruit pectin

1. If you are using fresh rhubarb, combine the rhubarb and the sugar and let set overnight.  The sugar will draw the moisture out of the rhubarb and make it cook faster.  If you are using frozen rhubarb, just be sure to thaw it and and save the juice and this step is unnecessary.

2. Starting directly over the firebox of the wood cookstove, cook the rhubarb with the sugar.  This will come to a boil quickly because there really isn't that much volume to heat.  Once it comes to a boil, you may need to move it away from the fire a little.  Boil the rhubarb and sugar together for 12 minutes.


Rhubarb and sugar cooking together.
3. Add the can of crushed pineapple.

Rhubarb, sugar, and pineapple.

4. Add the gelatin and the teaspoon of pectin. 

All of the ingredients boiling together.
5. Bring the entire mixture back to a boil and boil for one minute.  Remove from the fire.

6. Now you have a few options.  You can pour the hot jam into sterilized jars, and it will keep in the refrigerator for up to a year.  This is what Nancy's grandma did, and we still have the pickle barrel-shaped jars that she used.  We do this sometimes, but I have also put this in jelly jars and water bathed it for ten minutes.

Unfortunately, the sunshine clearly shows that
the rhubarb and pineapple are not very evenly
distributed in this jar of jam.
This jam is excellent on anything, but I think it is particularly good on English muffins.  In the picture below, it is spread on some of our homemade bread.


Hope you are enjoying a good rhubarb harvest this spring!

Tuesday, May 22, 2018

Cheating with Your Wood Cookstove: Broccoli Rice Casserole

I'm totally embarrassed by the recipe that I'm sharing with you today.

It is not healthy.

It is not original.

It is not from scratch.

It is not one made from all homegrown foods.

You've probably all seen it before.

But .  .  .

It tastes SOOO good!

This 1970s-era recipe was one of only two casseroles that my mom could get the three of us kids to eat while I was growing up.  We all loved it, and it was frequently requested on our birthdays when we got to choose what we ate for all three meals that day.  I still really enjoy it, and because of the cooking method, it is extremely well suited to being made on a wood cookstove.

You are going to need the following ingredients:

1/4 cup butter (I usually reduce this to 1 or 2 TBSP.)
1/2 cup chopped celery
1/2 cup chopped onion
1 can cream of mushroom soup
An 8 oz. jar of Cheez Whiz (GASP! I'll talk more about this later.)
10 oz. frozen broccoli
1 cup instant rice

Here is what you do:

1) Build your fire so that eventually you will have a moderate oven.


2) While the oven is heating, gently sauté the onion and celery in the butter in a very large frying pan.  I like to use my Magnalite chicken fryer for this because it has much taller sides, and that prevents spillage on the cooktop. I usually add a sprinkling of pepper to this mixture, too.


3) Once the onion is translucent, add the rest of the ingredients in the order given, stirring after each addition.  You may need to add a little water if the mixture doesn't flow freely, but don't do this until the broccoli has thawed so you know how much moisture it will release.


4) After the mixture has started to bubble a little, pour it into a greased 7" x 12" casserole dish.

5) By this time, the oven should be running at about 350º.  Pop the casserole into the oven for about a half hour.  It should be bubbly around the edges and beginning to brown a little on the top.


6) Remove from the oven and serve.


My mom always served this with our homemade applesauce, and I think this is an excellent combination.  When I was little, Mom would always make hamburgers (sans bun; we never had hamburgers with buns) to go with this as our meat.  Later on, she began to put a pound of cubed ham into the casserole.  This adds a lot of flavor to this and makes it a one-dish meal.  That is my favorite way to make it, but I didn't have any ham to put in it this evening.  If you do put the ham in it, you'll need a bigger casserole dish.  I often use a 9" x 13" dish then.

I have made this casserole with home-canned broccoli quite successfully.  It is a good way to use up a vegetable that many don't find very good when canned.

Now, about that Cheez Whiz.  You can substitute other cheeses or other cheese sauces here as you see fit and your taste permits.  You could also make your own mushroom white sauce and parboil regular rice, and then this recipe is no longer cheating.  It's still a great cookstove recipe, though, because you take advantage of the hot cooktop while your oven is heating to bake the casserole.

And since I'm so embarrassed that I like this dish so much, let's just agree to not talk about it anymore. 

Thanks.  I knew you'd understand.


Tuesday, May 1, 2018

Grasshopper Pie - A Frozen Cookstove Dessert

I am just old enough to remember the time when microwave ovens came into popular use.  My parents bought theirs shortly after I was born, but I distinctly remember when both sets of my grandparents bought theirs, and I was near to junior high age when my aunt Meme began to use one.  No one in our family did much cooking in their microwaves; their primary service was to re-heat leftovers, and I think (with a few exceptions) that is how most of us still use them.

Eventually, I'd like to do a series of posts about how to use a woodburning cookstove to re-warm leftovers because one of the purposes of this blog is to show people what a flexible appliance wood cookstoves are.  Another purpose of the blog is to show that older methods of cooking can still be viable in today's world.

Now, I'm not sure that the recipe that I'm about to share even really qualifies as cooking because it is so easy--"food preparation" yes, but "cooking" not so much.  This is because the heat is only applied to some ingredients to melt them, not to change their chemical composition.  (Some may say that a comment like that makes me into a cooking snob.  Guilty as charged, I guess.)  However, the end product is delicious, and you can't make this dessert without using some heat-producing device or other.

This recipe came from cooks.com, which appears to have somewhere around three billion recipes for grasshopper pie.  I had printed it off many years ago and pasted it into my binder of dessert recipe clippings.  A short search to try to find it again online so that I could provide link to it was unsuccessful, so just know that I'm not taking any credit for this one at all.

You'll need the following ingredients:

1 lb. marshmallows
1/2 c. milk
18 chocolate sandwich cookies (We splurged and bought real Oreos®.)
3 Tblsp. butter
1 1/2 c. heavy cream
1/4 c. Creme de Menthe
3 Tblsp. Creme de Cacao
Andes mints for garnish

1. The first thing to do is to melt the pound of marshmallows with the 1/2 c. of milk.  My copy of the recipe even says right on it "can be done in microwave," but I decided to do this the old-fashioned way and melt them in the top of a double-boiler.  I can remember my mom and Meme doing this when they made Rice Krispie Treats®.  I started them directly over the fire, but ended up moving them to a cooler spot to just keep the water at a simmer rather than a rolling boil.  The marshmallows may begin to stick a little if the water below them is boiling too hard.


2. While the marshmallows are melting, melt the three tablespoons of butter in the warming oven or on top of the water reservoir.  I used the warming oven this time.


3. As the marshmallows melt, stir them occasionally to speed the process and to mix in the milk.


4. When you can no longer see any marshmallow lumps, remove the top part of the double boiler to a trivet to cool completely.

5. At about the time the marshmallows are melted, the butter should be melted too.  Crush the Oreo® cookies using either a rolling pin or a food processor.  I was in a hurry, so I used the food processor, and I have to admit that I think that machine is great.  Mix the 3 Tbsp. melted butter into the cookie crumbs and pour them into a nine-inch pie plate.


6. I used another pie plate that was the same size to quickly press the crumbs into a crust.


7. Once the crust is ready, the next step is to whip the cup and a half of cream until it is stiff.

I took a picture of some of the ingredients because I laugh when
I think about the two bottles of liqueur.  The other teachers at
school make fun of me because I got these two bottles in 1997
when Club 64, a steakhouse where I was working, closed.  I was
the one who cleaned out the bar, and the owners let me take home
a few bottles of things that I knew would be valuable for cooking.
I still have all of the bottles except the bottle of sherry which only
had about a cup in it.  The six bottles and a couple of bottles of
wine we have received as gifts over the years constitute the
entirety of the alcohol around here.

8. Add the cooled melted marshmallow/milk mixture to the whipped cream.   Add the liqueurs and mix thoroughly.

The entire filling mixture being combined in the mixture.

9. Pour the mixture into the prepared crust.  Then decorate with Andes Mint® shavings and put the whole thing in the freezer.


10.  Just before serving, melt the rest of the Andes Mints® with a little cream and butter to make a chocolate mint sauce.  If you have a steady fire burning in the range when you do this, be sure to keep the pot as far away from the fire as possible.  You want to have only a gentle heat for melting chocolate.


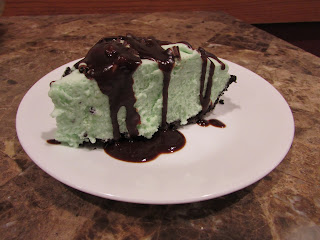
11. When serving, drizzle a little of the melted chocolate mixture over each piece of the grasshopper pie.


Just an FYI: When I made the pie in the pictures above, I actually made two pies, and used the microwave to melt the marshmallows for the other one.  I don't know why, but the marshmallows melted in the double boiler were much fluffier and gave the nice volume to the filling that you see above.  Those melted in the microwave were runny, and the pie was consequently a little less attractive.  Of course, flavor was not affected at all.

This is one of Nancy's favorite desserts, and I hope you all enjoy it!