Saturday, June 27, 2020

Using the Hayes-Custer Range in the Summer Kitchen


As I've mentioned before, we moved our summer kitchen closer to the house in April of 2019.  However, I didn't get a cookstove hooked up in it last summer because I was so busy with all of the rigamarole of publishing my novel.  This year, because of all the Covid-19 stuff, I've had a lot more time at home, so with the help of my brother, I was able to move the Riverside Bakewell to a different corner of the summer kitchen and put the Hayes-Custer on the hearth.

First, some of you may be wondering why I traded the beautiful green and cream Riverside Bakewell with its spacious warming ovens for the beige Hayes-Custer which is only outfitted with a high shelf, especially when I tell you that the baking ovens and cooktops are the same size.

The Riverside Bakewell--former occupant of
the hearth in our summer kitchen.

Folks, it all comes down to this:


The right oven door hinge broke some years ago, and while the stove still heats, cooks, and bakes just fine, this is a major inconvenience, and it's also rather dangerous since one has to balance the hot oven door on one's knee in order to transfer anything into or out of the oven.

Besides, I also wanted to be able to share the experience of cooking on a different cookstove with all of you.

You can read about the acquisition of the Hayes-Custer at this post, and you can read about the history of the Hayes-Custer Stove Company here, so this post is about the range itself and its actual use.

This stove has done 100% of the cooking, baking, and food preservation here since its installation on June 12th.  While food preservation has so far only been canning pickled beets, blanching peas for the freezer, and a batch of mixed fruit jelly, there is a lot more of that to come.  The meal preparations have only involved breakfast once because I've been eating a lot of toast and cold cereal on these warmer mornings, but dinners and suppers have been a little more elaborate.

So far, I would say that the stove performs just fine.  I do have to rotate things which are baking, but I've got some chimney improvements to do which may change that.  I'll let you know.

The fire you see burning in the stove is of wood, but yes, you
do see coal in that hod in the lower right corner of the picture.
I'm trying to learn how to burn coal, but it is proving to be quite
the learning curve.  I'll let you know if I ever get it figured out.

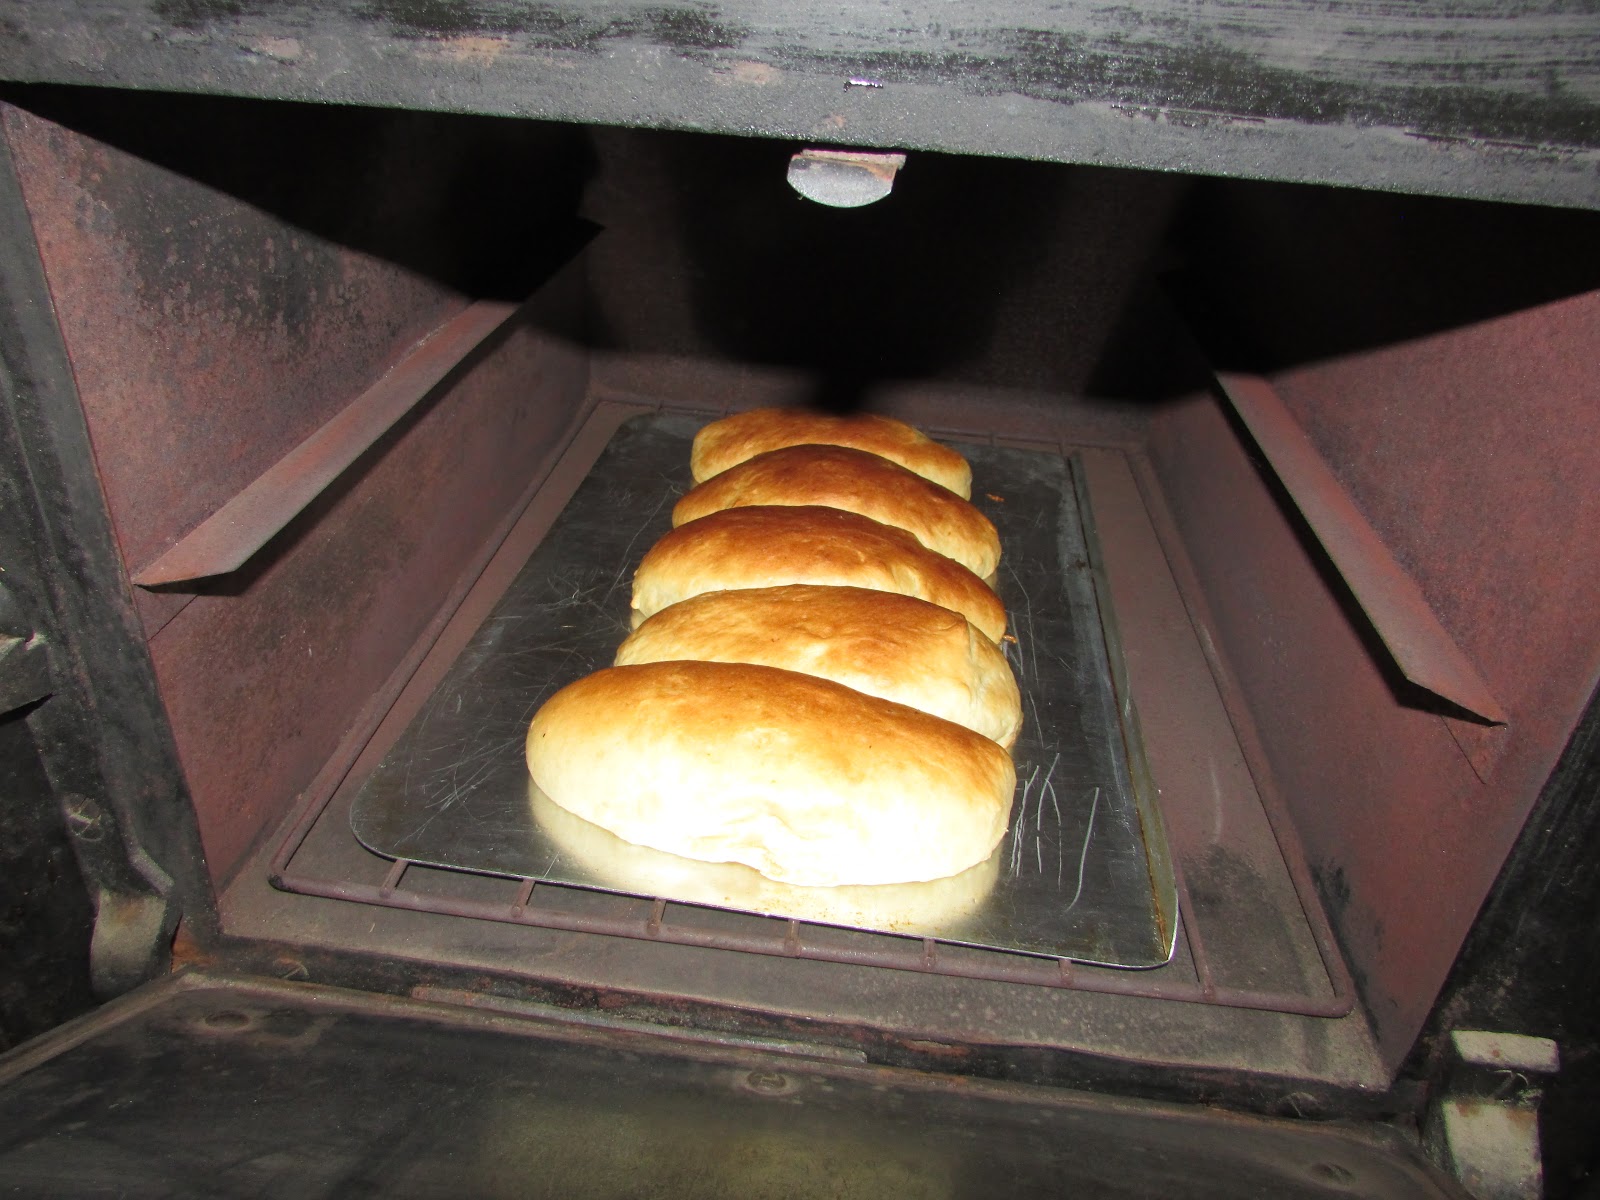
In the picture below, you can see some homemade hamburger buns which were toasting over the fire, waiting for the barbecued beef which is in the pot to their right.  The hamburger buns were baked in the Hayes-Custer and rotated once.  You can see that the bottoms were sufficiently browned as well.


One of the things that I like about this stove is that it has a pouch feed with a door which lifts up.  The Riverside Bakewell has a pouch feed, but it opens down.  The Qualified Range has a pouch feed too, and it opens up, and I really prefer this arrangement.  The Margin Gem doesn't have a pouch feed, and I would have to admit that I miss it.

You can also see from the picture below that the hole for the lid lifter in the "T" has worn through, and I have stuffed it with foil so it doesn't spoil the draft.  There is also a chip out of the cast iron to the right of the pouch feed door, which I have also temporarily patched with foil for the same reason. This is not scientific stove repair, but it is certainly affordable.  (Actually, the foil had even been used once already.)


While putting the stove back together after moving it, I noticed something unique about the pouch feed door.  The left hinge pin is constructed such that it has a tab on the end that juts out to the left.  This seemingly little thing is actually quite thoughtful on the part of the Hayes-Custer designers. The Qualified Range is not equipped with this extra tab, and I've had the pouch feed door fall off a few times during particularly athletic episodes of adding fuel through this door.


You may have noticed how rusty the top of the range is in the two pictures above.  I had removed all of the rust with my grill brick and given it a good coating of vegetable oil once the stove was in place, but I've had some hot fires since then, so the oil burned off over the firebox quickly.  Then, even though the summer kitchen is an enclosed building, the windows are open nearly all the time, so the humidity can get pretty high in there.  Hence, the rust came back in a hurry.

You can see in the picture below that this stove has seen some intense heat. Below the pouch feed, a repair has been made using stove cement. I imagine that this injury is the result of an extremely hot coal fire at some point in the stove's history.


The Hayes-Custer firebox is 7" deep x 8" wide x 18" long and is equipped with duplex grates.


Another interesting feature of this stove is that the only place which tells you who the manufacturer was is the outside of the front firebox door.  In a day when most stove makers were prominently autographing their ranges, the Hayes-Custer company was concealing their information pretty well. You can also see from this picture that the handle has broken off the front of the ash drawer.  This makes ash removal a little more difficult than it need be, but I've learned that by prying with a small flat screwdriver or the handle of a pair of pliers, you can create a gap between the top of the ash pan and the opening to get your fingers into and pull.


Although I haven't measured its capacity, the reservoir on this stove seems HUGE.  It must hold at least ten gallons.

Of course, when I run into a vintage stove, I can't help but wonder about its history.  Was this range a household's only heat during the notorious winter of 1936?  How many Thanksgiving dinners did it turn out?  In this stove's previous home, it had not been used since the 1970s when an ice storm knocked out the electric power for a week.  It kept its owners warm and well fed during that time.

No matter what its history, it is certainly working hard in its present.  And I'm pretty sure that I'm the first person in its list of owners to ever bake a frozen pizza in it!  Don't be too harsh on us.  During Covid-19 Quarantine, we've eaten exactly two frozen pizzas, but we've had three from-scratch homemade ones, complete with sauce which was home-canned.

You can see the raging fire that was burning in
order to achieve the quick oven needed for baking
a frozen pizza.

The finished frozen pizza.
I don't know what the temperature inside the summer kitchen reaches, but I can assure you it is beastly hot.  However, doing all of the cooking out there has enabled us to go without turning on our house's air conditioning so far this summer.  In addition, there is very little cost involved in collecting the fuel for this stove since I'm able to use small sticks and other poor quality scrap wood I've picked up in our pastures.  And while the Lord has so far protected us from dire financial consequences during these uncertain times, it does seem prudent right now to trim costs wherever we are able.

Stay tuned for more posts which feature this stove, since it looks like it's going to have a busy summer.

In the meantime, if you are interested in the Riverside Bakewell, let me know--since I'm interested in having the floorspace back.

Friday, June 19, 2020

Using My Brother's Vintage Montgomery Ward Cookstove in Our Summer Kitchen

So, way back in 2013, I blogged about my brother's new-to-his-family cookstove in this post, and for nearly seven years, I've been looking forward to hauling this little cookstove over to our place and hooking it up in our summer kitchen.  Since we moved the summer kitchen much closer to the house last spring, we had disconnected the Riverside Bakewell cookstove that was in it.  I wanted to perform a little cookstove rotation anyway, so this was the perfect time to try this little baby out.

When I say "little baby," I mean it.  With the cast iron eyes and "T" removed from the cooktop, I am able to carry it by myself.  Kevin was surprised to find that I had carried it out of the loft of his shed without assistance.  This stove is 26" wide by 21" deep, and it is a back-breaking 25" tall, but don't let its diminutive size fool you.  This stove performs very, very well.


As I have mentioned before, there is no joy in cooking with a wood fire for me unless the stove I'm using has an oven, so I was particularly interested in how this stove would bake.  At first glance, the oven seems tiny, measuring 17.75" deep, 13.5" wide, and 9.5" tall.  In the picture below, I tried to give you a little perspective by holding my spread hand in front of the oven door.  I'm not sure it was the most effective photography technique, though.


Also, it is the first oven on a woodburning cookstove that I have used to be heated using a configuration similar to the one illustrated in the bottom drawing below.  The oven damper is operated by a small lever near the upper right hand corner of the oven door.  For kindling the fire, the damper is turned to the right.  For baking, the lever is turned to the left and thereby diverts all of the smoke and heat from the fire around the oven box.


Well, the stove was installed in our summer kitchen from June 5th to June 12th.  During that time, I did absolutely all of our cooking on it, and I was thoroughly impressed.  You can see from the pictures below that baking was no problem at all.  I did rotate a few things, but this is not uncommon in wood cookstove cookery, and I was pleased and surprised to note how well the bottoms of things had cooked (this can sometimes be a problem on some wood cookstoves).  

The first thing that struck me about the operation of this stove is how quickly it heated.  With the first fire I built, I had the oven temperature up over 400ºF within 15 minutes.  The firebox is small, but not overly so, and during the whole time that the stove was in use, I only used small sticks and wood chips picked up from the floor of the shed where we keep the wood splitter.  Even though the stove is nowhere near airtight, I would say that it was remarkably efficient as I was surprised at how much cooking I could do on so little fuel.


While the stove was in service here, I baked sweet potatoes, sweet potato casserole, bread, hot dog buns, a sour cream cake, a meatloaf, and brownies.  The only thing that didn't turn out well was the brownies--and that was due to a little nephew messing with the timer, not any problem with the stove.


The size of the oven was not as limiting as I thought it would be.  The brownie recipe calls for them to be baked in a 10" x 15" pan, and it fit and worked perfectly.


I have already blogged about cooking our supper of shrimp scampi and capellini pasta, but that was a supper for only two people.  

Our supper of shrimp scampi and capellini pasta
cooking on the tiny Montgomery Ward Cookstove.

I wanted to stretch the capacity of this little stove a bit, and since my young nephews claim the stove as theirs, I wanted to teach them how to use it, too.  Thus, we invited my brother and his family over for supper and therefore served supper for eight cooked on this tiny cookstove.  We had Lamb Loaf Supreme (a recipe out of a vintage pamphlet from the Martin Meat Market which used to be in our hometown--I wasn't impressed, so you won't get to see the recipe here), mashed potatoes, and fried cabbage.  As you can see from the picture below, we had sufficient room on the stove to have been able to cook more food if we had wanted to.


The one characteristic of this stove that I didn't care for was the fact that the sliding draft on the left side is located at the same level as the grate so that when you rake the ashes down or maneuver the dump grate, ashes jump out of the stove onto the floor--a minor inconvenience but worth mentioning.

Overall, the experience of cooking on this stove was fantastic.  Its ease of use and fuel efficiency were quite impressive.  If given the choice between this stove and no wood cookstove at all, I would be glad to have this Montgomery Ward Economy Cookstove.  

One thing I couldn't help but wonder about was its room heating capacity. Our summer kitchen is only 10' x 12', and the weather was hot here the whole time the stove was in use, so I have no idea how warm it might keep a home in the winter.  My romantic side thinks it would be fun to test this stove in some kind of small cabin in the middle of a blizzard, but that will only happen in my imagination.

If you are local to the greater Omaha area, an identical stove is currently for sale on Craigslist at the following link: https://omaha.craigslist.org/fuo/d/valley-antique-black-white-cast-iron/7133461955.html

After supper with my brother's family, we let the fire go out and exchanged this little cookstove with the Hayes-Custer that I brought home in March of 2018 (more on that stove will be coming).  The next day, I gave my brother's little stove a coat of stove black to retard rust, and he has taken it home now.  I feel better knowing they have it back.  In the event that some humongous disaster occurs, I know that they will be able to stave off starvation with this little marvel.

Thursday, June 11, 2020

Making Popcorn on a Wood Cookstove

I like popcorn, but Nancy LOVES popcorn.  Her grandparents, with whom she frequently stayed, would have popcorn for Sunday night supper.  Her grandmother made it in the bottom of an old pressure cooker which she shook over a burner of her propane stove.  We are a little more uptown with a Lindy's stainless steel stovetop corn popper that we purchased at an Amish store, but we still use a stove rather than a microwave or electric popper.

Making popcorn on the gas stove is very easy, but there was a bit of a learning curve for us when it came to popping corn on the wood cookstove.  Here is the key: you've got to have a REALLY HOT fire burning in the stove in order to get the best popcorn.  Thus, at the risk of sounding like a broken record on this blog, we use lots of small sticks to build a raging inferno when we are going to make popcorn.  You can see one of the fires built for popping corn during the Covid-19 Quarantine in the picture below.


You can't tell it well from the photo above, but I try to keep the bulk of the fuel toward the front of the firebox so that the hottest part of the cooktop is the front left lid.  This is the easiest spot to place the popcorn popper since you have to be able to lightly hold the handle with one hand and turn the crank with the other.

Nancy puts a little canola oil in the bottom of the popper along with two kernels of corn, places it on the fire and begins turning the crank.


When she hears the two kernels pop, she knows the oil is the right temperature.


Once the oil is hot, she adds a scant cup of popcorn, shuts the lid and begins turning the crank in earnest.  She says the popcorn is done popping when she can no longer turn the crank.


Within minutes, she has a popper full of delicious popcorn, which she pours out into one of our large stainless steel bowls.  She then seasons it as she desires, and we scarf it down.  If you want, you could use the recipe at this link in order to make caramel popcorn.  Either way, the popcorn is delicious.


Monday, June 8, 2020

Tonight's Supper: Shrimp Scampi on Capellini Pasta

I don't have a single drop of Italian blood in me, and this landlocked Iowa boy would take beef, pork, or poultry over anything from the sea most every time, but I do have a weakness for shrimp.  The last time Nancy and I were in the grocery store together, which we think was sometime in March, Nancy put a bag of frozen shrimp in the cart, saying that we would use them as some kind of treat during the Covid-19 Quarantine time.  The bag was put in the freezer in the basement, and Nancy forgot about it. When she went down to retrieve her ice cream yesterday, she saw it there and asked if we could have "shrimp something" for supper after she got home from work today.

"Shrimp something" would probably have been shrimp Alfredo, but I neglected to buy cream on my last grocery run, so I had to strike out on my own.  The results were so good that I have to blog this before I forget what I did so that I can recreate this supper sometime in the future.

First, since I use this blog for personal record keeping, I need to report that as of last Friday (June 5) I have done all of our cooking out in the summer kitchen on my brother's Montgomery Ward Economy Cookstove that I blogged about back in 2013 in this post.  Our last daily fire in the Margin Gem went out on the morning of June 1, which was when it began to get pretty warm around here.  Obviously, that was also the day that I turned on the electric hot water heater, which we will run for the next four months. This was the latest in the season that we have ever waited to do that, beating our previous record of May 27th.  Thus, the stats for the 2019-2020 heating season are that from October 11 to June 1, all hot water was heated by the Margin Gem, and it cooked all but four of the meals prepared at home during that time (two frozen pizzas, one crockpot roast, and one meal cooked entirely on the grill).  Also, because of Covid-19, the Margin Gem cooked all but seven of the meals I ate between March 16 and May 31.

My brother's Montgomery Ward Economy Cookstove
temporarily installed in our summer kitchen.

I worked the primary election on June 2, and I had cooked enough food ahead that the only cooking I did between the Margin Gem and this little stove was French toast on the gas stove (a ridiculously difficult task--so hard to get it to brown evenly over a gas flame) and baking four potatoes in the electric stove in the basement.

I am writing a whole post about cooking on this little cookstove of Kevin's, so all I'll say here is that it has worked surprisingly well--great really.  I was so anxious to get cooking on it, you'll notice that I didn't get the floor of the summer kitchen scrubbed yet.

Anyway, back to supper tonight.  I started by making the angel hair pasta. To roughly a cup of all-purpose flour, I added a sprinkling of baking powder and a dash of salt, then an egg.  I worked additional flour into the pasta dough until I couldn't get it to take any more by hand.  Then, I started running it through the rollers of my Atlas pasta machine.  I got to level 7 on the rollers and then cut the pasta with the cutter labeled capellini (Italian for "little hairs," slightly larger than true angel hair).  I kind of clumped the pasta into little loosely packed nests and set them aside on a plate to dry a bit while I did other things.  These were probably the best pasta I've ever made.

Making pasta is a messy proposition no matter how you look at it.

I started the fire out in the summer kitchen then, and put a pot of salted water on to boil for the pasta. I also put on the base to the steamer with a little water in it.  While they were heating, I headed to the gardens and picked some garlic chives and two onion leaves.  I washed those and snipped them into a frying pan with a 1/2 stick of butter in it.  Then, I took two tiny garlic bulbs harvested yesterday and put them through my Pampered Chef garlic press; they would have been the equivalent of two store-bought garlic cloves.  The frying pan was carried out to the stove then, where the other two kettles had come to a boil.

While the butter was beginning to melt and cook the herbs from the garden, I put a large head of broccoli in the steamer and dropped the nests of pasta into the boiling water.  By that time, the butter was simmering nicely, so I added about nine oz. of the cooked, frozen shrimp and a few parsley flakes.  Since the shrimp was already cooked, it just needed to thaw and heat through.

Tonight's supper cooking on my brother's little stove.
Sorry about the lens cap on the right side of the pic.
I couldn't hold onto the lids of the two kettles and
keep the lens cap out of the way at the same time.

Everything was finished cooking at the same time, so I carried it all back into the house.  We used a slotted spoon to fish the pasta nests out of the water, draining them as we did so.  Then, we scooped the cooked shrimp and its buttery juice over the pasta and sprinkled it with grated parmesan cheese.  The steamed broccoli was seasoned with a quick sprinkle of garlic salt, and supper was served.

Our supper.  Next time we'll be sure to buy shrimp that doesn't
have its tails on.

Nancy said I had hit the nail on the head with what she had in mind for "shrimp stuff," and we agreed that our supper tasted like it had come from a fine Italian restaurant.  It really was outstanding if I do say so myself. Making the pasta was the most difficult part of this meal, and if I were in a hurry and not in the middle of a pandemic, I would have bought angel hair nests in the grocery store and not thought twice about it.  We are looking forward to having this meal again when our own broccoli is ready to eat.

Saturday, May 30, 2020

Grandma Marian's Caramel Frosting

Today is my maternal grandmother's 93rd birthday.  She fell and broke her hip in March and is now in a nursing home, and because of Covid-19 none of us are permitted to visit her.  She hasn't had her mind for quite some time, so she won't know it is her birthday, but we will celebrate with her when the restrictions are lifted.

For many years, Grandma Marian would bake an angel food cake for family birthday celebrations.  If it was Grandpa's birthday, she would lightly frost it with powdered sugar icing, and for Meme's birthday she would use seven-minute frosting, but everyone else got caramel frosting, and Grandma became a little famous for it.  Even today, I don't feel like I've had a birthday unless I've had angel food cake with caramel frosting.

Grandma Marian was an awesome cook, but it was a rare event that she would serve a meal that she was completely happy with.  Most of her meals were served with a healthy dose of apologies for foods that she did not feel were perfect--even though the rest of us thought they were fine. The same was true of her many, many birthday cakes.  I can't tell you how many times she would take the cover off the cake stand and say things like "This cake just didn't get as tall as it was supposed to" or "I don't know what was the matter with my frosting today; it just wouldn't set up right." Let me just assure you all that we scarfed down the cakes every time.

Sadly, Grandma's angel food cake baking days have been over for quite some time, so if there is a need for an angel food cake with caramel frosting, I'm the one who bakes it now.  And I just have to say that this caramel frosting is proof of Grandma's love for us for all the years that she made it because it is persnickety stuff.  I totally understand why she fretted about each cake.

I've seen this recipe crop up in many places and in many cookbooks, so it is not any kind of hidden family gem.  In fact, Grandma used the recipe from her copy of the Kitchen Klatter Cookbook, but she didn't follow the directions as they are written there.  I was probably in college when I had the good sense to arrange a lesson from her in how to make this frosting.  I had made it several times before that, but mine never turned out like hers, and I wanted to know why.  Now I'm going to clue you all in to her method too.

First, here are the ingredients you'll need:
  

1 cup light brown sugar
1 stick margarine (Grandma used Blue Bonnet)
1/4 c. milk
2 cups sifted powdered sugar
1 tsp. vanilla
2-3 drops Mapleine

1. Sift the two cups of powdered sugar and put them in a heavy glass mixing bowl.  Grandma Marian had two sets of the classic multicolored Pyrex bowls which she had received as wedding gifts in the late 1940s, and she always used the second largest green one.  I have my own set of those mixing bowls, so my green bowl is what you'll see in the second to last picture below even though I measured the sugar into a smaller red one to begin with.


2. Put the stick of margarine and the cup of brown sugar in a heavy-bottomed saucepan.  Now, some of you will be tempted to use butter instead of margarine, and that's fine.  I've done that many times, but to get the flavor and consistency that Grandma's frosting had, you need to use the Blue Bonnet margarine--and not the "light" stuff.

You can start cooking the sugar and margarine right over the firebox because you need to bring it to a boil; however, you won't be leaving it there.


3. While it is heating, I usually use my spoon to chop up the stick of margarine a little bit and stir things around a little.  Don't stir much, though, because you don't want it to get grainy.


4. Once this mixture comes to a full rolling boil, keep it boiling for exactly two minutes.  Don't leave it directly over the fire, though, because you don't want it to boil hard for that amount of time.  If you do, you'll end up with frosting that will crack into a million pieces later on.  In the pictures below, you can see the progression of the syrup moving away from the fire in the space of these two minutes.  Have your 1/4 cup of milk ready for the next step.


Boy!  I'm sorry about the state of my cooktop in these last two
pictures.  Marjorie is long overdue for a good polishing.

5. At the end of the two minutes, add the 1/4 cup of milk, place the syrup back over the firebox, and bring the mixture back to a boil.


6. As soon as it has reached a good rolling boil again, remove from the fire immediately.


Now things get interesting (hence the lack of pictures).

7. Pour a little of the hot syrup into the bowl of sifted powdered sugar and begin beating it together.

8. Continue to add the hot syrup a little at a time, beating after each addition.  You may need to beat quite a while.  It's a little like making homemade candy.

The original recipe directions say to add all of the syrup to the powdered sugar and beat until it is of spreading consistency.  However, Grandma never did that because she said that all of the syrup wasn't  always necessary.  She swore that the recipe varied every time.  Sometimes she added all of the cooked syrup, but more often than not she would have anywhere from a tablespoon to a quarter cup of syrup leftover.

9. Once the frosting is of the desired consistency, add a teaspoon of vanilla and the two or three drops of Mapleine.


10. Frost whatever you are going to put this on in kind of a hurry because it can set up fairly quickly if you are not careful.

In the picture below, the caramel frosting is spread on a pan of Rosalie's Spice Bars.  I shared that recipe on the blog way back in 2011 and promised that I'd share the frosting recipe at a later date.  I keep my promises, I guess, but not in a timely fashion.

Hints:


  • This frosting can be thinned successfully with a little cream.
  • I've often used all of the syrup and added some extra sifted powdered sugar with very good results.
  • This yields enough frosting for a jelly roll pan of bars or the top and sides of a tall angel food.
  • Grandma saved any unused syrup in a little jar in the refrigerator and would later use it as ice cream topping.  Since there are four August birthdays in her descendants alone, there would be multiple little jars of syrup in her refrigerator during that month!
  • For my from-scratch recipe for angel food cake and directions on how to bake one in a wood cookstove, go to this link.
As frostings go, I think this one is a whole lot of work and stress, but it is really worth it.  Trust me.

Happy Birthday, Grandma!

Wednesday, May 27, 2020

Canning Homemade Pork and Beans on the Wood Cookstove

Life has certainly been different the last two months, hasn't it?  I never would have imagined that the last day of school for the 2019-2020 school year would have been Monday, March 16th, and I would never have predicted that I would have as much time at home as I've had over these last several weeks. 

It seems like we've been in this COVID-19 situation for such a long time.  It was winter when everything seemed to come to a grinding halt, and now we have arrived at the unofficial start of summer.  We had a few warm days early on, but then our temperatures dropped back below normal, and our biggest snowfall of the season occurred on April 16th.  We haven't been overly warm since then, but we've got a beautiful garden this year, even though we lost a few green bean plants to frost, and our tomato plants were a bit damaged.

Our wood cookstove has been very busy during all of this time.  We turned off our electric water heater for the season on October 11 last year, which means that the Margin Gem cookstove has been fired daily ever since (except for the single whole day we spent in San Antonio where my brother was honored as the president of the National Corn Growers Association). Since October 11, every meal that we've made at home has been cooked on the wood cookstove except for one crockpot supper and one recent dinner that was cooked on the grill.  The only thing we've done on a modern stove is make popcorn (We've popped corn on the wood cookstove too, but that needs to be its own post.) We've been very thankful for the economy of the wood cookstove since the financial state of things has changed so dramatically.

We've also been very thankful for a well-stocked freezer and fruit room. The rows and rows of home-canned fruits, vegetables, meats, pickles, juices, jams, and jellies have been such a blessing during this time.  For many years, I've enjoyed canning lots of different foods, but we never seem to eat as much of it as we should.  That has changed dramatically. Since March 16th, we've eaten out (carry out only) a total of five times. Now, I know that for some of my readers that is more than they would normally eat out in that amount of time, but for us this is a dramatic change.  Thus, we are barreling through our canned goods right now, and it is a good thing for the inventory.

I have also done a fair amount of canning since being home during the quarantine.  At the time everything shut down, we still had three bushels of fall apples in our utility room.  They were my first priority.  Other than an apple crisp and Danish apple bars, I canned the rest of them.  While the water bath canner was on the stove, I also made and canned a couple batches of grape jelly from juice that my sister-in-law canned some time ago.

One of the supermarkets in Council Bluffs had a sale on pineapples for 98¢ each a couple weeks ago, so I bought five and canned three of them.  I had never canned pineapple before, but if I can find a bargain like that again, I will certainly do it in the future.  Nancy and I agree that the home-canned pineapple tastes much better than commercially canned pineapple, and when I pushed pencil to paper and figured the cost of the lids, sugar, and fruit, I discovered that we saved almost $5 over the store brand pineapple tidbits and nearly $8 over Dole brand.

Then with rhubarb coming available and in an effort to clean out our freezer, I've made and canned three batches of pineapple-rhubarb jam and one batch of strawberry-rhubarb spread.  Of course, all of this has been done on the Margin Gem wood cookstove.

The only time I have used the pressure canner during quarantine has been to can homemade pork and beans.  This was the second time I did this, and I am so happy with the results.  See, I love Van Camp's pork and beans (doctored up, of course), but the price of these has really gone up quite a bit since I first started doing my own grocery shopping twenty-some years ago.  Besides, I like being able to make foods myself when I'm able.

The method and recipe I use is based on the "Baked Beans" recipe in my Kerr Home Canning and Freezing Book from the 1970s, but I've changed it to suit my taste and updated it to meet today's standards for safe canning.

The first thing you do is thoroughly wash four cups of navy beans.  In a heavy enamel or stainless steel kettle, cover the beans with plenty of water and let them soak overnight.  You may have to add water to them in the morning; I certainly did.  Place the pot of beans directly over the firebox and bring to a boil.  Continue boiling for 45 minutes.  You can move the pot to a cooler spot on the stove if you need to as they don't have to boil fast.


As the beans cook, they will absorb more water.  Add boiling water from the teakettle as needed to keep plenty of moisture on the beans.


At the end of the 45 minutes, the beans will not be cooked thoroughly enough to be tender yet, but that is all right.  They will finish cooking during the canning process.


At the end of the 45 minutes, drain the beans in a colander, reserving the juice.


At this point in the process, build your fire very hot and put your canner on the stove to begin heating.  Also put your canning lids in hot water over a cooler part of the stove.

Return the beans to the heavy kettle that you were using in the initial cooking time, and then add two cups of the reserved bean liquid.

Now is the time to dress the beans up in whatever way you desire.  A little bacon or salt pork may be added at this point, and in the pictures below you can see that I added some of my Homemade Heinz Ketchup and some brown sugar and four teaspoons of salt.  I also put a little bacon in; I have used salt pork before too.  Some people like to add molasses, prepared mustard, or onions at this point.  Mix all together well.


Pack into canning jars leaving one inch of headspace and making sure each jar has a little more moisture than what you think is ideal.  This is very important.  The first time I canned these, I didn't keep them wet enough and packed them too full.  As a result, I had several jars that didn't seal because the beans expanded while they processed and the thick juice was pushed up between the lid and the sealing edge of the jar.

Pack jars into the canner, and begin the pressure canning process.  For more details on how to pressure can on a wood cookstove, please visit this post.  Baked beans need to process for 75 minutes at whatever pressure is appropriate for your altitude.


Those four initial cups of beans resulted in six and a half pints of canned beans.


It's been a couple of years, but I have pushed the pencil on this recipe, and canning your own baked beans does result in a small savings over purchasing them.  My mother and grandmothers always said that another advantage of home canning is that you always know exactly what is in each jar, too.  If you use canned pork and beans, consider giving these a try sometime.

Monday, May 18, 2020

Glaze Creosote Confession: The Potentially High Cost of Ignorance

This was my twenty-third winter season cooking on a woodburning cookstove, but I still have things to learn.  Truthfully, I'm kind of embarrassed to share the information in this post, but since the whole point of this blog is to help others enjoy cooking on woodburning cookstoves, I feel obligated.

First, some history:

The first wood cookstove that I used was the Qualified Range.  I bought it new in January of 1997 and had it installed in the little house with a pre-fabricated metal chimney.  I would say that the distance from the stove collar to the top of the chimney was probably less than twelve feet.  I never had any trouble with creosote accumulation in that setup.  However, I only used it from January of 1997 to May of 1998 because then I moved to the "big house."

When I moved into the "big house" on the farm, I had to wait a winter before I was able to get a new stainless steel liner put in the original brick chimney, but by the fall of 1999, I was again using the Qualified on a daily basis for cooking and heating.  The Qualified was in use in the "big house" from 1999-2011 when it was replaced by the Margin Gem.  During those twelve years, I had one chimney fire, but it started in the stovepipe of the stove and spread to the chimney.  It was easily extinguished by closing the drafts of the stove, and since it happened in the summer, it was not difficult to get on the roof and sweep the chimney clean again.  Had I been more diligent about keeping the stovepipe clean, the fire wouldn't have happened at all.

With the Qualified Range, there was never a lot of creosote in the chimney. I would sweep it in the fall of the year before daily firing of the stove began, and what creosote was present was always light, flaky, and easy to remove.  The creosote in the stovepipe was always the same, but would sometimes cling more stubbornly.

Now, the Qualified Range was not airtight.  It had the old style sliding drafts on the left side of the firebox, and though they were made well, there were some gaps that were inherent with that sort of stove construction.  Tiny gaps were also present in the top left corner of the firebox and where the outer front door latched to the cast iron of the firebox.  Further, the standard of fit and finish for the cast iron stovetop was lower than that of the Margin Gem.  If a bright fire was burning in the stove and all of the lights were put out at night, you could see tiny yellow flickers against the backsplash of the stove and on the kitchen ceiling.  Obviously, there were plenty of places where air could gain entrance to the stove even when it was shut down tightly.  Therefore, the Qualified could not hold a fire overnight or during the day when Nancy and I were gone to work and school.

The Margin Gem began its career in our kitchen in the spring of 2012 and has been in daily use from late September or early October until May ever since.  Shortly after it was installed, I noticed that the creosote in the chimney was different.  Some of the dry, flaky, familiar stuff was present, but there was a coating of black, tarry stuff that was very smooth.  This, however, appeared to only be in the top three or four feet of the chimney, which is the part that sticks out above the roof line.  It was a thin layer, as I said, and I didn't think a whole lot about it.  I attributed it to the fact that the stove is airtight and also to the fact that because the Margin Gem has both a hyper-heat water reservoir and a waterfront for the range boiler, a lot of the heat from the fire was being absorbed before it had a chance to travel up the chimney.

I didn't think a whole lot about this new creosote.  Usually, after a summer of only intermittent firing--usually using small sticks that burn hot and quick--the hard, shiny stuff would sweep out of the chimney with the fall sweeping that began the continual firing season.

Fast forward to this last winter.  During the months when the Margin Gem is being fired daily, I sweep the chimney once per month as long as the roof is free of snow.  During December and early January, we were burning some mulberry wood which had been dead for at least six years, but was more wet than I would have liked.  When I went to sweep the chimney in early January, my chimney sweeping brush got stuck in the chimney.  The shiny, hard creosote had become quite thick on the inside of the chimney, and it was no longer just in the top three or four feet of the flue.  I had a really tough time getting my brush back out of the chimney, and I knew we had to do something.

My first thought was that we needed to have a professional chimney sweep come and clean the chimney.  I did some phone calling and discovered that where we live, professional chimney sweeps are few and far between, and they are really busy.  We would have had to wait a very long time before a professional chimney sweep would have been able to come to our house--in fact, I was basically told that we wouldn't be able to see a chimney sweep until after the heating season was over.

We couldn't wait that long.  During the winter months, the Margin Gem heats our home and our hot water, and it cooks nearly all of our food.  I was worried about the creosote situation and began doing some research. I learned that professional chimney sweeps use mechanized equipment to clean chimneys rather than just a steel brush on rods like I have.  I discovered that our nearest Menards carries such equipment and promptly plopped down around $150.00 for a set of chimney cleaning equipment that attaches to a drill.  (I didn't know that this kind of chimney cleaning equipment even existed, and I'll write a post about it sometime because it is worthy of a lengthy discussion by itself.)

I got my new purchase home and opened the package.  Having never known anything about this sort of chimney cleaning device before, the first thing I did was open the instruction booklet.  Among other disappointing information there (which I will discuss in a later post), the instruction booklet said that the chimney sweeping equipment was not for use on "GLAZE CREOSOTE."  There it was: a name for the stuff I had seen lining the chimney!

After more research, I knew how dangerous glaze creosote in a chimney can be (if ignited, it burns at a higher temperature than light, flaky creosote does).  That same research taught me that there is no mechanical way to remove it, so sweeping wasn't going to make any difference.  Glaze creosote must be removed chemically.  Even professional chimney sweeps must treat glaze creosote with a chemical first and then come back to sweep it later, and the powders and chimney sweeping logs commonly advertised and sold locally have no effect on this type of creosote.  Internet reviews told me that two different products were highly recommended for use in glaze creosote removal: Cre-Away and Anti-Creo-Soot.  These are environmentally safe products that convert the glaze creosote from a hard substance to flaky creosote which is easy to remove.  Unfortunately, neither of these compounds are sold locally, so we had to order online and wait for delivery.  For a few days, we limped along with a stove that was operational but obviously not breathing as well as she should.  Then we began the glaze creosote mitigation process.

The two chemicals we used to remove our glaze creosote.  (Because I know
someone will ask, the cookstove on the left is the ceramic base to a lamp that
sits on the corner of our kitchen table.)

The Process of Glaze Creosote Removal:

The sites I read told me that I should start by using the Cre-Away.  Cre-Away is a fine white powder which comes in a plastic bottle with a hinged nozzle on the top.  You apply the Cre-Away to the chimney by squeezing puffs of it up into the stovepipe and the bottom of the chimney.  Because our chimney is so tall, the directions on the bottle also recommended sprinkling it down from the top of the chimney.  As we had very little snow this winter, this was not a difficult process.

Once Cre-Away has been placed in the chimney, the next step is to build a hot fire in the stove to activate the chemical reaction.  The flue temperature has to reach a minimum of 300ºF in order for each of the products to work, so I moved the flue thermometer that we have on our Jotul heating stove to the stovepipe of the Margin Gem.

Cre-Away was amazing!  It wasn't long before I could hear chunks of creosote falling down the chimney.  For three days in January, as soon as I got home from school, I would take the stovepipe down, remove the pile of creosote that had fallen down the chimney in the last 24 hours, and re-apply the Cre-Away.

The next step was to use the Anti-Creo-Soot.  This is a liquid, and to apply it you spray it into a good hot fire.  You can see in the picture above that the Anti-Creo-Soot which I purchased was in a gallon jug.  You can purchase smaller spray bottles of this compound, but they are more expensive, so it was cheaper for me to buy the gallon jug and pour some into our own spray bottle.  For the first application of Anti-Creo-Soot, the directions say to apply 60 (that's right, sixty!) squirts to the inside of the firebox or directly onto the fuel.  In severe cases of glaze creosote, the directions recommend sixty squirts each day for seven days.  Twelve squirts per day after that is what they advise for keeping your chimney clean thereafter.  Again, flue temperatures must reach 300ºF, in order for this compound to be activated.

Anti-Creo-Soot was excellent too.  It was very easy to apply, and chunks of creosote continually rattled down the chimney, especially when the fire was first stirred up in the morning or upon my return from school in the evening. I continued to regularly take the stovepipe down and clear away the piles of creosote left in the elbow at the bottom of the chimney.

Finally, a thorough sweeping is in order.  I am happy to report that this sweeping was easy, and I've never seen so much creosote come out of the chimney at once.  The Margin Gem was breathing freely again, and I could breath a sigh of relief!

I continue to squirt Anti-Creo-Soot into the firebox occasionally--especially when I know I'll be sweeping the chimney soon--and the effect that it has had is remarkable.  I cannot say enough good things about both of these products!

Summary:

Here is an abbreviated list of the new things I know after having dealt with this situation:

1. Only burn dry fuel!  I knew this but admit to not prioritizing our fuel supply as well as I should have.  Also, I was under the impression that creosote only formed from wood that was wet because it hadn't been dead long enough.  Not so!  Wood that has been "seasoned" for adequate time but has been allowed to become wet again is just as susceptible to depositing creosote in a chimney.

2. There are different types of creosote, so you must pay attention to what is present in your chimney.

3. Glaze creosote can be removed by a do-it-yourselfer; you don't have to hire a chimney sweep if you are able to access your chimney yourself.

4. Glaze creosote can only be removed by using chemical compounds to loosen it before it can be swept away.

5. Cre-Away and Anti-Creo-Soot are awesome!  They are very effective in glaze creosote removal and are easy to use.

I hope that embarrassing myself and letting you all in on my former ignorance proves helpful to someone and that I can save someone else the danger of a chimney fire or the expense of hiring out work that one can do oneself.  Be safe!