Showing posts with label summer kitchen. Show all posts

Thursday, June 17, 2021

Cooking on the Hayes-Custer in the Summer Kitchen Again

Nancy has pronounced me crazy.

My insanity is not news, however.  My longtime, loyal readers and certainly those who know me personally had no doubt arrived at this conclusion long ago, so that is not the reason for this blogpost.

The reason for this blogpost and the reason that Nancy has pronounced me crazy are one and the same.  She made her proclamation when she saw me hauling a large skillet of cauliflower out to the summer kitchen a week ago Saturday.  

"You're cooking out there?" she said incredulously.

"Yes," I responded.

She looked at me strangely.

"I've told you how much I don't like cooking on that gas stove," I said, shrugging.

"You're crazy," said she.

Guilty as charged, I guess.  I've said before on this blog that no method of cooking compares to cooking on a woodburning cookstove, and now that I don't have to give it up for the summer, I don't plan to.

I had posted on May 22nd that we had turned our electric water heater back on.  However, we had some cooler weather after that, so I fired the Margin Gem again for a few more days.  We left the electric water heater on, but we used the valves in the basement to alternate using water heated electrically and water heated by the Margin Gem.  Once the first of June rolled around, however, the weather got quite warm again, so I have not had a fire inside the house since then.

I've put a two-burner electric hot plate on the reservoir of the Margin Gem in the house kitchen--something that was done quite frequently in history judging from the pictures I've seen.  I've used this for only very light cooking here and there.  Any serious cooking and baking has been hauled out to the summer kitchen.

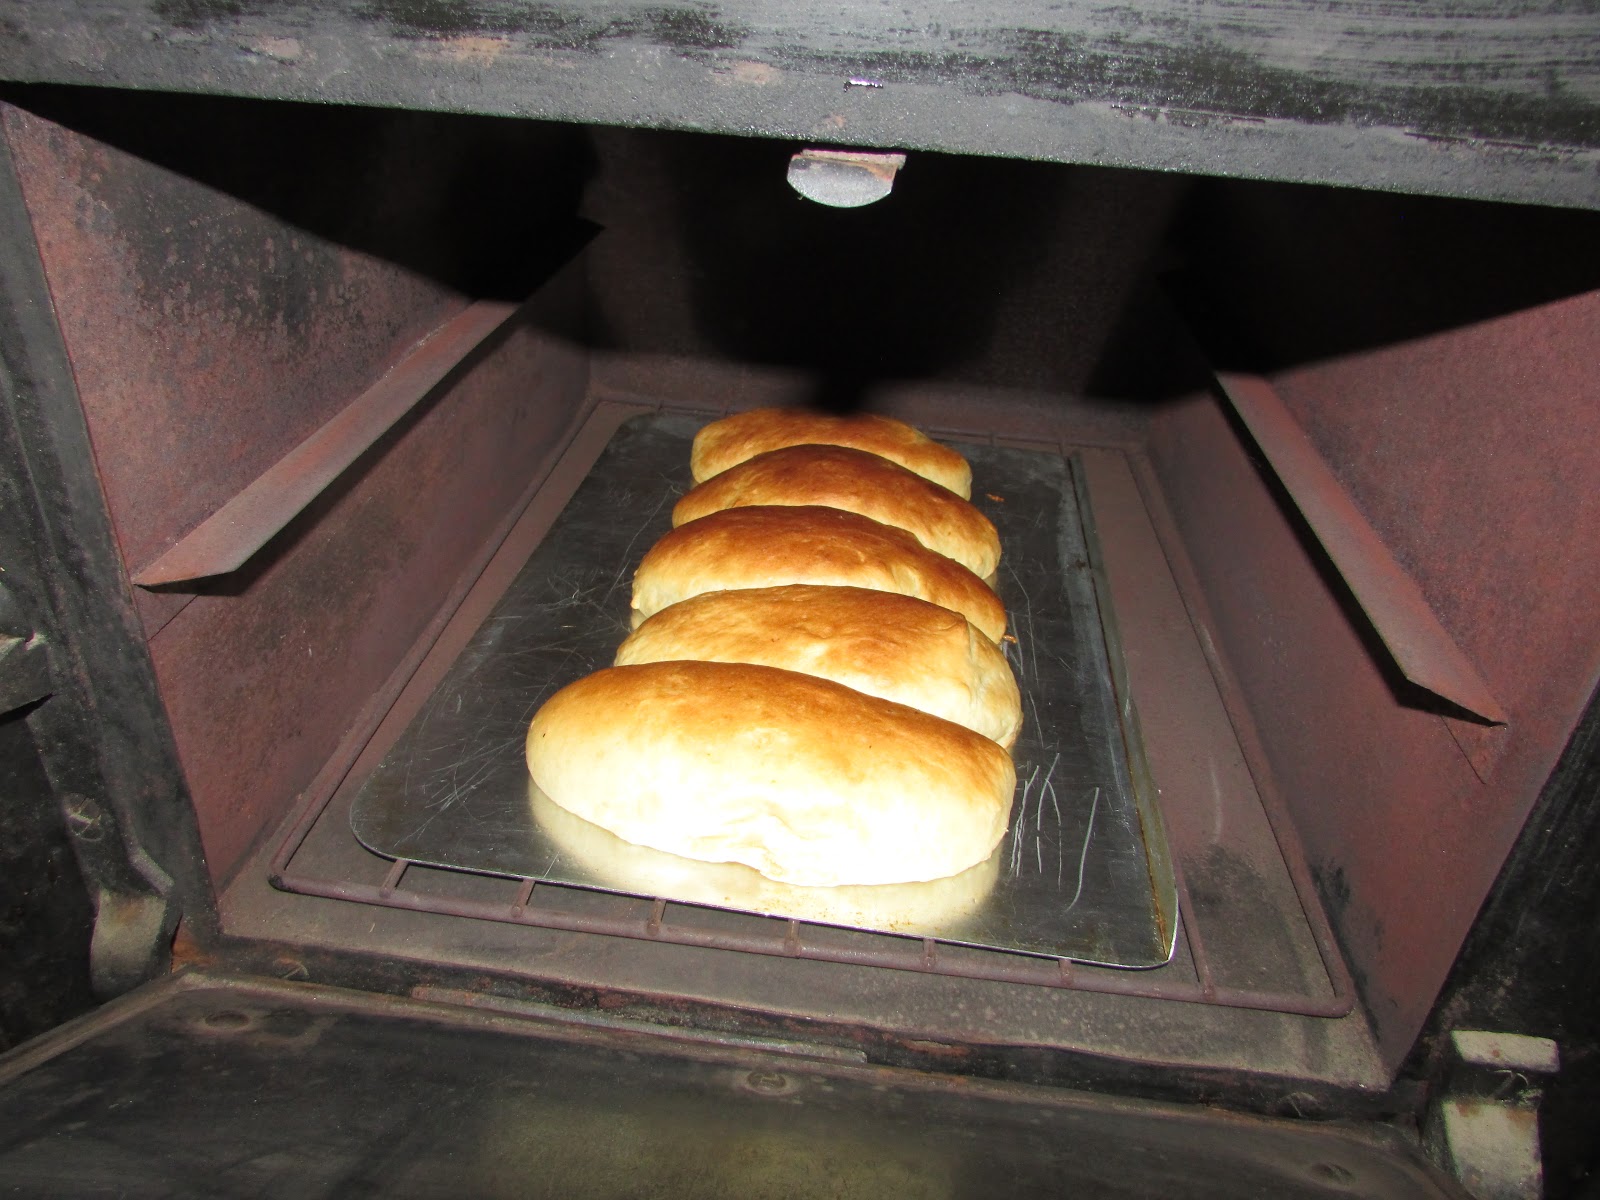
I really think this Hayes-Custer is quite fuel efficient.  On just a few sticks, I can do quite a bit of cooking and baking.  Speaking of baking, I think it does a beautiful job of it.  In the picture below, I left the goods in the oven about three minutes too long (my fault entirely), but isn't everything a beautiful, uniform golden brown?  I didn't have to rotate anything during the baking time, either.

Bread and rolls coming out of the oven on the Hayes-Custer.  Notice how 
small a fire was required to keep the oven hot.

Oh, and I wish someone would explain something to me: Why do I like cinnamon rolls that are made out of bread dough so well?  I make very good cinnamon rolls using my own variation of my aunt Meme's recipe.  For Monday Market baking, I mix up 15 batches of those rolls, five batches at a time.  People stand in line to buy them.  But, when I'm baking bread for just Nancy and me, I sometimes make one loaf's worth of the dough into a pan of cinnamon rolls.  That's what I did in the picture above.  And I love them!  They have less fat and less sugar in the dough; they are not nearly so light.  In fact they're downright chewy, and I savor every bite!  But why?

Anyway, the picture below is my first ever attempt at tater-tot casserole.  It was very good, but I'm just not a huge fan of tater-tots.  I would like to try it as the recipe originally said, which was to make it with sliced potatoes.  We'll see.  Didn't the Hayes-Custer do a nice job of browning the tater-tots, though?  Nancy doesn't like vegetables to be in the casserole, so the two saucepans over the firebox have home-grown peas and sweet corn from our freezer in them.


During Covid-19 quarantine time, I learned to make hamburger buns from scratch.  The ones that I made on Tuesday of this week were the best batch ever.  The secret?  I think it was the fact that I used bacon grease in them instead of Crisco or vegetable oil.  I've never done that before.

The buns didn't taste like bacon at all, but they were very tender.  They look a little brown on the top, but they were actually just perfect.  I made them for the barbecued shredded pork that you can see in the smaller saucepan directly above the oven.  I made the shredded pork out of some that I had canned on the Margin Gem back in 2017.  The sandwiches were very delicious.

When I start a fire to do some cooking in the summer, I try to take advantage of the fire as much as possible in order to be more efficient.  The black saucepan on the warming shelf has hardboiled eggs in it that are being timed before their cold water bath.  The saucepan over the firebox was water coming to a boil for cooking pasta for a salad.

The last picture is of yesterday's breakfast--and supper and today's supper actually.  The pancakes and part of the bacon were the breakfast.  The rest of the bacon and the chicken breast hidden inside that small cast iron skillet on the back of the range all went into the aforementioned pasta salad.

Breakfast cooking on the Hayes-Custer wood cookstove.

There has been much more cooking done on the Hayes-Custer already this summer, but not every occasion has warranted a picture.  As you can see, the stove has been busy, and I must say, it's been very cooperative too.

I've got a series of posts using this stove coming up, so stay tuned!

Saturday, June 27, 2020

Using the Hayes-Custer Range in the Summer Kitchen


As I've mentioned before, we moved our summer kitchen closer to the house in April of 2019.  However, I didn't get a cookstove hooked up in it last summer because I was so busy with all of the rigamarole of publishing my novel.  This year, because of all the Covid-19 stuff, I've had a lot more time at home, so with the help of my brother, I was able to move the Riverside Bakewell to a different corner of the summer kitchen and put the Hayes-Custer on the hearth.

First, some of you may be wondering why I traded the beautiful green and cream Riverside Bakewell with its spacious warming ovens for the beige Hayes-Custer which is only outfitted with a high shelf, especially when I tell you that the baking ovens and cooktops are the same size.

The Riverside Bakewell--former occupant of
the hearth in our summer kitchen.

Folks, it all comes down to this:


The right oven door hinge broke some years ago, and while the stove still heats, cooks, and bakes just fine, this is a major inconvenience, and it's also rather dangerous since one has to balance the hot oven door on one's knee in order to transfer anything into or out of the oven.

Besides, I also wanted to be able to share the experience of cooking on a different cookstove with all of you.

You can read about the acquisition of the Hayes-Custer at this post, and you can read about the history of the Hayes-Custer Stove Company here, so this post is about the range itself and its actual use.

This stove has done 100% of the cooking, baking, and food preservation here since its installation on June 12th.  While food preservation has so far only been canning pickled beets, blanching peas for the freezer, and a batch of mixed fruit jelly, there is a lot more of that to come.  The meal preparations have only involved breakfast once because I've been eating a lot of toast and cold cereal on these warmer mornings, but dinners and suppers have been a little more elaborate.

So far, I would say that the stove performs just fine.  I do have to rotate things which are baking, but I've got some chimney improvements to do which may change that.  I'll let you know.

The fire you see burning in the stove is of wood, but yes, you
do see coal in that hod in the lower right corner of the picture.
I'm trying to learn how to burn coal, but it is proving to be quite
the learning curve.  I'll let you know if I ever get it figured out.

In the picture below, you can see some homemade hamburger buns which were toasting over the fire, waiting for the barbecued beef which is in the pot to their right.  The hamburger buns were baked in the Hayes-Custer and rotated once.  You can see that the bottoms were sufficiently browned as well.


One of the things that I like about this stove is that it has a pouch feed with a door which lifts up.  The Riverside Bakewell has a pouch feed, but it opens down.  The Qualified Range has a pouch feed too, and it opens up, and I really prefer this arrangement.  The Margin Gem doesn't have a pouch feed, and I would have to admit that I miss it.

You can also see from the picture below that the hole for the lid lifter in the "T" has worn through, and I have stuffed it with foil so it doesn't spoil the draft.  There is also a chip out of the cast iron to the right of the pouch feed door, which I have also temporarily patched with foil for the same reason. This is not scientific stove repair, but it is certainly affordable.  (Actually, the foil had even been used once already.)


While putting the stove back together after moving it, I noticed something unique about the pouch feed door.  The left hinge pin is constructed such that it has a tab on the end that juts out to the left.  This seemingly little thing is actually quite thoughtful on the part of the Hayes-Custer designers. The Qualified Range is not equipped with this extra tab, and I've had the pouch feed door fall off a few times during particularly athletic episodes of adding fuel through this door.


You may have noticed how rusty the top of the range is in the two pictures above.  I had removed all of the rust with my grill brick and given it a good coating of vegetable oil once the stove was in place, but I've had some hot fires since then, so the oil burned off over the firebox quickly.  Then, even though the summer kitchen is an enclosed building, the windows are open nearly all the time, so the humidity can get pretty high in there.  Hence, the rust came back in a hurry.

You can see in the picture below that this stove has seen some intense heat. Below the pouch feed, a repair has been made using stove cement. I imagine that this injury is the result of an extremely hot coal fire at some point in the stove's history.


The Hayes-Custer firebox is 7" deep x 8" wide x 18" long and is equipped with duplex grates.


Another interesting feature of this stove is that the only place which tells you who the manufacturer was is the outside of the front firebox door.  In a day when most stove makers were prominently autographing their ranges, the Hayes-Custer company was concealing their information pretty well. You can also see from this picture that the handle has broken off the front of the ash drawer.  This makes ash removal a little more difficult than it need be, but I've learned that by prying with a small flat screwdriver or the handle of a pair of pliers, you can create a gap between the top of the ash pan and the opening to get your fingers into and pull.


Although I haven't measured its capacity, the reservoir on this stove seems HUGE.  It must hold at least ten gallons.

Of course, when I run into a vintage stove, I can't help but wonder about its history.  Was this range a household's only heat during the notorious winter of 1936?  How many Thanksgiving dinners did it turn out?  In this stove's previous home, it had not been used since the 1970s when an ice storm knocked out the electric power for a week.  It kept its owners warm and well fed during that time.

No matter what its history, it is certainly working hard in its present.  And I'm pretty sure that I'm the first person in its list of owners to ever bake a frozen pizza in it!  Don't be too harsh on us.  During Covid-19 Quarantine, we've eaten exactly two frozen pizzas, but we've had three from-scratch homemade ones, complete with sauce which was home-canned.

You can see the raging fire that was burning in
order to achieve the quick oven needed for baking
a frozen pizza.

The finished frozen pizza.
I don't know what the temperature inside the summer kitchen reaches, but I can assure you it is beastly hot.  However, doing all of the cooking out there has enabled us to go without turning on our house's air conditioning so far this summer.  In addition, there is very little cost involved in collecting the fuel for this stove since I'm able to use small sticks and other poor quality scrap wood I've picked up in our pastures.  And while the Lord has so far protected us from dire financial consequences during these uncertain times, it does seem prudent right now to trim costs wherever we are able.

Stay tuned for more posts which feature this stove, since it looks like it's going to have a busy summer.

In the meantime, if you are interested in the Riverside Bakewell, let me know--since I'm interested in having the floorspace back.

Friday, June 19, 2020

Using My Brother's Vintage Montgomery Ward Cookstove in Our Summer Kitchen

So, way back in 2013, I blogged about my brother's new-to-his-family cookstove in this post, and for nearly seven years, I've been looking forward to hauling this little cookstove over to our place and hooking it up in our summer kitchen.  Since we moved the summer kitchen much closer to the house last spring, we had disconnected the Riverside Bakewell cookstove that was in it.  I wanted to perform a little cookstove rotation anyway, so this was the perfect time to try this little baby out.

When I say "little baby," I mean it.  With the cast iron eyes and "T" removed from the cooktop, I am able to carry it by myself.  Kevin was surprised to find that I had carried it out of the loft of his shed without assistance.  This stove is 26" wide by 21" deep, and it is a back-breaking 25" tall, but don't let its diminutive size fool you.  This stove performs very, very well.


As I have mentioned before, there is no joy in cooking with a wood fire for me unless the stove I'm using has an oven, so I was particularly interested in how this stove would bake.  At first glance, the oven seems tiny, measuring 17.75" deep, 13.5" wide, and 9.5" tall.  In the picture below, I tried to give you a little perspective by holding my spread hand in front of the oven door.  I'm not sure it was the most effective photography technique, though.


Also, it is the first oven on a woodburning cookstove that I have used to be heated using a configuration similar to the one illustrated in the bottom drawing below.  The oven damper is operated by a small lever near the upper right hand corner of the oven door.  For kindling the fire, the damper is turned to the right.  For baking, the lever is turned to the left and thereby diverts all of the smoke and heat from the fire around the oven box.


Well, the stove was installed in our summer kitchen from June 5th to June 12th.  During that time, I did absolutely all of our cooking on it, and I was thoroughly impressed.  You can see from the pictures below that baking was no problem at all.  I did rotate a few things, but this is not uncommon in wood cookstove cookery, and I was pleased and surprised to note how well the bottoms of things had cooked (this can sometimes be a problem on some wood cookstoves).  

The first thing that struck me about the operation of this stove is how quickly it heated.  With the first fire I built, I had the oven temperature up over 400ºF within 15 minutes.  The firebox is small, but not overly so, and during the whole time that the stove was in use, I only used small sticks and wood chips picked up from the floor of the shed where we keep the wood splitter.  Even though the stove is nowhere near airtight, I would say that it was remarkably efficient as I was surprised at how much cooking I could do on so little fuel.


While the stove was in service here, I baked sweet potatoes, sweet potato casserole, bread, hot dog buns, a sour cream cake, a meatloaf, and brownies.  The only thing that didn't turn out well was the brownies--and that was due to a little nephew messing with the timer, not any problem with the stove.


The size of the oven was not as limiting as I thought it would be.  The brownie recipe calls for them to be baked in a 10" x 15" pan, and it fit and worked perfectly.


I have already blogged about cooking our supper of shrimp scampi and capellini pasta, but that was a supper for only two people.  

Our supper of shrimp scampi and capellini pasta
cooking on the tiny Montgomery Ward Cookstove.

I wanted to stretch the capacity of this little stove a bit, and since my young nephews claim the stove as theirs, I wanted to teach them how to use it, too.  Thus, we invited my brother and his family over for supper and therefore served supper for eight cooked on this tiny cookstove.  We had Lamb Loaf Supreme (a recipe out of a vintage pamphlet from the Martin Meat Market which used to be in our hometown--I wasn't impressed, so you won't get to see the recipe here), mashed potatoes, and fried cabbage.  As you can see from the picture below, we had sufficient room on the stove to have been able to cook more food if we had wanted to.


The one characteristic of this stove that I didn't care for was the fact that the sliding draft on the left side is located at the same level as the grate so that when you rake the ashes down or maneuver the dump grate, ashes jump out of the stove onto the floor--a minor inconvenience but worth mentioning.

Overall, the experience of cooking on this stove was fantastic.  Its ease of use and fuel efficiency were quite impressive.  If given the choice between this stove and no wood cookstove at all, I would be glad to have this Montgomery Ward Economy Cookstove.  

One thing I couldn't help but wonder about was its room heating capacity. Our summer kitchen is only 10' x 12', and the weather was hot here the whole time the stove was in use, so I have no idea how warm it might keep a home in the winter.  My romantic side thinks it would be fun to test this stove in some kind of small cabin in the middle of a blizzard, but that will only happen in my imagination.

If you are local to the greater Omaha area, an identical stove is currently for sale on Craigslist at the following link: https://omaha.craigslist.org/fuo/d/valley-antique-black-white-cast-iron/7133461955.html

After supper with my brother's family, we let the fire go out and exchanged this little cookstove with the Hayes-Custer that I brought home in March of 2018 (more on that stove will be coming).  The next day, I gave my brother's little stove a coat of stove black to retard rust, and he has taken it home now.  I feel better knowing they have it back.  In the event that some humongous disaster occurs, I know that they will be able to stave off starvation with this little marvel.

Thursday, April 4, 2019

Moving the Summer Kitchen

Monday was a big day at our place.  It was the first day in the last eight that I didn't have some kind of school obligation or other.  I was not scheduled to substitute, so I spent the whole day at home trying to get some things done.  While I was eating my lunch, my brother came in from loading out corn to find out if it would work to move the summer kitchen. Secretly, I had been hoping all morning that this would be the case, but he travels a lot since he is the First Vice President of the National Corn Growers Association, and his days at home are usually quite full as he catches up on farm work and other responsibilities.  Therefore, I didn't want to exert any pressure.  But, bless him, he took time out of his busy afternoon to organize and transport the necessary equipment while I vacated the more portable things from the inside of the building.

Originally, we put up this shed to operate a small bakery out of it at the end of our driveway.  After seeing how the Amish in southern Iowa have bakeries and little grocery stores on their farms, we thought that we'd like to try something like that.  Thus, back in the summer of 2009, we purchased this Tuff shed, finished the inside, installed the Riverside Bakewell cookstove, which I had had since the late 1990s, and began baking every Saturday that fall until it got so cold that the garden hose which supplied our running water froze.

We did an okay business that fall, and I learned A LOT.  Our biggest problems were that it was hard to sacrifice the time from our already busy weekends, and we never knew how much we were going to sell.  Some Saturdays we didn't have anything left by the evening; other Saturdays would see us with five or more loaves of bread that didn't sell.

We opened again the next fall, but it became a drag in a real hurry, and so ended that phase of our lives as custom bakers.  The "shed" as we called it, then became our summer kitchen, but because it was located a full 75 steps from the back door of the house, cooking down there was colossally inconvenient.  Couple that with the fact that the oven door broke during the family reunion in 2011, and you have all of the reasons that we just haven't used the summer kitchen all that much.


True confessions now: we didn't have a clue as to how to move a building. I'm not sure that I do yet, but Kevin is brave and adventuresome, and we accomplished the task!


The summer kitchen now rests on a concrete pad north of the house where our old garage used to be.  It is only 11 steps away from the back door, and is actually very close to where the original summer kitchen/washhouse was on our farm.  Hopefully, this will mean that I'll use it more.

Noting that Sunday evening marked the end of March and that there are only a maximum of two more months that we will use the Margin Gem on a daily basis, I lamented to Nancy, "I already miss the cookstove."  She was in a different room; otherwise, I'm pretty sure I would have seen an epic eye roll in response.  But, now I can look forward to just switching to a different cookstove!

I'll keep you posted on the progress as we get the summer kitchen rearranged and in operation.

Thursday, June 11, 2015

First Time Cooking in the Summer Kitchen in 2015

I know I'm an odd duck.  I'm used to it, and I'm fine with it, so please don't point it out. 

We had started the electric water heater in the early days of May, and I started whining to Nancy about how much I missed the wood cookstove after only one day of cooking on gas, so we've had Margery the Margin Gem cookstove going intermittently.   On May 30th and 31st, for example, I had a lot of cooking to do and so had fired her up.  One of the things that I cooked on those days was a caramel cheesecake--stay tuned for the upcoming post!  However, I had been cooking mostly on the gas stove since then.

Sorry, but I feel the need to vent a little about our propane range.  You see, I was raised in a home with an electric stove; in fact, the only person on both sides of my family to have a gas stove is my aunt Cheri, who has simply had gas stoves at various times during her many travels and moves.  Nancy, on the other hand, was raised with a gas stove, and her grandmother also had one.  Thus, since I got the wood cookstove that I wanted, the modern gas range next to it is the compromise that proves my love for my wife.

Of course, my opinions weighed heavily in our choice of the gas range, and I think we chose well.  I'm just surprised and frustrated by a couple of the characteristics of today's gas range.  I've cooked on only four gas ranges: the tiny, ancient, unbranded one in our church basement, the 1950s Crown in my parents' basement that we use to freeze sweet corn, the new one in our kitchen now, and the old Hardwick that my grandparents installed in our basement years ago in case of an extended power outage (used twice in my recollections of growing up here).  When we gutted our kitchen in 2011, I cooked on the Hardwick for about a year.  I don't mind cooking on old gas ranges, but our new stove (and every gas stove that is available on the market now) has the cooking vessels sitting so far above the gas burners that the amount of heat that escapes up the sides of the pots is just unreal.  Also, I'm continually surprised at how much heat comes out of the oven vent!

All of this is to say that in the 95 degree heat that we had on Tuesday, I was not excited about cooking supper in the house, even though the air conditioning was on.  The thought of all the heat that comes into the room from the gas range was enough to make me want to have just a bowl of cold cereal for supper, but our nephews were here, so we had to be more responsible and balanced in our meal choice.  Hence, the boys and I trooped down to the summer kitchen and started the Riverside Bakewell.

"But, Jim, wasn't it already 95 degrees in the summer kitchen before you even started the stove?" most sane observers would ask.

Well, yes.  It was already hot in there, and we made it hotter.  I already told you that I know I'm crazy.

We cooked some marinated chicken and macaroni and cheese (which with carrot sticks and fresh strawberries constituted our supper), and then I baked banana bars down there afterward.


Supper cooking on the Riverside Bakewell cookstove.

So yes, it was hot down there, and yes, the summer kitchen is a full 75 paces away from the house kitchen, but cooking on a woodburning cookstove just feels right.  If I could explain it any better, I would.  Surely some of you loyal readers who have your own cookstoves know what I'm talking about and could agree with me in the comments section below so that I don't have to feel quite so weird, right?

I don't know the history of the Riverside Bakewell cookstove as I bought it on an estate auction, but when I'm cooking a meal on it, I can't help but wonder how many meals it turned out before it was put out to pasture for a time.  How many Thanksgiving dinners did it cook?  Did it help keep a family from freezing to death in the notorious winter of 1936?  How many corncobs has it consumed in its lifetime?  As you can see, I have an overactive imagination.  Anyway, add one more meal to the count!

Sunday, August 31, 2014

Our Summer Kitchen

I had a request for more information and pics of our summer kitchen, so I thought I'd write a quick post about it.  Our summer kitchen is just a Tuff Shed that we purchased in July of 2009.  Originally, we were thinking about having a farm store/bakery at the end of our driveway.  We spent Saturdays of the fall of 2009 baking breads, pies, and cinnamon rolls in the Riverside Bakewell cookstove down there.  We opened for a few Saturdays in 2010, but we decided that for various reasons the reality of having a farm store/bakery was not what we had envisioned it to be.  Thus, the building is now just called "the summer kitchen" or "the shed" and is used occasionally for canning and cooking, but mainly just for storage.  If we ever get our dilapidated garage torn down, I would like to move the summer kitchen up closer to the house where I'm sure that it would get more use.

We wanted to be as economical as possible, so we chose a 10'x12' shed because that was the largest building that we could erect without having to go through the difficulties of county permits.  We painted its exterior to match the paint scheme of our house, and we hung drywall and pegboard on the inside, finishing with trim around the windows and door and baseboard.  The following pictures were taken last November.


The first thing that catches your eye when you walk in is the green and cream Riverside Bakewell cookstove.  I purchased this stove at an estate auction in McClelland for either $240 or $260--I can't remember which.  The fellow who owned the estate had refurbished the stove so by putting a new oven box in it.

As the pictures show, the chimney situation for the stove is not great.  When you buy a Tuff Shed, you order your shed according to the specifications that you request from your salesman.  Then Tuff Shed sends an installation crew out to assemble your shed on your property.  I had negotiated with my salesman to have the Tuff Shed people install the chimney for the stove since they would be assembling and shingling the roof.  Unfortunately, the message about the chimney did not make it from the sales desk to the crew foreman's clipboard, so while I was able to convince the crew to install the chimney, the situation was not good and the chimney did not end up being installed correctly.

This made for some extra difficulties in attaching the stove pipe to the chimney, and my extremely poor sheet metal working skills were no help (hence the two ninety-degree elbows just above the warming oven).  After reading some things from Woody Chain about stovepipe and chimney installations, I think I'm going to endeavor to at least partially rectify this situation.

This seems a good time to point out that we do not carry insurance on our summer kitchen building.  I don't know of any insurance company who would insure a building with a stove that is connected to an improperly installed chimney.  Furthermore, because of the limited space in the shed, the stove is installed WAY TOO CLOSE to the walls.  You can see that the rear wall of the shed is protected by sheets of quarter inch concrete board which are fastened to the studs using electric fence insulators.  These prevent the heat of the stove from burning down the summer kitchen, but I'm only comfortable with this arrangement because of the fact that while the stove is in use, we are always right there with it (and our bedroom is not above it!).

The Riverside Bakewell with its poorly installed chimney
in our summer kitchen.
 
To the left of the stove is the sink.  This cast iron beauty was rescued from an Omaha dumpster by my uncle.  We had the sink refinished by Nebraska Permaglaze, and now it is my second favorite feature in the summer kitchen.  Naturally, it only has a cold water spigot which is fed by about seventy-five feet of hose attached to one of the farm's hydrants up the hill.  The drain is connected to pipe which goes out of the side of the summer kitchen and angles down toward a five gallon bucket.  Waste water is then used to water the lawn around the shed.  The pipes for the sink are visible on the left side of the first picture above.
 
The sink in our summer kitchen.
The view below is looking from the sink to the south side of the room.  You can see that the stove sits on a prefabricated stove pad purchased at Menards.  We painted the floor with Dutchboy porch floor paint, and I have been very impressed with how well it has held up.  The counter top is made of cheap pieces of plywood, cut to fit over old metal Youngstown kitchen cupboards.  These cupboards were installed in our house's kitchen by my grandparents in the early 1950s.  They took them out in the late 1970s and put them in the basement.  Then, when the basement was redone, the cupboards went to the garage.  I removed the handles, cleaned them up, spray painted them, put the handles back on, and they are now back in commission.


The next picture is taken from the same spot as the previous picture, but the view is turned toward the door.  We hung peg board and shelving in this corner because this was where we originally displayed our baked goods, cards, and needlework that was for sale.  Now we use the shelves for storage.


The view to the north while standing between the stove and the counter.


The summer kitchen is not equipped with electricity.  Again, we didn't want to have to go to all the trouble of permits and what have you.  Therefore, we did opt for the skylight, and this makes it so that the shed is a wonderfully bright place to work during the day.  At night, the oil lamps that you see in the pictures are employed.

Also note the register that you see at the peak of the ceiling.  We opted for one of these on both the east and west sides as well as the rotating roof vent that you can see in the second exterior picture above.  Our idea was to make it so that the heat could circulate out of the shed as easily as possible.  An unfortunate side effect of this arrangement is that with the poor chimney situation, the shed itself almost has as much draw as the chimney, so refueling the fire can sometimes be a smoky affair.


Besides the wonky chimney, one thing that I really want to change about the shed is the arrangement of the counter.  As it is, while you are working at the counter, your back is very close to the range.  In the winter, this doesn't feel too bad, but in the summer it is hot.  In reality, the whole shed can get quite hot in the summer.  We have a thermometer inside it, and its maximum temperature is 125 degrees Fahrenheit.  The thermometer has been completely red, and I suspicion that the temperature was actually closer to 140 degrees on the worst days.  That's plenty hot!


Thursday, August 29, 2013

Vintage Recipe for Cole Slaw Dressing

As many of you probably know, the Midwest has been socked with sweltering weather for the last few days.  This has made it so that we haven't had any desire to fire the Margin Gem since the 17th, and we have been avoiding cooking much with the gas stove, too. Tonight, however, I headed down to the summer kitchen to try a quick vintage recipe.

During the summer, I spent some time looking at more of the recipes in the 1926 West Pottawattamie County Farm Bureau Women's Cookbook (some of you may recall that I had tried a candy recipe from this cookbook just before Christmas).  I know that many of the regular readers of this blog are interested in homesteading and self-sufficiency, so when I ran across this recipe, I made a mental note to try it because it uses ingredients that many homesteaders would either be able to produce on their own or would usually keep on hand.  I'm excited to also tell you that it turned out to be delicious!

For one head of cabbage, you'll need 3 egg yolks, 2/3 cup sugar, 2/3 cup vinegar, 1/2 cup cream, salt and pepper. 

Here is what you do:

In a heavy saucepan, beat the egg yolks.  Then beat in the sugar.  Add the vinegar and place it over the fire to bring it to a boil.  Stir constantly.


The egg yolk, sugar, and vinegar mixture on the fire.

I was able to cook the dressing on a very small fire
made only of corn cobs and pieces of bark picked
up from the ground in the shed where we split our
firewood.

Once the egg, sugar, and vinegar mixture has come to a good boil, add the 1/2 cup cream.  Bring back to a hard boil and then remove from heat.

The salad dressing once the cream has been added.  I was using
cream from our own cow, so you see white lumps of cream
which were very thick and had not yet melted when I snapped
the picture.
Add salt and pepper to taste, and then chill the dressing mixture.  It will congeal to a soft set as it cools in the refrigerator.


Nancy shredding the carrots and cabbage using
Granny's Saladmaster.
While the salad dressing was chilling in the refrigerator, Nancy and I prepared the cabbage and carrots with my grandmother's ancient Saladmaster.  Somewhere I have the advertising brochure that went with the Saladmaster cookware set. It was purchased for three hundred and some dollars in the 1960s, and I'm sure that it was a major purchase for my grandparents at the time. 

I can remember Granny making cole slaw with this machine when our house was still her house in the late 1970s.  Her cole slaw was always outstanding, but she made the dressing with Miracle Whip--which, of course, would have meant that there would have been no reason to fire up the Riverside Bakewell and write a blog post. :)

When the cabbage and the carrots were ready, the dressing was cool.  We combined everything and threw in a few dried cranberries.  The results were great!

The finished cole slaw.
Here is how the recipe originally appeared on page 129 of the 1926 cookbook:

Dressing for Cabbage Slaw
Mrs. Geo. J. Ward
3 egg yolks beaten                            2/3 cup vinegar
2/3 cup sugar                                    Salt and pepper


Beat the sugar into egg yolks, add vinegar and seasoning.  Boil this mixture, stirring all the time.  Add 1/2 cp sweet cream, let boil again.  When cold mix with chopped cabbage.


Again, I have to say that I'm very impressed with this simple old recipe.  It is easy and delicious, made of things that I always have on hand, and I can pronounce everything that is in it.  That's what I'd call a winner.

Saturday, July 16, 2011

Starting the Stove

The Riverside Bakewell cookstove in our summer kitchen.
Just as each cookstove behaves uniquely, each chimney is unique as well.  The same stove when moved to a different chimney can become a different beast.  This post will show me starting the Riverside Bakewell in our summer kitchen.

Our summer kitchen, a Tuff Shed, was designed and finished with the knowledge that we wanted to let as much heat escape the building as possible.  Unfortunately, this resulted in the building itself being as good a chimney as the flue that the cookstove is attached to.  Therefore, starting the fire can be a very smoky affair until a sufficient draft is established in the chimney.  To prevent being smoked out, I first burn just a couple of sheets of crumpled newspaper in the firebox.

A piece of crumpled paper and a couple of tissues in the firebox. 
Notice that the ashes are cleared off the grate.

I then make sure that the stovepipe damper is open,


the oven damper is open,

The knob is broken off the oven damper, but you can see the hole
next to the word "open."

and the side draft is partially open.


Then, I light the paper and put the lid back over the firebox.  As you can see in the picture below, the smoke that was let into the room was minimal.


Once the paper had been burning for a little while, all the smoke began to go up the chimney.  After the paper has completely burned, I put more crumpled papers into the firebox and add a few small sticks of kindling.


Kindling burning in the cookstove.

It usually won't be long until you have a nice little fire of kindling.  You can then gradually add larger pieces of wood.  Because of the draft problems in our summer kitchen that I mentioned earlier, I cannot completely shut the oven damper as quickly as I always could with the stove in our house kitchen.  In the summer kitchen, I have to close it partially to strengthen the draw around the oven.


If baking is your goal, or if you want the maximum heat output of the stove, by the time a good bed of coals has been established, larger pieces of wood can be added, and the oven damper can be completely closed as shown below.  Of course, if you have a chimney that draws well, the oven damper could be closed shortly after the paper has burned away in the firebox.


Drafts can be closed down to slow the burning of the fuel and to thus conserve it.


Due to the fact that the firebox side of this stove is very near the sink, you can see that I put water in a canner and a 40-cup coffee pot over the firebox.  Otherwise, the heat that radiates from this side of the stove is nearly unbearable to stand next to.

Keep in mind that each stove is different.  This is what works for this particular stove while hooked up to this particular chimney.  Please feel free to share your "startup" methods.