Showing posts with label wood cook stove. Show all posts

Monday, September 11, 2017

Cookstove Road Trip to Mill Creek Antiques in Paxico, Kansas

Nancy had a total replacement done on her left knee in June, and she is having the right one done as I type this post.  Since she spent most of the summer recovering from the first surgery and since her recovery used up her vacation time, we didn't take any vacation this summer.  Instead, we've opted for a couple of day trips.

On Labor Day, we went to Jamesport, Missouri, which has a large Amish settlement.  We only saw one cookstove, a small Windsor that was a decoration in a cheese shop.  There was a cookstove dealer in the area, and after a few wrong turns we were able to locate his shop.  He did not have any cookstoves on display, however, as he mostly sets up direct shipments from manufacturer to buyer.  In the course of visiting with him, he told me that in the last seven or eight years, their settlement began allowing the use of propane cooking stoves, so most of the younger Amish families used them for their cooking now.  This was no surprise to me since I've noticed this trend in other Amish areas that we have visited.

Last Saturday, we trekked to Paxico, Kansas, to visit Mill Creek Antiques.  To my knowledge, this is the antique stove store that is closest to us. Neither of us had ever been there before, but it is a most impressive place, and I am already looking forward to going back.

Storeowner and expert stove restorer Steve Hund was on hand at the store as well as his very personable and entertaining assistant salesman, whose name I'm embarrassed to have forgotten.  I have been in a lot of antique stores, but this one was extraordinary in that it is not cluttered up with the usual run of mid-twentieth century glassware and bric-a-brac.  Further, the store is set up to feel much more like you've walked back into time and are shopping in an old fashioned stove and furniture shop.

When we walked in the front door, we took an immediate left and saw several period gas stoves, but the salesman directed our attention to an Acorn combination range that was extremely unique.  The only other Acorn cookstove that I've been in contact with is discussed in this post about the wood cookstoves at Living History Farms in the Des Moines area.  Acorn manufactured quality stoves, but the one we saw in Paxico was fascinating. This was the view that we had when we walked into the room.  You can see the gas cooktop and the high gas oven stack on the right.

The Acorn combination gas/wood cookstove.


I could see that there is a wood or coal burning firebox on the lower left with an oven to the right.


The salesman pointing out where the grate shaker
is located while I snapped a view of the left side
of the stove.

Then the salesman showed me one of the most surprising features of a stove I have ever seen.  The gas cooktop was hinged so that when you wish to cook on solid fuel, you just fold the gas cooktop into the back splash, revealing the second cooktop!  I had never seen anything like it.

The Acorn combination stove with the gas cooktop
latched in the up position.

Interior shot of the long, narrow oven which is heated by the
wood or coal fire.

The room with the Acorn had two toy wood cookstoves in it, which I took a couple of quick snaps of.


Then we traveled to the main stove room, which was just beautiful.

The main stove display room.  If I'd have been
thinking at all, I would have shot this in black
and white because then it would have been hard
to tell this photo from one of those period
pictures you see of hardware stores in the past.

Of course, I was immediately drawn to the Majestic cookstove in the right rear part of the room.  You can't imagine my delight at finding that a fire had been lit in it, and a round link of homemade German sausage was cooking. This stove is gorgeous, and my photograph does not begin to do it justice. For one thing, you cannot see how the nickel plating gleams.  This stove is ready to turn out many more delicious meals while gracing whatever kitchen it lands in.

The Great Majestic cookstove with its firebox door
open to show the fire.  The sausage link is cooking
in the pan over the fire.  I wish you could see how
shiny this stove is.

Other cookstoves in this room included the ones below, all ready to begin cooking again.

A Monarch range.  My guess is that this stove is
from the 20s or early 30s.  This stove looks like it
may be the same model that blog reader Tim in
Minnesota has.  Tim's post can be read here.

A cute, smaller, later model Majestic than the
one that had the fire in it.

This stove is listed on Mill Creek Antiques'
website as a Malleable Cookstove.  The right
side of this stove used to have four gas burners,
but they have been replaced with a big piece
 of cast iron to make a convenient, heat safe
work surface.  The gas oven and broiler are
above.

A Home Comfort Range with a stovepipe oven resting
on its cooktop.  Home Comforts had reputations as
real work horses, and many of them are still in regular
use today.

One thing I would like to add about the stoves being sold at Mill Creek Antiques is that I felt the pricing was quite reasonable for the quality work that each stove exhibits.  A short conversation with owner/restorer Steve Hund assured me that he knows exactly what he is doing when it comes to stove restorations, and his 40+ years of experience make him a valuable resource for information.

In addition to stoves, Mill Creek Antiques carries high quality antique furniture, most of which is quite unique.  They are also an Aladdin Lamps Authorized Dealer, and they carry a huge selection of flat wick antique oil lamps and other light fixtures.

Paxico has a number of other antique stores in its small business district, but I don't think any of the other store owners would argue with me when I say that Mill Creek Antiques is the town's crown jewel.  Nancy and I are already looking forward to our next trip to Paxico.  I hope it will be in the dead of winter when the store's many heating stoves will be in use!


Sunday, June 23, 2013

Cookstoves that We Saw on Vacation

Whenever we venture away from home, I'm always on the prowl for wood cookstoves.  Several days ago, Nancy and I returned from visiting her sister Susan and her husband in southeastern Iowa.  They are fantastic hosts, and Susan always thinks of new and interesting places to take us while we are in their corner of the state. This trip was no exception.

The first cookstove that I saw was at a place that is officially called "Shoppes on Wall Street."  Basically, the "shoppes" are four buildings of second-hand items on the north side of the town square in Seymour, Iowa.  Sitting right outside was the wood cookstove that you see in the following pictures.  I spent a great deal of time examining her and dreaming about how much fun it would be to have enough money (or know-how) to restore her.

I could find no identifying mark for a brand name--which was disappointing--but I did get to learn a little about wood cookstoves that are designed this way.  This is the third wood cookstove that I have seen with the oven up high on the right side.  The first one that I ever saw like this is located at the Machine Shed Restaurant in Urbandale, Iowa.  It is used as a storage cabinet in the dining room of the restaurant where the wait staff keep things like jelly packets.

I spotted the second one online at antiquestoves.com.  It just so happened that we visited the proprietor of the business Mr. Semmelroth in Tekonsha, Michigan, on our summer vacation that year, and I got to see that restored stove in person in his storage garage.  It was beautiful and unique and very similar in color to the one you see below.


I think that the design of these stoves is fascinating.  To begin with, I'm amused by the fact that stove designers of the time tried to copy the high side oven design that was so popular with gas, electric, gasoline, and oil ranges of that time.  It would be pretty nice to not have to bend over so far to see into the oven.  My theory about why this design fell out of style is that the high side ovens generally needed to be smaller than ovens which were located beneath the cooktop in order to keep the width of the range within reason.
 
The oven door open.
 You can see in the picture above that the oven is not very wide since that is a standard size business envelope resting on the oven rack--which by the way is upside down and backward.  You can also see that under the stuff on top of the oven, there are two stove lids.  Clearly, you would have been able to cook on the surface above the oven since it theoretically would have been equivalent in heating capacity to the two stove lids which would be farthest away from the firebox in a regular style wood cookstove.

The firebox (sans ashpan) on the left and the warming oven on the right.
Another thing that was interesting about this stove was the location of the warming oven.  As you can see in the picture above, it was just to the right of the firebox.  Since this is the location of the baking oven on most stoves, I wonder just how warm this space would have gotten.  Note the water pipe just below the grate shakers.  I'm not sure how the stove heated water, but this pipe was connected to some kind of spigot which exited the stove next to the draft on the left side of the stove. 


I didn't get to look at the flue path very well because the stove was full of all manner of material that rodents had drug into it in order to make it into a suitable condo for their kind.  Therefore, I don't know whether the smoke and heat from the fire would have been first routed to the bottom of the oven and then up, around and out, or if everything would have run up the left side of the oven, across the top, down the right side, along the bottom and then out.  
 
While doing the research for this post, I ran across an entry on eBay with the following picture.  Perhaps the stove in the pictures above is a Belknap and Perfecto from about 1940.  This page from the catalog can be yours by visiting eBay here.


 Maybe someday I will know more about these fascinating ranges.
 
Anyway, we then saw a very cute and pretty small cream and green cookstove at Forbush Artiques.  Unfortunately, we didn't have our camera with us, so we didn't get any pictures of that cookstove.
 
On the Monday that we were there, we traveled further east and visited Gingerich Stoves and Plumbing, an Amish stove shop.  Gingerich's sells Margin Stoves, Ashland Stoves, and Kitchen Queen cookstoves.  There I was surprised to see that the Kitchen Queen cookstove actually comes in two sizes.  They had both sizes in their showroom.  While I was looking online to see if I could find information about the two sizes, I also discovered that at antiquestoves.com they are currently offering a limited edition of the Kitchen Queen in green and cream enamel, also.
 
As always, please leave a comment if you can add information about the content of my blog posts.  Thanks!

Saturday, February 16, 2013

Maintaining an Even Oven Temperature in a Wood Cookstove, Part 3


What Works for Other People

As I wrote in part I of this series, every wood cookstove baker has his or her own method of managing the temperature of the oven.  What works for one baker does not necessarily work for another.  Truth be told, what works for a baker on one day may not work for the same baker using the same stove on the next day.  The variables that go into baking in a wood cookstove are responsible for this, which is why I spent part II discussing them. 

In this post, I'd like to discuss what I know that other successful wood cookstove bakers do (or did) to maintain the temperature in the ovens of their cookstoves.  Unfortunately, there is next to no information available about what processes wood cookstove cooks have used to keep the heat steady in their ovens.  This seems odd when one takes into account that for a period of about one hundred years, most households were equipped with this sort of cooking appliance.  However, in my research for this post, I have read over cookbooks and websites and articles to no avail.  I even have original cookbooks which came with ranges made by Riverside, Home Comfort, and Malleable Steel Range, and they say nothing about the process of maintaining an even oven temperature.  Thus, this will be a short post!

Here is the paltry bit of information that I can offer:

1) I live in the Corn Belt where, historically, corn cobs were commonly used as cooking fuel.  I'm planning on writing an entire post about using corn cobs for fuel in a woodburning cookstove at some point in the future.  For now, it is sufficient for you to know that corn cobs burn for only a short time, but they burn quite hot.  One of my aunts told me that when her mother was a little girl in the days when cookstoves were the only cooking appliances in farm kitchens, her grandmother enlisted her mother's help on baking days.  Her mother would be stationed at the open firebox door with a bushel basket of cobs at her feet.  In order to keep the heat of the oven constant, she was to put one corn cob at a time into the fire at regular intervals.  This would have been a really uncomfortable job on summer baking days!

2) Jane Cooper, in her excellent book Woodstove Cookery: At Home on the Range (1977), writes the following:

"I find it easier to bake with coals rather than with flames--the oven temperature is no longer building and there is less chance that the goods will burn.  For short baking times (up to an hour), a bed of glowing coals will maintain the heat long enough without needing more wood.  The draft is opened a crack, and the damper closed.  For longer periods, I add unsplit hardwood sticks, one at a time, to the bed of coals."

This, dear readers, is the extent of any information that I could find from outside sources about how to maintain an even oven temperature, and neither of these methods works for me.    I'll try to hurry with the next post (part IV) about the specifics of what I do to maintain even oven heat.  However, if you are a fellow wood cookstove user, please feel free to fill the comments section of this post with information about how you manage your fire in order to bake successfully.  I'm looking forward to reading what you've got to say!

Saturday, January 19, 2013

Maintaining an Even Oven Temperature in a Wood Cookstove, Part 1


How the Oven on a Wood Cookstove is Heated


One of the most common questions that people ask me about cooking on a woodburning cookstove is how to maintain an even oven temperature.  I think that this question is so popular for two reasons: a) people have heard all manner of folklore about temperamental cookstove ovens and b) though it was once as common a skill as combing one's hair, people no longer have the foggiest ideas about how to control a wood fire.  Trust me when I say that baking in a wood cookstove is really not that difficult.  It is, however, a topic that is complicated to write about, so this is the first of a series of posts about how to manage the oven of a woodburning cookstove.

As with many aspects of cooking with a woodburning range, each experienced wood cookstove cook will develop a sytem which works best for him or her.  All I can do here is share what I know works for others and for me, knowing that each stove and chimney behaves differently than the next.  To begin with, though, it seems like it is necessary to first discuss how a wood cookstove oven heats.

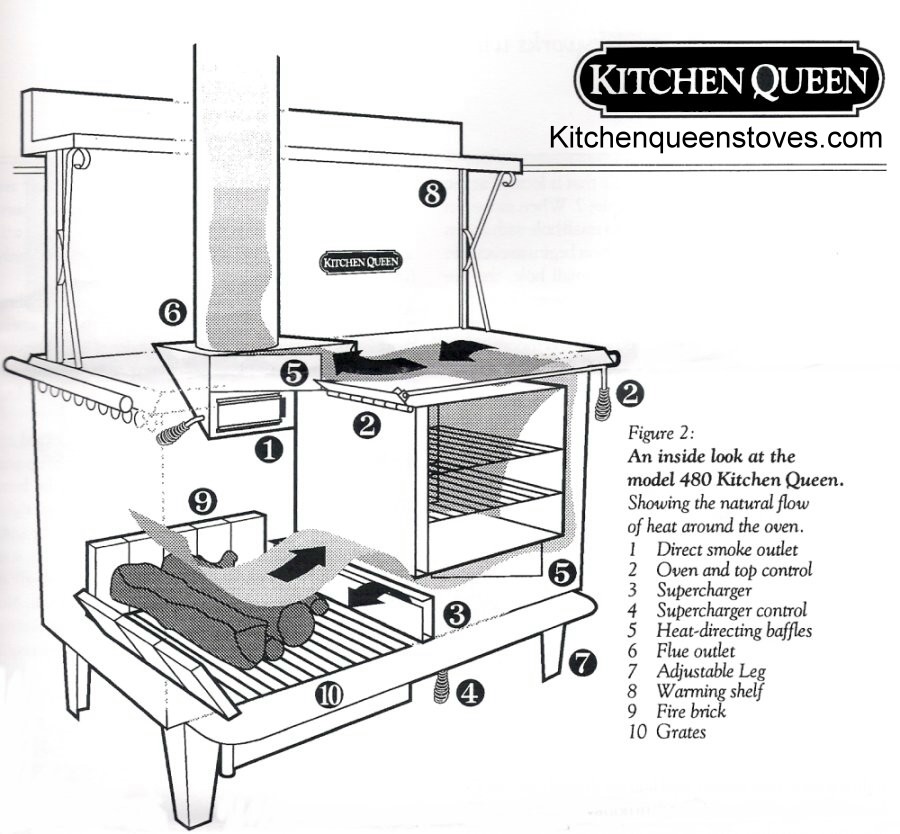
As far as I know, what I'm about to tell you is true about all of the cookstoves being manufactured today with the exception of the the Vermont Bun Baker (or Baker's Oven), the Kitchen Queen, and Enterprise-Fawcett's reproduction Queen Cook.   The Vermont Bun Baker's firebox sits squarely above its oven, and from what I've read, the heat and smoke from the fire are routed down around the oven before exiting via the flue.  The Kitchen Queen and the Queen Cook are both designed so that their ovens are heated from the bottom.

The Vermont Bun Baker.  Photo from
www.vermontwoodstove.com


A drawing of the Kitchen Queen wood cookstove which
shows the flue path when it is in the baking mode.  Photo
from www.kitchenqueenstoves.com.

Enterprise-Fawcett's Queen Cook.  The
oven is the box at the rear with the nickel-plated
image of Queen Victoria on it.  Photo from
www.farmallclub.com.

To the best of my knowledge, all the rest of the woodburning cooktoves which are being manufactured today are designed in basically the same way.  Furthermore, this design has been standard in woodburning ranges since the last two decades of the nineteenth century.   From everything that I have seen or read about the new cookstoves on the market currently, the major differences between the stoves of today and the stoves of yesteryear are mostly due to adjustments in the fireboxes, draft systems, and cosmetic appearances.

Generally, the firebox is on the left side of the stove, and the oven damper is located in the middle rear of the stove just under the stovetop.  The oven damper is a little door which, when open, allows smoke and heat to travel in the most direct route possible from the fire and up the chimney.  When closed, the oven damper forces the smoke and heat to flow around the oven before exiting the stove, thus heating the oven.

The following picture is a scan of p. 283 of John Vivian's 1978 book entitled The New Improved Wood Heat, which was illustrated by Liz Buell and published by Rodale Press.  All of the wood cookstoves that I have worked with, cooked on, or fully examined (over a dozen) were configured in the manner illustrated in the top design.  The only difference is that the three cookstoves that I have cooked on regularly here at home--the Margin Gem, the Qualified, and the Riverside Bakewell--all have a baffle centered under the oven.  This baffle extends from the back of the stove to about half way to the front of the stove, forcing the smoke and heat to travel under the oven and toward the front of the stove before taking a left and traveling to the back of the stove and then out the stovepipe.


Liz Buell's illustrations from John Vivian's book The New Improved
Wood Heat.  The shaded strips represent the path that heat and smoke
take around the oven in a cookstove when the oven damper is closed.
The photos below show the oven damper lever on the left side of the Margin Gem, and the middle rear lid of the Margin Gem cooktop is removed to show the actual oven damper itself.

A picture of the left side of the Margin Gem.  The
oven damper lever is the one with the black knob
on the end of it next to where the top water pipe
exits the waterjacket.  When the lever is down like
this, the oven damper is open.

The Margin Gem's oven damper in the open position so that
smoke and heat can go directly up the chimney.


This picture from the post entitled "Perfect Roast
Beef from Your Wood Cookstove" shows the oven
damper lever in the up position.  This means that the
damper is closed and the oven is heating.

The Margin Gem's oven damper in the closed position, forcing
all of the heat and smoke from the fire to be diverted around the oven.

Now, we are very happy with the Margin Gem for many reasons, but one feature of the Qualified range that I miss is that it had a sliding oven damper.  The Riverside Bakewell range down in the summer kitchen is equipped with a sliding oven damper as well.  I prefer the sliding oven damper over the levered oven damper because you can decide how widely you'd like the oven damper to be open.  The following pictures are of the oven damper of the green and cream Riverside Bakewell in various positions.
Riverside Bakewell cookstove's oven damper handle in the "open"
position.

The middle "French plate" or "blank plate" is removed to show
the oven damper in the open position. 

The oven damper handle in the partially closed position.

The oven damper on the Riverside Bakewell partially closed.


The oven damper handle in the position "to bake."

The Riverside Bakewell's oven damper closed for baking.
The Margin Gem's oven damper is either closed or open; there is no in between.  While I do like the added flexibility and control of the sliding oven damper, it is important to note that I have not been inconvenienced at all by the Margin Gem's style of oven damper either.  Many old stoves were manufactured with the same style of hinged oven damper, and I've never read of anyone clamoring about it as much as I just have.  Furthermore, you can also see that when the oven damper is open, the hole that it creates is really not that large, so some smoke and heat still always travel around the oven to exit the stove.

I am surprised at the variety of places that oven damper levers are found on different woodburning cookstoves.  I've taken the liberty of drawing a cookstove with arrows pointing to the various places where I've seen oven damper levers placed.

Each arrow shows a location where the oven damper has been located on
wood cookstoves that I have seen.

Hmmmm.  I suspect that the aforementioned John Vivian might have artistic abilities which are about as poor as mine, thus causing him to have collaborated with Liz Buell for his book's illustrations.  I'm thoroughly embarrassed that all of you now know the limited extent of my talent in the field of visual arts.

The Waterford Stanley cookstove seems to have a pretty unique baffle and damper system which operates on the same basic principles as I have recorded here, but it is manipulated by using a lever in notched dials on the cooktop itself.  A good place to see how all of that works is at a website called Granny Miller.  You can see the article here.

Now that you know how the heat from the fire gets to the oven of a woodburning cookstove, stay tuned for posts on how to control the heat.

Quick Links:  Maintaining an Even Oven Temperature in a Wood Cookstove, Part 2 Variables

Maintaining an Even Oven Temperature in a Wood Cookstove, Part 3: What Other People Do

Maintaining an Even Oven Temperature in a Wood Cookstove, Part 4: What I Do

Saturday, November 24, 2012

"Automatic" Cooking on a Wood Cookstove

My mother has always taken great advantage of the "Time Bake" feature of her electric stoves in order to be able to have Sunday dinner cook automatically while we were at church.  Nancy and I would occasionally do the same thing with our 1951 Hotpoint electric range, which we sometimes used in conjunction with the Qualified Range until we began remodeling our kitchen.  Usually, whatever meat dish we were having would be cooked in the Hotpoint, and then we would cook the side dishes on the Qualified once we got home.  The reason that we never cooked the whole meal in the woodburning cookstove was because the Qualified couldn't hold a constant fire for the time that we were gone to church since it wasn't airtight.  It would have been able to start the cooking with no problem, but the oven temperature would have dropped to a point where meats couldn't have been safely consumed.

The 1951 Hotpoint was delivered to a used appliance store to hopefully be refurbished and resold shortly after we began serious work on our kitchen in 2011.  I will admit to having been sad to see it go.  However, it had some quirks that Nancy found particularly unforgivable, and the new plan for the kitchen doesn't allow any space for it anyway.  The good news is that because Marjorie the Margin Gem is an airtight cookstove and is able to easily hold a fire while we are gone, I've begun to experiment with having her cook our dinner while we are gone to church.

In The Foxfire Book of Appalachian Cookery, Addie Norton is quoted as saying, "If I put a fire in that woodstove and go out of the house, it's not gonna get hotter.  It's gonna get cooler.  That wood's gonna burn up and it's not gonna hurt nothing."  For the most part, I would say that is true.  The exception is that if you fuel the fire right before you leave it, the fire will first get hotter and then will get cooler.  In an old style cookstove, this cycle will take less time, and the extremes in the hottest point and coolest point in that short cycle are most likely to have a wider gap between them.  In an airtight stove, the burn time will be longer, and the extremes of temperature will not be as discrepant.

Knowing how the heat of the stove will behave governs one's decisions regarding how and what to cook when you are having your wood cookstove cook "automatically."  For our initial experiment, I chose pork roast and mashed potatoes.  I seasoned the roast, put it in our red spatterware roaster, and slid it into the oven.  The oven was running at about 400 degrees at the time that the roast was put in. 

The potatoes were peeled and quartered and then put in a Saladmaster saucepan with a vented lid.  I chose that particular pot because I could put the lid on it tightly, but the chances of the potatoes boiling over were lower because the steam vent on the lid would have reduced the chance of that happening.  I was also only cooking a small amount of potatoes, so the pan was plenty tall in order to provide additional protection against boiling over.  The potatoes were placed between the rear middle and right lids.

Pork roast in the oven and potatoes on top of the stove
ready to cook while we are gone to church.

I then filled the firebox with large pieces of wood, turned the damper down, and completely closed the drafts.  We left at about nine in the morning and got back home at about 12:45.  When we returned, this is what we saw.

Cooked potatoes that were still very hot but no longer boiling.
They did boil, though.  You can tell that by the starch that is clinging
to the sides of the pot.
A completely cooked pork roast.  I know that the top looks burnt,
but there was a thick layer of fat on the top side of the roast.  I cut
the blackened part away since it was not meat anyway, and a tender,
succulent pork roast lay underneath.  The oven was still at a safe
temperature to hold the meat.
 
I put a pint of home-canned green beans on the stove to boil while I mashed the potatoes and carved the meat.  Nancy cut some pre-cooked bacon into the green beans and set the table.  Within minutes of coming home, we sat down to a wood-cooked meal that looked like this:

Yumm!
We deemed this experiment a definite success and feel that we have yet another reason to be glad that we upgraded from the Qualified Range to the Margin Gem.  I can't wait to try other combinations of dishes.  If I were to cook another pork roast in this manner, I think that I would add a little water or stock because I think that a little added moisture would have prevented the top of the roast from becoming overly browned.  My grandmother-in-law says that I also should have put the potatoes in with the roast.  I would have thought of this with a beef roast, but I guess my mother never did that with pork roasts, so I didn't think of it.  I don't think that the moisture from the potatoes would have been sufficient to prevent the over-browning, though.  At any rate, stay tuned for more "automatic" cooking experiments!

Saturday, November 3, 2012

Using a Stovetop Oven on a Wood Cookstove

Nancy and I spent a few days in Storm Lake, Iowa, while I attended a conference there about Concept-Based Curriculum and Instruction this last week.  On the evening of the second day, we ventured downtown and stopped in a candy and antique store.  There, clean and bright, stood a stovetop oven.  For those who are unfamiliar with these little contraptions, they are metal boxes which are placed on a stovetop and thus heated for baking.  Historically, the most common use for these ovens was for baking atop kerosene cookstoves, most of which did not come equipped with an oven.  In our area, many homes had kerosene cookstoves for use during the summertime when the extra heat of a wood or corncob-fired cookstove was particularly undesirable or unnecessary.  My great-great aunt Meme, who taught me to cook, used to talk about using a kerosene cookstove and stovetop oven occasionally during the summers and on days when the weather conditions prevented them from being able to get a fire started in the Monarch wood cookstove.

We have been looking for a stovetop oven since this summer when we were baking for the Monday Markets.  While baking for the markets, we operated at peek capacity most of the time.  Something was usually in the oven from as early as possible in the mornings to just a few minutes before we left to set up our table.  Even at that, demand exceeded supply.  We could have fired up the Riverside Bakewell down in the summer kitchen (we did, in fact, on the first baking day), but the distance to the summer kitchen from the house was too great to make that really feasible.  Furthermore, the heat radiating into the kitchen from the cooktop of Marjorie the Margin Gem was extremely uncomfortable, and it seemed like we ought to figure out a way to make better use of it.

New stovetop ovens are still being manufactured and can be purchased from Lehman Hardware.  These are rather expensive, though, and we couldn't believe that we would make enough additional sales at the Monday Markets to offset the cost.  We found a couple of ovens in antique venues, but the only one that was large enough to be at all helpful was not only quite expensive, but also had some visible insulating material which looked alarmingly like asbestos.  Thus, Wednesday's find was a happy one, especially since its price tag was less than half that of the first suitable antique we had located.

Of course, I had to try it out as soon as possible.  My first foray into the stovetop baking world was with a batch of from-a-box blueberry muffins.  I'm ashamed to admit that I love from-a-box blueberry muffins.  There, I've confessed; now we can be done with that and move on.  I started with the oven positioned on the cookstove as shown below.

The stovetop oven heating on top of the Margin Gem.

I placed our trusty oven thermometer inside it because the thermometer in the door of it simply says "cold, BAKE, hot."  Don't you get a kick out of thermometers like that?

The oven thermometer inside the stovetop oven.  The shiny piece
of metal on the bottom is a baffle.  The right and left sides are
open to the stovetop below.
It didn't take too long for the oven to reach the appropriate temperature for baking muffins.


I popped them in and began to monitor their progress and the oven's temperature. 


I used one light pan and one dark pan to see which type of pan would work best. Just so the faithful blog readers who don't know me very well can get a glimpse into how tenaciously I hold onto the past, I'd like to point out that the pan on the left is one of a pair which belonged to my grandmother on my dad's side.  The pan on the right is one of a pair which belonged to the aforementioned aunt Meme. 

Obviously, I'm big into hand-me-downs.  Many people know this and give various wonderful things to me.  By the way, if you are the person (or know whom the person was) who left three pairs of blue jeans and a brown sort of mock suede shirt on our back porch, would you please make yourself known?  I really appreciate both your generosity and your belief--albeit mistaken--that I have a narrow enough waist to fit the jeans.  If you would like them back, you're going to have to forfeit your anonymity.  Otherwise, we're going to forward them to the Goodwill.

Where was I? 

The oven began to get too hot over the firebox, so I had to move it a little to the right.


After what was probably a little more than normal baking time, the muffins were done.  They weren't quite as brown on the top as they might have been had I baked them in the regular oven, but they were quite presentable.  You can also see from the second picture below that the bottoms were an acceptable brown also.


This was all very encouraging, but we don't sell from-a-box muffins at the Monday Market, so today I had to try baking bread in the stovetop oven.  I made a batch of whole wheat bread which should really have had more whole wheat flour in it, but when you don't measure much of anything, you are bound to turn out the occasional less-than-perfect-but-still-delicious batch of bread.

The oven beginning to heat while the loaves of bread rise in
Marjorie's warming oven.
Seven loaves of bread all ready to be baked at once.  Notice that
the thermometer in the oven door has moved to just a little to the
left of "BAKE."  The stockpot on the right is a mess of chicken
breasts being cooked for casseroles and salads next week.
I put four of the loaves into the Margin Gem's regular oven and initially put three loaves into the stovetop oven.  This was a mistake.  With three loaves in the oven, it was filled wall-to-wall with bread, and the heat rising from the cooktop was not allowed to sufficiently circulate within the oven to cook the tops of the loaves of bread.  I took the middle loaf out at about the halfway point, and the other two loaves immediately began to brown on the top--lesson learned.

The two loaves on the lower right were those which were baked
in the stovetop oven.  Their top crust is lighter due to the initial
presence of the third loaf.
The bottoms of the same loaves of bread.

Despite the difference in the complexion of the top crust, which I believe will be resolved next time since I won't try to cram too much into the oven, the loaves of bread baked in the stovetop oven were thoroughly cooked and identical to the other loaves in flavor.  All in all, we figure we have successfully accessorized our cookstove.  Not only have we increased our capacity for the Monday Markets, but as Nancy pointed out, we will be in better shape whenever we next host Thanksgiving dinner, too, since the foods that we traditionally make for that meal are mostly cooked in the oven.

As always, I hope this information is helpful to a reader, and if you've got information to add, please do so in the comments section.  I enjoy hearing from readers!

Sunday, October 28, 2012

Adventures: First Time Pressure Canning on the Margin Gem and First Time Using Tattler Lids

A dishpan of broccoli from our garden.

Even though we've had a couple of hard freezes, the broccoli plants in our garden have begun to produce in earnest since we've had several nice rains lately.  We both love broccoli cooked, raw, or in casseroles, so we're happy for the late harvest.

We've canned broccoli before.  While it isn't the prettiest canned vegetable to look at, it is quite convenient to be able to open a quart jar, drain the water off, and have broccoli that is already defrosted and ready to be stirred into a couple of our favorite 70's era casserole recipes.  Thus, we decided that we would pick what is very likely the last broccoli of the 2012 growing season and try pressure canning on the Marjorie the Margin Gem for the first time. 

I also decided to take this opportunity to try using Tattler reusable canning lids for the first time.  We had bought a trial box of these lids when we were at The Dutchman store in Cantril, Iowa, back in June, but I had completely forgotten about them while we were canning during the summer.  We buy our canning lids in bulk sleeves from the Amish stores down in Redding, Iowa, at very reasonable prices, but if we could reuse them indefinitely, that would be quite a savings in the long run.

After picking the broccoli, we soaked it in salt water to wash it and draw off any insects.  Surprisingly, a few tiny bugs did surface despite the chilly weather.

 
Then, I placed the canner over the fire and scalded the Tattler lids.

Tattler reusable canning lids waiting in hot water.  (Forgive
the looks of the teakettle.  It has a date with a scouring pad
scheduled in the near future.)
We trimmed the broccoli and cut it into the size pieces that we want; then, we packed it fairly tightly into quart jars.

Broccoli waiting in quart jars on top of the reservoir.  The
teakettle has been moved closer to the fire to boil briskly again.
We put the lids on the jars, loaded them into the canner, and put the lid on.  The canner exhausted for approximately ten minutes.  I covered the petcock with the weight, and "the dance" began.  The following pictures are posted in chronological order, showing how many different positions the canner had to be in in order to reach and maintain the approriate amount of pressure for the appropriate amount of time.


A little too much pressure showing on this one.  I moved it back
toward the right for a little while next.


There were a few other positions that I didn't snap a picture of, but these pictures show the general progression.  I did not fuel the fire while the canner was maintaining pressure, but it would have been best to have added only small pieces of wood so as not to run the risk of cooling the fire too much while waiting for a large log to ignite.

Once the processing time was finished, the trivet that you see resting on the reservoir in the pictures above was moved to the ledge on the kitchen cupboard, and the canner was placed there to cool.  Remember, a pressure canner has to be completely removed from a woodburning range in order for the pressure and temperature to drop at the correct speed.

As you can see, the canner had to be moved around a lot more in this canning session than in the one that I photographed for my original post about pressure canning on a wood cookstove.  Keep in mind that there were several differences, though: six pints/seven quarts, different canner, different stove, different processing time, and different weather conditions.  Even with the increased movement of the canner in order to maintain constant pressure, I don't really think that I adjusted the canner's placement any more frequently than I would have adjusted an electric or gas burner.

All went well, and every jar sealed.  I'm anxious to see how well the seal holds and how difficult they are to get into without damaging the rubber ring.

The blue jar on the left shows what a Tattler lid looks like after
the metal band has been removed.

Notes:

A) The directions on the Tattler box simply say: "When jars have cooled, remove metal band and determine by feel if lids are securely sealed."  Tattler lids don't make that familiar "ping" sound when they seal.  However, before sealing, the lids have an obviously convex curve to them.  When they are sealed, they are noticeably concave.

B) Nancy finds the odor produced while canning broccoli particularly offensive and likens it to the odor of dead mice.  I have to admit that it isn't the most pleasant smell, so consider yourself fairly warned that this may not be an activity you would want to complete before having a house full of company--unless, of course, you don't particularly like the company that is coming and hope that they'll either leave in a hurry or think twice before coming again.