Showing posts with label Riverside Bakewell cookstove. Show all posts

Saturday, June 27, 2020

Using the Hayes-Custer Range in the Summer Kitchen


As I've mentioned before, we moved our summer kitchen closer to the house in April of 2019.  However, I didn't get a cookstove hooked up in it last summer because I was so busy with all of the rigamarole of publishing my novel.  This year, because of all the Covid-19 stuff, I've had a lot more time at home, so with the help of my brother, I was able to move the Riverside Bakewell to a different corner of the summer kitchen and put the Hayes-Custer on the hearth.

First, some of you may be wondering why I traded the beautiful green and cream Riverside Bakewell with its spacious warming ovens for the beige Hayes-Custer which is only outfitted with a high shelf, especially when I tell you that the baking ovens and cooktops are the same size.

The Riverside Bakewell--former occupant of
the hearth in our summer kitchen.

Folks, it all comes down to this:


The right oven door hinge broke some years ago, and while the stove still heats, cooks, and bakes just fine, this is a major inconvenience, and it's also rather dangerous since one has to balance the hot oven door on one's knee in order to transfer anything into or out of the oven.

Besides, I also wanted to be able to share the experience of cooking on a different cookstove with all of you.

You can read about the acquisition of the Hayes-Custer at this post, and you can read about the history of the Hayes-Custer Stove Company here, so this post is about the range itself and its actual use.

This stove has done 100% of the cooking, baking, and food preservation here since its installation on June 12th.  While food preservation has so far only been canning pickled beets, blanching peas for the freezer, and a batch of mixed fruit jelly, there is a lot more of that to come.  The meal preparations have only involved breakfast once because I've been eating a lot of toast and cold cereal on these warmer mornings, but dinners and suppers have been a little more elaborate.

So far, I would say that the stove performs just fine.  I do have to rotate things which are baking, but I've got some chimney improvements to do which may change that.  I'll let you know.

The fire you see burning in the stove is of wood, but yes, you
do see coal in that hod in the lower right corner of the picture.
I'm trying to learn how to burn coal, but it is proving to be quite
the learning curve.  I'll let you know if I ever get it figured out.

In the picture below, you can see some homemade hamburger buns which were toasting over the fire, waiting for the barbecued beef which is in the pot to their right.  The hamburger buns were baked in the Hayes-Custer and rotated once.  You can see that the bottoms were sufficiently browned as well.


One of the things that I like about this stove is that it has a pouch feed with a door which lifts up.  The Riverside Bakewell has a pouch feed, but it opens down.  The Qualified Range has a pouch feed too, and it opens up, and I really prefer this arrangement.  The Margin Gem doesn't have a pouch feed, and I would have to admit that I miss it.

You can also see from the picture below that the hole for the lid lifter in the "T" has worn through, and I have stuffed it with foil so it doesn't spoil the draft.  There is also a chip out of the cast iron to the right of the pouch feed door, which I have also temporarily patched with foil for the same reason. This is not scientific stove repair, but it is certainly affordable.  (Actually, the foil had even been used once already.)


While putting the stove back together after moving it, I noticed something unique about the pouch feed door.  The left hinge pin is constructed such that it has a tab on the end that juts out to the left.  This seemingly little thing is actually quite thoughtful on the part of the Hayes-Custer designers. The Qualified Range is not equipped with this extra tab, and I've had the pouch feed door fall off a few times during particularly athletic episodes of adding fuel through this door.


You may have noticed how rusty the top of the range is in the two pictures above.  I had removed all of the rust with my grill brick and given it a good coating of vegetable oil once the stove was in place, but I've had some hot fires since then, so the oil burned off over the firebox quickly.  Then, even though the summer kitchen is an enclosed building, the windows are open nearly all the time, so the humidity can get pretty high in there.  Hence, the rust came back in a hurry.

You can see in the picture below that this stove has seen some intense heat. Below the pouch feed, a repair has been made using stove cement. I imagine that this injury is the result of an extremely hot coal fire at some point in the stove's history.


The Hayes-Custer firebox is 7" deep x 8" wide x 18" long and is equipped with duplex grates.


Another interesting feature of this stove is that the only place which tells you who the manufacturer was is the outside of the front firebox door.  In a day when most stove makers were prominently autographing their ranges, the Hayes-Custer company was concealing their information pretty well. You can also see from this picture that the handle has broken off the front of the ash drawer.  This makes ash removal a little more difficult than it need be, but I've learned that by prying with a small flat screwdriver or the handle of a pair of pliers, you can create a gap between the top of the ash pan and the opening to get your fingers into and pull.


Although I haven't measured its capacity, the reservoir on this stove seems HUGE.  It must hold at least ten gallons.

Of course, when I run into a vintage stove, I can't help but wonder about its history.  Was this range a household's only heat during the notorious winter of 1936?  How many Thanksgiving dinners did it turn out?  In this stove's previous home, it had not been used since the 1970s when an ice storm knocked out the electric power for a week.  It kept its owners warm and well fed during that time.

No matter what its history, it is certainly working hard in its present.  And I'm pretty sure that I'm the first person in its list of owners to ever bake a frozen pizza in it!  Don't be too harsh on us.  During Covid-19 Quarantine, we've eaten exactly two frozen pizzas, but we've had three from-scratch homemade ones, complete with sauce which was home-canned.

You can see the raging fire that was burning in
order to achieve the quick oven needed for baking
a frozen pizza.

The finished frozen pizza.
I don't know what the temperature inside the summer kitchen reaches, but I can assure you it is beastly hot.  However, doing all of the cooking out there has enabled us to go without turning on our house's air conditioning so far this summer.  In addition, there is very little cost involved in collecting the fuel for this stove since I'm able to use small sticks and other poor quality scrap wood I've picked up in our pastures.  And while the Lord has so far protected us from dire financial consequences during these uncertain times, it does seem prudent right now to trim costs wherever we are able.

Stay tuned for more posts which feature this stove, since it looks like it's going to have a busy summer.

In the meantime, if you are interested in the Riverside Bakewell, let me know--since I'm interested in having the floorspace back.

Thursday, April 4, 2019

Moving the Summer Kitchen

Monday was a big day at our place.  It was the first day in the last eight that I didn't have some kind of school obligation or other.  I was not scheduled to substitute, so I spent the whole day at home trying to get some things done.  While I was eating my lunch, my brother came in from loading out corn to find out if it would work to move the summer kitchen. Secretly, I had been hoping all morning that this would be the case, but he travels a lot since he is the First Vice President of the National Corn Growers Association, and his days at home are usually quite full as he catches up on farm work and other responsibilities.  Therefore, I didn't want to exert any pressure.  But, bless him, he took time out of his busy afternoon to organize and transport the necessary equipment while I vacated the more portable things from the inside of the building.

Originally, we put up this shed to operate a small bakery out of it at the end of our driveway.  After seeing how the Amish in southern Iowa have bakeries and little grocery stores on their farms, we thought that we'd like to try something like that.  Thus, back in the summer of 2009, we purchased this Tuff shed, finished the inside, installed the Riverside Bakewell cookstove, which I had had since the late 1990s, and began baking every Saturday that fall until it got so cold that the garden hose which supplied our running water froze.

We did an okay business that fall, and I learned A LOT.  Our biggest problems were that it was hard to sacrifice the time from our already busy weekends, and we never knew how much we were going to sell.  Some Saturdays we didn't have anything left by the evening; other Saturdays would see us with five or more loaves of bread that didn't sell.

We opened again the next fall, but it became a drag in a real hurry, and so ended that phase of our lives as custom bakers.  The "shed" as we called it, then became our summer kitchen, but because it was located a full 75 steps from the back door of the house, cooking down there was colossally inconvenient.  Couple that with the fact that the oven door broke during the family reunion in 2011, and you have all of the reasons that we just haven't used the summer kitchen all that much.


True confessions now: we didn't have a clue as to how to move a building. I'm not sure that I do yet, but Kevin is brave and adventuresome, and we accomplished the task!


The summer kitchen now rests on a concrete pad north of the house where our old garage used to be.  It is only 11 steps away from the back door, and is actually very close to where the original summer kitchen/washhouse was on our farm.  Hopefully, this will mean that I'll use it more.

Noting that Sunday evening marked the end of March and that there are only a maximum of two more months that we will use the Margin Gem on a daily basis, I lamented to Nancy, "I already miss the cookstove."  She was in a different room; otherwise, I'm pretty sure I would have seen an epic eye roll in response.  But, now I can look forward to just switching to a different cookstove!

I'll keep you posted on the progress as we get the summer kitchen rearranged and in operation.

Thursday, March 15, 2018

Latest Cookstove Acquisition: A Hayes-Custer


Okay.  I spend WAY too much time trolling about eBay and Craigslist looking at the wood/coal cookstoves that are for sale on those sites.  But I learn a lot, and sometimes I run across some real finds.

The woodburning range you see in the pictures below was advertised on Craigslist.  Very little was said in the description except that it needed to be moved ASAP as the owners were remodeling their basement, and the contact telephone number shared our area code, so I thought there was a chance that it was fairly near us.

I contacted the person who placed the ad.  The stove was fairly near, so I scheduled a time to go and investigate.


The house was built in the 1950s, and the stove has probably been in the basement from the beginning.  Kevin, the owner, lived in the house during part of his youth, and he remembered a particularly bad winter storm that put their electricity out for a period of about a week.  During that time, the stove was put back into service, but even though it was connected to a chimney until just before the basement remodel began, it had not been used since then.  

Since the stove had spent all of this time in a dry basement, it was in remarkable shape.  After a thorough examination, the most major problem I could find was that the lid-lifter notch in the "T" over the firebox had rusted, burned, or worn through; and one of the cast iron tabs which cover the holes where water pipes would pass through the wall of the firebox was broken, but everything else was in great shape.

 1
The other picture of the Hayes-Custer cookstove  from the Craigslist ad.


You can see from the picture above, that there is no brand identification on the front of the stove, and even the oven thermometer merely indicated that the stove was American.  Furthermore, the design of the stove didn't immediately give away its brand either.  Kalamazoo ranges, for example, never had a brand insignia visible on the front of the stove either, but their familiar appearance gave away their identity at first glance.  It wasn't until I opened the left door that I saw on the interior cast iron firebox door the words "Hayes-Custer, Bloomington."  I'd never heard of the Hayes-Custer Stove Company, and it is rare that I run across a brand of stove that I'm unfamiliar with!  More on the Hayes-Custer Company will be coming in a later post.

Kevin said that he'd had other people who were interested in the stove, but no one wanted to tackle the project of getting the stove up out of the basement.

"That's why I'm giving it away," he added.

Wow!  The price was right!

I wasn't too excited about getting it removed from the basement either, but my dad and I had hauled a Kenmore cookstove out of a neighbor's basement when I was in high school, so I had an idea about how it could be done.  The price tag caused me to be suddenly motivated, too!

I knew that my family members wouldn't be too excited about helping to haul a stove out of a basement, but my advantage is that I know some really strong high school boys, and the stove was located much closer to them than my relatives.  I told Kevin that I would see what I could do about lining up a removal crew and get back to him.

Well, Kevin was anxious to get the stove out of his basement.  He made sure that the other most interested party was not coming for the stove, and then he called me back on the same day that I had convinced a junior boy to round up some of his friends to help me out.

On Monday of this week, I returned to Kevin's and disassembled the stove.  Everything came apart easily except the bolts that held the two shelf brackets to the stovetop.  In my experience, these bolts are often problematic for three reasons: a) access to them is often difficult because you can't get a straight shot at them from the top, b) food splatters have often landed on them, making them sticky, and c) they have been exposed to a lot of expansion and contraction due to temperature fluctuation.  We ended up having to sacrifice those two bolts, which had to be done quite carefully so as not to damage anything else.

Then, Tuesday evening the high school boys came, and we carried the stove up the stairs, out of the house, and into the pickup.  The main body of the stove was heavy, but not too bad really, and everything traveled very easily.


The disassembled stove in the back of the pickup in our driveway.

So now the question Nancy asks is what I will do with this stove.  It's a good question, too.

This stove is in better condition than the green and cream Riverside Bakewell out in our summer kitchen, especially since its oven door hinge broke.

The broken oven hinge on the Riverside Bakewell.


Thus, at this moment, I'm considering selling the Riverside Bakewell and using this stove in its place.  The only hang-up is that the Riverside has a warming oven, and the Hayes-Custer only has a high shelf.  Other than that, the two stoves are very similar.  Oven size, firebox size, and reservoir capacity are nearly identical.  Both stovetops have just two eyes over the firebox, but one thing that I consider an advantage about the Hayes-Custer is that the rest of the stovetop consists of just one French plate to the right of the firebox rather than two like the Riverside has.  This is an advantage because the joint between the two plates on the Riverside is not perfectly even, causing larger kettles to not heat as evenly as they might.

Even so, the warming oven is a big plus.

What do any of you readers think you'd do?  Anyone interested in purchasing a green and cream Riverside Bakewell?

Saturday, December 16, 2017

Using Corn Cobs as Fuel in a Woodburning Cookstove

Harvest is finished here in the Corn Belt, and it seems like this would be a very appropriate time to talk about using corn cobs as fuel in a woodburning cookstove.  Cobs were an extremely popular cooking and heating fuel in the Midwest for a long period of time, but despite the fact that in this day and age more cobs are produced annually than at any other time in history, using them as fuel has become obsolete.

Some Basic Information about Corn Cobs--

First, let me explain what a corn cob is for those who are not familiar with the corn plant--especially since this blog has international readership. What we Americans call corn is really more properly known as maize.  It is considered the most domesticated crop in the world.  Technically classified as a grass, the seeds of the plant grow on something called an "ear."  An ear of corn grows inside of tightly connected leaves called "husks."  The next layer inside the husk is several hairlike strands called the "silk."  The silk is what catches the corn pollen and transports it to the corncob, where the kernel of corn is formed.

An ear of ripe corn complete with husk and silk.

Originally, corn was harvested by picking each ear by hand.  By about 1940, most farmers had gone to mechanical corn pickers that still picked the entire ear.  Corn could either be fed as whole ears to cattle and hogs, or the corn would be "shelled" (removing of the corn kernels from the cob) later and fed to livestock whole or ground, or sold as a cash crop.

In our area, it was around 1970 when most farmers switched from harvesting corn by picking the whole ear to using machines called "combines."  A combine is so named because it combines the processes of picking the ear and shelling the corn all as it travels through the field.  The empty corn cobs are sent out the back end of the combine along with bits of stalk, husk, and leaves to fall roughly where they grew, becoming a part of the "crop residue" that is left in the field to return nutrients to the soil and prevent erosion.  However, compared to the leaves, husks, and stalks of the corn plant, the cob is of little value as crop residue.

The corn cob is rough in texture and lightweight.  It feels a little like a tube of tightly rolled paper.  Because the cob is also fibrous, moisture affects it easily.  Cobs dry quickly, but they also are very absorbent and can quickly become wet even when simply exposed to high humidity.

Because of this light, fibrous structure and rough texture which creates an abundance of surface area, dry corn cobs ignite quickly.  They burn very hot and very fast, leaving only short-lived embers behind.

Historical Use of Corn Cobs as Fuel--

As American settlers moved westward into the plains states, trees were fewer and farther apart, so pioneers began to turn to other fuels besides wood in order to do their heating and cooking.  We've all heard stories of them using "prairie coal," which was a fancy name for buffalo chips or cow chips.  The word "chips" itself is a euphemism for the dried dung of these animals.  I've actually burned some cow chips in my cookstove, and they don't work too badly, but I'd have to admit that the smoke does not have a very pleasant odor.

Settlers would also use dried grass (hay) as fuel by twisting it into bundles called "cats."  Special cooking stoves were even designed in order to facilitate burning hay more efficiently and conveniently.

However, as more and more acres came under corn production, the corn cob became the prairie fuel of choice.  Abundant, cheap, relatively clean to handle, and easy to ignite, the corn cob enjoyed wide use as fuel across the Great Plains for many decades.  This article shows how largely the cookstove and the corn cob affected life here in earlier days.  It is also important to note that before the advent of the chain saw, harvesting firewood was a much more arduous task than it is today, making the corn cob even more desirable fuel because once the corn has been shelled, the cob is ready to be burned.

Historical accounts of life on the Great Plains are replete with stories about burning corn cobs for heating and cooking.  In some research that I did about the Schoolchildren's Blizzard of 1888, many of the memoirs mentioned corn cobs being the only fuel that was used in the farm homes of rural Nebraska.  Some also talked about the fact that their schoolhouses were heated with cobs which the different families in the district took turns furnishing.

This is a Library of Congress photo of a Mrs. Emma
Bettenhausen pouring corn cobs in her kitchen range
 in Nov. 1940.  She lived in McIntosh County,
 North Dakota.


Burning corn cobs in cookstoves became such a common thread in the fabric of rural life that last summer when I met veteran Southwest Iowa radio homemaker Evelyn Birkby, who is still broadcasting on KMA in Shenandoah at the age of 98, the first thing she said upon finding out that I cook on a woodburning range was "Then you know exactly how many corn cobs it takes to bake an angel food cake."

This made me think of my aunt Ellen's mother Dorothy.  As a young girl, it was Dorothy's job to stand by the open firebox door of her mother's wood cookstove and shove one cob into the fire at a time in succession in order to maintain even oven heat while her mother was baking.  (I don't doubt that this story is true, but it does seem to me like keeping the firebox door open constantly would have absolutely ruined the efficiency of the fire because of the spoiled draft.  Perhaps this was the only solution Dorothy's mother had found for a cantankerous stove.)

The fact that corn cobs were so widely used as cooking fuel was not lost on the retail establishments of the day, either.  My copies of vintage Sears catalogs show that as late as the 1920s, corn cobs were listed alongside wood, coal, coke, and rubbish as possible fuels for their ranges.  Some of the earlier catalogs even list "chips" among their fuels.

The architecture of farm buildings was even affected by the use of corn cobs for fuel.  Due to the fact that cobs can take on moisture so easily, it was important to keep cobs sheltered so that they would remain dry for burning.  On our farm, the combination wash house/garage (a wash house was a building separate from but near to the house where the weekly chore of clothes washing was completed) was outfitted so that its second story was used for cob storage.  I'm told that the cobs were delivered to the wash house side of the first floor via a chute that emptied into a bin somewhere near the laundry stove.

A similar setup was built at Nancy's grandparents' farm.  Their wash house was divided into two rooms.  The north room was for cob storage.  Cobs were shoveled into a small door at the top of the north wall.  They were accessed on the wash house side through a people-sized door which was to the right of the stove.  When they broke up housekeeping in 2010, I sifted through quite a few cobs which were still there in order to salvage the anthracite coal which was also stored in that room.

At the house where my maternal grandmother lives, a building called "the cob house" stood just inside the back gate between the driveway and the kitchen.  One side of it was used to store corn cobs, and the other side housed a Delco Light Plant.  The Delco generator was removed with the arrival of Rural Electrification in our area in the 1930s, but the corn cobs remained in use for cooking and water heating for at least another decade.

My paternal grandmother lived on a farm just over the hill from where Nancy and I live, and she told me that their cobs were stored in a lean-to which was attached to their wash house.  She said that somehow or other the corn cobs caught fire, and the whole building was quickly reduced to ashes.  She remembered that the fire was particularly hot because of the corn cobs.

My great-great aunt Meme (born in 1895 and mentioned in the About Me section to the left) never married and remained on the home farm with my great-great grandparents until they moved in order to make room for my newlywed grandparents in 1947.  At sometime during the mid-1920s, the large, beautiful farmhouse that they lived in was equipped with hot running water furnished by a Monarch range in the kitchen, but during hot days in the summer, they had a three burner kerosene stove that they cooked on. She frequently reminisced with me about her early life, and I remember her talking about the fact that after a hot summer's day of outdoor work, she would build a corn cob fire in the green and cream Kalamazoo cookstove in their summer kitchen, heat a teakettle of rainwater, and use that to take a bath in a washtub.  The corncob fire was perfect for this since it was quick to kindle but did not linger after it had served its purpose.

Meme also talked about how she and her brother and sister hated to gather corn cobs.  Of course, if the corn had been shelled to feed to poultry or to sell, those corn cobs were not difficult to collect.  However, ear corn was fed to hogs by just giving them the whole ear.  The hogs would chew the corn off the cob and leave the corn cobs lying about their pen.  It was the kids' job to get into the hog pen and retrieve the scattered cobs, which would often be quite dirty, not to mention the fact that hogs can be pretty ornery, too.

In order to maximize the capacity of a bushel basket (commonly called "cob baskets" when hauling this cargo was their primary function), it was the practice among some farm families to stand cobs vertically in a ring around the outer edge of the basket.

My cob basket filled and stacked in the old fashioned
way.  You'd be amazed at how long it took to pick up
this many cobs in the harvested field.

Cob baskets were often put on the floor next to the firebox side of the stove to make fueling easier.  Unfortunately, this could be a dangerous situation since cobs catch fire so easily.  In antique cookbooks, it is not uncommon to see warnings about keeping the cob basket a safe distance from the range.

I once had to interview my paternal grandparents about life during the Great Depression.  In the course of the conversation, Granny told me that the price for corn dropped so low that her parents began to burn not just corn cobs, but whole ears of corn.  (I don't know why they wouldn't have burned wood instead.)  Gramps agreed that many farmers did that and said that he remembered his folks tried it too, but they found it too depressing.  I can understand that since in those days so much of the work of corn production was done by hand.

How I Use Corn Cobs Today--

Corn cobs burn just as well today as they did in the past, and as I said, there are many more of them available per field than ever before. However, two things have changed which have made them less desirable as fuel for me.  The first is that they are no longer a common by-product of regular barnyard chores.  Thus, in order to collect enough of them to make any size fire, one has to spend a lot of time bent over picking them up off the ground.  The second change is the construction of wood cookstove fireboxes.  The traditional design of a wood cookstove included a firebox depth that was usually less than twelve inches.  This kept the fire very near the cooktop, making the use of corn cobs very efficient.  The depth of the Margin Gem's firebox makes it so that I would have to have a quite a lot of cobs burning in order to raise the temperature of the stovetop sufficiently to do any type of cooking.

Since it is a traditional cookstove, the firebox of the Riverside Bakewell in our summer kitchen is well suited to burning corn cobs.  You can see what a corn cob fire looks like in the Riverside Bakewell in the picture below.

A corn cob fire in the Riverside Bakewell cookstove.  I was
canning brown rice and cooking chicken when this photo was
snapped.
My favorite use for corn cobs now is for starting the fire.  The addition of a few dry corn cobs to the usual sticks of kindling when lighting a fire insures that the fire will start without any difficulty.  Until this year when she turned ninety, my maternal grandmother would collect all of the stray corn cobs that would find their way into her barnyard on farm machinery and send them to me in boxes, cat food sacks, or milk cartons that she would cut open.  I always appreciated getting them because it was sort of the same as receiving fire-starting insurance from her.

Somehow I doubt that we will ever see widespread use of the corn cob as household fuel again, but I did run across this article about using corn cobs in commercial coal-powered power plants that I thought was very interesting.  The article is almost ten years old, however, and I would like to try to find some follow-up information.  The article also talks about the corn cob harvesting implement that can be attached to the back of a combine in order to save the cobs as well as the grain.  Maybe I'll have to buy one for my brother for Christmas!  (Sorry, Kev.  Way out of our budget.)

Anyway, please use the comments section to share your memories about burning corn cobs in a kitchen range, or--especially if you live outside the Midwest--tell about whether corn cobs were ever used as fuel in your area of the world, or if you still burn cobs, talk about that too!


Thursday, June 11, 2015

First Time Cooking in the Summer Kitchen in 2015

I know I'm an odd duck.  I'm used to it, and I'm fine with it, so please don't point it out. 

We had started the electric water heater in the early days of May, and I started whining to Nancy about how much I missed the wood cookstove after only one day of cooking on gas, so we've had Margery the Margin Gem cookstove going intermittently.   On May 30th and 31st, for example, I had a lot of cooking to do and so had fired her up.  One of the things that I cooked on those days was a caramel cheesecake--stay tuned for the upcoming post!  However, I had been cooking mostly on the gas stove since then.

Sorry, but I feel the need to vent a little about our propane range.  You see, I was raised in a home with an electric stove; in fact, the only person on both sides of my family to have a gas stove is my aunt Cheri, who has simply had gas stoves at various times during her many travels and moves.  Nancy, on the other hand, was raised with a gas stove, and her grandmother also had one.  Thus, since I got the wood cookstove that I wanted, the modern gas range next to it is the compromise that proves my love for my wife.

Of course, my opinions weighed heavily in our choice of the gas range, and I think we chose well.  I'm just surprised and frustrated by a couple of the characteristics of today's gas range.  I've cooked on only four gas ranges: the tiny, ancient, unbranded one in our church basement, the 1950s Crown in my parents' basement that we use to freeze sweet corn, the new one in our kitchen now, and the old Hardwick that my grandparents installed in our basement years ago in case of an extended power outage (used twice in my recollections of growing up here).  When we gutted our kitchen in 2011, I cooked on the Hardwick for about a year.  I don't mind cooking on old gas ranges, but our new stove (and every gas stove that is available on the market now) has the cooking vessels sitting so far above the gas burners that the amount of heat that escapes up the sides of the pots is just unreal.  Also, I'm continually surprised at how much heat comes out of the oven vent!

All of this is to say that in the 95 degree heat that we had on Tuesday, I was not excited about cooking supper in the house, even though the air conditioning was on.  The thought of all the heat that comes into the room from the gas range was enough to make me want to have just a bowl of cold cereal for supper, but our nephews were here, so we had to be more responsible and balanced in our meal choice.  Hence, the boys and I trooped down to the summer kitchen and started the Riverside Bakewell.

"But, Jim, wasn't it already 95 degrees in the summer kitchen before you even started the stove?" most sane observers would ask.

Well, yes.  It was already hot in there, and we made it hotter.  I already told you that I know I'm crazy.

We cooked some marinated chicken and macaroni and cheese (which with carrot sticks and fresh strawberries constituted our supper), and then I baked banana bars down there afterward.


Supper cooking on the Riverside Bakewell cookstove.

So yes, it was hot down there, and yes, the summer kitchen is a full 75 paces away from the house kitchen, but cooking on a woodburning cookstove just feels right.  If I could explain it any better, I would.  Surely some of you loyal readers who have your own cookstoves know what I'm talking about and could agree with me in the comments section below so that I don't have to feel quite so weird, right?

I don't know the history of the Riverside Bakewell cookstove as I bought it on an estate auction, but when I'm cooking a meal on it, I can't help but wonder how many meals it turned out before it was put out to pasture for a time.  How many Thanksgiving dinners did it cook?  Did it help keep a family from freezing to death in the notorious winter of 1936?  How many corncobs has it consumed in its lifetime?  As you can see, I have an overactive imagination.  Anyway, add one more meal to the count!

Sunday, August 31, 2014

Our Summer Kitchen

I had a request for more information and pics of our summer kitchen, so I thought I'd write a quick post about it.  Our summer kitchen is just a Tuff Shed that we purchased in July of 2009.  Originally, we were thinking about having a farm store/bakery at the end of our driveway.  We spent Saturdays of the fall of 2009 baking breads, pies, and cinnamon rolls in the Riverside Bakewell cookstove down there.  We opened for a few Saturdays in 2010, but we decided that for various reasons the reality of having a farm store/bakery was not what we had envisioned it to be.  Thus, the building is now just called "the summer kitchen" or "the shed" and is used occasionally for canning and cooking, but mainly just for storage.  If we ever get our dilapidated garage torn down, I would like to move the summer kitchen up closer to the house where I'm sure that it would get more use.

We wanted to be as economical as possible, so we chose a 10'x12' shed because that was the largest building that we could erect without having to go through the difficulties of county permits.  We painted its exterior to match the paint scheme of our house, and we hung drywall and pegboard on the inside, finishing with trim around the windows and door and baseboard.  The following pictures were taken last November.


The first thing that catches your eye when you walk in is the green and cream Riverside Bakewell cookstove.  I purchased this stove at an estate auction in McClelland for either $240 or $260--I can't remember which.  The fellow who owned the estate had refurbished the stove so by putting a new oven box in it.

As the pictures show, the chimney situation for the stove is not great.  When you buy a Tuff Shed, you order your shed according to the specifications that you request from your salesman.  Then Tuff Shed sends an installation crew out to assemble your shed on your property.  I had negotiated with my salesman to have the Tuff Shed people install the chimney for the stove since they would be assembling and shingling the roof.  Unfortunately, the message about the chimney did not make it from the sales desk to the crew foreman's clipboard, so while I was able to convince the crew to install the chimney, the situation was not good and the chimney did not end up being installed correctly.

This made for some extra difficulties in attaching the stove pipe to the chimney, and my extremely poor sheet metal working skills were no help (hence the two ninety-degree elbows just above the warming oven).  After reading some things from Woody Chain about stovepipe and chimney installations, I think I'm going to endeavor to at least partially rectify this situation.

This seems a good time to point out that we do not carry insurance on our summer kitchen building.  I don't know of any insurance company who would insure a building with a stove that is connected to an improperly installed chimney.  Furthermore, because of the limited space in the shed, the stove is installed WAY TOO CLOSE to the walls.  You can see that the rear wall of the shed is protected by sheets of quarter inch concrete board which are fastened to the studs using electric fence insulators.  These prevent the heat of the stove from burning down the summer kitchen, but I'm only comfortable with this arrangement because of the fact that while the stove is in use, we are always right there with it (and our bedroom is not above it!).

The Riverside Bakewell with its poorly installed chimney
in our summer kitchen.
 
To the left of the stove is the sink.  This cast iron beauty was rescued from an Omaha dumpster by my uncle.  We had the sink refinished by Nebraska Permaglaze, and now it is my second favorite feature in the summer kitchen.  Naturally, it only has a cold water spigot which is fed by about seventy-five feet of hose attached to one of the farm's hydrants up the hill.  The drain is connected to pipe which goes out of the side of the summer kitchen and angles down toward a five gallon bucket.  Waste water is then used to water the lawn around the shed.  The pipes for the sink are visible on the left side of the first picture above.
 
The sink in our summer kitchen.
The view below is looking from the sink to the south side of the room.  You can see that the stove sits on a prefabricated stove pad purchased at Menards.  We painted the floor with Dutchboy porch floor paint, and I have been very impressed with how well it has held up.  The counter top is made of cheap pieces of plywood, cut to fit over old metal Youngstown kitchen cupboards.  These cupboards were installed in our house's kitchen by my grandparents in the early 1950s.  They took them out in the late 1970s and put them in the basement.  Then, when the basement was redone, the cupboards went to the garage.  I removed the handles, cleaned them up, spray painted them, put the handles back on, and they are now back in commission.


The next picture is taken from the same spot as the previous picture, but the view is turned toward the door.  We hung peg board and shelving in this corner because this was where we originally displayed our baked goods, cards, and needlework that was for sale.  Now we use the shelves for storage.


The view to the north while standing between the stove and the counter.


The summer kitchen is not equipped with electricity.  Again, we didn't want to have to go to all the trouble of permits and what have you.  Therefore, we did opt for the skylight, and this makes it so that the shed is a wonderfully bright place to work during the day.  At night, the oil lamps that you see in the pictures are employed.

Also note the register that you see at the peak of the ceiling.  We opted for one of these on both the east and west sides as well as the rotating roof vent that you can see in the second exterior picture above.  Our idea was to make it so that the heat could circulate out of the shed as easily as possible.  An unfortunate side effect of this arrangement is that with the poor chimney situation, the shed itself almost has as much draw as the chimney, so refueling the fire can sometimes be a smoky affair.


Besides the wonky chimney, one thing that I really want to change about the shed is the arrangement of the counter.  As it is, while you are working at the counter, your back is very close to the range.  In the winter, this doesn't feel too bad, but in the summer it is hot.  In reality, the whole shed can get quite hot in the summer.  We have a thermometer inside it, and its maximum temperature is 125 degrees Fahrenheit.  The thermometer has been completely red, and I suspicion that the temperature was actually closer to 140 degrees on the worst days.  That's plenty hot!


Thursday, August 29, 2013

Vintage Recipe for Cole Slaw Dressing

As many of you probably know, the Midwest has been socked with sweltering weather for the last few days.  This has made it so that we haven't had any desire to fire the Margin Gem since the 17th, and we have been avoiding cooking much with the gas stove, too. Tonight, however, I headed down to the summer kitchen to try a quick vintage recipe.

During the summer, I spent some time looking at more of the recipes in the 1926 West Pottawattamie County Farm Bureau Women's Cookbook (some of you may recall that I had tried a candy recipe from this cookbook just before Christmas).  I know that many of the regular readers of this blog are interested in homesteading and self-sufficiency, so when I ran across this recipe, I made a mental note to try it because it uses ingredients that many homesteaders would either be able to produce on their own or would usually keep on hand.  I'm excited to also tell you that it turned out to be delicious!

For one head of cabbage, you'll need 3 egg yolks, 2/3 cup sugar, 2/3 cup vinegar, 1/2 cup cream, salt and pepper. 

Here is what you do:

In a heavy saucepan, beat the egg yolks.  Then beat in the sugar.  Add the vinegar and place it over the fire to bring it to a boil.  Stir constantly.


The egg yolk, sugar, and vinegar mixture on the fire.

I was able to cook the dressing on a very small fire
made only of corn cobs and pieces of bark picked
up from the ground in the shed where we split our
firewood.

Once the egg, sugar, and vinegar mixture has come to a good boil, add the 1/2 cup cream.  Bring back to a hard boil and then remove from heat.

The salad dressing once the cream has been added.  I was using
cream from our own cow, so you see white lumps of cream
which were very thick and had not yet melted when I snapped
the picture.
Add salt and pepper to taste, and then chill the dressing mixture.  It will congeal to a soft set as it cools in the refrigerator.


Nancy shredding the carrots and cabbage using
Granny's Saladmaster.
While the salad dressing was chilling in the refrigerator, Nancy and I prepared the cabbage and carrots with my grandmother's ancient Saladmaster.  Somewhere I have the advertising brochure that went with the Saladmaster cookware set. It was purchased for three hundred and some dollars in the 1960s, and I'm sure that it was a major purchase for my grandparents at the time. 

I can remember Granny making cole slaw with this machine when our house was still her house in the late 1970s.  Her cole slaw was always outstanding, but she made the dressing with Miracle Whip--which, of course, would have meant that there would have been no reason to fire up the Riverside Bakewell and write a blog post. :)

When the cabbage and the carrots were ready, the dressing was cool.  We combined everything and threw in a few dried cranberries.  The results were great!

The finished cole slaw.
Here is how the recipe originally appeared on page 129 of the 1926 cookbook:

Dressing for Cabbage Slaw
Mrs. Geo. J. Ward
3 egg yolks beaten                            2/3 cup vinegar
2/3 cup sugar                                    Salt and pepper


Beat the sugar into egg yolks, add vinegar and seasoning.  Boil this mixture, stirring all the time.  Add 1/2 cp sweet cream, let boil again.  When cold mix with chopped cabbage.


Again, I have to say that I'm very impressed with this simple old recipe.  It is easy and delicious, made of things that I always have on hand, and I can pronounce everything that is in it.  That's what I'd call a winner.

Sunday, March 3, 2013

Maintaining an Even Oven Temperature in a Wood Cookstove, Part 4

What I Do
This post is intended to be an accurate and detailed account of what I do to keep the temperature of my wood cookstove ovens steady.  Remember, however, that every stove and every chimney is different, and it is entirely possible that for another wood cookstove user, none of this information will prove useful.

The first steps in baking in either of the cookstoves that we currently use is the same: start the fire.  The process of establishing a steady fire should result in a bed of coals being present in the bottom of the firebox.  A bed of coals serves to prevent the oven temperature from fluctuating drastically, but I find that coals alone provide insufficient heat for baking.  Furthermore, it doesn't take long--especially in the Margin Gem--for the coals to "ash over."  "Ashing over" is my own term to describe the process of the outer layer of a glowing coal becoming ash as combustion of the burnable material is totally completed.  If you've ever burned charcoal, you are familiar with this situation and know that the bed of charcoal needs to be stirred a bit when you can no longer see the glowing coals for the layer of ash that has accumulated on their outsides.  Once coals have ashed over, the heat which radiates from them is significantly diminished.

Before I go on with the next steps, it is important to understand another characteristic of the wood-fueled fire: the amount of heat radiating from the fire is determined by the amount of surface area of the burning firewood.  The greater the surface area which is burning, the greater the heat radiated.  Suppose you have a log which is four inches in diameter and eighteen inches in length.  If that log is put into the firebox and ignites, the maximum surface area which will be radiating heat is approximately 251.2 square inches.  Now suppose that the same size log is split into four smaller pieces and all four pieces are put into the fire at once.  The same volume of fuel has been added to the fire, but the surface area of those four pieces is now 539.2 square inches.  Thus, the four smaller split pieces will burn hotter than the one whole log, but they will not burn as long.

This whole geometry lesson is important because once you have established your bed of coals, you control the temperature of the oven by adding appropriately sized pieces of firewood to keep the oven at the temperature that you desire, using larger pieces for cooler temperatures and smaller pieces for hotter temperatures. 

Managing the baking fire in the vintage Riverside cookstove and managing the fire in the new, airtight Margin Gem cookstove are two distinctly different processes, so I'd like to talk about the two stoves separately now.  We'll start with the Riverside.  Maintaining the oven temperature in the Qualified was basically the same process, by the way.
A small log burning in the Riverside Bakewell.

The firebox on the the Riverside (and the Qualified) is quite small compared to wood stoves which are built for heating.  Once the fire has a well established bed of coals and the oven is near to the needed temperature, I would add one fair-sized split piece or whole log--there isn't room for much more--for a moderate oven.  This needs to be quite dry and ready for burning.  This should be sufficient for keeping the oven at a moderate temperature.  Once this log has perhaps burned to about half its useful life, I would add another piece of similar size.  While the second log is igniting, the first log is finishing its combustion.  This keeps the second log from suffocating or significantly cooling a fire which has completely gone to coals. 

If a hot oven is needed, then I would continually fire with smaller pieces of wood which would be added at more regular intervals.  Since the firebox is small, large pieces are not really an option, anyway. 

Riverside Bakewell firebox full of small pieces of wood.  A fire
like this would be needed for a hot oven.


Managing the oven temperature on the Margin Gem has proved to be quite a bit more challenging for me than I had expected.  We have used the Margin Gem exclusively for our baking since August of 2012.  I haven't ruined anything, but the Margin Gem's firebox operates on an entirely different principle of combustion than that of older style stoves like the Qualified and the Riverside.  Basically, in the Margin Gem, air enters the firebox above the fire rather than from beneath the fire.  Also, since the firebox itself is so much larger than the Qualified or the Riverside, I've discovered that adding only one piece of wood at a time is not sufficient for keeping the oven hot.  Instead, I always have to add at least two pieces of wood at a time.

Two pieces of wood burning in the Margin Gem cookstove.
In the Margin Gem, it has been my experience that more logs or split pieces make a hotter fire, and fewer makes a cooler fire.  However, I have encountered some challenges.  If the bed of coals in the firebox is quite deep, it can sometimes take quite a while for wood which has just been added to the fire to begin burning, and the oven cools because the new wood is preventing the heat from the coals from moving through the stove. 

I mentioned this to Mrs. Detweiler, an Amish acquaintance who has a Gem Pac cookstove.  She understood exactly what I meant and advised keeping the bed of coals to a minimum and making sure that they were frequently stirred down.  This causes the firebox to operate more like older style cookstoves where the oxygen enters the fire from beneath.  This certainly works, but it is not always easy to get the coals stirred down sufficiently.

What seems to work best is to make sure that I have plenty of small pieces of wood available when I am baking because they offer a more controllable heat.  The small pieces not only burn hot, but they burn quickly which provides an added measure of control.

I also have to remember that I cannot let each load of wood burn quite so far into its total combustion time as I would have in the Qualified or the Riverside before adding more wood.  Because the ignition time on new wood is longer in the Margin Gem, it is important to add the new wood to the fire sooner than what I was accustomed to.

I have also tried filling the firebox to the top and then controlling the amount of heat which the fire emits through the use of the drafts.  This method has not been as successful as I would like because the fire tends to eventually burn quite hot.  I'll continue to experiment and update the blog as I learn more.

Hmmmm.  I feel that I must again say that baking in a woodburning cookstove looks a lot more complicated in print than it is in real life.  Don't let any of these posts intimidate you.  They are merely well-intentioned help for those wondering how to manage the heat of a cookstove.  Each wood cookstove cook will develop his or her own techniques which will work best for each stove.  The biggest key is to pay attention to what gets results and to be observant.  Besides, the rewards of learning to bake in a woodburning cookstove are great.  For some reason, when I cook on a modern range anymore, it just doesn't feel like cooking.  That sounds funny, I know, but I can't describe it any other way.


Saturday, January 19, 2013

Maintaining an Even Oven Temperature in a Wood Cookstove, Part 1


How the Oven on a Wood Cookstove is Heated


One of the most common questions that people ask me about cooking on a woodburning cookstove is how to maintain an even oven temperature.  I think that this question is so popular for two reasons: a) people have heard all manner of folklore about temperamental cookstove ovens and b) though it was once as common a skill as combing one's hair, people no longer have the foggiest ideas about how to control a wood fire.  Trust me when I say that baking in a wood cookstove is really not that difficult.  It is, however, a topic that is complicated to write about, so this is the first of a series of posts about how to manage the oven of a woodburning cookstove.

As with many aspects of cooking with a woodburning range, each experienced wood cookstove cook will develop a sytem which works best for him or her.  All I can do here is share what I know works for others and for me, knowing that each stove and chimney behaves differently than the next.  To begin with, though, it seems like it is necessary to first discuss how a wood cookstove oven heats.

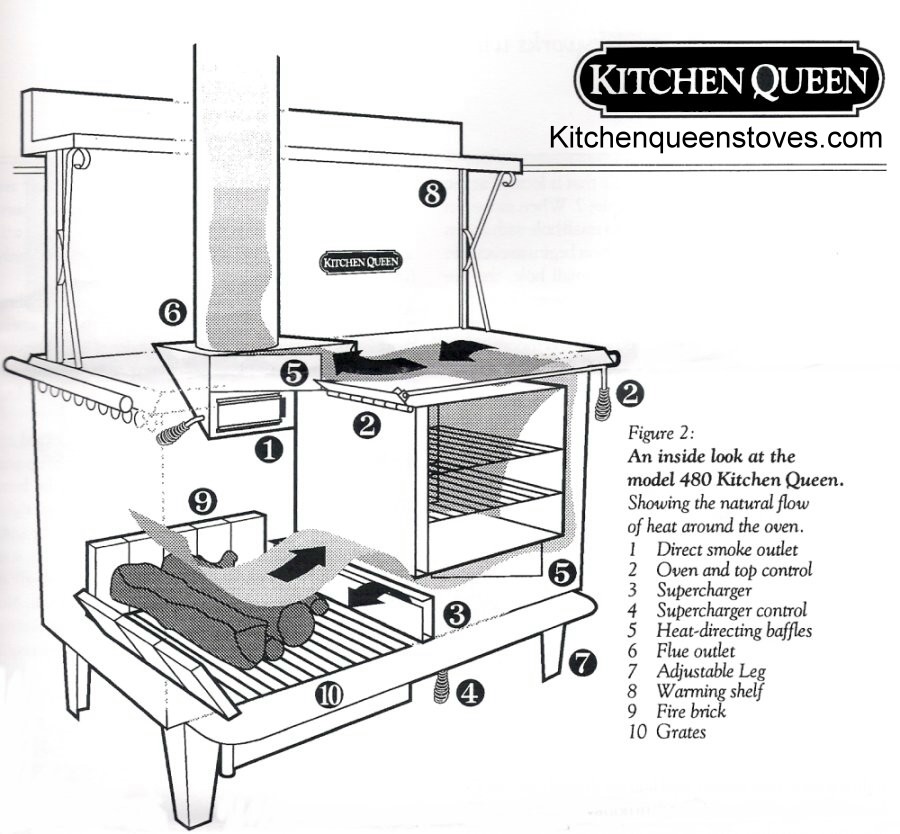
As far as I know, what I'm about to tell you is true about all of the cookstoves being manufactured today with the exception of the the Vermont Bun Baker (or Baker's Oven), the Kitchen Queen, and Enterprise-Fawcett's reproduction Queen Cook.   The Vermont Bun Baker's firebox sits squarely above its oven, and from what I've read, the heat and smoke from the fire are routed down around the oven before exiting via the flue.  The Kitchen Queen and the Queen Cook are both designed so that their ovens are heated from the bottom.

The Vermont Bun Baker.  Photo from
www.vermontwoodstove.com


A drawing of the Kitchen Queen wood cookstove which
shows the flue path when it is in the baking mode.  Photo
from www.kitchenqueenstoves.com.

Enterprise-Fawcett's Queen Cook.  The
oven is the box at the rear with the nickel-plated
image of Queen Victoria on it.  Photo from
www.farmallclub.com.

To the best of my knowledge, all the rest of the woodburning cooktoves which are being manufactured today are designed in basically the same way.  Furthermore, this design has been standard in woodburning ranges since the last two decades of the nineteenth century.   From everything that I have seen or read about the new cookstoves on the market currently, the major differences between the stoves of today and the stoves of yesteryear are mostly due to adjustments in the fireboxes, draft systems, and cosmetic appearances.

Generally, the firebox is on the left side of the stove, and the oven damper is located in the middle rear of the stove just under the stovetop.  The oven damper is a little door which, when open, allows smoke and heat to travel in the most direct route possible from the fire and up the chimney.  When closed, the oven damper forces the smoke and heat to flow around the oven before exiting the stove, thus heating the oven.

The following picture is a scan of p. 283 of John Vivian's 1978 book entitled The New Improved Wood Heat, which was illustrated by Liz Buell and published by Rodale Press.  All of the wood cookstoves that I have worked with, cooked on, or fully examined (over a dozen) were configured in the manner illustrated in the top design.  The only difference is that the three cookstoves that I have cooked on regularly here at home--the Margin Gem, the Qualified, and the Riverside Bakewell--all have a baffle centered under the oven.  This baffle extends from the back of the stove to about half way to the front of the stove, forcing the smoke and heat to travel under the oven and toward the front of the stove before taking a left and traveling to the back of the stove and then out the stovepipe.


Liz Buell's illustrations from John Vivian's book The New Improved
Wood Heat.  The shaded strips represent the path that heat and smoke
take around the oven in a cookstove when the oven damper is closed.
The photos below show the oven damper lever on the left side of the Margin Gem, and the middle rear lid of the Margin Gem cooktop is removed to show the actual oven damper itself.

A picture of the left side of the Margin Gem.  The
oven damper lever is the one with the black knob
on the end of it next to where the top water pipe
exits the waterjacket.  When the lever is down like
this, the oven damper is open.

The Margin Gem's oven damper in the open position so that
smoke and heat can go directly up the chimney.


This picture from the post entitled "Perfect Roast
Beef from Your Wood Cookstove" shows the oven
damper lever in the up position.  This means that the
damper is closed and the oven is heating.

The Margin Gem's oven damper in the closed position, forcing
all of the heat and smoke from the fire to be diverted around the oven.

Now, we are very happy with the Margin Gem for many reasons, but one feature of the Qualified range that I miss is that it had a sliding oven damper.  The Riverside Bakewell range down in the summer kitchen is equipped with a sliding oven damper as well.  I prefer the sliding oven damper over the levered oven damper because you can decide how widely you'd like the oven damper to be open.  The following pictures are of the oven damper of the green and cream Riverside Bakewell in various positions.
Riverside Bakewell cookstove's oven damper handle in the "open"
position.

The middle "French plate" or "blank plate" is removed to show
the oven damper in the open position. 

The oven damper handle in the partially closed position.

The oven damper on the Riverside Bakewell partially closed.


The oven damper handle in the position "to bake."

The Riverside Bakewell's oven damper closed for baking.
The Margin Gem's oven damper is either closed or open; there is no in between.  While I do like the added flexibility and control of the sliding oven damper, it is important to note that I have not been inconvenienced at all by the Margin Gem's style of oven damper either.  Many old stoves were manufactured with the same style of hinged oven damper, and I've never read of anyone clamoring about it as much as I just have.  Furthermore, you can also see that when the oven damper is open, the hole that it creates is really not that large, so some smoke and heat still always travel around the oven to exit the stove.

I am surprised at the variety of places that oven damper levers are found on different woodburning cookstoves.  I've taken the liberty of drawing a cookstove with arrows pointing to the various places where I've seen oven damper levers placed.

Each arrow shows a location where the oven damper has been located on
wood cookstoves that I have seen.

Hmmmm.  I suspect that the aforementioned John Vivian might have artistic abilities which are about as poor as mine, thus causing him to have collaborated with Liz Buell for his book's illustrations.  I'm thoroughly embarrassed that all of you now know the limited extent of my talent in the field of visual arts.

The Waterford Stanley cookstove seems to have a pretty unique baffle and damper system which operates on the same basic principles as I have recorded here, but it is manipulated by using a lever in notched dials on the cooktop itself.  A good place to see how all of that works is at a website called Granny Miller.  You can see the article here.

Now that you know how the heat from the fire gets to the oven of a woodburning cookstove, stay tuned for posts on how to control the heat.

Quick Links:  Maintaining an Even Oven Temperature in a Wood Cookstove, Part 2 Variables

Maintaining an Even Oven Temperature in a Wood Cookstove, Part 3: What Other People Do

Maintaining an Even Oven Temperature in a Wood Cookstove, Part 4: What I Do