Showing posts with label apples. Show all posts

Friday, October 24, 2014

Danish Apple Bars with Brown Butter Frosting

Our apple crop this year has not been nearly so large as last year, and the quality of the apples is lesser also.  However, we have taken the opportunity to make a couple of these Danish Apple Bars. This is a perfect seasonal recipe for autumn when apples can seem to be multiplying before your very eyes and while the chickens begin to respond to the waning daylight by slackening off on their laying.

The first step is to cut 1 cup of vegetable shortening into 2 1/2 c. all-purpose flour and a scant teaspoon of salt.  I always use a pastry blender for this job.

Shortening, flour, and salt blended together.
Next, place an egg yolk in a measuring cup.  Add a little vanilla and enough water or milk to make 2/3 c. of wet ingredients.  Beat the mixture until well combined.

The egg yolk, vanilla, and milk combined to make 2/3 cup.
Add wet ingredients to the dry ingredients and combine.  Do not over beat!  This is a pastry after all.
The completed pastry dough.
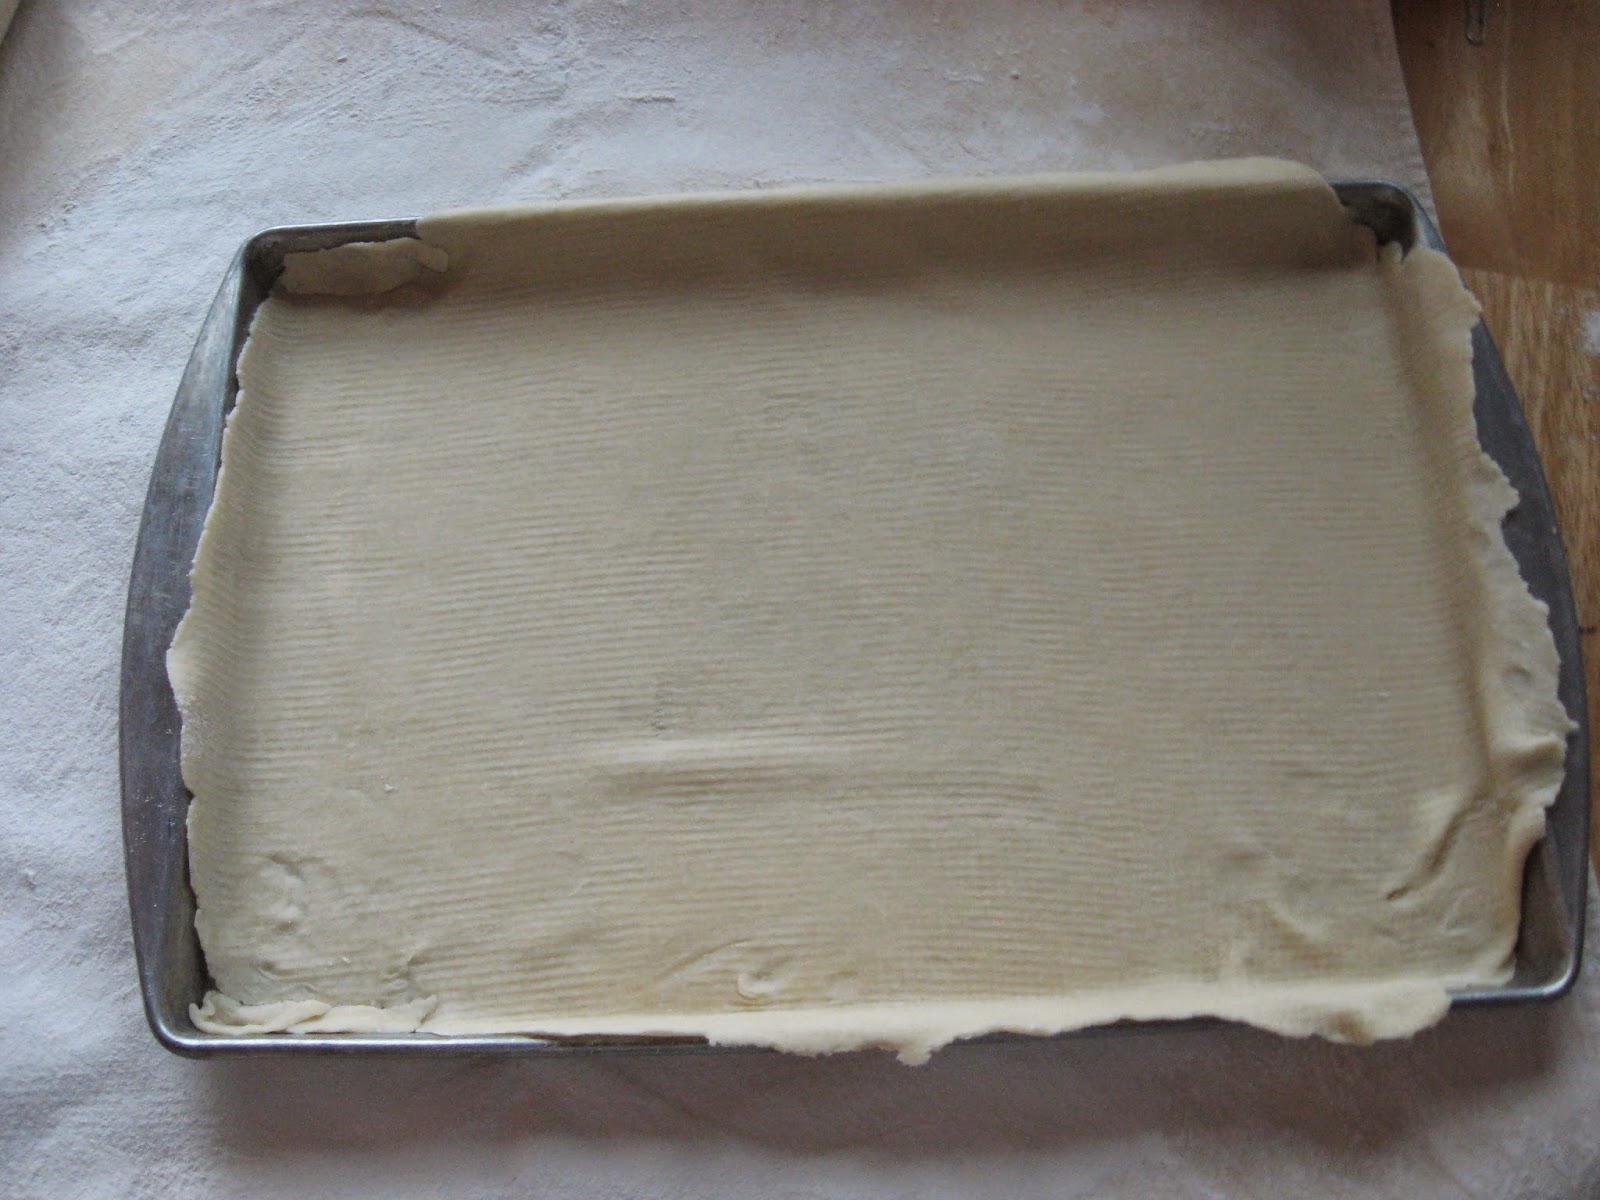
Divide the dough in half and roll one half into a 10x15-inch rectangle.  Line the bottom of a 10x15 jelly roll pan with this bottom crust.
 
The bottom crust in the jelly roll pan.
Next, peel eight to ten small baking apples and slice them thin as for pie.  Spread these on top of the bottom crust.  On top of the apples, sprinkle two handfuls of corn flakes (to absorb some of the moisture from the apples), one cup sugar, and one teaspoon of cinnamon.  I also added some raisins because I love them--in everything.  


The apple, corn flake, sugar, cinnamon, (and raisin) mixture.
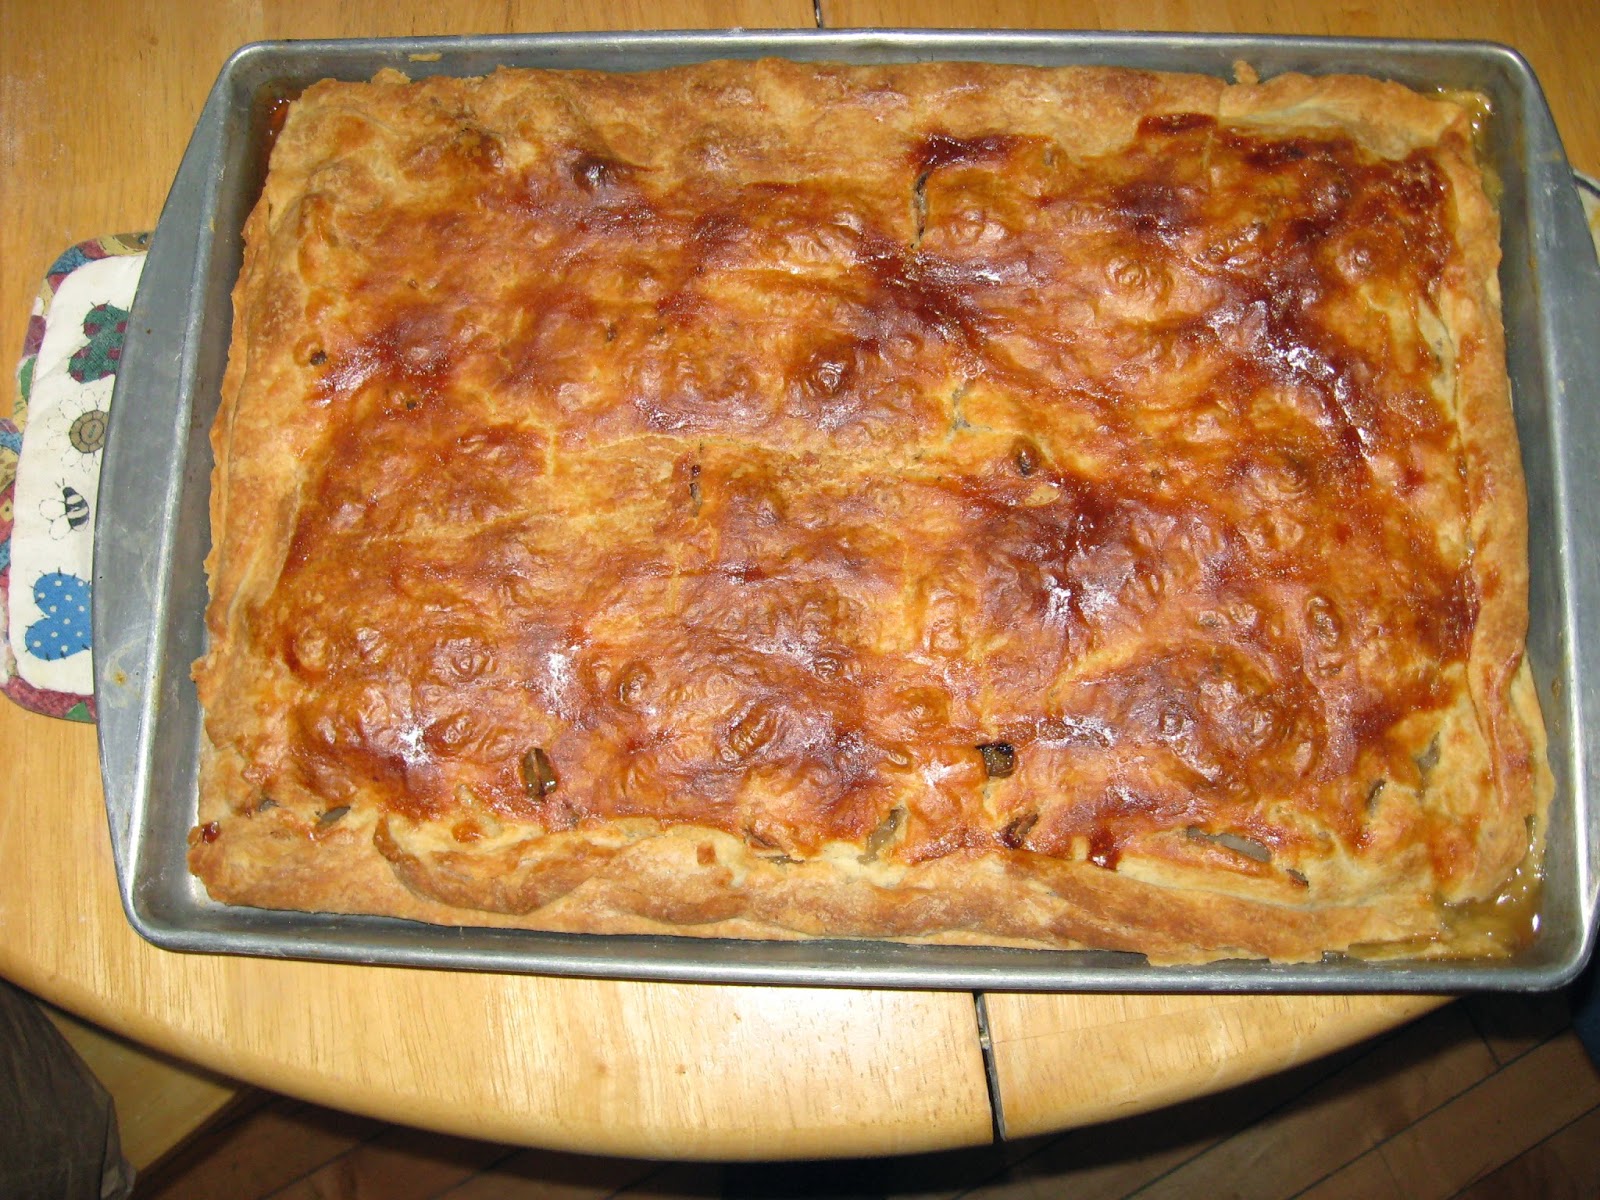
Roll out the other half of the crust and put it on top of the fruit mixture.  Seal the edges.  Beat the egg white and brush it over the top of the upper crust.

The Danish Apple Bars ready to go into the oven.  My second
one of these of the season looked a lot better.
Bake in a moderately hot oven for 45-60 minutes.  The recipe says to bake it at 400 degrees for that amount of time, but I think that an oven closer to 375 degrees for about forty minutes seems better.  You be the judge based on how brown you want the crust to be and how thickly you have sliced the apples.
Danish Apple Bars baking in the oven of Marjorie, the Margin
Gem cookstove.

The finished bars.  The second batch of these was not so dark,
partly because I didn't put the egg white on top.

And now for my favorite part of the whole thing: the frosting!

Some of you may recall that I had written about the Applishus booths at the Iowa State Fair and how wonderful I consider their frosting.  This recipe is so similar to what they use that it may be the very same recipe.  I found it on page 339 of the 463-page Kitchen Klatter cookbook, a wonderful collection of recipes that I sometimes call "the southwest Iowa kitchen bible."  This was a very popular cookbook in our area in the middle of the last century, and it remains so popular that they are very hard to come by.

For the frosting, melt 1/4 cup of butter.
 

A half stick of butter melting over the fire.

Gently brown the butter.


Add the browned butter to two cups of powdered sugar.  Add 2 Tbls. cream, 2 Tbls. hot water, and 1 1/2 tsp. vanilla.  Beat until smooth.


The finished frosting.
Drizzle frosting over the pastry.


Here are the same recipes in a little more accessible form:
 
 
Danish Apple Bars
 
Pastry:
 
2 1/2 c. flour
1 tsp. salt
1 c. vegetable shortening
1 egg yolk
1/2 tsp. vanilla
enough water or milk with the above to ingredients to make 2/3 c.
 
Directions: Mix as for pie crust.  Roll out half to cover the bottom of a 10x15 inch jelly roll pan.
 
Filling:
 
8-10 medium baking apples
1 c. sugar
2 handfuls corn flakes
1 tsp. cinnamon
 
Directions: 1. Peel and core apples, slice thin. 
2. Spread apples and rest of filling ingredients on bottom crust.
3. Roll out top crust and place over apple filling.  Seal edges.
4. Beat egg white and brush over top crust if desired.
5. Bake at 400 degrees for 45-60 minutes until apples are done.  (See what I think about this above.)
 
 Brown Butter Frosting
 
(p. 339 of the Kitchen Klatter Cookbook, The Prairie Press, 17th Printing, March 1978)
 
1/4 c. butter or margarine, melted
2 cups powdered sugar
2 Tbls. cream
2 Tbls. hot water
1 1/2 tsp. Kitchen Klatter vanilla flavoring
 
Melt butter or margarine over a low flame until golden brown.  Remove from fire and add sugar, cream, water and vanilla.  Beat until smooth and creamy.
 
 
I have also used this recipe for making apple strudel.  Instead of making the pastry into bars that will be cut into squares, I roll the pastry out, put the apple filling along one side, then start rolling the fruit up in the pastry.  It works pretty slick.  I hope you enjoy this recipe as much as I do.


Thursday, March 27, 2014

Popover Puff Tart


This elegant but relatively simple dish originated with a Pampered Chef recipe.  Let me say right up front that I like a lot of the Pampered Chef merchandise, and if you were to take inventory of our kitchen, you would find many pieces of Pampered Chef equipment--some of which are used very regularly.

However, I have a couple of little problems with Pampered Chef recipes.  One is that because Pampered Chef is out to sell their merchandise, the directions for each recipe are made so complicated by them telling you in bold print which of their products you are to use to complete each task.  Second, Pampered Chef recipes often include the use of a pre-packaged or pre-processed ingredient such as canned biscuit dough, etc.  I don't mind a bit that their recipes use these things, but I wish that they would also include a "from scratch" version for a couple of reasons.  To begin with, many people are trying to cut as many of the pre-packaged, processed foods from their diets as they can.  Furthermore, I've spent a lot of time poring over vintage recipes, and nothing frustrates me more than when a recipe says something like "a box of marshmallows" or something like that.  The size and contents of packages change over time, and a recipe that calls for a "package" of something is then rendered useless.

Thus, the recipe that I'm sharing here originated with a Pampered Chef recipe, but I drew on my great-grandmother's from-scratch recipe for cornstarch pudding to modify it so that it is completely from scratch.

This recipe is particularly timely if your family is like ours and experiences a rise in the consumption of eggs in the weeks before Easter.  We poke holes in each end of the eggs and blow the egg out of the shell so that when we dye Easter eggs, we are only dying the empty shell.  This is a great system because sometimes the weather on Easter forces us to hold our egg hunts indoors.  You have to understand something about our Easter egg hunts, though: they are a competition, and we hide the eggs so well that sometimes we don't find them all.  Thus, hiding only the shell prevents us from having a rotten mess on our hands.

It's a timely recipe for other reasons too.  We had a huge apple crop last fall, and we've still got bushels of apples in our utility room.  It is quite cool in there, and the apples were Jonathans, so they've been keeping quite well.  We need to get them used, though.

Since the cookstove is being fired almost constantly still, I added small pieces of wood to make a brisk fire in order to bring the oven temperature up to around 400 F.

Here is what you'll need to make the popover puff crust:


3 Tablespoons butter
6 eggs
1 cup milk
1 cup all-purpose flour
First, melt the butter in the bottom of a cast iron skillet.  I used a #8, but I think the next size up would have been better. 
I didn't measure the butter for this particular tart, and I think I got
a little too generous.  This resulted in a puff that wasn't as pretty as
it usually is, so I guess this is one time when more butter isn't better.
Remove the skillet from the heat and tilt and turn it until butter coats the entire bottom and goes part way up the sides.  Set aside.
Combine the eggs, milk, and flour, beating well.

Add the melted butter from the skillet, beating it in quickly so that if it is a little hot yet, it doesn't cook the eggs.  The batter will look a little lumpy.  Pour all into the skillet and put it in the hot oven to bake.


The popover puff is supposed to bake in a hot oven for about twenty minutes.  Then, the oven heat is to be reduced to moderate for another fifteen or so minutes to finish the cooking.  I've found that reducing the heat is not really necessary.  All you need to do is be sure that you've accomplished your hot oven by burning small pieces.  Then, don't refuel the fire as quickly as you would if you were maintaining the high oven heat.  Rather, let the oven gradually cool down to a little hotter than 350 before you add fuel to the fire. 

Of course, you'll want to occasionally take a peek in the oven to see that everything is progressing as it should.  This is particularly fun during this recipe because the popover part changes so dramatically.

The popover puff about midway through its baking.  This is not
nearly as pretty as some that I have made.


While the popover puff is baking, begin working on the fruit filling.  You'll need the following:

4-5 baking apples (I think Jonathans are best)
1 orange
3 egg yolks
3/4 cup sugar
1/2 cup orange juice
1/4 c. raisins
1/4 c. dried cranberries
2 1/2 Tablespoons cornstarch
water
vanilla


Core and slice the apples into a skillet.  I use Granny's large Saladmaster stainless steel frying pan for this step.  Add the raisins and cranberries.  Zest the orange, putting the zest in the pan with the fruits.

Squeeze the juice from the orange and add it to the 1/2 c. of orange juice.  Add enough water to make a cup of liquid. 

In a medium bowl, combine the rest of the filling ingredients and whisk until smooth.  Pour over fruit.


Place the fruit mixture directly over the firebox.  Stirring constantly, cook until thick and fruit is coated.

By the time I inherited Granny's frying pan, the bottom was warped
enough that it doesn't make contact with the stovetop except in the
center.  Therefore, I remove the stove lid beneath it to speed the cooking.
While you are cooking the filling, the popover puff crust will probably finish baking.  Remove it from the oven when it is golden brown and appears to be firm all the way through the bottom.


As the popover puff cools, it will contract and make a nice "bowl" to receive the fruit mixture.


This is what the fruit filling looks like when it is finished.
Pour the fruit filling into the popover puff crust, dust lightly with powdered sugar if desired, and enjoy!  I think that it is delicious.


Tuesday, September 10, 2013

Marjorie's Busy Weekend

Last weekend was a very busy one.  Besides visiting Carstens Farm on Saturday and having a potluck brunch and church service in the park on Sunday morning, pretty much the rest of the weekend was taken up with canning and preserving.

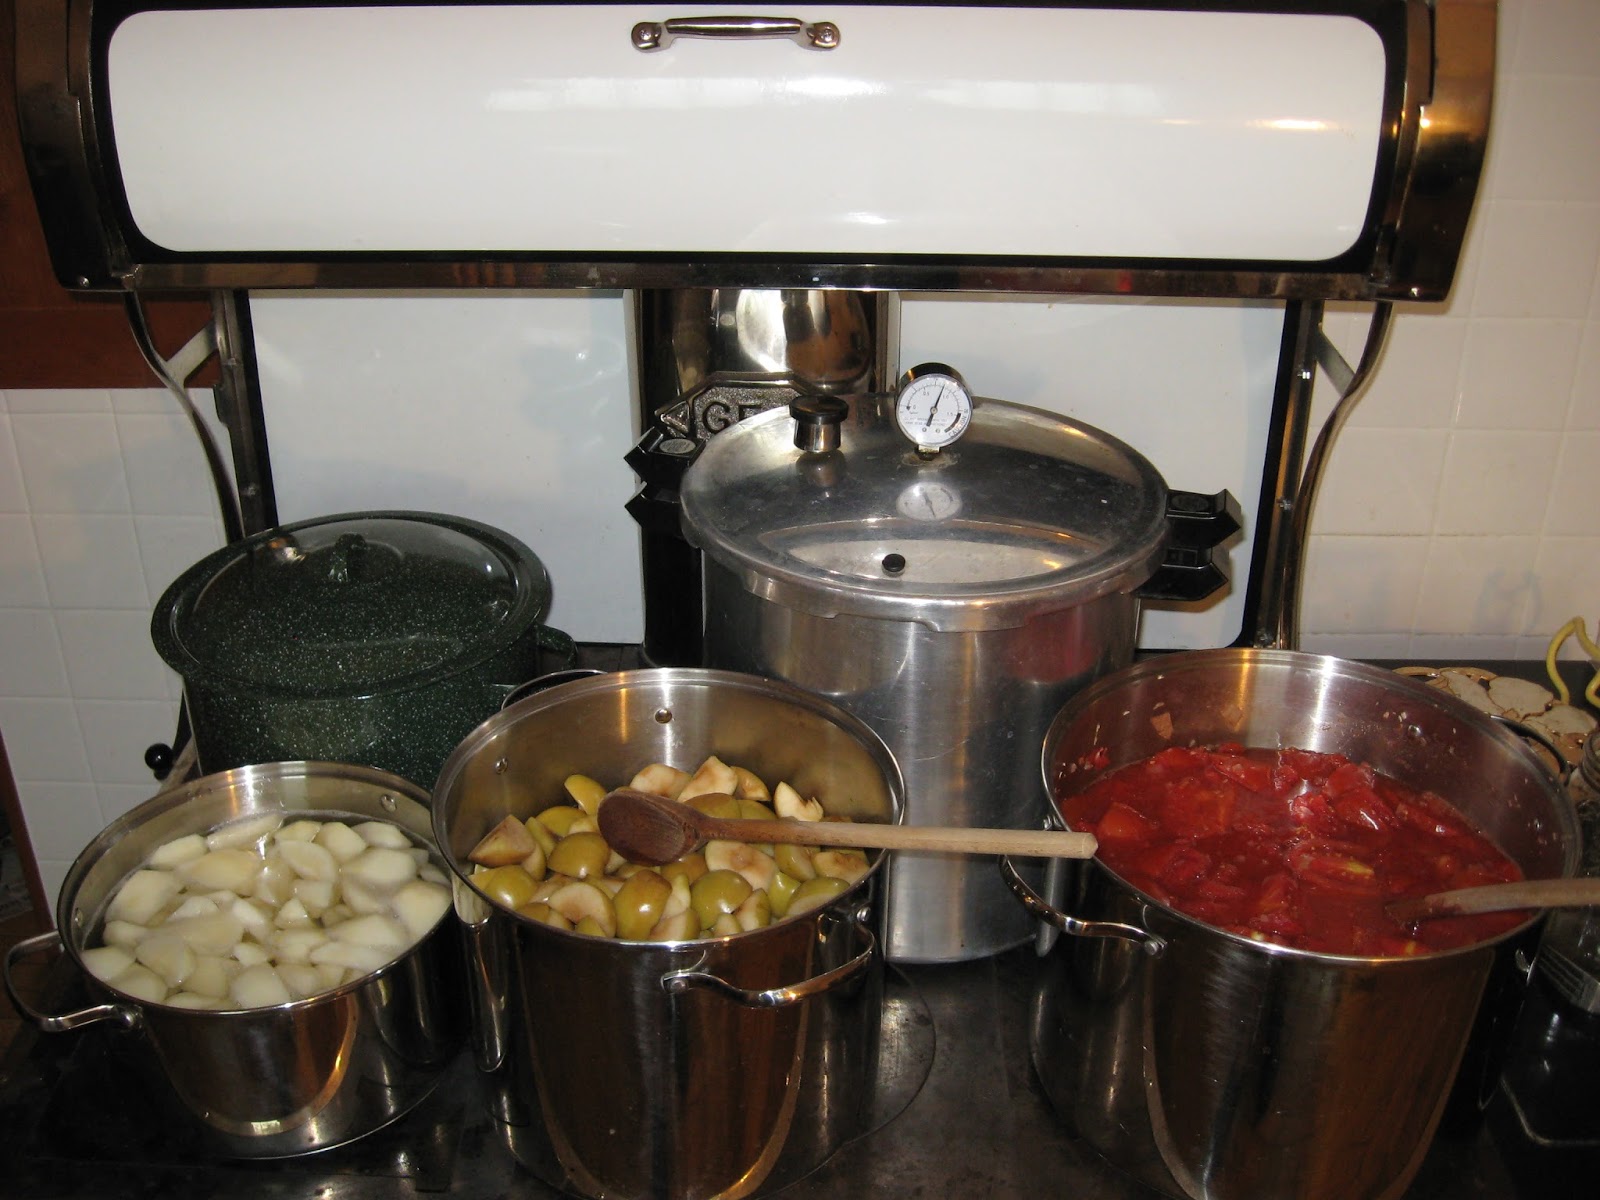
Many different produce items are currently ripe in our corner of the world, so we had a wide variety of tasks to complete, and despite temperatures in the 90s and considerable humidity, we fired up Marjorie the Margin Gem to do the canning.  First, we quickly canned the small batch of sweet pickles that my mother had been working on for the last two weeks.  She used my great-grandmother's recipe, which all of my dad's side of the family is quite fond of.  While they were in the canner, we started making pectin out of the unripe Jonathan apples which we plucked from the broken branches of my favorite apple tree in our orchard.  We also put a kettle of Roma tomatoes from my mother-in-law on the stove to cook down for homemade ketchup.  Then, we canned green beans from my sister-in-law's garden, and began to work on canning the pears from the tree in our orchard.  All of this kept the Margin Gem's cooktop quite full.


A very busy Margin Gem cookstove pressure
canning and water bath canning at the same time.

Notice in these two photos that the Margin Gem is accommodating seven vessels.


A closer picture of the many pots on the cooktop.  Pears boiling
to be hot-packed are on the lower left.  The apples being cooked
for pectin are in the middle rear; the tomato and onion mixture is
in the right rear.  The two canners, the teakettle, and scalding lids
round out the picture.


Things had to move once the pressure canner reached the
appropriate point. 
On Sunday afternoon, the stovetop looked quite similar except that the pears were replaced with peaches.  The pectin was on its second cooking, and we filled the sixteen-quart kettle with a second batch of tomatoes.

I'm terrible at guessing quantities of food to be canned, and I frequently miss my guess when it comes to how much fruit it will take to fill the canner.  Therefore, one of the things that I really like about using the wood cookstove for water bath canning is the reservoir.  If I have more fruit prepared than I can actually fit in the canner, what I've taken to doing is going ahead and filling the extra jar with the fruit and boiling syrup, putting the lid on it, and then placing it in the hot water in the reservoir.  This way, the jar won't seal prematurely (like it would if you were open-kettling), and I'm quite sure that the high temperature of the reservoir prevents any bacteria growth in the short time before the jar of fruit is removed to the canner once the initial batch of jars is finished processing.

I have read that if your stove's water reservoir is capable of reaching the boiling point, you can just do your water bath canning in the reservoir.  So far, the water in the Margin Gem's reservoir has not gotten hot enough to boil.

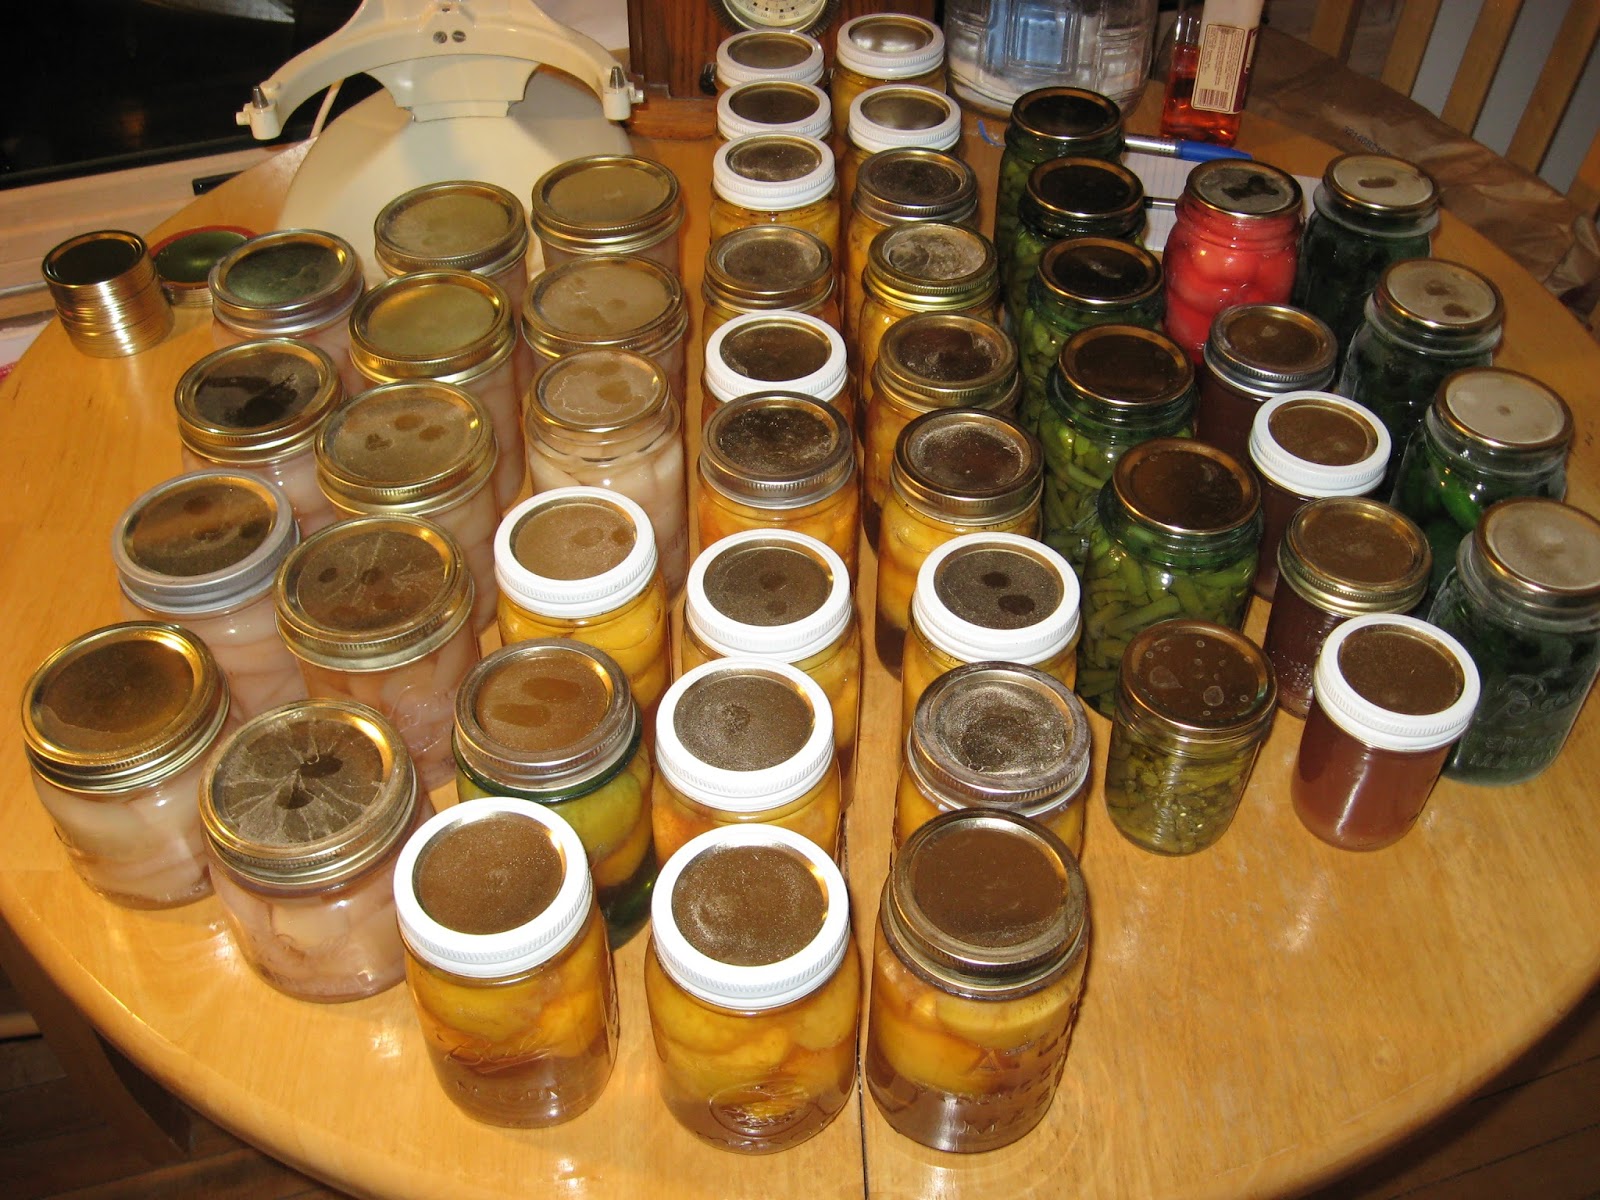
The final products ready to be washed and carried down to the
fruit room.  It isn't a large number of total jars, and they don't
include the ketchup yet because we were not finished with it at
the time of the photo.
I am quite fascinated by the whole prospect of making our own pectin.  I found the method here on Pinterest while looking at one of the boards that someone else had pinned our blog to.  My great-great-aunt Meme, who is mentioned in the "About Me" section to the left, used to reminisce about making pectin when she was a young girl, and I had read some vague accounts of how it was done, but this was the first time that I had seen very much in the way of directions.  Because of two exceedingly long cooking times, making pectin is a process which is well suited to the wood cookstove.

Everything worked according to what I read at the site, but one thing puzzles me.  The pectin gelled like it was supposed to when I tested it in the rubbing alcohol, and when I put it in the jars, it poured like honey.  However, now that it has been canned and allowed to cool, it is almost as runny as water, so I'm a little concerned about it.  I also have no idea how to use it.  I was able to find directions for that at this link: http://www.pickyourown.org/makeyourownpectin.htm.  I think I'll start by using the proportions for Certo and see what happens.  I'd better make a batch of jelly with it as soon as possible in order to find out whether it is going to work.  If the jelly is successful, I'd like to make more because commercial pectin has become so expensive.  If any of my readers have experience with this and can offer advice, please do!

Another thing that I wondered about frequently during our weekend was energy efficiency.  While we had the cookstove fired, we had the kitchen shut off from the rest of the house, but we had the air conditioning going.  Of course, it ran nearly constantly after the stove had been going for a while.  So, would it have been more energy efficient to use the gas stove?  In some ways, I think the gas stove throws an equal amount of heat into the house, and there is no way that we could have had any more than four pots in use at once when using it.  Also, when the cookstove is being fired, it is heating lots of hot water for us.  I don't know how one would figure this out, but it is a question that intrigues me.

At any rate, the forecast for the next several days shows much, much cooler weather on the way.  It doesn't look like we'll be needing the air conditioning anymore in the foreseeable future, so there won't be any wondering which method of canning will be the most energy efficient.

Tuesday, July 30, 2013

Applesauce on the Wood Cookstove

I would like to admit right away that while the vast majority of the cooking that I have done since I left my parents' home has been on one wood cookstove or another, while I was growing up, everyone in my family had electric stoves, so that was what I was accustomed to until I purchased the Qualified Range in 1997.

If you read my last post, you know that we purchased the modern propane stove which is going to be our summer cooking alternative in the house kitchen.  Before I say anything else, let me just also admit that for the Monday Market summer baking, the convection oven on this new stove has been wonderful.  When we are baking on such a large scale for the market, the new stove has made things much easier on us.  (We are able to bake ten loaves of bread or nine pans of cinnamon rolls at a time using the propane stove.)

However, I have discovered two large-scale cooking activities that I much prefer using the wood cookstove for: applesauce and jelly making.

I'll talk more about making jelly on a wood cookstove in a later post.  The main cooking project that has been going on around here (other than the baking for the Monday Markets) is the production of a boat load of applesauce.  The apples from our Yellow Transparent apple tree--along with everything else--are late this year due to the interminable winter weather that we had this spring, but the tree is loaded with them, and they are beautiful.  We do not spray the trees, so in some years we spend hours and hours paring away damaged spots and worm holes, but this year the apples are gorgeous.

The tree was planted many years ago by my grandparents, and we have enjoyed applesauce and apple pies from it for as long as I can remember.  Using apples from this tree, my sister won Grand Champion Apple Pie at our county fair with the recipe that is featured in my post about apple pie.  We also consider applesauce from this tree to be far superior to any other applesauce.  My grandmother on my dad's side, whom we all called "Granny," spearheaded the applesauce making days when I was young, and we carry on the tradition today.  At our house, we've had three large applesauce making days so far this summer, and I doubt that we are done yet.  Here is what we do:

We start by quartering the apples, removing the stem, and paring out any bad spots.  I also tend to cut out the blossom end of the apple, but I don't think that this step is really necessary.  We do not peel the apples.  Granny always believed that the most nutritious part of the apple was right under the skin and thought that it was best not to peel them.  I don't know whether this is really true, but I can still hear her saying it as we made applesauce.

Put the apples into a heavy bottomed-kettle.  I have several Chef-Mate stock pots that were given to us as wedding presents.  I think that these are the perfect kettles to use for applesauce making because the bottoms are about a 1/2 inch thick and they are fitted with glass lids.  Add only enough water to have it rise about an inch from the bottom of the kettle while it is full of apples.  Place the kettle directly over the fire to begin with, but watch it carefully!  Once the apples begin to soften, it can easily scorch.
A 16-quart kettle of Yellow Transparent apples
beginning to cook directly over the firebox.
On the day that I was making the batch of applesauce in the pictures, I was also planning on doing some other cooking, so my fire was pretty brisk because I needed higher heat for the other tasks.  You will see a picture at the end of this post that was taken on a different day when the only cooking project was applesauce.  On that day, I kept only a small, slow fire going because the apples do not need a high heat in order to cook down.  Therefore, because the fire was brisk in the first set of pictures, I had to move the apples away from the fire once they began to cook.

Here the same kettle of apples had been moved to
the middle of the cooktop because they have begun
to cook.
The apples need to cook long enough that each chunk has become soft enough that it breaks apart when you press it against the side of the kettle with your stirring spoon.  Frequent stirring is a must during this time because the apples can scorch so easily.

As I said, I was taking advantage of the fire on this cool summer day and accomplishing several tasks.  I made and water-bath canned strawberry jelly and baked a chocolate zucchini cake.  The strawberries were from our own patch, but the zucchini came from my sister-in-law.  The zucchini cake recipe is from my friend Tanya's friend Crystal's boyfriend's Grandpa Ollie (or Ali?).  Tanya, if you read this, would you let me know if I can share that recipe here?  I will understand if the answer is no.  I don't share unpublished recipes on my blog that are not mine unless I have permission from my source.  At any rate, the applesauce had to eventually be moved to the coolest part of the stove because my fire was fairly hot.

Marjory working hard.  The jelly is directly over the fire, the
canner is in the middle, and the applesauce from has been moved
all the way to the right.
Once the apples are completely cooked, they will look as they do in the picture below.

The same kettle of apples that was in the first picture after cooking.

The next thing that we do is run the apples through a food mill.  Granny always called this machine a ricer, but I think that term is supposed to be only used to describe the hand-held potato ricers.  The food mill that you see in the picture below is not Granny's.  My sister has that one, but this one is exactly like it.  I purchased it at Templeman's, a second-hand store in Atlantic, Iowa, for twenty dollars.  I consider it money very well spent.

Perhaps someday I'll learn not to photograph the
camera strap!  The vintage Sunbeam mixer that
you see behind the applesauce was an early1950's
gift from my grandparents on Mom's side to my
great-great aunt Meme who taught me to cook.
I used it to make the zucchini cake. 
Once the apples have been put through the food mill, we sweeten the applesauce with sugar--quite a bit of sugar to be truthful.  People outside of the family have accused our applesauce of being candy.  However, if they knew how sour Yellow Transparent apples are, they would understand the need for the sugar.  The applesauce is then put into various plastic containers (Cool Whip, margarine, yogurt, sour cream, etc.  We believe in recycling at home.) and then frozen.  I have canned applesauce, but our preference is for freezing it.

So why do I think that the wood cookstove is the best way to make applesauce?   Well, on the first day that we worked on applesauce, we used the gas stove and the same kettles that you see in the pictures here in this post.  Remember that I told you that they have heavy bottoms?  I think that we were watching things pretty closely, but EVERY pot of applesauce scorched that day.  And I don't mean a little bit.  Using a trick that my mother-in-law taught me about how to get the gas flames even lower than the low setting on each dial did not even help.  The scorched place was always right above the burner.  It was exceptionally frustrating.  I don't have nearly that much trouble with scorching when making applesauce on a wood cookstove.  Admittedly, we did have a tiny bit of minor scorching in one of the kettles in the picture below, but you could not taste it like you could in the applesauce made on the gas stove, and it was such a light scorch that it was much easier to clean off the bottom of the kettle than that which had been scorched over the gas flame.  Furthermore, the whole bottom of the kettle was in contact with the heat, rather than having a central place of more intense heat and the rest of the bottom of the kettle just receiving the "leftover" heat as it traveled to the outside of the kettle.

Also, the vast cooktop of the woodburning range accommodates multiple large kettles so much more conveniently than the cooktop of a 30" range.  Yes, you have to move them around to get the desired level of heat, but you have the room to do it.

Three kettles of apples (2 12-quart and 1 16-quart) cooking over
a low fire in the Margin Gem on the third applesauce making session.
If our weather remains cool, I'll be able to make more applesauce on the Margin Gem in the house.  Otherwise, I'll probably fire up the Riverside Bakewell in the summer kitchen.  I should probably give it another try just to be fair, but I'm afraid that making applesauce on the propane stove will be a last resort from now on.