Sunday, July 31, 2011

Grilling on the Wood Cookstove

One of our favorite types of cooking to do on our wood cookstoves has always been grilling--especially during the winter.  It's a long ways from winter around here with highs in the 90s, but we don't own a regular grill, so we used the Riverside Bakewell in the summer kitchen to grill beef filets for our Sunday noon dinner.  I think grilling on the cookstove is particularly efficient because the same fire that you use to grill can accomplish multiple other cooking tasks.  As with most cooking on a wood cookstove, it is all about the rhythm.  Here is what I did today.

The first thing that I did was put the defrosted beef filets in a marinade that I concocted.  Nancy could tell you the name of the Jersey/Simmental cross steer that made the ultimate sacrifice in order to provide us with the filets, but I've forgotten.

Second, I started the cookstove in the summer kitchen the way that I always do.  When the fire reached the point where I could put larger pieces of wood on it, I was a bit more discriminating than usual about the kind of wood that I added.   Cooks seem to pretty much universally agree that the best way to cook meat on a wood fire is to cook it using coals because they provide a more predictable and even intensity of heat and there is little risk of coals imparting a smoky taste to the food.  Of course, hickory would probably be the ideal wood to use because it is coveted for the flavor that it gives to meats.  We don't have hickory available to us here, though, so fruitwood is my best choice. 

Digression: I'm told that my great-great grandfather always used silver maple to smoke pork, so I feel comfortable using it, too, when it is available.  Maple is less ideal than fruitwood, however, because it is generally lighter and therefore doesn't provide a long-lasting bed of hot coals quite so easily.  End of digression.

I would caution against considering Mulberry a suitable fruitwood for grilling.  I think that Mulberry, while a good wood to burn, has acrid smoke which would render any food that was exposed to it quite unappetizing.

On this particular occasion, I used some small pieces of ornamental pear that my parents cut for me after they lost the tree in a storm last year.  Isn't that one of the beauties of a wood cookstove?  What would ordinarily be carted off as garbage created by a storm can be used to cook a complete meal.

While these pieces of wood were initially burning, I started cooking the meal with my pots arranged as you see below. 

Beginnings of dinner on the wood cookstove.
The larger pot at the back was half filled with water coming to a boil for the sweet corn.  The pot at the front is our potatoes.  The coffee pot and teakettle are full of water to absorb extra heat from the cooktop.  The firebox door is open for taking this picture so that you can see that we have a rapid fire burning.

Sweet corn has just been added to the boiling water at the back of the firebox.

Once the potatoes had come to a boil, I had to cock the lid a little so that they didn't boil over.  I didn't move them away from the firebox right away because I wanted them to cook as quickly as possible in the beginning because they would be moved away from the firebox in a little while.  Once the water for the corn had come to a boil, I put in the ears of corn--which I had stolen from the raccoons, by the way.  It is quite clear to them that they own the patch and I am the interloper.

I put the lid on the corn and moved the potatoes to the back of the stove where they continued to boil, but less rapidly.  I then removed the lid over the front part of the firebox and placed over it a grill salvaged from a long-defunct Hibachi.  We saved the grill for just this sort of cooking.  The marinated steaks are then put directly over the fire.  I try to be very careful that the steaks do not rest over any part of the stove's cooktop because their drippings will make a mess on the iron that may eventually smoke into the room as it burns off.  Smoke resulting from drippings that go into the fire is carried out the chimney.


I suppose that one could cook the steaks sufficiently just like this, but in my experience, three undesirable things can happen at this point: a) the usual draft of the stove is spoiled, and cool air rushes right past the cooking meat to the fire, slowing the cooking considerably, or b) if the chimney to which the stove is connected has a slow draft, a lot of smoke escapes into the room, and c) at the very least, the sides of the steaks don't cook as thoroughly as I like them to.  For these reasons, we place a lid over the steaks that we are grilling on the cookstove.  The lid also adds a certain measure of safety in preventing sparks from escaping the fire into your house, although I have never had a problem with that while grilling.


The lid that you see in this picture is used solely for the purpose of grilling on the cookstove.  It came from a very thin stockpot that bit the dust some time ago, but it is perfect for this type of cooking because it is large enough to fit completely over the grill and tall enough to accomodate a fairly thick cut of meat.  A word of caution here: the under side of this lid looks like it has been used to grill meat, and no amount of scrubbing so far has successfully changed this, even though it feels clean.

By this time, the fire was reduced to just coals, so I scraped the coals to the front of the firebox so that they were all under the steaks.

View of the firebox from the feed door on the left side.

Even though the coals were all in the front of the firebox, their heat was sufficient to bring the sweet corn back to a boil and continue cooking the potatoes.


You can see that I had to move the potatoes closer to the fire after the fire had died down, to keep them cooking as quickly as I wanted them to.  For this picture, I had taken the lids off everything, but with the lids on, both the potatoes and the corn were at a pretty fast boil.

Unfortunately, I don't have any pictures of the final meal once it was plated.  You'll just have to take my word for it when I say that it was delicious--especially the steaks.

Some side notes: 

1. If the coals begin to get ashy on the top and cool down, simply stir them a little with your poker; the ash will be knocked off, making them radiate more heat again.

2. To cook larger amounts of meat, I have used the same timing/rhythm with the side dishes, but removed both lids over the firebox as well as the "T" and placed a rectangular rack from a gas grill over the fire.  For a lid, I used the liner from an old electric roaster.  Of course, you want the firebox to have a full bed of coals in this case.  I once cooked steaks for about a dozen people on the Qualified Range in the dead of winter that way.

3. In the absence of good firewood for this purpose, I have used charcoal in the cookstove in order to grill like this.  I was disappointed at the large amount of charcoal that was necessary to achieve a high enough heat, however.

4. All chimneys are different, and the same chimney can behave differently in differing weather conditions.  I have found that it is sometimes necessary to at least partially open the oven damper to prevent too much smoke from entering the room while grilling.  This can make difficulties if one of your side dishes is baked and it hasn't finished cooking before you begin your grilling.


If your wood cookstove is one that has removable lids, I recommend giving grilling a try sometime.  I have to admit to feeling quite smug in January when we have treated ourselves to a grilled steak without ever having to brave the cold outdoors.

Monday, July 25, 2011

Cheating with Your Wood Cookstove: Shrimp and Broccoli Alfredo

I hadn't planned on writing a "cheating" post quite so soon in my blogging experience.  I had thawed a beef roast today, intending to post a blog about one of the ways that I like to fix a beef roast on the cookstove, but life got in the way.  I didn't get the roast started early enough because I was working on getting ready for the family reunion that we will be hosting in a little less than two weeks.  Thus, when Nancy called to let me know that she was on her way home from work and that she was too hungry to wait for a roast, I had to resort to plan B.

Plan B was what I call cheating because it was a combination of ready-made foods.  Hey, it happens sometimes! 

The reason that I want to include these cheating recipes on the blog, though, is to drive the point home that cooking on a wood cookstove doesn't necessarily mean that every meal is going to take an eternity of prep time.  I read somewhere that cooking on a wood cookstove tends to draw people toward cooking meals that generally take more time than usual just because of the nature of the stove.  This may be true, but it doesn't have to always be that way.  My approach to living with a wood cookstove is that I want this beast in the kitchen to do what I want it to do, and occasionally that means that I need a meal in a hurry.

If you start with a cold stove, the meal in this post can be completed in less than an hour.  If the stove is already going before you start, this meal could be complete in about a half hour.


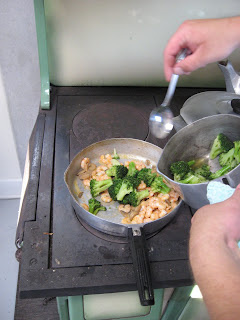
With a hot fire in the firebox, I start with my pans arranged in the manner that you see above.  The large pot in the back is water coming to a boil for the pasta.  The saucepan to the right has about a half inch of water boiling in the bottom to steam broccoli.  The frying pan in the front has a couple tablespoons of butter melting in it to saute the shrimp and mushrooms.  Once again, the coffee pot and teakettle are filled with cold water to just absorb extra heat since our summer days are still climbing into the nineties with high humidity.


I add a good two cups or so of uncooked bowtie pasta to the boiling water.  I'm sorry about the vague measurements; I'm just that sort of cook.  You'll have to be patient with me.

If I were a good Italian, I suppose that I would have added a little olive oil and salt to the water.  You can feel free to do so, but I'm not a good Italian.  I'm not even a bad Italian.  I'm mostly German, but that has nothing to do with anything.

I tend to not salt much while I'm cooking because my mother didn't salt much when she cooked.  Furthermore, since there is a purchased jar of alfredo sauce coming up, I can depend on it to have plenty of sodium for me.  I also figure that people can salt their own plates at the table so that they get the flavor that they desire.


 I then put a lid on the pasta.  This may seem like a gratuitous picture, but I want to take this opportunity to talk about the importance of lids while cooking on a cookstove.  When I'm cooking on an electric or gas stove, I usually use lids because of the energy savings that they afford.  The same is true on the cookstove.  Since a wood-fired range generally provides a less intense heat than a gas or electric range, the lids can help ensure faster cooking.  The other reason that I am a proponent of using lids on a cookstove is because sometimes it is necessary to add fuel to the fire while you are cooking.  I tend to feed the fire through the front top lid, and occasionally small pieces of bark, splinters, dirt, or fly ash will land on the cooktop as a result of this.  The lids make sure that none of this debris lands in your food. 

Just being honest here, folks. 

I can hear my mother's voice right now, saying of the debris (of the skinned knee, of the bug you accidentally swallowed as you were walking up to Gramps and Gran's, of the manure you fell into, etc.), "It won't kill you."  She's right; it's not a big deal, but I want to be a clean cook.


I put frozen cooked shrimp into the butter to begin cooking.  I think that we put about two cups in this batch because we are shrimp lovers. 

Opened the firebox for this shot just to prove that we are indeed cooking over a wood fire.
I get tired of seeing posed shots on the net where pots, pies, and loaves of bread are put
all over the cooktop of a wood cookstove in a vain attempt at making the stove look
like it is really in use.  Nothin' but the real thing here.
Unfortunately, you'll have to click on the pic to see that I've added a drained can of mushrooms to the shrimp in the frying pan.  About two cups of frozen broccoli are steaming in the saucepan behind the shrimp.  You'll note that the pasta pot has been moved off the firebox because it was boiling too hard while it was directly over the fire.  Moving a pot to the right (or away from the firebox) is the same as turning down the heat on a modern range.


Once the shrimp was thoroughly heated and the broccoli had steamed long enough to be hot, I scoop the broccoli out of the water and put it in with the shrimp and mushroom mixture.


Then I poured in a jar of alfredo sauce.  You can use homemade alfredo sauce at this point, too.  Do what you want here.


I let this cook together, stirring occasionally, until the pasta is finished cooking.  Usually, this is only a few minutes.

I put a bed of pasta on a plate, and pour some of the shrimp alfredo mixture over the top, and supper is served.

Shrimp and broccoli alfredo, a quick wood cookstove meal.


Shrimp and Broccoli Alfredo

2 good cups uncooked bowtie pasta
2 T. butter
2 good cups frozen cooked shrimp
1 can mushrooms, whatever size you want
1 jar alfredo sauce, or about a pint homemade
2 cups frozen broccoli

1. Bring sufficient water for cooking pasta to a boil.  Add pasta to boiling water and reduce heat to simmer.
2. Saute shrimp and mushrooms in butter.
3. Steam broccoli in about a half inch of water until hot.
4. Remove broccoli from steaming water and add to shrimp and mushroom combination.
5. Add alfredo sauce to shrimp and broccoli and let cook together until pasta is finished cooking.
6. Drain pasta.
7. Place a bed of pasta on each plate, pour shrimp alfredo mixture over the top.

Yield: Four servings.

Thursday, July 21, 2011

Pressure Canning on the Wood Cookstove

Several years ago, I was reading an article about canning in one of my homesteading/country/hobby farm magazines.  I was excited about the article because it was written by a fellow who is considered a recognized authority on wood heating and cooking.  All was going well until he wrote that pressure canning on a wood cookstove was impossible because you couldn't adequately control the pressure in the canner.  I was amused and a little angry, to say the least.  Apparently, he has never tried to maintain a constant pressure on an electric push-button stove--now that IS a challenge. 

I'm here to tell you that pressure canning on a woodburning cookstove is not only quite possible, it is pretty easy.  In fact, the Presto canner that my mother and grandmother bought at Minden Hardware in 1979 came with instructions on how to can on a "constant heat stove."  It is just about knowing where to put everything on the cooktop.  Furthermore, it only makes sense to me that the farm that produces much of my food should also be able to produce the energy needed to cook and preserve it. 

Below, I'll show you how I pressure can on the wood cookstove.  I want this blog to be helpful for people who want to know more about using a woodburning cookstove, but I don't claim to have all of the answers.  My hope is that by showing others what I do, they will have a better chance of finding success with their own stoves. 

This post assumes that the reader is familiar with the pressure canning process and focuses on how it is accomplished on a wood cookstove.  If you aren't familiar with canning, resources about it abound in both print and electronic forms.


I start by building a hot fire of small sticks and pieces of what I think of as "biscuit wood."

Small pieces of wood burning in the cookstove.

Once the fire was burning nicely, I closed the oven damper halfway.  All I need in this particular case is intense heat over the firebox.  The rest of the cooktop doesn't need to be all that hot, and I'm not going to be baking anything at the same time, although I have done that before, so the oven doesn't need to be evenly heated.  I'm going to be canning green beans (courtesy of my mother-in-law's beautiful garden) for this post, so the first hot item that I need is boiling water to pour over the beans once they are in the jars. 

Boiling water in the teakettle to the left.  Canner and lids on the
cooler part of the stove on the right.

I start with the various vessels arranged on the cooktop as shown above.  Directly over the firebox at the back (usually the place with the most heat) I have the teakettle with water coming to a boil for the beans.  In the pink saucepan in the front, my canning lids are warming up.  The base to the canner already has water in it, and it is warming over the coolest side of the cooktop, which of course, is still way too hot to touch.  The white coffee pot in the back has water in it and is there simply to absorb some BTUs since the outside temperature was in the 90s.

While I wait for the water to come to a boil, I fill the canning jars with the produce.


When the water in the teakettle has come to a boil and I'm ready to start putting it in the jars, I move the warm canner over to the top of the firebox so it can begin heating more.


Jars are then filled, lids are adjusted, canner is filled, and the lid is put into place.

Putting the lid on the pressure canner.

Now here comes the fun part.  This canner belonged to Ruth Nickle, my wife Nancy's grandma.  As near as I can tell from the instruction book that came with it, she purchased it sometime in the 1940s.  Ruth had only a wood/coal stove until the early 1950s, and I can tell from the bottom of the canner that she frequently removed a lid from over the fire and placed the canner right over the fire.  With the other pressure canners that I've used, I've always tried to keep their bottoms in pristine condition.  This one left pristine condition in the dust over three score years ago, so I'm going to speed things along and follow Ruth's method.


What is it about men always wanting to cook over flames? 

Above, the canner isn't centered over the eye of the firebox, just so that you can see the fire.  As soon as the picture was snapped, I moved the canner forward so that the eye was completely covered; otherwise, removing the lid is pointless because it spoils the draft and cold air rushes right by the canner to the fire.

As this is a dial guage canner, it has to exhaust for about ten minutes over high heat.  At the end of that time, I closed the petcock so that it could begin to build pressure.

In a few minutes, the canner had reached the correct amount of pressure for our elevation. 


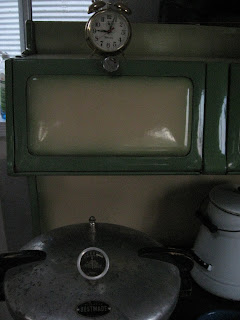
Thus began the 20 minute countdown for pints of green beans, and thus began "the dance" of moving the canner to a location with less intense heat to just maintain the correct pressure level.  In the following sequence of pictures you can see the clock above the warming oven and notice the location of the canner as the twenty minute interval progressed. 


Canning on the wood cookstove.


The canner didn't have to move much because I only added a small piece of wood once. If I were going to can more after this batch, I would probably have kept the fire hotter in order to bring another teakettle of water to a boil, etc. Therefore, the canner would have had to be moved farther to the right to a cooler portion of the cooktop so that its pressure did not continue to rise.  If the fire slows, I move the canner closer to the fire so that it doesn't lose pressure.

I could tell that the fire was not going to get too hot or too cold very quickly, so I didn't stay right with the canner the whole time.  I went outside of the summer kitchen and weeded the gladiolus and sweet peas, but I didn't go far.  I wouldn't go far from a pressure canner on any kind of stove, for that matter.

By the end of the canning time, it had gotten quite dark in our summer kitchen.  Since it has no electricity, the lamp that you see in the last picture was necessary when the camera wasn't flashing.  You can also see that the fire had burned down to just coals.

Once the correct amount of processing time has elapsed, I move the canner completely off the stove so that its pressure can go down.  Once the pressure is gone, I remove the jars to a towel on the countertop for them to cool, and I begin waiting for that all-important and rewarding sound of canning: the ping of a canning lid sealing.

I got a little artsy with the camera while I was waiting.

Vintage cookstove in the lamplight.

All of this batch sealed.  Canning with a pressure canner on a wood cookstove is not only possible, it is easy.

Update: For more information about pressure canners and wood cookstoves, please see this post.
If you want to pressure can on a wood cookstove with two pressure canners simultaneously, check out my post about that.

Monday, July 18, 2011

Baking White Bread in the Cookstove

I read somewhere on the Internet that the first food that most people want to learn how to cook in a woodburning cookstove is bread, so it seems fitting that my first actual "food" post will be about making white bread.

First, a disclaimer or two.  Yes, I know that white bread is the least healthy bread.  Yes, I know that wheat gluten is an unpopular topic right now.  And yes, I know that this is not the way your great-grandmother did it.  I'll get to healthier breads in later posts.  Right now, I just want to show you a recipe that I developed which consistently gets respectable results.  Furthermore, the number of bread baking methods probably equals the number of bread bakers, so I'm just showing you what works for me.

Because I am using raw milk from our Jersey cow Dolly, I have to start the breadmaking process by scalding milk.  Raw milk has enzymes in it that will kill yeast (I learned this the hard way before being educated about it), so this is a necessary step for me.  If you are using pasteurized milk, you can simply warm it to about 110 degrees.  To scald milk, I put it over fairly high heat until a scum forms over the top of it.  You can see in the picture that I have the milk directly over the firebox.

Scalding milk on the cookstove.

Once the milk is scalded, it will need to cool for a while.

On this particular day, I was baking bread for Nancy and me, some family members, and some neighbors, so my goal was six loaves.  I figure one cup of liquid per loaf of bread, so I measured--you'll learn that this is often a relative term for me--about six cups of scalded and cooled milk into our largest stainless steel bowl.


I then added three tablespoons of yeast (we use Fleischman's bulk yeast that is available at Sam's for a very reasonable price).  I then added one cup of sugar and about three tablespoons of salt.


I stir this a little and wait for the yeast to begin to activate.


Once I can see some bubbles forming, I add one cup of canola oil.  I used to use olive oil, but we were never happy with the flavor.  I should probably continue to experiment with different olive oils to see if we can find one that we are happy with, but I just haven't taken the time yet.


Then I begin sifting flour into the mixture and stirring it in.  We use All Trumps, a bread flour made by General Mills that we buy from an Amish store near Redding, Iowa.


When the dough has sufficient flour in it to look like it does in the next picture, it is stiff but still stirrable.  At this point, I always beat it as hard as I can in order to encourage the flour's glutening action.  Hmmm . . . my computer tells me that "glutening" is not a word.  Sorry, but I'm going to use it anyway.  Don't tell my students, please.  "Glutening action" is what my cousin said when she was sharing tips with me about baking bread many years ago,  and I'm going to "stick" with it--pun intended. 

Why do I get the feeling that I'm the only one laughing?


You can see how the texture in the second picture is more smooth and elastic.  I feel that this makes for better bread.

Once you've stirred in enough flour that using a spoon has become difficult, it is time to turn the dough out onto a floured surface and begin kneading it.


Unfortunately, I couldn't figure out how to knead the bread and take a picture of the process at the same time without getting bread dough all over Nancy's camera, so I have no pictures of that process.  Look for those on a later post about another kind of bread.

At any rate, for this recipe, I have found that I continue to knead and add flour until the dough no longer sticks to my hands as I work with it.  Miraculously, the amount of time that this takes also seems to be the correct amount of time for kneading the dough. 

Return the dough to the bowl, and spread a thin layer of shortening over the top to ensure that the outside of the dough does not dry out.  In the beginning of my bread baking experiences, I never spread the shortening over the top of the dough, but I highly recommend this step for two reasons: 1) it prevents the dough from forming a crust that can retard the rising process, and 2) it prevents dense clumps from showing up in the final loaves, providing a better overall texture in the final product.


I then cover the bowl of dough with a tea towel and let it rise (pretty embroidery on the tea towel is optional).


Note: This tea towel is indeed clean, but the stains that you can see on it show that it has been used to cover bread and rolls many times. 

Once the dough has doubled in size, punch it down and let it rise again.


Grease your bread pans generously while the dough is rising for the second time.  Yes, I've heard all about how we don't need any extra shortening in our diet, but you don't want to go to all of this work only to have your bread stick to the pans.  Few things are as frustrating, believe me.

Shape the dough into loaves and let rise until almost double.  I say almost double because the loaves will rise a bit more once you put them in the hot oven.  This phenomenon is known as "oven spring."  You may want to prick the tops of the loaves to prevent air bubbles from forming just under the top crust.  I put a thin layer of shortening over the tops of the loaves at this step, too.

You can see in the picture below that I had sufficient bread dough for not only six loaves of bread, but also a pan of dinner rolls.

Bread rising next to the cookstove.


I cover everything with a tea towel again and then start getting the oven hot enough for baking the bread.  I like to bake this bread between 350 and 375 degrees.  In the woodburning cookstoves that I have worked with, achieving this oven temperature generally takes at least 45 minutes, so the final rising time and the oven preheating time work out to be pretty close to the same.  I'll talk more in a later post about oven temperature in woodburning cookstoves.

When the oven is hot and the bread has risen sufficiently, pop the loaves in.


I find that putting the oven rack on the floor of the oven usually gives me the best results.  Please excuse the aging oven floor in the picture above.  The stove has done a lot of baking.

Once the loaves have been in the oven for about 25 minutes, I take them out and put them on the top of the stove to finish baking their bottom crusts sufficiently.  I don't put them directly over the fire, though, as the heat would be too hot and result in a burnt bottom crust.  In the Qualified range in the house kitchen, I would always remove the oven rack during the last five minutes of baking and just let the pans sit directly on the floor of the oven to make sure that the bottom crust was baked enough.


Bread baking in the cookstove.

You can see the remaining two loaves beginning to bake while the first four are browning on the bottom a bit.

After the loaves are browned enough on the bottom, remove from pans to a cooling rack to cool.


Now where did I put that last jar of homemade raspberry/apple jelly?


White Bread

6 cups scalded milk
3 Tbls. yeast
1 cup sugar
3 Tbls. salt
1 cup canola oil
Enough bread flour to make a dough that doesn't stick to your hands as you knead.

a) Combine milk, yeast, sugar, and salt.  Let begin to foam.
b) Add oil.
c)Stir in flour until dough stiffens.  Beat until elastic.
d)Continue added flour and kneading until dough no longer sticks to your hands.
e) Place in bowl to rise, covering with a light layer of shortening.
f)Let rise until double.  Punch down and let rise again.
g)Shape into loaves and cover with a light layer of shortening.
h) Bake in a moderate oven for 25-30 minutes.


Saturday, July 16, 2011

Starting the Stove

The Riverside Bakewell cookstove in our summer kitchen.
Just as each cookstove behaves uniquely, each chimney is unique as well.  The same stove when moved to a different chimney can become a different beast.  This post will show me starting the Riverside Bakewell in our summer kitchen.

Our summer kitchen, a Tuff Shed, was designed and finished with the knowledge that we wanted to let as much heat escape the building as possible.  Unfortunately, this resulted in the building itself being as good a chimney as the flue that the cookstove is attached to.  Therefore, starting the fire can be a very smoky affair until a sufficient draft is established in the chimney.  To prevent being smoked out, I first burn just a couple of sheets of crumpled newspaper in the firebox.

A piece of crumpled paper and a couple of tissues in the firebox. 
Notice that the ashes are cleared off the grate.

I then make sure that the stovepipe damper is open,


the oven damper is open,

The knob is broken off the oven damper, but you can see the hole
next to the word "open."

and the side draft is partially open.


Then, I light the paper and put the lid back over the firebox.  As you can see in the picture below, the smoke that was let into the room was minimal.


Once the paper had been burning for a little while, all the smoke began to go up the chimney.  After the paper has completely burned, I put more crumpled papers into the firebox and add a few small sticks of kindling.


Kindling burning in the cookstove.

It usually won't be long until you have a nice little fire of kindling.  You can then gradually add larger pieces of wood.  Because of the draft problems in our summer kitchen that I mentioned earlier, I cannot completely shut the oven damper as quickly as I always could with the stove in our house kitchen.  In the summer kitchen, I have to close it partially to strengthen the draw around the oven.


If baking is your goal, or if you want the maximum heat output of the stove, by the time a good bed of coals has been established, larger pieces of wood can be added, and the oven damper can be completely closed as shown below.  Of course, if you have a chimney that draws well, the oven damper could be closed shortly after the paper has burned away in the firebox.


Drafts can be closed down to slow the burning of the fuel and to thus conserve it.


Due to the fact that the firebox side of this stove is very near the sink, you can see that I put water in a canner and a 40-cup coffee pot over the firebox.  Otherwise, the heat that radiates from this side of the stove is nearly unbearable to stand next to.

Keep in mind that each stove is different.  This is what works for this particular stove while hooked up to this particular chimney.  Please feel free to share your "startup" methods.