Friday, April 30, 2021

In Praise of the Margin Gem's Waterfront

Things have been ridiculously busy in our lives over the last several weeks.  School has kept me occupied with both substituting and accompanying the choirs; our church has hired a pastor; after a futile housing hunt we prepared our little house here on the farm for him and his wife to live in; and our church is converting a former doctor's office into our new church building.

You will note from the list above that I haven't done any spring gardening or cleaning, and I didn't even put mowing on the list, though the yard is beginning to look like a jungle.  All of these necessary activities have prevented me from posting very regularly.

Through it all, we've still managed to be firing the Margin Gem on a daily basis.  My goal is to have it heat all of our hot water until the end of May, but we shall see.  Lots of factors play into this, such as how much time I have to keep gathering and cutting fuel, how hot the weather becomes, the levels of humidity indoors and out, whether I can keep enough dry fuel ahead, etc.

Today, though, I just wanted to write a quick post to say how truly impressed I am by the water heating capacity of our Margin Gem system.  In something I read or watched or in a phone conversation with Daniel Fenoff of Stoves and More LLC, where we purchased our Margin Gem back in 2011, I remember him saying that during the summer months they lit a fire in their cookstove each morning in order to cook breakfast.  That fire heated enough water to meet their hot water needs until they had another fire in the evening to cook supper.  

With our schedule as full as it has been, we haven't been doing a lot of cooking.  Last night we had a cold supper, for example, and the night before that, all I made was a dish that my niece calls "Bougie Ramen."  As that involves simply boiling water for three minutes, it was far faster to cook it on the electric stove down in the basement.  Thus, what we've been doing is not starting a fire in the cookstove until just before we go to bed.  Once the fire is well established, I put large chunks of wood in the stove and turn the draft down so that the fire will burn all night.  When we get up in the morning, there is a nice bed of coals that I rake together.  I throw some kindling on this, wait a few minutes after it has caught fire, and throw a few more small pieces in.  This fire is sufficient to fry a couple eggs or make French toast, and it tops off the hot water enough that we can shower and wash dishes in the mornings.

(Note: The above firing method of firing the cookstove can create an unduly large accumulation of creosote in the chimney.  In order to prevent that, I have to use the driest wood that I can find.)

You don't have to have a very hot fire in order to heat quite a bit of water.  I think this is due to the large surface area of the Margin Gem's waterfront.

The interior of the Margin Gem firebox.

In the picture above, you can kind of see the waterfront.  It is the whole left side of the Margin Gem's firebox and measures approximately 16" x 12" which results in about 192 square inches of heat exchanging space.  Coupled with a stone-lined 40-gallon Vaughn range boiler, the heating capacity of this system is impressive, I think.

A picture of the Vaughn range boiler before it
was attached to the Margin Gem.

If I were going to level any complaint against this water system of ours, it would be at the mixing valve which tempers the water as it leaves the tank and goes into the house plumbing.  

Our problematic mixing valve.

Sometimes in the middle of a shower (and perhaps it does this at other times too, but we have no way of knowing) it behaves badly, sending the water from very pleasant to too cold to uncomfortably hot for no apparent reason.  We notice that this happens most frequently when the water in the tank is extremely hot.  I believe this little defect to be the result of the fact that it was damaged by the plumber during installation.  While this is annoying, it hasn't proven to be dangerous, and getting it replaced will not necessarily be expensive, but it will be colossally inconvenient.

The longterm weather forecast is for fairly cool weather, so we'll see how long we can hold out until we switch to electrically heated water for the summer.

Friday, April 9, 2021

Chicken Pot Pie Baked in a Wood Cookstove

This is a picture of an earlier chicken pot pie which
was baked in the Margin Gem; it's not the one you
will see in the photos below.

One thing Nancy and I both love is good chicken pot pie, and we're pretty happy with the version that I make.  Pulling a meat pie out of the oven of a woodburning cookstove gives one a feeling of satisfaction that is a close second to that of a beautifully browned turkey or a golden loaf of bread.

As always with any wood coookstove dish that is going to be baked, the first thing you have to do is to build your fire and heat the oven.  You need a "hot" oven for baking a pot pie, so build your fire so that your oven will run at about 425ºF.

I think the second step to making a really good chicken pot pie is making the right crust, and I'm excited to share the recipe that I use.  It originated from my reprint of the 1950 Betty Crocker Picture Cookbook (Wiley Publishing, Inc. and General Mills, Inc.), and it was labeled "English Pastry."  For a meat pie, especially a chicken pot pie, I think people generally are looking for a thicker, richer crust than one might find on a homemade fruit pie, for example.  As always, I've tweaked the recipe a bit, and now it's exactly what I'm looking for.

The ingredient list for the crust is as follows:

2 cups sifted all-purpose flour

2 tsp. baking powder

1 tsp. salt

2/3 cup butter flavor Crisco

1/2 c. hot water

1 Tablespoon lemon juice

1 egg yolk

1 egg white

1 Tablespoon cold water

Here is what you do:

1. Sift the flour, baking powder, and salt together.


2. Measure the butter flavor Crisco and pour the half cup of hot water over it from the teakettle.  Obviously, this will soften the shortening significantly.

3. Add the tablespoon of lemon juice to the shortening/hot water mixture and stir around a little.

4. While stirring the above mixture vigorously, add the egg yolk.  You've got to stir while doing this so that the egg yolk doesn't cook.


5. Combine the wet ingredients with the dry, stirring until no lumps of shortening are visible.


6. Pop the crust mixture into the freezer to chill while you mix and cook the filling.  If you're not going to be assembling this pie immediately, just put the pastry dough into the fridge.

Now, in the pictures that you see below, I used a quart of chicken breast meat that I had canned on the Margin Gem last fall.  When I can chicken, I fill the jar loosely with pieces of meat, and then I fill the jar to an inch from the top with hot water and add a bouillon cube or two.  After the meat has been processed in the pressure canner, the chicken usually condenses down to a little over a pint of meat swimming in about that much broth.

Here is what I did for the filling.  I'm sorry that there aren't any hard and fast measurements for any of this; it is always just by guess and by golly.

7. Drain the quart of canned chicken, putting the broth in a tall-sided frying pan.  I use my Magnalite chicken fryer.  To the broth I added one bouillon cube and a teaspoon of chicken base.  Put that directly over the firebox to come to a good boil.

8. While that was heating, I poured about a 1/2 cup of heavy cream into it along with the juice from a six-ounce can of mushrooms.

9. Add a half teaspoon of paprika, a dash of pepper, and a sprinkling of seasoned salt.

10. I beat about six tablespoons of all-purpose flour into a cup of cold milk until it was smooth.  

11. While stirring the hot mixture constantly, I added the milk and flour mixture. 

12. Once the flour and milk is added, stir constantly with a fork until everything comes to a boil and begins to thicken.  Once that happens, add the canned chicken, the canned mushrooms, a tablespoon of onion flakes, and a cup or two of mixed vegetables.  Bring everything to a boil again, stirring quite frequently.


13. Move the filling mixture as far away from the fire as possible so that it will just simmer very gently while you work on the crust.


14. Whisk the egg white and cold water from the crust ingredients until they're a little frothy on top.


15. Remove the pastry dough from wherever you had it chilling.  Pat 3/4 of the dough into the bottom and up the sides of a deep dish pie pan.  I find that our Pampered Chef deep dish stoneware pie plate is perfect for this.


16. Roll out the remaining pastry dough until it is just large enough to fit over the top of the pie.  I didn't stop quite soon enough in the picture below.


17. Pour the hot filling into the bottom crust, leaving about a half-inch of space at the top so that the pie won't boil over in your oven.


18. Put the top crust on the pie, pinching the edges together to seal.  (I'm embarrassed at the looks of this one as I didn't center the crust right and had to go back and patch it.)

19. Poke holes in the top crust to vent the pie; then brush the egg white/water mixture over the top.


20. Slide the pie into the hot oven and bake for about 25 minutes or until the pastry is a beautiful brown.


I took a picture of the oven thermometer while the pie was in the oven.  If you look closely, you can tell that the thermometer doesn't indicate that the oven is anywhere close to 425ºF, but experience tells me that it is.  If the thermometer on your wood cookstove's oven is not accurate, that doesn't mean that it's not useful.  For example, after almost a decade of baking in the Margin Gem, I don't pay any attention to the numbers on the thermometer.  Instead, it is more helpful to think of the thermometer like a clock face.  If the needle is pointing to 10:00, the oven is at 350º.  Eleven o'clock is 375º; noon is 400º; one o'clock is 425ºF.  If the needle goes past three o'clock, I need to open the oven door! 


After three or four attempts at photographing what the fire looks like in order to maintain a hot oven in the Margin Gem, I settled on this one.


Watch the pie carefully during the last few minutes.  When you're baking at an oven temperature this high, you don't want to let the crust burn.

Doesn't the egg white wash make a nice looking
crust?


I took this picture because I wanted to show that when this crust
is baked in a stone pie plate, it pulls away from the edges once
it's done (as long as you've done a good job of sealing the edges
and none of the filling has boiled down between the crust and
and the pan). You can see it particularly well at the lower left side.

21. After you remove the chicken pot pie from the oven, let it cool for a few minutes before you cut into it.  That will let the filling thicken even more, and it will be easier to neatly remove a piece.  

A piece of the finished chicken pot pie.

We find that this version of chicken pot pie reheats into very tasty leftovers.  In this household, that is a very high recommendation for any recipe!


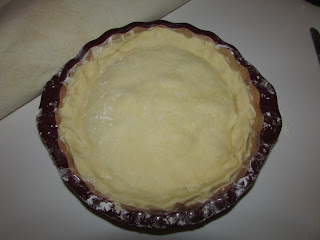
The picture below is of the pie in the picture at the beginning of this post before it was baked.  I included it to prove that I can actually make a top crust that doesn't have to be patched!