Wednesday, May 27, 2020

Canning Homemade Pork and Beans on the Wood Cookstove

Life has certainly been different the last two months, hasn't it?  I never would have imagined that the last day of school for the 2019-2020 school year would have been Monday, March 16th, and I would never have predicted that I would have as much time at home as I've had over these last several weeks. 

It seems like we've been in this COVID-19 situation for such a long time.  It was winter when everything seemed to come to a grinding halt, and now we have arrived at the unofficial start of summer.  We had a few warm days early on, but then our temperatures dropped back below normal, and our biggest snowfall of the season occurred on April 16th.  We haven't been overly warm since then, but we've got a beautiful garden this year, even though we lost a few green bean plants to frost, and our tomato plants were a bit damaged.

Our wood cookstove has been very busy during all of this time.  We turned off our electric water heater for the season on October 11 last year, which means that the Margin Gem cookstove has been fired daily ever since (except for the single whole day we spent in San Antonio where my brother was honored as the president of the National Corn Growers Association). Since October 11, every meal that we've made at home has been cooked on the wood cookstove except for one crockpot supper and one recent dinner that was cooked on the grill.  The only thing we've done on a modern stove is make popcorn (We've popped corn on the wood cookstove too, but that needs to be its own post.) We've been very thankful for the economy of the wood cookstove since the financial state of things has changed so dramatically.

We've also been very thankful for a well-stocked freezer and fruit room. The rows and rows of home-canned fruits, vegetables, meats, pickles, juices, jams, and jellies have been such a blessing during this time.  For many years, I've enjoyed canning lots of different foods, but we never seem to eat as much of it as we should.  That has changed dramatically. Since March 16th, we've eaten out (carry out only) a total of five times. Now, I know that for some of my readers that is more than they would normally eat out in that amount of time, but for us this is a dramatic change.  Thus, we are barreling through our canned goods right now, and it is a good thing for the inventory.

I have also done a fair amount of canning since being home during the quarantine.  At the time everything shut down, we still had three bushels of fall apples in our utility room.  They were my first priority.  Other than an apple crisp and Danish apple bars, I canned the rest of them.  While the water bath canner was on the stove, I also made and canned a couple batches of grape jelly from juice that my sister-in-law canned some time ago.

One of the supermarkets in Council Bluffs had a sale on pineapples for 98¢ each a couple weeks ago, so I bought five and canned three of them.  I had never canned pineapple before, but if I can find a bargain like that again, I will certainly do it in the future.  Nancy and I agree that the home-canned pineapple tastes much better than commercially canned pineapple, and when I pushed pencil to paper and figured the cost of the lids, sugar, and fruit, I discovered that we saved almost $5 over the store brand pineapple tidbits and nearly $8 over Dole brand.

Then with rhubarb coming available and in an effort to clean out our freezer, I've made and canned three batches of pineapple-rhubarb jam and one batch of strawberry-rhubarb spread.  Of course, all of this has been done on the Margin Gem wood cookstove.

The only time I have used the pressure canner during quarantine has been to can homemade pork and beans.  This was the second time I did this, and I am so happy with the results.  See, I love Van Camp's pork and beans (doctored up, of course), but the price of these has really gone up quite a bit since I first started doing my own grocery shopping twenty-some years ago.  Besides, I like being able to make foods myself when I'm able.

The method and recipe I use is based on the "Baked Beans" recipe in my Kerr Home Canning and Freezing Book from the 1970s, but I've changed it to suit my taste and updated it to meet today's standards for safe canning.

The first thing you do is thoroughly wash four cups of navy beans.  In a heavy enamel or stainless steel kettle, cover the beans with plenty of water and let them soak overnight.  You may have to add water to them in the morning; I certainly did.  Place the pot of beans directly over the firebox and bring to a boil.  Continue boiling for 45 minutes.  You can move the pot to a cooler spot on the stove if you need to as they don't have to boil fast.


As the beans cook, they will absorb more water.  Add boiling water from the teakettle as needed to keep plenty of moisture on the beans.


At the end of the 45 minutes, the beans will not be cooked thoroughly enough to be tender yet, but that is all right.  They will finish cooking during the canning process.


At the end of the 45 minutes, drain the beans in a colander, reserving the juice.


At this point in the process, build your fire very hot and put your canner on the stove to begin heating.  Also put your canning lids in hot water over a cooler part of the stove.

Return the beans to the heavy kettle that you were using in the initial cooking time, and then add two cups of the reserved bean liquid.

Now is the time to dress the beans up in whatever way you desire.  A little bacon or salt pork may be added at this point, and in the pictures below you can see that I added some of my Homemade Heinz Ketchup and some brown sugar and four teaspoons of salt.  I also put a little bacon in; I have used salt pork before too.  Some people like to add molasses, prepared mustard, or onions at this point.  Mix all together well.


Pack into canning jars leaving one inch of headspace and making sure each jar has a little more moisture than what you think is ideal.  This is very important.  The first time I canned these, I didn't keep them wet enough and packed them too full.  As a result, I had several jars that didn't seal because the beans expanded while they processed and the thick juice was pushed up between the lid and the sealing edge of the jar.

Pack jars into the canner, and begin the pressure canning process.  For more details on how to pressure can on a wood cookstove, please visit this post.  Baked beans need to process for 75 minutes at whatever pressure is appropriate for your altitude.


Those four initial cups of beans resulted in six and a half pints of canned beans.
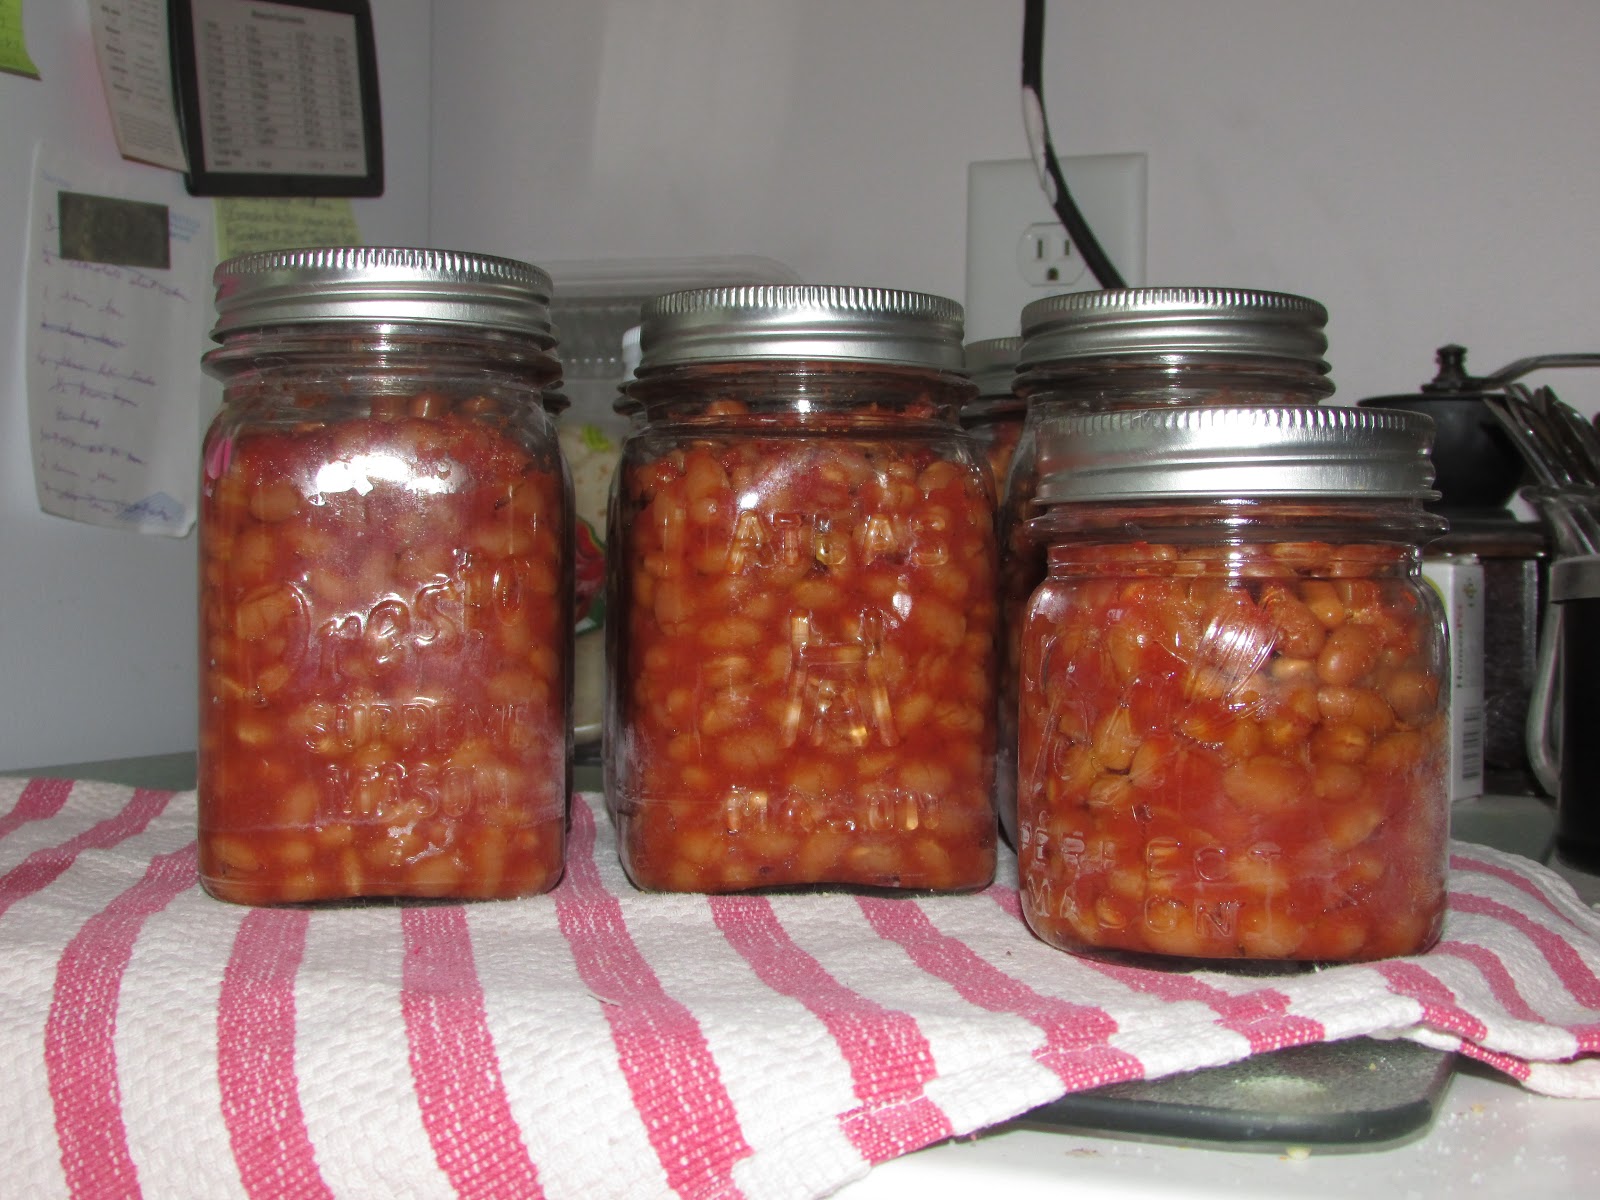


It's been a couple of years, but I have pushed the pencil on this recipe, and canning your own baked beans does result in a small savings over purchasing them.  My mother and grandmothers always said that another advantage of home canning is that you always know exactly what is in each jar, too.  If you use canned pork and beans, consider giving these a try sometime.

Monday, May 18, 2020

Glaze Creosote Confession: The Potentially High Cost of Ignorance

This was my twenty-third winter season cooking on a woodburning cookstove, but I still have things to learn.  Truthfully, I'm kind of embarrassed to share the information in this post, but since the whole point of this blog is to help others enjoy cooking on woodburning cookstoves, I feel obligated.

First, some history:

The first wood cookstove that I used was the Qualified Range.  I bought it new in January of 1997 and had it installed in the little house with a pre-fabricated metal chimney.  I would say that the distance from the stove collar to the top of the chimney was probably less than twelve feet.  I never had any trouble with creosote accumulation in that setup.  However, I only used it from January of 1997 to May of 1998 because then I moved to the "big house."

When I moved into the "big house" on the farm, I had to wait a winter before I was able to get a new stainless steel liner put in the original brick chimney, but by the fall of 1999, I was again using the Qualified on a daily basis for cooking and heating.  The Qualified was in use in the "big house" from 1999-2011 when it was replaced by the Margin Gem.  During those twelve years, I had one chimney fire, but it started in the stovepipe of the stove and spread to the chimney.  It was easily extinguished by closing the drafts of the stove, and since it happened in the summer, it was not difficult to get on the roof and sweep the chimney clean again.  Had I been more diligent about keeping the stovepipe clean, the fire wouldn't have happened at all.

With the Qualified Range, there was never a lot of creosote in the chimney. I would sweep it in the fall of the year before daily firing of the stove began, and what creosote was present was always light, flaky, and easy to remove.  The creosote in the stovepipe was always the same, but would sometimes cling more stubbornly.

Now, the Qualified Range was not airtight.  It had the old style sliding drafts on the left side of the firebox, and though they were made well, there were some gaps that were inherent with that sort of stove construction.  Tiny gaps were also present in the top left corner of the firebox and where the outer front door latched to the cast iron of the firebox.  Further, the standard of fit and finish for the cast iron stovetop was lower than that of the Margin Gem.  If a bright fire was burning in the stove and all of the lights were put out at night, you could see tiny yellow flickers against the backsplash of the stove and on the kitchen ceiling.  Obviously, there were plenty of places where air could gain entrance to the stove even when it was shut down tightly.  Therefore, the Qualified could not hold a fire overnight or during the day when Nancy and I were gone to work and school.

The Margin Gem began its career in our kitchen in the spring of 2012 and has been in daily use from late September or early October until May ever since.  Shortly after it was installed, I noticed that the creosote in the chimney was different.  Some of the dry, flaky, familiar stuff was present, but there was a coating of black, tarry stuff that was very smooth.  This, however, appeared to only be in the top three or four feet of the chimney, which is the part that sticks out above the roof line.  It was a thin layer, as I said, and I didn't think a whole lot about it.  I attributed it to the fact that the stove is airtight and also to the fact that because the Margin Gem has both a hyper-heat water reservoir and a waterfront for the range boiler, a lot of the heat from the fire was being absorbed before it had a chance to travel up the chimney.

I didn't think a whole lot about this new creosote.  Usually, after a summer of only intermittent firing--usually using small sticks that burn hot and quick--the hard, shiny stuff would sweep out of the chimney with the fall sweeping that began the continual firing season.

Fast forward to this last winter.  During the months when the Margin Gem is being fired daily, I sweep the chimney once per month as long as the roof is free of snow.  During December and early January, we were burning some mulberry wood which had been dead for at least six years, but was more wet than I would have liked.  When I went to sweep the chimney in early January, my chimney sweeping brush got stuck in the chimney.  The shiny, hard creosote had become quite thick on the inside of the chimney, and it was no longer just in the top three or four feet of the flue.  I had a really tough time getting my brush back out of the chimney, and I knew we had to do something.

My first thought was that we needed to have a professional chimney sweep come and clean the chimney.  I did some phone calling and discovered that where we live, professional chimney sweeps are few and far between, and they are really busy.  We would have had to wait a very long time before a professional chimney sweep would have been able to come to our house--in fact, I was basically told that we wouldn't be able to see a chimney sweep until after the heating season was over.

We couldn't wait that long.  During the winter months, the Margin Gem heats our home and our hot water, and it cooks nearly all of our food.  I was worried about the creosote situation and began doing some research. I learned that professional chimney sweeps use mechanized equipment to clean chimneys rather than just a steel brush on rods like I have.  I discovered that our nearest Menards carries such equipment and promptly plopped down around $150.00 for a set of chimney cleaning equipment that attaches to a drill.  (I didn't know that this kind of chimney cleaning equipment even existed, and I'll write a post about it sometime because it is worthy of a lengthy discussion by itself.)

I got my new purchase home and opened the package.  Having never known anything about this sort of chimney cleaning device before, the first thing I did was open the instruction booklet.  Among other disappointing information there (which I will discuss in a later post), the instruction booklet said that the chimney sweeping equipment was not for use on "GLAZE CREOSOTE."  There it was: a name for the stuff I had seen lining the chimney!

After more research, I knew how dangerous glaze creosote in a chimney can be (if ignited, it burns at a higher temperature than light, flaky creosote does).  That same research taught me that there is no mechanical way to remove it, so sweeping wasn't going to make any difference.  Glaze creosote must be removed chemically.  Even professional chimney sweeps must treat glaze creosote with a chemical first and then come back to sweep it later, and the powders and chimney sweeping logs commonly advertised and sold locally have no effect on this type of creosote.  Internet reviews told me that two different products were highly recommended for use in glaze creosote removal: Cre-Away and Anti-Creo-Soot.  These are environmentally safe products that convert the glaze creosote from a hard substance to flaky creosote which is easy to remove.  Unfortunately, neither of these compounds are sold locally, so we had to order online and wait for delivery.  For a few days, we limped along with a stove that was operational but obviously not breathing as well as she should.  Then we began the glaze creosote mitigation process.

The two chemicals we used to remove our glaze creosote.  (Because I know
someone will ask, the cookstove on the left is the ceramic base to a lamp that
sits on the corner of our kitchen table.)

The Process of Glaze Creosote Removal:

The sites I read told me that I should start by using the Cre-Away.  Cre-Away is a fine white powder which comes in a plastic bottle with a hinged nozzle on the top.  You apply the Cre-Away to the chimney by squeezing puffs of it up into the stovepipe and the bottom of the chimney.  Because our chimney is so tall, the directions on the bottle also recommended sprinkling it down from the top of the chimney.  As we had very little snow this winter, this was not a difficult process.

Once Cre-Away has been placed in the chimney, the next step is to build a hot fire in the stove to activate the chemical reaction.  The flue temperature has to reach a minimum of 300ºF in order for each of the products to work, so I moved the flue thermometer that we have on our Jotul heating stove to the stovepipe of the Margin Gem.

Cre-Away was amazing!  It wasn't long before I could hear chunks of creosote falling down the chimney.  For three days in January, as soon as I got home from school, I would take the stovepipe down, remove the pile of creosote that had fallen down the chimney in the last 24 hours, and re-apply the Cre-Away.

The next step was to use the Anti-Creo-Soot.  This is a liquid, and to apply it you spray it into a good hot fire.  You can see in the picture above that the Anti-Creo-Soot which I purchased was in a gallon jug.  You can purchase smaller spray bottles of this compound, but they are more expensive, so it was cheaper for me to buy the gallon jug and pour some into our own spray bottle.  For the first application of Anti-Creo-Soot, the directions say to apply 60 (that's right, sixty!) squirts to the inside of the firebox or directly onto the fuel.  In severe cases of glaze creosote, the directions recommend sixty squirts each day for seven days.  Twelve squirts per day after that is what they advise for keeping your chimney clean thereafter.  Again, flue temperatures must reach 300ºF, in order for this compound to be activated.

Anti-Creo-Soot was excellent too.  It was very easy to apply, and chunks of creosote continually rattled down the chimney, especially when the fire was first stirred up in the morning or upon my return from school in the evening. I continued to regularly take the stovepipe down and clear away the piles of creosote left in the elbow at the bottom of the chimney.

Finally, a thorough sweeping is in order.  I am happy to report that this sweeping was easy, and I've never seen so much creosote come out of the chimney at once.  The Margin Gem was breathing freely again, and I could breath a sigh of relief!

I continue to squirt Anti-Creo-Soot into the firebox occasionally--especially when I know I'll be sweeping the chimney soon--and the effect that it has had is remarkable.  I cannot say enough good things about both of these products!

Summary:

Here is an abbreviated list of the new things I know after having dealt with this situation:

1. Only burn dry fuel!  I knew this but admit to not prioritizing our fuel supply as well as I should have.  Also, I was under the impression that creosote only formed from wood that was wet because it hadn't been dead long enough.  Not so!  Wood that has been "seasoned" for adequate time but has been allowed to become wet again is just as susceptible to depositing creosote in a chimney.

2. There are different types of creosote, so you must pay attention to what is present in your chimney.

3. Glaze creosote can be removed by a do-it-yourselfer; you don't have to hire a chimney sweep if you are able to access your chimney yourself.

4. Glaze creosote can only be removed by using chemical compounds to loosen it before it can be swept away.

5. Cre-Away and Anti-Creo-Soot are awesome!  They are very effective in glaze creosote removal and are easy to use.

I hope that embarrassing myself and letting you all in on my former ignorance proves helpful to someone and that I can save someone else the danger of a chimney fire or the expense of hiring out work that one can do oneself.  Be safe!


Sunday, April 5, 2020

Potato Donuts


This recipe is an old favorite in our area.  Our recipe card says that our family got it from Ruth Anne Huff, who is a really sweet lady and a retired school cook.  She lived between my aunt and uncle and my great-great-aunt and uncle while I was growing up.  I'm pretty sure, though, that the recipe is also the same one that the Hazel Dell Extension Club used to make as a fundraiser when they would provide the concessions for a local sale.  Either way, it is an oldie but a goodie.

Just a fair warning up front: I wouldn't recommend trying this alone.  I've never made them by myself, and I have no desire to.  When you get to the point where you are cutting out the donuts, frying them, and glazing them, an extra pair of hands or two is most welcome.

Special note for my fellow wood cookstove cooks: Have PLENTY of smaller sticks and split pieces of wood ready.  In both of the wood cookstoves that I have fried donuts on, it takes a LOT of fuel to keep the oil hot enough to fry all of these properly!

Here is what you will need:

2 packages (2 TBLSP.) yeast
1/2 cup warm water
2 cups scalded milk, cooled to just warm
1/2 cup shortening (butter is better)
1/2 cup sugar
2 tsp. salt
1 1/2 cups mashed potatoes
4 beaten eggs
10-12 cups flour (We use bread flour for improved tenderness.)

Other food ingredients:
Oil or other fat for frying (I'd plan on a half gallon.)
sugar for rolling--OR--powdered sugar, vanilla, and a little butter for glazing

Our recipe did not come with directions, but here is what we do:

1. Scald the milk.  I do this in a heavy bottomed saucepan directly over the firebox.  You know it is scalded when tiny bubbles form around the edge of the pan or a scum forms across the top.  Remove from the fire.


2. While the milk is on the stove, dissolve the yeast in the 1/2 cup of warm water in your largest mixing bowl.  Don't mess around with any little bowl here; I'm not even sure that a half batch would fit in a standard mixer bowl.

3. Usually, I use leftover mashed potatoes that have been refrigerated. Since I don't want the cold potatoes to lower the temperature of the dough and thereby make the rising process longer, I like to put the cold mashed potatoes into the hot milk.  This cools the milk quickly and speeds the whole process along.  If the butter is cold, I put it in the milk too.  Leave this aside for a moment.

4. Sprinkle the 1/2 cup sugar over the yeast and water mixture.

5. Add the salt and stir a little.

6. Stir the milk, potatoes, butter, and beaten eggs into the yeast mixture. Be careful to get any large lumps of potatoes out now because it will be difficult later.


7. Begin stirring in flour.  You are shooting for a dough that is still a little sticky.  It should be less sticky than cinnamon roll dough, but more sticky than bread dough.


8. Cover and let rise until double in bulk.


While the dough is rising the first time, you need to do the following:

a) Prepare a place to roll out and cut the dough.

b) Have at least four of your largest cookie sheets or jelly roll pans ready to hold the rising donuts.

c) Put paper towels on two or three of your largest dinner plates because this is where you'll drain the donuts after frying them.

d) Prepare a place for the donuts to drain once they are glazed, or to continue cooling once they are sugared.  We use our broiler pan for the initial drainage spot and then transfer to a cooling rack that has been placed in yet another of our largest jelly roll pans.  This way, we can easily scrape up any glaze that drips off and recycle it in the glazing bowl.  I've seen pictures of Amish people sliding the donuts onto the handles of wooden spoons to drain, but you'd have to have a whole lot of wooden spoons for this recipe, and it won't work for the holes.

e) Prepare your dipping sugar or your glaze.  We always glaze because I think frosting of any kind makes the world go 'round.  We mix a couple of tablespoons of butter, some vanilla, water, and powdered sugar together to make our glaze.  For a single batch of donuts, you'll need at least two pounds of powdered sugar if you glaze them.


When the dough has risen sufficiently, punch it all down and roll out a fifth to a quarter of it at a time.  Roll it out to no thinner than a half inch.  Cut donuts out.  We have several donut cutters, most of which have removable center pieces that cut the donut holes.  I find that the most effective cutting method is to press down and then twist the cutter.  I know the twist is forbidden in biscuit cutting because it makes a lop-sided biscuit, but I have noticed no such effect on donuts.  Place each donut on a cookie sheet to rise again, leaving space between them for this to happen.


Because we like donut holes better than the regular donuts, I remove the center part of the donut cutter and cut holes out of any of the leftover spaces in the dough.  Once everything that was usable has been cut, knead the scraps together and add them to another hunk of dough to be re-rolled.

Here is where it gets tricky.  In my experience, the first donuts you have cut will be ready to be fried before you are finished rolling and cutting all of the dough.  Thus, while you are still cutting, you need to begin heating up your oil.  Mom used a Fry Daddy for donut making when I was little, but we have used cast-iron pans for the last many years.  My favorite pan to fry in is my cast-iron chicken fryer.  It is deeper than a regular frying pan, which helps reduce splatters--especially helpful on the wood cookstove.


We use canola oil to fry the donuts.  Mom used to use white Crisco.  I would like to try frying them in lard someday, but I haven't been brave enough to do it yet.

For the wood cookstove, I like to remove the front lid over the firebox and put my pan directly over the flames.  On a gas or electric stove, medium-high heat is needed.  I never put a thermometer in the oil to know how hot it is.  Here is how I tell whether the oil is at the right temperature:
  • the oil should be just hot enough that it could start smoking at any moment
  • I take a tiny drop (ONLY a tiny drop) of water on my fingertip and shake it into the oil.  If it sputters, it is ready.
  • I start with a single donut hole.  If it immediately begins to bubble quickly, the oil is the right temperature.
If the oil is too cool, the donuts will eventually cook, but they will be greasy and will take on too much of the oil flavor.  If the oil is too hot, they will cook too quickly on the outside and be doughy on the inside.

Fry the donuts a few at a time until they are nicely browned on either side. Only turn them once!  Turning them multiple times will make them greasier than they need to be.  Don't fill the surface of the oil completely full of donuts because they will rise a little more while they are frying, and they can become very difficult and a bit dangerous to turn if they are too crowded.  The donut holes may not allow you to turn them, or sometimes they will roll over themselves.  If they don't get fried on both sides, it will be all right.  They are small enough to get cooked through if only one side ever sits in the oil.  Truthfully, I think they are better that way.


Remove from the hot oil to drain on the paper-towel-covered plates.  While they are still hot, roll in sugar or glaze.  Cool on the broiler pan or racks.


Hints:
  • Using more than the 1 1/2 cups of mashed potatoes makes a better tasting donut
  • THESE DO NOT KEEP WELL AT ROOM TEMPERATURE.  By the next day, they will be disgusting.
  • However, THEY FREEZE BEAUTIFULLY.  Pack into Ziplock bags or airtight containers.  When you're ready to eat a few, just pop them in the microwave for a few seconds and they will taste as fresh as the hour you made them. 
  • Our favorite way to make these is to make a triple batch and invite family over to have a great big "Donut Day."  Everybody goes home with bags of donuts for their freezer.
  • You can make twists by twisting a cut donut.
  • To make Bismarcks, roll the dough a little thinner and remove the center of the donut cutter to cut a regular circle.  Fry in oil that is a little cooler than what you would for donuts so that you can leave the Bismarck in the oil longer in order to cook the inside thoroughly.  Use a Pampered Chef decorator gun or a pastry bag full of jelly or other filling to inject the filling into the center of the Bismarck after it is cooked and cooled.
  • Your house will smell like you've been deep fat frying for several hours after this, and you're going to have to live with it.
Historical note: My great-great-aunt Meme told me that when they had threshers, they always made them donuts for their 3:00 lunch break.  This was after a humongous noon dinner, so you can imagine how much energy those men needed to do their work!

As with any recipe, I'm sure there are as many ways to make these as there are people who do it, but the above is what we've found works best for us.

Thursday, February 20, 2020

A Little Cookstove Poetry

I'm sorry that I've neglected this blog so badly.  We've had a long and busy speech season, and I'm just finishing a long-term substitute teaching job at the school where I used to teach full-time.  The wood cookstove has been in daily use since October 11, though, and we have only cooked about three meals with some other method since then.  We've had quite a battle with creosote this winter, and I'm working on a long post about that which I hope will be published before the end of February.

Until then, while I was hunting material for a literary program for speech, I found a poem about wood cookstoves that I want to share with you all today.  The last time I shared a cookstove poem was back in 2012 in a post about teakettles, so  I guess that means it's not too soon for another.

This poem is from the January 1956 Ideals magazine and was written by Adam N. Reiter.


The Old Kitchen Range

It's pleasant to muse in an era of change,
On the time-honored role of the old kitchen range;
That served at the homestead for many a year
Bestowing of comfort and lending to cheer.

I well recollect where the veteran stood,
With the settee nearby and the box for the wood--
And woe to the urchin and bitter his plight,
Who failed to replenish the wood-box at night.

It made of the kitchen a place all aglow,
With homely delight that we oldsters still know.
Its smooth, polished surface resplendently shone,
And the kettle hummed softly a quaint monotone.

Not a thing in the house had the ardent appeal
Of the range, when folks were preparing a meal;
And savory odors surpassed all belief,
And coaxed forth "Old Tabby" who dozed underneath.

And who but remembers the scent, if he try,
Of wood in the oven at evening to dry:
The laughter of children disrobing for night,
And the head of the house with his old pipe alight.

Who cared for the winter, the beat of the rain,
Or the blast of the wind on the shuddering pane?
Not I, and no power could influence me,
To leave my snug place on the kitchen settee.

What tales have been spun!  What dreams of been wove!
In the "circle of charm" by an old kitchen stove:
And I doubt if man could devise for his race,
A thing of more excellence to serve in its place.


I feel like a resounding "amen" needs to be added to that last couplet.  In my humble opinion, man has yet to devise a cooking appliance that out performs a wood cookstove!  

Friday, December 6, 2019

Grandma Marian's "White Salad"

As I mentioned a couple of posts ago, we hosted the traditional Thanksgiving Dinner at our house last  Thursday.  I'm sure everyone has a different list of what is considered the traditional Thanksgiving menu, but for my family it is always the same:

Turkey and Gravy
Mashed Potatoes
Candied Sweet Potatoes
Cranberry Sauce
Green Bean Casserole
Escalloped Corn
White Salad
Dinner Rolls
Pumpkin Pie with Whipped Cream

This is tradition in our family because this is always what my Grandma Marian served on Thanksgiving.  Today, I want to share with you her recipe for "White Salad."  This is my favorite fruit salad, and when Grandma was still cooking, it was hers too.  My mother and aunt were reminiscing about the fact that she used to take it everywhere.  It is delicious, and it was the first leftover to be finished off.  I don't know why I don't make it more often because it's really not difficult either.

Here is what you'll need:

  • 2 eggs
  • 1/4 cup sugar
  • 1/4 cup distilled vinegar
  • Non-dairy whipped topping (thawed) or slightly sweetened whipped cream (about a cup and a half).
  • 1 15oz. can of mandarin oranges
  • 1 15oz. can of pineapple tidbits
  • red and green grapes (at least a cup of each)
  • at least 1 cup of miniature marshmallows
  • red cherries for garnish (optional)

Directions:

Early in the morning or the night before the meal, you will need to make the first part of the salad dressing.

1. Have your fire hot enough to boil a little bit of water in the bottom of a double boiler.

2. Before putting it over the hot water, lightly beat two eggs in the top part of the double boiler.

3. Beat in the 1/4 cup of sugar and the 1/4 cup of distilled vinegar.


4.  Once thoroughly combined, put the top of the double boiler over the boiling water.


5. Stirring constantly, cook until it has thickened enough that it coats a spoon.

6. Remove from the heat and cool slightly.  Cover, then chill thoroughly in the refrigerator.  (This doesn't take that long because there really isn't that much volume here.)

7. While the dressing is chilling and long before you plan to assemble the salad, wash the grapes and cut them in half.  Place them on paper towels to dry.  Also drain the cans of mandarin oranges and pineapple tidbits.  Let them rest in a colander for quite a while.  You want the fruit to be as dry as possible.

8. Once the cooked part of the dressing is thoroughly chilled, beat the whipped topping or the whipped cream into the custard part.  The directions for the amount of whipped topping literally say "until it looks right" on the recipe that I copied from Grandma.  This was the phrase that she and her mother both used when they tried to tell someone else how they cooked by guess and by golly.


I don't really think you can mess up this part.  If you want to make this salad larger by adding more fruit, you can always add more whipped topping to the custard at this step.  The only thing that will happen is that the sweet and sour flavor of the dressing will tend toward the sweeter side.


In the pictures here, I would say that I added about one and a half cups of whipped topping.

9. Combine the fruits and then fold in the dressing.


10. Add about a cup of miniature marshmallows.  DON'T SKIP THIS STEP in an effort to cut back on the calories.  The value of the marshmallows is not so much in the flavor as it is in their ability to absorb the juices which will be drawn out of the fruit.  Their primary function is to keep the salad from turning watery.


11. If desired, garnish the top of the salad with a red cherry or more.  Refrigerate until serving.


The last picture above didn't get taken until the salad had been passed around the table once.  That's why a chunk of the salad is missing on the right side.

You will note that the salad dressing doesn't appear very white.  That's because my chickens are free range, so their egg yolks are darker than what you would get out of the store.

This is really an excellent fruit salad: tangy, sweet, and colorful.  Bon appetit!

Tuesday, December 3, 2019

What Does "Back of the Stove" Mean?

200th Post!  200th Post!  200th Post!  200th Post!  200th Post!  200th Post!

Sorry.  I'm excited that this is my 200th blogpost!

A while back, I had a reader suggest to me that I write a blog post explaining the phrase "back of the stove"--as in "Let it simmer on the back of the stove for six hours" or "Cook at the back of the stove until thick."  It is a very common phrase in old recipes and cookbooks and is perhaps a little confusing to today's cooks.

In actuality, this phrase even predates the most common designs for woodburning ranges, so we have to go back in history a little to understand it fully.

When household cookery began to move from open fireplaces to cast iron stoves, the stoves were built with very low fireboxes at the front, which then vented toward the rear of the stove beneath an oven, the bottom of which was even with the level of the cooktop, as in the picture below:

Photo courtesy of farmallclub.org


This stove design then changed to have the oven be tucked under the cooktop, and the firebox was raised to a more comfortable height. Cookstoves then looked like this:


Photo Credit: amberghistory.org

A door is open on the oven in the picture above, but the photos only show one of the two oven doors on each stove since each of these cookstoves was equipped with an oven which could be accessed from either side.

This type of cookstove was usually installed with the firebox side toward the room as in the first picture above.

Thus, the firebox side was literally the front of the stove, and the cooler, rear part was at the back.  The phrase "back of the stove" meant the cooler part of the cooktop.

As with so many things in the human experience, our tools changed before our terminology did.  More recent stove designs put the firebox on the left (only rarely on the right), and the cooler part of the range top is now on the side of the stove instead of the back.

In the pictures below, you can see the firebox on the left side of the Margin Gem, and in the second picture you see a saucepan and our teakettle "on the back of the stove."


Basically, the phrase "back of the stove" means the coolest part of the cooktop even though it is no longer necessarily at the stove's back.  The phrase indicates an area used for slow cooking and keeping things warm while still having direct heat.

I hope that clears things up for everyone who might have been wondering!


Thursday, November 28, 2019

Full Thanksgiving Dinner Cooked on the Wood Cookstove

Well, today was Marjorie the Margin Gem's first Thanksgiving.  She has baked pies for Thanksgiving every year since she was installed in 2012, but this was the first year since her installation that we hosted Thanksgiving.

Today was not our family's official Thanksgiving dinner.  That will be tomorrow when we all get together at my parents' home.  This was the year for my brother and sister's families to be with their in-laws. so since our get-together isn't until tomorrow--on a non-official holiday--my brother wanted to have one of those days where we all bring things we've never made before.  (Stay tuned for a post about one of the dishes that I'm making for the first time.)

While tomorrow will be fun and interesting, some of us were a little sad because we wouldn't have any of the traditional foods that we eat on Thanksgiving.  Therefore, Nancy and I hosted the traditional dinner today for just eight of us: Nancy's folks, my folks, my aunt and grandma, and Nancy and me.

Of course, this meant that I had the perfect opportunity to blog cooking a whole Thanksgiving dinner on a wood cookstove.  I have read a description of cooking on a wood cookstove as a "dance" as you move pots and pans around to the appropriate heat levels for where their respective foods are in their cooking process, and you can see from the movement of things in the pictures, that there are lots and lots of movements to this dance.

Last night, I cooked the cranberry sauce and put the bread for the dressing in the warming oven to dry out.


This morning, I got up early and baked the pumpkin pies.  The recipe for pumpkin pie that I used today is from my great-great-grandma, Mabel Ford.  I blogged it several years ago, and you can see it here.

This is a picture of the pumpkin pies when they first went into
the oven.  The firebox is open to prove that I'm cooking over a
wood fire.

The pumpkin pies after they were finished baking.
The next job was to make the fruit salad dressing, but since I'm going to make a separate blog post about that, I'm saving those pictures for later.

Then, I had to assemble the stuffing so that I could get some of it in the bird and put him in the oven.  First, I saute'd some celery and onion in butter.

Celery and onion frying in butter for the dressing.
After I transferred the cooked celery and onions to the bowl of the dried bread, I cut up the turkey's liver and fried it in butter too.  Yes, I know that is a large chunk of butter, but we put melted butter in the dressing anyway, and I've learned that if I fry the liver pieces in a lot of butter, they remain more tender than if they are fried in only a little.  The final dressing product is much better this way.

The turkey liver chopped fine and frying in a lot of butter.  It
will later be added to the dressing.
 Once I had some of the dressing stuffed inside the turkey, it was ready to go into the oven.  I used an oven bag this time, but I didn't think it helped make the turkey any more moist.  You can read my instructions for roasting a turkey in a wood cookstove at this post.


With the turkey in the oven, there was no room for anything else, and I still had lots of things that would need to be baked.  Thus, I had to get one of my stovetop ovens out.  In the picture below, it is heating up over the firebox.  On the open door of the warming oven, you see two pans of dinner rolls rising.  The turkey neck and gizzard are in the saucepan on the far right, cooking for the cats.


Then, it was time for a few more things to begin to cook.  The first pan of dinner rolls is baking in the oven on top of the stove.  The dressing is in a 9"x9" baking pan sitting on a simmering pad under the lid to the roaster. The pot on the left is the mashed potatoes, and the frying pan contains the syrup for sweet potatoes beginning to cook.


In the picture below, the potatoes had moved to the back center of the stovetop, the sweet potatoes had been added to the syrup, a pot of green beans had been added, and the dressing moved to the right because the stovetop is so busy.  The turkey was finished cooking, and was ready to be removed from the oven.


Then, the turkey was moved to the simmering pad on the back of the stove to await serving.  The dressing has been put into the stovetop oven, and the rolls have been put into the stove's oven.


I'm sorry that this next picture is a little blurry.  The dinner rolls that had been baking in the stovetop oven were nearly done when I transferred them to the cookstove oven.  However, they had not browned on top, so I put them on the top shelf of the oven.  The second pan of dinner rolls is beginning to bake on the bottom rack in the back, and the dish of scalloped corn is beginning to cook at the front of the oven.

It is important to note that the second pan of dinner rolls didn't brown very nicely on the bottom, so I later transferred them to the bottom rack of the stovetop oven beneath the dressing, and the bottoms browned perfectly.  I didn't get a picture of the little stovetop oven full of both dressing and rolls, though.


In this next picture, you will see that the green beans were removed from the stovetop and made into green bean casserole.  It is baking in the front of the oven while the scalloped corn continued to cook in the back.  All of the dinner rolls were out of the ovens by this time.


You still can't see the corn, but in this picture, you can see the edge of a round Pyrex pan on the top rack of the oven.  The sweet potatoes had been put into this pan, and marshmallows had been put on top.  The platter for the turkey was resting in the warming oven to take the chill off of it before receiving the bird.


I poured the drippings from the turkey into my Magnalite chicken fryer and made the gravy in that.  The dressing was basically done at this point, so the oven holding it was moved away from the firebox.  You can also see that the green bean casserole has the french fried onions on the top and is browning nicely.

The marshmallows on the top of the sweet potatoes had roasted to a fantastic golden brown and had been removed to the warming oven.


Meal preparations were complete when this last picture was taken.  The sweet potatoes are still in the warming oven along with the mashed potatoes and the gravy boat.  The dressing is staying warm in the stovetop oven, but the door has been opened to stop it from cooking further.  The gravy is finished and has been taken away from the firebox.  The vegetables in the oven are done, and the turkey was on the platter at the table.


Everything turned out quite delicious with the exception of the dressing, and that wasn't the cookstove's fault.  The sage that I put in the dressing was gritty.  How I figured out that the grittiness was from the sage is a long story, but has anyone else ever experienced that?  I bought the sage in a bulk foods store, and I won't be doing that again.

When my father-in-law walked in the kitchen door just before noon, he asked how the stove was working.  I told him that it was working just fine. It was, too, but I have to say that I cooked more Thanksgiving meals on the Qualified Range, and I have to admit that that was an easier stove to cook a large meal on than the Margin Gem.  I think the difference is that the Qualified responded more quickly to adjustments of the drafts and the additions of more firewood.  The Margin Gem responds to these things, but seems sluggish in comparison.  I don't know how to explain it any other way.

We had enough food for more than the eight people who were here, but to cook these same dishes for a larger crowd using only the wood cookstove would have presented some interesting challenges and demanded some different planning.  I'm looking forward to trying that sometime!

Hope you had a happy Thanksgiving!