Thursday, September 19, 2013

A Blog Reader's Cookstove - II


Mark, a blog reader in Missouri, contacted me this week with a very nice comment on a recent post.  He wrote that he has recently begun learning to cook on a vintage Glenwood #8 cabinet style cookstove installed in the kitchen of the newly built home that he shares with his wife.  He gave the address of his blog, where he has posted a few pictures of this grand old lady in her new home.

Reader Mark at his Glenwood #8 cabinet style
cookstove.

You can visit Mark's blog to see more pictures of his stove and to read what he says about it by clicking on his posts at this link, this link, and this link.  Glenwood stoves were manufactured in Taunton, Massachusetts, and this stove was refurbished and sold by The Love Barn in Orland, Maine.  You can visit their website here.

I wanted to include pictures of Mark's cookstove here on my blog because I want people to see how Mark and his wife and their builder incorporated a working antique cookstove into a modern kitchen design.


As you look at the pictures of Mark's stove, several things are noteworthy:

a) To bring the stovetop up to a height that is even with the countertops, a steel base was custom-made for the stove to sit on.

b) Mark's builder made some clever modifications to the walls next to the stove to offer reduced clearances.  He gives more information about that in his blog posts.

c) This particular model Glenwood was chosen because it fit in the space that was available, and as I study the pictures, I notice that this model is doubly convenient for Mark's situation since the pouch feed is on the front of the firebox rather than on the left side.  The proximity of the wall to the left side of Mark's stove would have made a left-facing pouch feed pretty useless, so the front pouch feed is perfect.  Our Qualified Range was equipped with a pouch feed on the left side, and I used that quite frequently for refueling and poking the fire, and I miss that feature on the Margin Gem. 

d) The pouch feed door is equipped with what is called a check draft.  Once the fire has been burning for awhile and has become hot, the check draft can be opened to allow cool air to be drawn across the top of the fire.  In theory, this will slow the combustion of the fuel and lower the heat of the cooktop.  I'm anxious to hear from Mark about whether this works since I've never cooked on a stove that has  this feature.

e) Most of the surviving antique cookstoves in the Midwest have bodies which are made of part cast iron and part steel.  These stoves, such as Home Comfort, Monarch, Kalamazoo, and Majestic brands, were manufactured in Michigan, Wisconsin, or Missouri.  Most of the surviving antique stoves made in the New England states, though, were either completely cast iron or at the very least had a higher percentage of cast iron.  It looks to me like, with the exception of the backsplash and warming oven, this stove is completely cast iron.  I've read that this is supposed to make them better bakers because the oven temperatures will not fluctuate as much.

As always, it was great to hear from a fellow wood cookstove user, and I hope that Mark will feel free to comment on my blog to share a Glenwood cookstove user's point of view.


Tuesday, September 10, 2013

Marjorie's Busy Weekend

Last weekend was a very busy one.  Besides visiting Carstens Farm on Saturday and having a potluck brunch and church service in the park on Sunday morning, pretty much the rest of the weekend was taken up with canning and preserving.

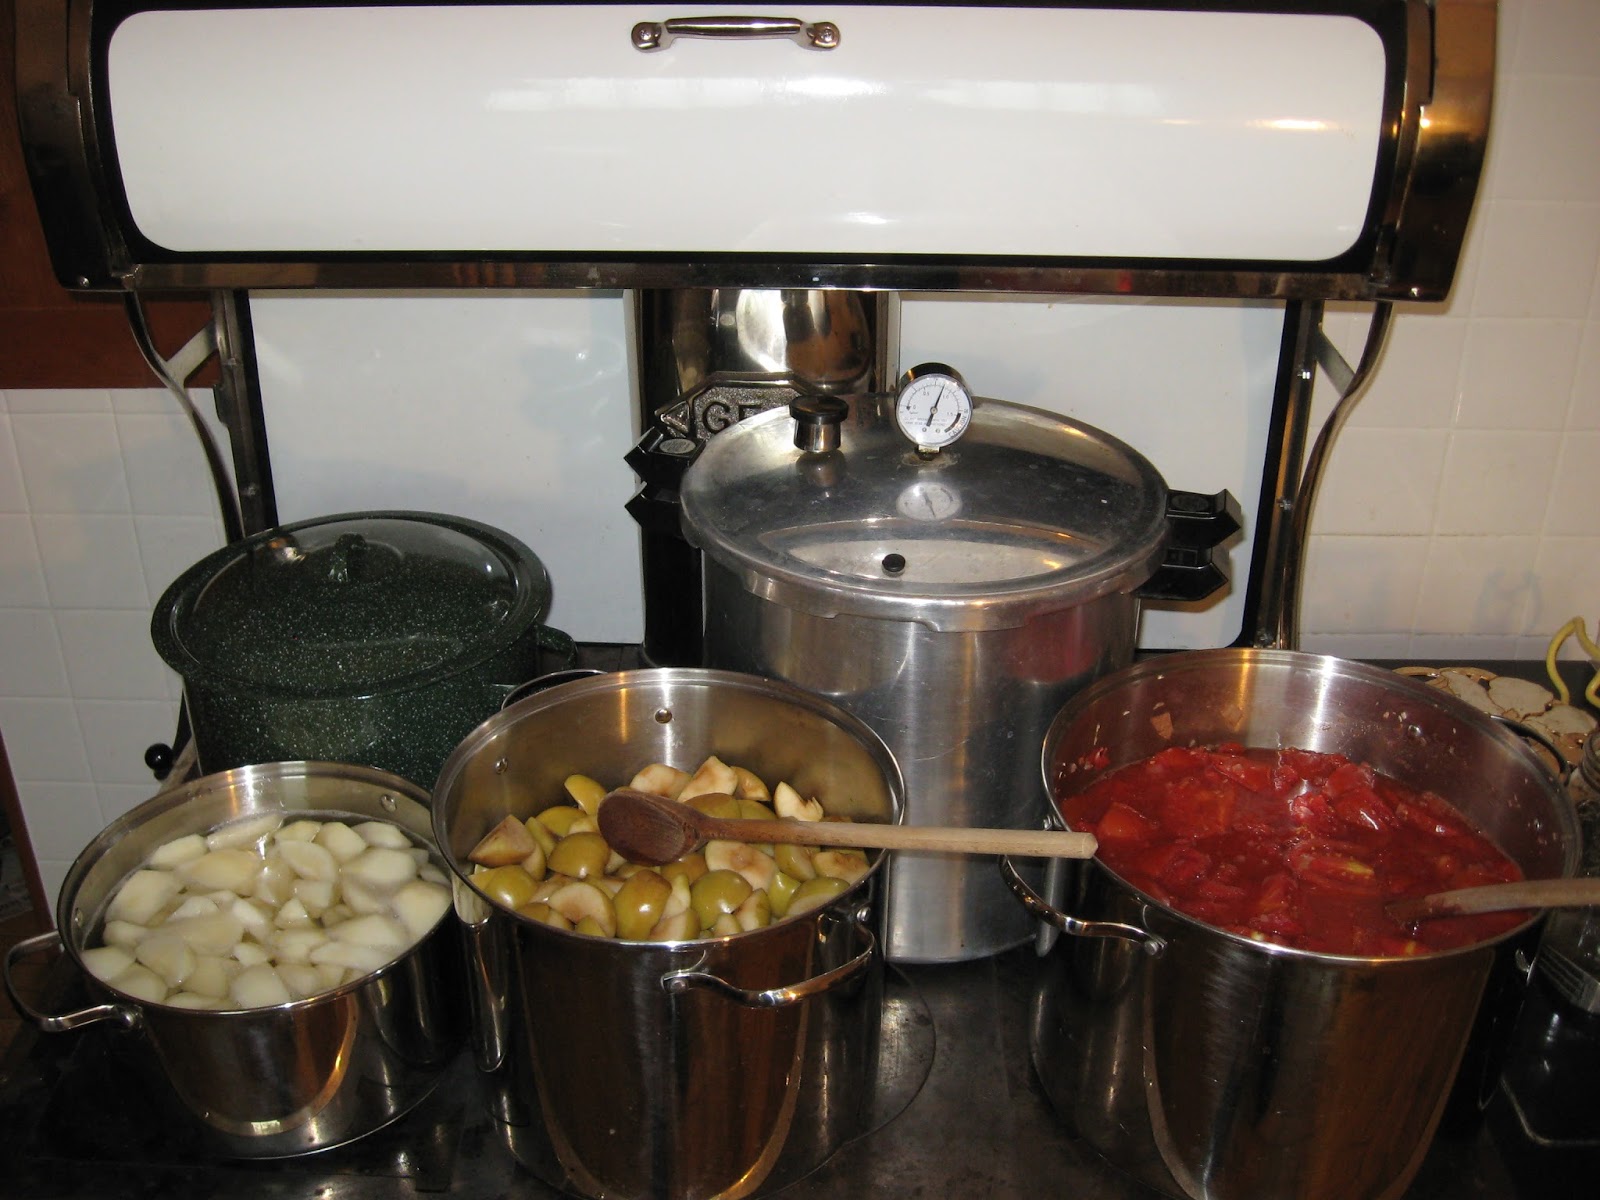
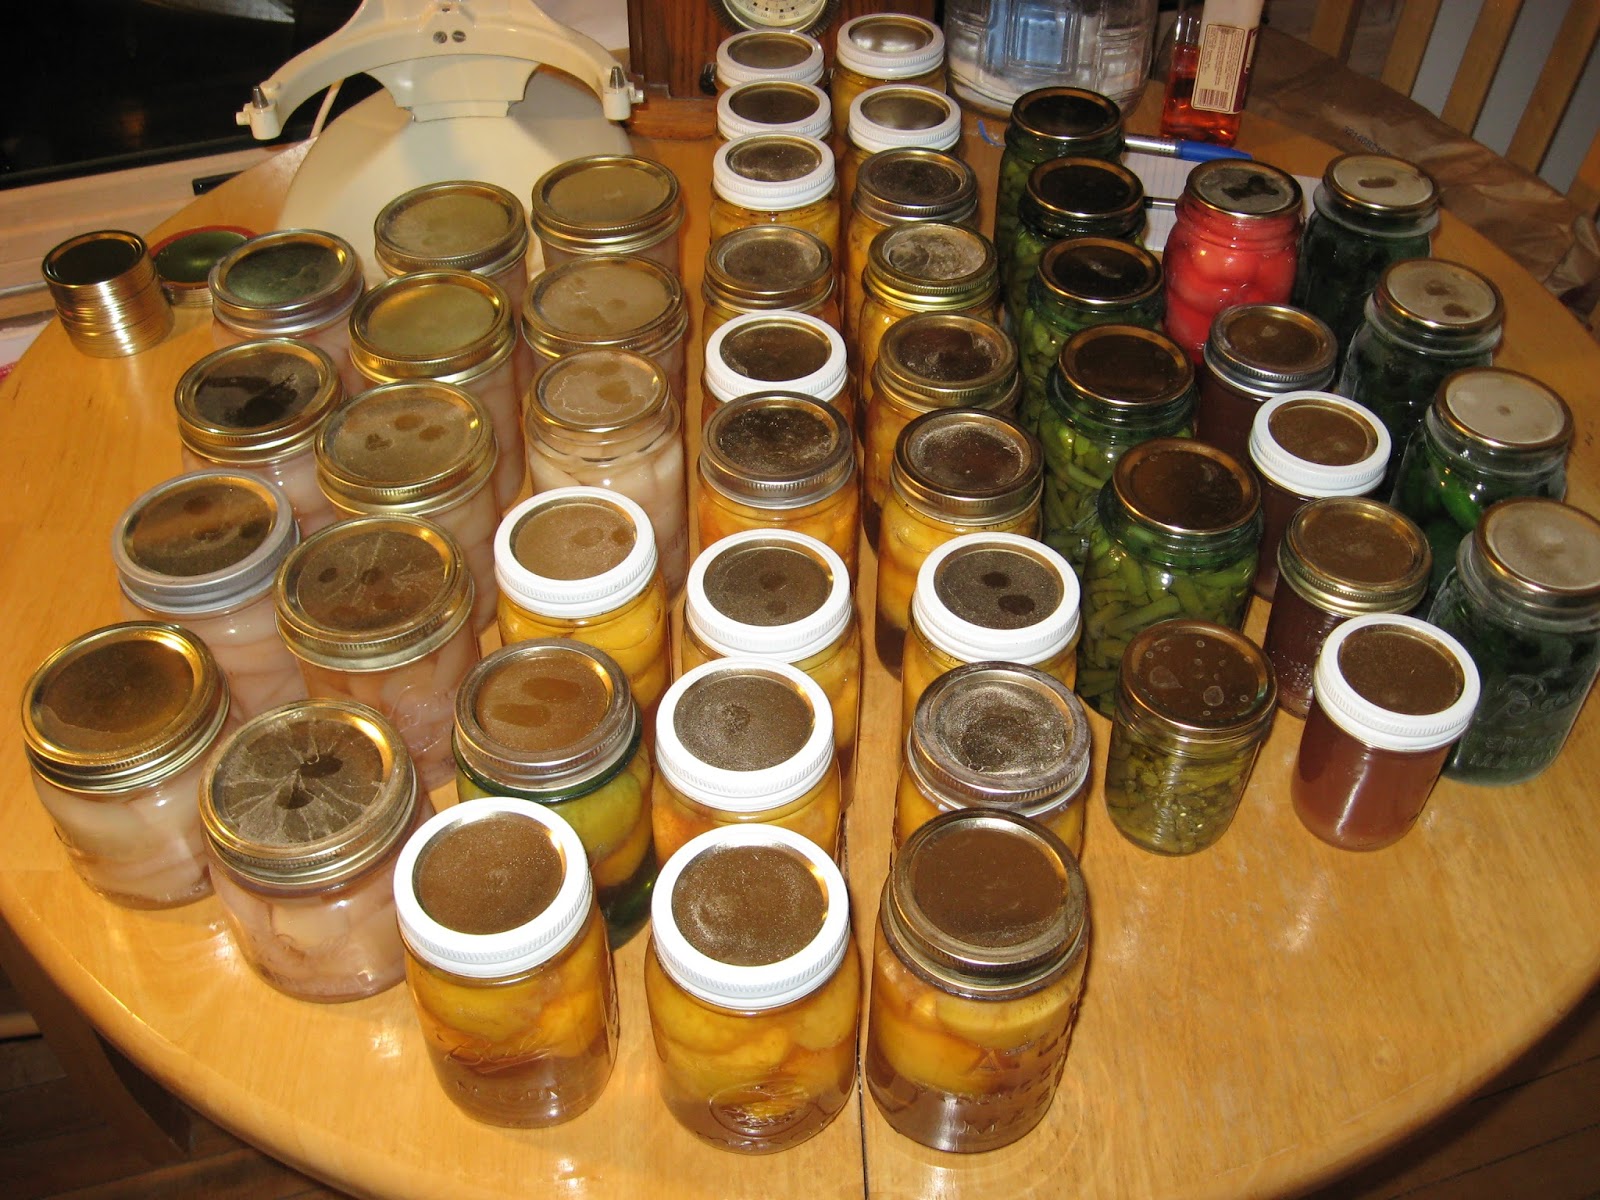
Many different produce items are currently ripe in our corner of the world, so we had a wide variety of tasks to complete, and despite temperatures in the 90s and considerable humidity, we fired up Marjorie the Margin Gem to do the canning.  First, we quickly canned the small batch of sweet pickles that my mother had been working on for the last two weeks.  She used my great-grandmother's recipe, which all of my dad's side of the family is quite fond of.  While they were in the canner, we started making pectin out of the unripe Jonathan apples which we plucked from the broken branches of my favorite apple tree in our orchard.  We also put a kettle of Roma tomatoes from my mother-in-law on the stove to cook down for homemade ketchup.  Then, we canned green beans from my sister-in-law's garden, and began to work on canning the pears from the tree in our orchard.  All of this kept the Margin Gem's cooktop quite full.


A very busy Margin Gem cookstove pressure
canning and water bath canning at the same time.

Notice in these two photos that the Margin Gem is accommodating seven vessels.


A closer picture of the many pots on the cooktop.  Pears boiling
to be hot-packed are on the lower left.  The apples being cooked
for pectin are in the middle rear; the tomato and onion mixture is
in the right rear.  The two canners, the teakettle, and scalding lids
round out the picture.


Things had to move once the pressure canner reached the
appropriate point. 
On Sunday afternoon, the stovetop looked quite similar except that the pears were replaced with peaches.  The pectin was on its second cooking, and we filled the sixteen-quart kettle with a second batch of tomatoes.

I'm terrible at guessing quantities of food to be canned, and I frequently miss my guess when it comes to how much fruit it will take to fill the canner.  Therefore, one of the things that I really like about using the wood cookstove for water bath canning is the reservoir.  If I have more fruit prepared than I can actually fit in the canner, what I've taken to doing is going ahead and filling the extra jar with the fruit and boiling syrup, putting the lid on it, and then placing it in the hot water in the reservoir.  This way, the jar won't seal prematurely (like it would if you were open-kettling), and I'm quite sure that the high temperature of the reservoir prevents any bacteria growth in the short time before the jar of fruit is removed to the canner once the initial batch of jars is finished processing.

I have read that if your stove's water reservoir is capable of reaching the boiling point, you can just do your water bath canning in the reservoir.  So far, the water in the Margin Gem's reservoir has not gotten hot enough to boil.

The final products ready to be washed and carried down to the
fruit room.  It isn't a large number of total jars, and they don't
include the ketchup yet because we were not finished with it at
the time of the photo.
I am quite fascinated by the whole prospect of making our own pectin.  I found the method here on Pinterest while looking at one of the boards that someone else had pinned our blog to.  My great-great-aunt Meme, who is mentioned in the "About Me" section to the left, used to reminisce about making pectin when she was a young girl, and I had read some vague accounts of how it was done, but this was the first time that I had seen very much in the way of directions.  Because of two exceedingly long cooking times, making pectin is a process which is well suited to the wood cookstove.

Everything worked according to what I read at the site, but one thing puzzles me.  The pectin gelled like it was supposed to when I tested it in the rubbing alcohol, and when I put it in the jars, it poured like honey.  However, now that it has been canned and allowed to cool, it is almost as runny as water, so I'm a little concerned about it.  I also have no idea how to use it.  I was able to find directions for that at this link: http://www.pickyourown.org/makeyourownpectin.htm.  I think I'll start by using the proportions for Certo and see what happens.  I'd better make a batch of jelly with it as soon as possible in order to find out whether it is going to work.  If the jelly is successful, I'd like to make more because commercial pectin has become so expensive.  If any of my readers have experience with this and can offer advice, please do!

Another thing that I wondered about frequently during our weekend was energy efficiency.  While we had the cookstove fired, we had the kitchen shut off from the rest of the house, but we had the air conditioning going.  Of course, it ran nearly constantly after the stove had been going for a while.  So, would it have been more energy efficient to use the gas stove?  In some ways, I think the gas stove throws an equal amount of heat into the house, and there is no way that we could have had any more than four pots in use at once when using it.  Also, when the cookstove is being fired, it is heating lots of hot water for us.  I don't know how one would figure this out, but it is a question that intrigues me.

At any rate, the forecast for the next several days shows much, much cooler weather on the way.  It doesn't look like we'll be needing the air conditioning anymore in the foreseeable future, so there won't be any wondering which method of canning will be the most energy efficient.

Thursday, August 29, 2013

Vintage Recipe for Cole Slaw Dressing

As many of you probably know, the Midwest has been socked with sweltering weather for the last few days.  This has made it so that we haven't had any desire to fire the Margin Gem since the 17th, and we have been avoiding cooking much with the gas stove, too. Tonight, however, I headed down to the summer kitchen to try a quick vintage recipe.

During the summer, I spent some time looking at more of the recipes in the 1926 West Pottawattamie County Farm Bureau Women's Cookbook (some of you may recall that I had tried a candy recipe from this cookbook just before Christmas).  I know that many of the regular readers of this blog are interested in homesteading and self-sufficiency, so when I ran across this recipe, I made a mental note to try it because it uses ingredients that many homesteaders would either be able to produce on their own or would usually keep on hand.  I'm excited to also tell you that it turned out to be delicious!

For one head of cabbage, you'll need 3 egg yolks, 2/3 cup sugar, 2/3 cup vinegar, 1/2 cup cream, salt and pepper. 

Here is what you do:

In a heavy saucepan, beat the egg yolks.  Then beat in the sugar.  Add the vinegar and place it over the fire to bring it to a boil.  Stir constantly.


The egg yolk, sugar, and vinegar mixture on the fire.

I was able to cook the dressing on a very small fire
made only of corn cobs and pieces of bark picked
up from the ground in the shed where we split our
firewood.

Once the egg, sugar, and vinegar mixture has come to a good boil, add the 1/2 cup cream.  Bring back to a hard boil and then remove from heat.

The salad dressing once the cream has been added.  I was using
cream from our own cow, so you see white lumps of cream
which were very thick and had not yet melted when I snapped
the picture.
Add salt and pepper to taste, and then chill the dressing mixture.  It will congeal to a soft set as it cools in the refrigerator.


Nancy shredding the carrots and cabbage using
Granny's Saladmaster.
While the salad dressing was chilling in the refrigerator, Nancy and I prepared the cabbage and carrots with my grandmother's ancient Saladmaster.  Somewhere I have the advertising brochure that went with the Saladmaster cookware set. It was purchased for three hundred and some dollars in the 1960s, and I'm sure that it was a major purchase for my grandparents at the time. 

I can remember Granny making cole slaw with this machine when our house was still her house in the late 1970s.  Her cole slaw was always outstanding, but she made the dressing with Miracle Whip--which, of course, would have meant that there would have been no reason to fire up the Riverside Bakewell and write a blog post. :)

When the cabbage and the carrots were ready, the dressing was cool.  We combined everything and threw in a few dried cranberries.  The results were great!

The finished cole slaw.
Here is how the recipe originally appeared on page 129 of the 1926 cookbook:

Dressing for Cabbage Slaw
Mrs. Geo. J. Ward
3 egg yolks beaten                            2/3 cup vinegar
2/3 cup sugar                                    Salt and pepper


Beat the sugar into egg yolks, add vinegar and seasoning.  Boil this mixture, stirring all the time.  Add 1/2 cp sweet cream, let boil again.  When cold mix with chopped cabbage.


Again, I have to say that I'm very impressed with this simple old recipe.  It is easy and delicious, made of things that I always have on hand, and I can pronounce everything that is in it.  That's what I'd call a winner.

Tuesday, August 20, 2013

Flameview Owners, Please Help!

Blog reader CS (subaru_cookstove) is considering purchasing a Flameview cookstove but has some questions.  If those of you who own a Flameview would be so kind as to put your opinions in the comments section, I'm sure that CS would appreciate it.  I'm copying and pasting the questions below.  They were originally posted as a part of the comments in the blog entry entitled "Purchasing a New Woodburning Cookstove."  However, I wanted to give the questions more attention than they would have received there.  Thanks, readers!

"I have come across many favorable reviews about the Flameview's operation. However there is one very comprehensive youtube review that does not give the Flameview a good overall review. This review id dome by a dealer in Montana, Woody Chain. He seems very knowledgeable on stoves. He sells nearly every make available in North America and beyond (or so it seems). So I feel he is being objective in his review, and has lots to compare the Flameview to. In his series of videos, he takes apart a Flameview to see it from the inside. He points out some flaws in this relatively brand new unit.

Such as:

Gaps in the internal flue that directs the hot gasses around the oven. Where it seems that smoke could leak out into your home until the gaps become sealed with creasode.

Again, gaps around the oven hinges that would appear to allow smoke and gasses to leak out.

Painted steel interior of the oven that was already starting to rust before it ever had steaming food cooking in it. (As opposed to porcelain enamel or stainless steel as other brands have.)

Blower fan that is oppressively loud. And in the opinion of this dealer, is a design flaw that disrupts the thermo-dynamics of the stove by cooling a section of the flue, there by causing smoke to leak from the stove.

Glass that doesn't stay clean. Apparently the airwash causes you to burn through fuel too quickly, and doesn't work that great anyways.

Can anyone with a Flameview or other Margin stove give me some input on the points I raised earlier? My two biggest reservations are the potential smoke leakage problems and rust forming in the oven. I don't expect the stove to be perfect. For instance dirty glass is not that big of deal. A loud fan (as long as the whole this works) is not a big deal either.

I understand that all stoves leak a little smoke when they are new. I am not super picky. It is just alot of money to spend and I want to make the right choice.

Thank-you all for your input."

P.S. For some great answers to these questions, please see the Dec. 2, 2013 comment from Green Mommy posted on the "Purchasing a New Wood Cookstove" entry which is linked above.  She has some great firsthand input that she has shared there. 

Also, the Sept. 8, 2020 comment from Oldplaner below gives an excellent update.

Saturday, August 17, 2013

A Blog Reader's Cookstove - I

I have always wanted this blog to be a clearinghouse of information about wood cookstoves.  Toward that end, I'm excited to have the opportunity to show you a reader-submitted cookstove photo from Tim in central Minnesota.


Reader Tim's Monarch cookstove in central Minnesota.
Tim's Monarch range is a model 272AT serial # P 3077
from the 20's or 30's.  Monarch stoves were made by the
Malleable Iron Range Co. in Beaver Dam, Wisconsin.
After Tim had contacted me, I sent him a bunch of questions because I always like to talk to my fellow contemporary wood cookstove cooks.  Like many of us who are cookstove lovers, Tim has basically been interested in wood cookstoves for as long as he can remember, and though Tim is a little more than a decade younger than I am, he does have the added advantage of having watched his grandmother cook on a Monarch combination range when he was young.   In my part of the world, most of the grandparents could recall cooking on a wood cookstove, but memories were all that we heard about. 

Because my post about buying a cookstove is one of the most popular here on the blog, I asked Tim what motivated him to buy this particular stove.  One of the aspects of this stove that caught Tim's attention first was the fact that it was almost identical to a cookstove that his great-grandmother had cooked on at one time.  He also noted that the firebox was in very good shape and that he was able to purchase it for only $150.00--a bargain if I ever saw one!  Tim also mentioned that he likes the front-feed option on the firebox because one doesn't have to move cooking vessels away from the fire in order to refuel.  However, the biggest attraction for Tim--who has owned and cooked on several wood cookstoves--was the presence of the warming oven. 

During the cooler seasons, this cookstove not only cooks Tim's food but also works in tandem with another wood stove to heat his house, which is actually where his grandparents lived in the early 60s.  The house was then vacant until 1999 when Tim began the long process of refurbishing it.  Clearly, he has done a fantastic job on this fixer-upper.  For summer cooking, the Monarch range is supplemented by a choice of two gas ranges, one of which is a vintage Chambers.

Friday, August 9, 2013

The Cookstove at the Iowa State Fair

Nancy and I went to the Iowa State Fair yesterday in Des Moines.  We try to go every year, but we go for different reasons.  Nancy likes to go because she likes to be at the fairgrounds.  For her, being there conjures up memories of camping at fair for several days with her grandparents, roaming the fairgrounds, seeing the sights, and taking in the shows.  I go because I like to make sure that nothing has changed and because I like to "eat my way through the fair" as Mom always puts it.

The Iowa State Fair is known for its many deep fat fried delectibles.  I don't go for the deep fat fried Twinkies, Oreos, or Snickers.  I have even been known to happily pass by the funnel cakes.  This is all sort of strange because, I swear, a person could deep fat fry rocks and I would eat them! 

I did have a couple of corn dogs today, but for me the best treat at the fair by far and away is the apple sticks at the Applishus booths.  The "stick" part is just your common grocery store bakery apple strudel.  What makes them fantastic is the frosting.  Heavenly, melt-in-your mouth frosting covers these little things, and after years of wondering what made it so good, I've found a recipe that is so similar that I can't tell the difference.  I'll have to share it sometime.

(2014 Update: The frosting recipe can be found here.)

Anyway, as I said, the other reason that I like to go to the fair is to make sure that nothing has changed.  You all have probably figured out that I am a lover of tradition, and the Iowa State Fair is steeped in traditions.  However, it would be grossly inaccurate as well as unfair to say that nothing changes at the fair.  A part of the fair that remains fairly constant, though, is Pioneer Hall.  Basically, this is a building with a lot of antiques on display and for sale.  One of the cubicles is dedicated to antique kitchen furnishings, and it has the cookstove that you see below.  This cookstove is actually quite little as cookstoves go and has been a part of the displays at Pioneer Hall for as long as I can remember.

The cookstove at the Iowa State Fair.


Because I cannot get close to it, I have no idea what brand it is, but my best guess is that it is a Kalamazoo.  I just wish that they had it hooked up to a chimney and had cooking demonstrations on it like the blacksmith demonstrations on the other side of the building.  Maybe someday!

Monday, August 5, 2013

Pardon My Soapbox: Summer Fuel Addendum

If you read my last post, you saw the picture below of a wheelbarrow full of summer fuel: sticks, corn cobs, bark, etc.


Most of this particular wheelbarrow full of fuel was just bits of wood that I had picked up here and there around our farm, the rest was contributed by my dear grandmother from what she picked up around her farm.

I want to tell you what just half of this fuel did last Saturday.

1. Cooked our casserole for noon dinner (a new recipe that I copied out of a magazine in my doctor's office while I waited for my bi-annual cholesterol maintenance appointment--which, by the way, went very well despite the bacon grease that I put in my potato soup).  This new casserole recipe had approximately 75 minutes of stovetop cooking time before it was put in a moderate oven for another 20 minutes.  Thus, it had a total of over an hour and a half of cooking time.  We didn't like it, so you won't see the recipe on the blog.

2. Sauteed zucchini from my sister-in-law for our vegetable side dish.

3. Baked a pan of from-scratch buttermilk biscuits made with buttermilk from our cow Bonnie.  As soon as the casserole was finished baking, I put it into the warming oven, threw a pile of little sticks on the fire and brought the oven up to over 400 degrees for the biscuits.

4. Boiled and canned three and a half pints of pancake syrup made from the drippings that we catch from beneath the caramel sticky rolls baked for the Monday Markets.  (I think that this is a great way to save on the expense of sugar.)

5. Heated water for scalding the Tattler canning lids.

6. Heated water in the teakettle and reservoir for washing the canning jars and a few other dishes.

7. Heated enough hot water to meet all of our needs for the rest of the day, including a nice hot shower for me before we went to town.

Yes, that's right, all of this on half of the pile of sticks and cobs and bark which could have easily been left to rot where they were! 

You see--here is the soapbox part--having a wood cookstove allows a person to take what would often be considered trash and use it productively and efficiently.  It's just one of the many aspects of owning a wood cookstove that I consider extremely advantageous. 

I just wanted you all to know about that.  Thanks, I feel better.

P.S. Don't worry.  I know about the scientific evidence available on the importance of rotting wood as habitat and food source for all manner of flora and fauna which are necessary in balanced ecosystems.  Rest assured, no ecosystems were irreparably harmed in the above activities.  We have PLENTY of rotting wood around here!

P. P. S. The other half of the fuel in the picture above was supplemented by some split pieces that you saw in the winter fuel picture to cook potatoes for our dinner while we were gone to church on Sunday morning, to make another new casserole (also not very good), and, of course, to heat water.  I did get another partial wheelbarrow of summer fuel later on Sunday afternoon to keep the stove going in order to bake three batches of cookies to sell today at the Monday Market.  Efficiency, efficiency!