Sunday, June 23, 2013

Cookstoves that We Saw on Vacation

Whenever we venture away from home, I'm always on the prowl for wood cookstoves.  Several days ago, Nancy and I returned from visiting her sister Susan and her husband in southeastern Iowa.  They are fantastic hosts, and Susan always thinks of new and interesting places to take us while we are in their corner of the state. This trip was no exception.

The first cookstove that I saw was at a place that is officially called "Shoppes on Wall Street."  Basically, the "shoppes" are four buildings of second-hand items on the north side of the town square in Seymour, Iowa.  Sitting right outside was the wood cookstove that you see in the following pictures.  I spent a great deal of time examining her and dreaming about how much fun it would be to have enough money (or know-how) to restore her.

I could find no identifying mark for a brand name--which was disappointing--but I did get to learn a little about wood cookstoves that are designed this way.  This is the third wood cookstove that I have seen with the oven up high on the right side.  The first one that I ever saw like this is located at the Machine Shed Restaurant in Urbandale, Iowa.  It is used as a storage cabinet in the dining room of the restaurant where the wait staff keep things like jelly packets.

I spotted the second one online at antiquestoves.com.  It just so happened that we visited the proprietor of the business Mr. Semmelroth in Tekonsha, Michigan, on our summer vacation that year, and I got to see that restored stove in person in his storage garage.  It was beautiful and unique and very similar in color to the one you see below.


I think that the design of these stoves is fascinating.  To begin with, I'm amused by the fact that stove designers of the time tried to copy the high side oven design that was so popular with gas, electric, gasoline, and oil ranges of that time.  It would be pretty nice to not have to bend over so far to see into the oven.  My theory about why this design fell out of style is that the high side ovens generally needed to be smaller than ovens which were located beneath the cooktop in order to keep the width of the range within reason.
 
The oven door open.
 You can see in the picture above that the oven is not very wide since that is a standard size business envelope resting on the oven rack--which by the way is upside down and backward.  You can also see that under the stuff on top of the oven, there are two stove lids.  Clearly, you would have been able to cook on the surface above the oven since it theoretically would have been equivalent in heating capacity to the two stove lids which would be farthest away from the firebox in a regular style wood cookstove.

The firebox (sans ashpan) on the left and the warming oven on the right.
Another thing that was interesting about this stove was the location of the warming oven.  As you can see in the picture above, it was just to the right of the firebox.  Since this is the location of the baking oven on most stoves, I wonder just how warm this space would have gotten.  Note the water pipe just below the grate shakers.  I'm not sure how the stove heated water, but this pipe was connected to some kind of spigot which exited the stove next to the draft on the left side of the stove. 


I didn't get to look at the flue path very well because the stove was full of all manner of material that rodents had drug into it in order to make it into a suitable condo for their kind.  Therefore, I don't know whether the smoke and heat from the fire would have been first routed to the bottom of the oven and then up, around and out, or if everything would have run up the left side of the oven, across the top, down the right side, along the bottom and then out.  
 
While doing the research for this post, I ran across an entry on eBay with the following picture.  Perhaps the stove in the pictures above is a Belknap and Perfecto from about 1940.  This page from the catalog can be yours by visiting eBay here.


 Maybe someday I will know more about these fascinating ranges.
 
Anyway, we then saw a very cute and pretty small cream and green cookstove at Forbush Artiques.  Unfortunately, we didn't have our camera with us, so we didn't get any pictures of that cookstove.
 
On the Monday that we were there, we traveled further east and visited Gingerich Stoves and Plumbing, an Amish stove shop.  Gingerich's sells Margin Stoves, Ashland Stoves, and Kitchen Queen cookstoves.  There I was surprised to see that the Kitchen Queen cookstove actually comes in two sizes.  They had both sizes in their showroom.  While I was looking online to see if I could find information about the two sizes, I also discovered that at antiquestoves.com they are currently offering a limited edition of the Kitchen Queen in green and cream enamel, also.
 
As always, please leave a comment if you can add information about the content of my blog posts.  Thanks!

Friday, May 31, 2013

An eBay Find

I continually troll about on eBay looking at the woodburning cookstoves that are for sale there, and I ran across a surprise the other day: the exact same model cookstove that Nancy's grandparents started keeping house with when they were first married in 1938.  Rue and Ruth purchased this stove with some of the money that Ruth had saved from her four years as a country school teacher.  They purchased this stove from Montgomery Ward's, and it was their sole means of cooking until sometime in the early 1950s.

The same model stove as Rue and Ruth's for sale
on eBay.
Rue and Ruth's stove is now in our possession.  It is not in quite as good a shape as the one in the picture, but I think it is more complete because the handle on the front left door is still connected.  We hope to have it restored someday.

The stove in the picture can be seen here.  The eBay description says that it was still in regular use this year.  Pretty good record, I'd say.

I want to transfer the other pictures to this blog post to keep as a record.


Double-crusted Strawberry Pie: An Old-Fashioned June Dessert

The weather has been pretty wet in our part of Iowa over the last several weeks.  After last year's drought, most everyone around here is quite thankful, though it would be nice if it would be dry long enough to finish planting.

At any rate, our strawberry beds have been really enjoying the abundant moisture, and it looks like we'll have a nice little strawberry crop if everything continues as it has been.  I've mentioned before that homegrown, vine-ripened strawberries were quite abundant in my childhood.  During that glorious first month of summer vacation, it seemed like they were everywhere, and many family members got together to pick and preserve them.  Each year, there were also strawberry pies.  I can remember Grandma Marian, Meme, and Mom all making them, but theirs were always the fresh-strawberry kind with a cooked gelatin/cornstarch glaze poured over the top--certainly very tasty in their own right.

I, however, have a weakness for cooked fruit, and when I saw the historians serving a double-crusted strawberry pie on the 1900 Farm at Living History Farms in Urbandale one summer, I set out to find a recipe.  I looked through my recipe boxes.  I looked through my recipe clippings.  I looked through my cookbooks (if you saw the embarrassingly large collection of cookbooks around here, you'd know how impressive this undertaking really was), and found nothing.  Nothing!  Well, that's not quite true; a vague recipe for "Berry Pie" appeared in one of the vintage cookbooks, but it seemed far more suited to raspberries and the like rather than strawberries.  So, I finally had to turn to the Internet. 

I know, I know.  Many of you reading this will think that I should have started with the World Wide Web, but you have to understand me.  I live in a world with rotary phones, for goodness' sake!  When it comes to food, my first instinct is not to turn to the Internet yet; it is still to begin poring through pages of real, hold-it-in-your-hand paper.

The Internet came through for me, however.  I found this recipe at allrecipes.com, and it fit the bill.  I changed it slightly for what I was looking for, and I am happy with the results.  I saw strawberries on sale at a nearby supermarket for $.99 per pound and couldn't wait for our own strawberries to make this pie again, so on Monday (Memorial Day) I threw one together.

When I bake a pie with fresh fruit, I always start by mixing the crust.  You can see how I make pie crust by looking at the recent post about apple pie.  I mix the crust first because I don't want the filling mixture to sit too long so that a lot of the juice is pulled out of the fruit before the pie is in the oven.

The first time I made this pie, I used the flour as the filling thickener as the recipe says.  However, it resulted in a cloudy and somewhat runny filling that wasn't quite what I had envisioned.  I had read somewhere that cornstarch has twice the thickening power as flour, and that is what I have used in place of the flour ever since.

I also scanted the sugar and the cinnamon.  I really don't think that the 1 1/4 cups of sugar is too sweet, but as I stated before, one of the para-educators at school is inspiring me to be a little more health conscious.  I scanted the cinnamon just because I like to taste the fruit in a fruit pie rather than the spices.  Altogether then, the changes to the filling recipe are as follows:

Instead of 1/3 cup all-purpose flour, 1 1/4 cups sugar, and 1/2 tsp. cinnamon, I used 1/3 cup cornstarch, 1 cup sugar, and cinnamon to taste.  Oh, and I omitted the butter, too.  I don't have anything against butter, but I haven't been able to tell the difference in the flavor of the filling with or without it, so I figure I don't need the extra fat.  Aren't you proud of me, Mrs. B.?

After that, I assembled the pie as you see me do in other posts and baked it in a hot oven until the crust was nicely browned and I could see that the filling was boiling nicely.  With the fire that we had going on Monday, that took somewhere between forty-five minutes and an hour.

The filling ingredients all together in the famous green Pyrex bowl.


The filling after everything was stirred together.


I like baking this pie in the woodburning cookstove because it feels old-fashioned.  I'm sure that this, along with strawberry-rhubarb pies, was one of the first fruit pies of the summer season for our ancestors who lived in the days before readily available strawberry gelatin changed the Midwestern dinner table forever.  I hope you enjoy it as much as I do! 


Monday, May 6, 2013

Nice Article about Wood Cookstoves with a Link to our Blog (Link is now fixed)

Off the Grid News.com published a nice article about wood cookstoves today.  The article has a link to our blog, so it showed up in our traffic sources this evening.  I'm just returning the favor and publishing a link to their article.  It is a good read.

http://www.offthegridnews.com/2013/05/06/the-absolute-best-survival-investment/

Egg sandwiches cooked on the cookstove were our supper tonight.  I've got many things to tell you all, but I need to spend time wrapping up the school year.  Be patient with me.

Hope everyone is doing well!

Monday, April 22, 2013

Poor Man's Chicken Monterey

Perhaps a better title for this dish would have been "Hurried Man's Chicken Monterey."  Either way, this is not the elegant and involved sort of Chicken Monterey that you can find on other Internet sites. This is just one of those quick main dishes that a person can make when one hasn't even had the time to defrost the meat before preparing a meal.  Unfortunately, with my busy schedule this happens sometimes, and "Poor Man's Chicken Monterey" can be a delicious solution to the problem.  I think that this recipe would be handy for unexpected company, too.

The first thing to do is melt a little butter (about a Tblsp.) in the bottom of a skillet for which you have a tight-fitting lid.  If you are a conscientious objector when it comes to butter, you could use a little olive oil or (gasp!) go completely rogue and use a modern non-stick pan without any fat.  Do this right over the firebox.

Next, place pieces of boneless chicken in the hot butter.  Ideally, you would have had time to defrost these, but I've made this several times when that wasn't the case, and everything works just fine.  Sprinkle the tops of the chicken pieces with the seasoning of your choice.  I was in a hurry and unashamedly used Mrs. Dash.

Frozen pieces of chicken placed in the hot butter and seasoned
with a little Mrs. Dash.  These are boneless thigh pieces that
we buy in bulk at Sam's Club.   Did you notice my well-loved
Magnalite skillet?  It belonged to Great-Grandma Gladys.  She
died before I was born, but I have a few pieces of her cookware.
Leave the skillet over the fire and cover it tightly.  The chicken will begin to cook, thawing as it does so, and the steam trapped in the pan will speed the process.

At this point, you could begin to fry one slice of bacon for each piece of chicken that you are cooking. In the pictures below, we used pre-cooked bacon which had been given to us.

A glimpse of the chicken after the lid has been on for awhile
and it has been turned once.
Turn the chicken so that it can brown a little on both sides, watching carefully that it doesn't get too dry.  I add a little hot water from the teakettle every once in a while to make sure that there is always plenty of steam to speed the cooking.  You don't want to flood the chicken because then it won't brown at all, and you want the subtle change in flavor that browned meat gets.  However, you really aren't out to fry the chicken either.

Once the chicken has browned a bit on both sides, you can move the chicken away from the fire to a much lower heat to continue cooking until it is done, keeping the lid on the skillet.  For the boneless thighs that you see in the picture, they were basically cooked by the time they had gotten to this point, but keep in mind that they were considerably thinner than what a chicken breast would be, for example.  I always cut into the thickest piece of chicken to see if the juices run clear in order to tell whether it is cooked.

The chicken is completely cooked and has been moved over
to the coolest part of the cooktop near the reservoir.
Once the chicken is completely cooked, place quarter-inch slices of Monterey Jack cheese atop each piece. 
Thick slices of Monterey Jack cheese on each piece of chicken.
Replace the lid on the skillet to let the cheese begin to melt.  Once the cheese has started melting, place strips of cooked bacon on top of the cheese.

Cooked bacon strips added to the top of the chicken and cheese.
Return the lid to the skillet long enough to let the heat and steam inside of the pan heat the bacon and let it stick to the cheese.  This takes very little time.  The chicken is now ready to be served.


Poor Man's Chicken Monterey, a brown rice and mushroom pilaf
that I concocted (which Nancy tasted and spit out and I considered
delicious) and fresh pineapple wedges: our noon dinner two
Sundays ago.

Here are some variations of this dish that we think have been successful:

1. Instead of bacon, sliced, canned mushrooms make a delicious and low-fat (but not low-sodium) substitute.

2. When they are in season, a slice of ripe tomato between the chicken and the cheese is very appetizing.  Wait to put on the cheese until the tomato has cooked a little, though.  I have also used home-canned, whole tomatoes in the same manner and had good results.

3. I have eaten a similar, fancier version of Chicken Monterey that was cooked under a broiler where slices of artichoke hearts were put on top of the chicken with the slice of fresh tomato.

As I've done it here, this dish is embarrassingly easy, but it is a tasty main dish for a busy day.

Saturday, April 13, 2013

Grandma Ruth's Apple Pie

I've mentioned my great-grandma Ruth in an earlier blog post, saying that even though she has been dead for over twenty-five years, she is still regarded as an excellent cook by those family members who knew her.  Our recipe boxes have several of her signature recipes in them, and I don't recall a Thanksgiving where her version of escalloped corn was not on the menu.

Grandma Marian credits Great-Grandma Ruth (Grandma Marian's mother-in-law) with having taught her to cook.  Grandma Marian always has said that when she was growing up, she was not interested in watching her own mother cook.  Thus, she says that when she got married, her repertoire in the kitchen was pretty limited.  However, upon her marriage, Grandma Marian and Great-Grandma Ruth became next door neighbors, so there were plenty of opportunities for Grandma Marian to study under Grandma Ruth's expert tutelage.

Grandma Ruth's method for making apple pie is our standard go-to recipe for this American favorite.  My sister won the grand champion spot with this recipe at our county fair, and it has been a request of my students at school, too.  There is really very little to it, and as Grandma Marian points out, one of the advantages of baking a double-crusted fruit pie is that once it is assembled and put into the oven, the work is done.  You don't have the tedious, labor intensive work of baking several pans of cookies, and you don't have to frost it as you would with a cake. 

As with any wood cookstove cooking or baking, the first thing that you want to do is to begin heating your oven.  Our stove is being fired constantly right now, so heating the oven for pie baking merely involved shutting the oven door and adding small pieces of fuel to bring the oven up to around 400 degrees or a little more.  You can find more information about managing your wood cookstove oven for pie baking in my first pie baking post here.

Next comes mixing the pie crust.  I've read lots of different recipes for pie crusts, but I must confess that I haven't tried any other recipe than what is below.  Grandma Marian has preached to me for years that a good pie crust is thin and flaky, and she has been quite vocal about what a travesty the thick crusts of bakery and restaurant pies are.  Not too long after Nancy and I were married, we took a pie down to her grandparents' home for a family dinner.  After tasting a piece of the pie, Nancy's grandma asked me what I used for a crust recipe.  I recited the recipe, and Ruth's response was, "And to think, I've been wasting my time with an egg in my pie crust all these years."  I took that to mean that she thought my crust was good.  This is a pretty common recipe, but here is what my family does:

Pie Crust
 
1 1/2 cups all-purpose flour
1/2 cup vegetable shortening
1/2 tsp. salt
4-5 Tblsp. cold water
 
1. Cut the shortening into the flour and salt using a pastry blender.  Grandma Ruth's original instructions to my mother stated that you were to cut the shortening and the flour/salt mixture together until "it is the size of small peas."
 
2. Add the water, and combine to form a ball of dough.  I usually stir it with a soup spoon.  The key is that you don't want to overwork the dough at this point.
 
The flour, salt, and shortening ready to be blended together.
 
What the flour, salt, and shortening mixture looks like when it
is ready for the water to be added.
The water has been added, and the dough is now ready to be divided in half.

At this point, I divide the dough in half and roll out the bottom crust and put it in the pie tin.  Then I roll out the top crust, putting some kind of design in the center of it to serve as a vent to let the steam from the filling escape.
 
It is only fair to tell you that I pretty much guess on the measurements for all of the ingredients in the pie crust, but the recipe seems pretty forgiving.  The measurements for the pie filling are even more vague.  Grandma, Mom, and I all have a set of the multi-colored Pyrex bowls that were popular in the late 1940s.  Grandma and Grandpa were married in 1947, and Grandma received two sets as wedding gifts.  She kept them both and uses them to this day.  I remember that when I was first learning to bake apple pie, she and I were discussing how many apples to use for filling.  I'll never forget what she said:
 
"I don't know how many apples I use.  It has always depended on what size the apples are and what kind of shape they are in.  I just know what looks right in my green bowl from that Pyrex set." 
 
As an inexperienced cook, that was not the helpful advice that I was looking for at the time, but now I know exactly what she means.  Now I always use the green bowl for any kind of fruit pie filling that is not cooked before it is put into the pie shell, because I too know "what looks right."  For the 9" pie
in the pictures below, I used four large Granny Smith apples which were uniform store-bought apples.  If you enlarge the pictures, you can see that I like to slice the apples pretty thinly.  This is because all of my female pie-baking ancestors preached about the cardinal sin of baking an apple pie in which the apples are not fully cooked.

A side note about apples: Often, we make apple pie out of our own homegrown apples.  Since we do not spray, the quality and size can vary widely and can also be dependent on how long they have been in storage.  As I noted above, I used Granny Smith apples for the pie in the pictures.  When my sister won grand champion apple pie at our county fair, however, she used Yellow Transparent apples from the tree in our orchard.  A Yellow Transparent is a sour green apple which ripens in early July here in southwestern Iowa (the name comes from the fact that when it is overly ripe, the skin becomes yellow and transparent).  It is certainly our family's preference for this pie, but they are difficult to come by.  My other favorite apple to cook with is the Jonathan.  Basically, you want to use an apple that is in the tart to sour range which has a firm flesh--in other words, the very opposite of the common Red Delicious apple.

 
The peeled, cored, and sliced apples.
To the peeled, sliced apples, add anywhere from one to two cups sugar depending on how sour the apples are.  I added only one cup of sugar to the apples in the picture because one of the para-educators at school has been inspiring me to experiment with cutting back on the amount of sugar in dessert recipes.  Unfortunately, that ended up being a little severe for these apples, and the filling was pretty tart.  Another quarter of a cup of sugar would have been better.  Had I used Jonathan apples, I probably could have gotten away with the single cup of sugar.  If I had been using Yellow Transparent apples, I would have put two cups of sugar in and not thought twice about it.

To thicken the filling, Grandma Ruth always added two- three tablespoons of flour.  That is all I've ever added, and as long as I have baked the pie for a sufficient time to get the filling to bubble, it is sufficient.  (Incidentally, I've never messed around with tapioca as a fruit pie thickening.  I love tapioca pudding, but I think that it adds a character all its own to pie filling and detracts from the fruit.)

Now, I know that many people like to add various spices to their pie filling, but Grandma Ruth and Grandma Marian were always adamant that the fruit should be what you taste in a pie, not the spices.  For that reason, we only add a sprinkling of cinnamon to apple pie filling--nothing else!


The sugar, flour, and cinnamon atop the apples, ready to be
stirred together.
At this point, as long as your crust is ready (or close to ready), you may stir the apples, sugar, flour,
and cinnamon together so that the apples are evenly coated.  The reason that I say that your crust must be ready before stirring the filling is that the sugar will immediately begin to draw the juice out of the apples, and if they are allowed to sit for any length of time, they can become quite soupy and result in a bottom crust that is of poor quality.


The apples, sugar, flour, and cinnamon once they are stirred together.
Put the apples in the bottom crust (which is already in the pie tin).  Then, put the top crust on, centering whatever you are using for a vent in the top crust.  Then, gather the edges of extra crust, pinch together to seal edges, and do whatever you want to flute them.  I just pinch them between my thumb and first finger.  Trim any excess crust away from the edge of the pan.  Sprinkle the top of the pie with a little sugar.

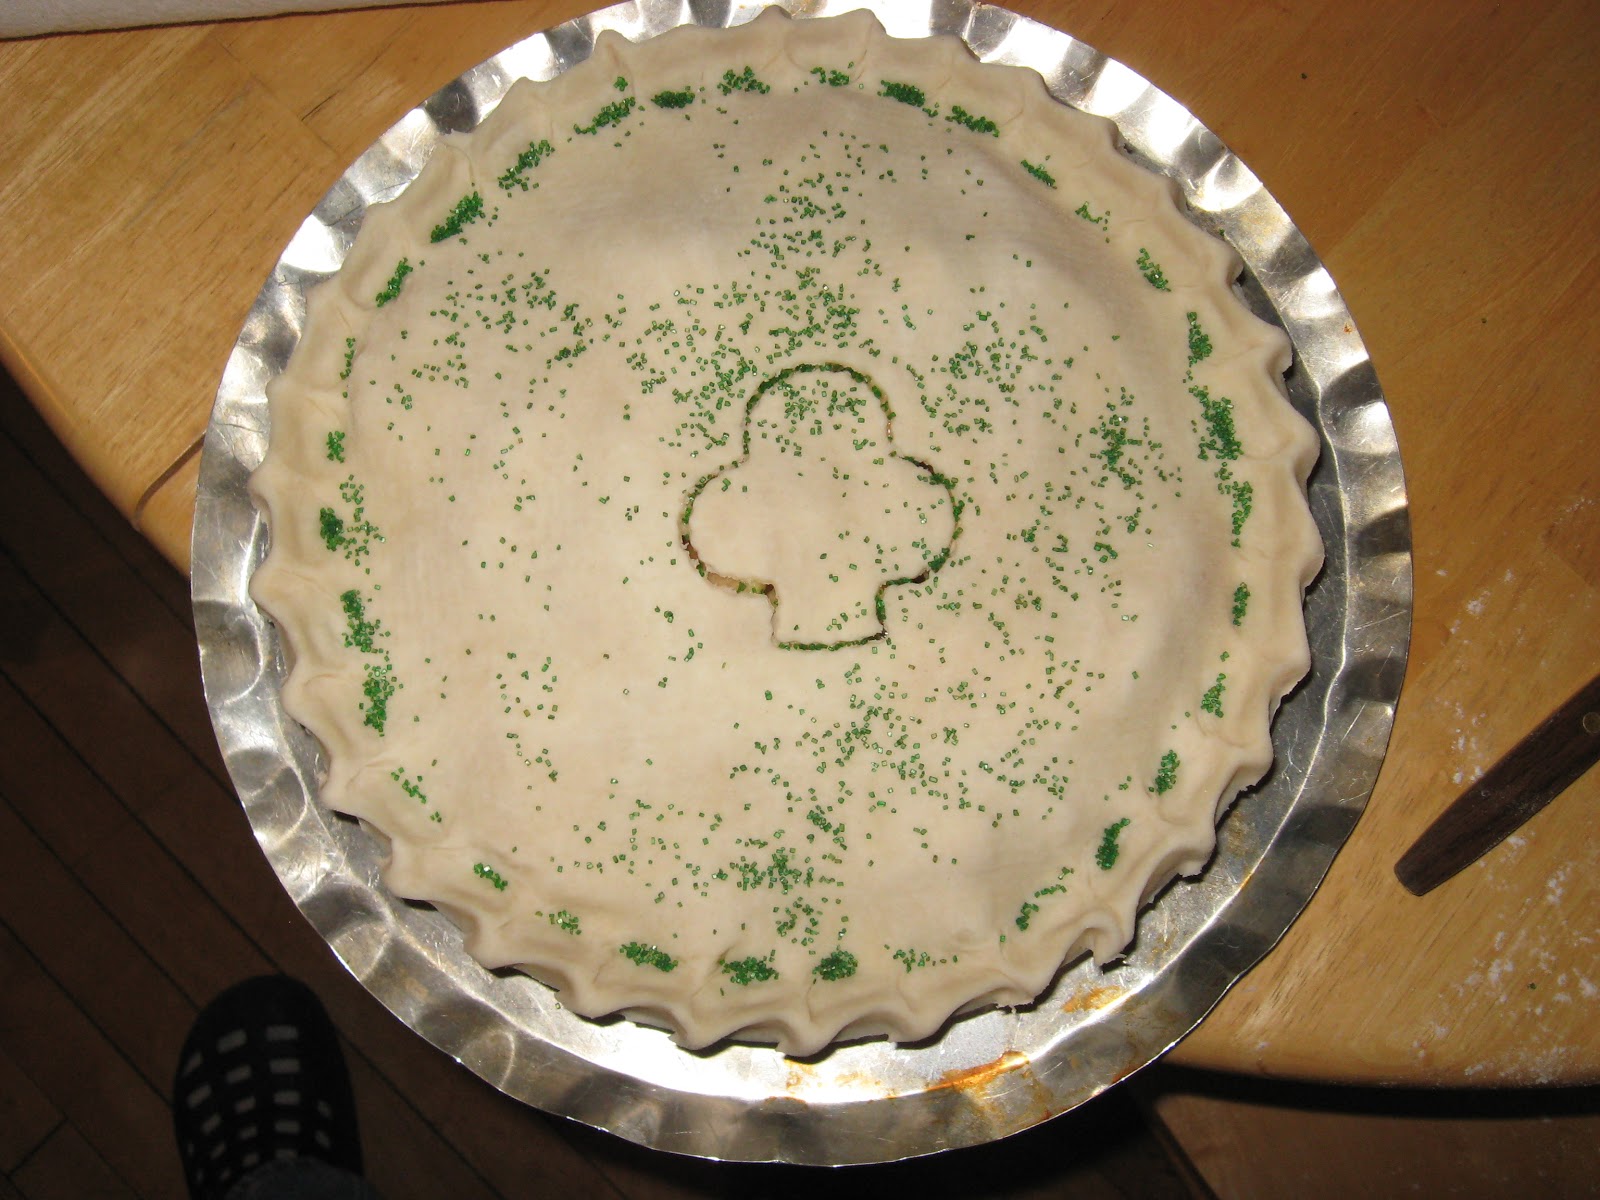
The assembled apple pie.  This pie was taken to a church potluck
which happened to be on St. Patrick's Day this year (hence the clover-
shaped vent and green sanding sugar).  Hmm.  You'd think I'd have
the sense to not photograph my own foot, wouldn't you?
I like to bake fruit pies on a drip guard as you see here.  Cleaning the oven of a wood cookstove is probably easier than cleaning the oven of a modern stove, but cleaning the bottom of any oven is really not fun.  Furthermore, since our stove has been fired almost constantly since sometime last fall, there has been virtually no time when the oven has been cool enough to clean it any more than quickly wiping the dust off the bottom.

As with any double crusted fruit pie, this pie should be put into a hot oven for the first ten-fifteen minutes of the baking time.  The oven heat can then be permitted to cool to moderate heat until sufficient time has passed to cook the filling (about forty-five minutes).  As I've written before,
another method which I have used successfully is to bake the pie for around an hour between 375 and 400 degrees.  I'm sure many cooks wouldn't agree, but it seems to me that very little about cooking is an exact science.  What you absolutely have to be sure of is that the filling is boiling and looks as though it has thickened before you take it out of the oven.  I like to see a nicely browned crust, also.


The finished apple pie.  I did rotate it about a quarter of a turn
during baking.  You can see that the left side of the pie is a little
darker than the right since the firebox side of our cookstove is
on the left.

As always, feel free to add your thoughts and questions in the comments fields below.  I like to hear from readers!


Wednesday, April 10, 2013

M&M Bars from Pinterest

Nancy is a Pinterest user.  I am not, but I'll be honest and admit that I am fascinated by many of the things that I have seen on Pinterest, and I'm grateful that Pinterest has contributed so many readers to this blog.

Nancy has been hinting that she wanted me to try a recipe for M&M bars that she found on Pinterest for a couple of weeks now.  She bought a bag of M&M's at Fareway, but alas, we ate them before we managed to get the bars made.  Oops.  Don't you hate it when that happens?  I'm embarrassed to admit that this "accident" happens too frequently around here.  Anyway, I finally got around to baking them last night, and they turned out to be delicious.

You can access them by going here: http://fantasticfamilyfavorites.blogspot.com/2011/06/thick-and-chewy-m-cookie-bars.html

This picture of the bars is from the Fantastic Family Favorites Blogspot. 
Ours looked exactly like these except that we used pastel Easter M&Ms.


Naturally, the reason that I am posting them on this blog is because I think they are a good wood cookstove recipe.  First, the recipe says to melt the butter and then let it partially cool, and you know how I like recipes that take advantage of the cookstove's heat as the oven reaches the appropriate temperature.  We melted the butter for these bars by putting it in a metal mixing bowl atop the reservoir.  Our butter was at room temperature, and we just let it partially melt; it worked beautifully.

We have been experiencing a wonderful spring storm here for the last two days which has delivered us a much needed, gentle, soaking rain.  We are very thankful for that, but it does make trips to the woodshed less pleasant, so I didn't have the normal variety of firewood sizes in the house last night that I like to have on hand for baking.  This brings me to the next reason that these bars are a good wood cookstove recipe.  They are supposed to be baked for 24-28 minutes at 325.  I ended up baking them for closer to 35 minutes at about 300, and they still turned out exactly like the picture above.  I'm sure that one could not bake them at a high temperature for a short time and get the same results, but I do think that they are pretty forgiving of an imprecise oven temperature.

Usually, I always make new recipes exactly the way they are written the first time.  However, with this one, I did not put all of the dry ingredients together separately like the recipe says.  I used Meme's method of mixing cookie dough which is to cream the fat and sugars, then add the eggs.  Next, beat in the soda and vanilla.  Add the flour and candies last.  I like this method because it works well for cookies, and I have one less dirty bowl at the end of the mixing process.

Also, we just lightly greased the 9x13 pan that we used rather than lining it with foil.  As near as I can tell, lining a pan with foil for a recipe like this is just intended to make cleanup easier.  Since I am a raging skinflint, I can't see wasting a foot and a half of tin foil when the bars don't stick badly anyway.

Next time I make these, I will omit the salt.  I don't think that it is necessary, and my blood pressure doesn't either.  The salt in the butter is sufficient.

Beware.  These will disappear fast!