Off the Grid News.com published a nice article about wood cookstoves today. The article has a link to our blog, so it showed up in our traffic sources this evening. I'm just returning the favor and publishing a link to their article. It is a good read.
http://www.offthegridnews.com/2013/05/06/the-absolute-best-survival-investment/
Egg sandwiches cooked on the cookstove were our supper tonight. I've got many things to tell you all, but I need to spend time wrapping up the school year. Be patient with me.
Hope everyone is doing well!

This is a blog about cooking on a woodburning cookstove. Here you will find recipes, methods, other uses, and miscellaneous information about using a woodburning range. I've searched the net for any and all information about cooking on one of these amazing appliances, and I've found a lot of interesting things, but none of them have been what I've been looking for. Therefore, this is my attempt at creating what I've been in search of.
Monday, May 6, 2013

Monday, April 22, 2013
Poor Man's Chicken Monterey
Perhaps a better title for this dish would have been "Hurried Man's Chicken Monterey." Either way, this is not the elegant and involved sort of Chicken Monterey that you can find on other Internet sites. This is just one of those quick main dishes that a person can make when one hasn't even had the time to defrost the meat before preparing a meal. Unfortunately, with my busy schedule this happens sometimes, and "Poor Man's Chicken Monterey" can be a delicious solution to the problem. I think that this recipe would be handy for unexpected company, too.
The first thing to do is melt a little butter (about a Tblsp.) in the bottom of a skillet for which you have a tight-fitting lid. If you are a conscientious objector when it comes to butter, you could use a little olive oil or (gasp!) go completely rogue and use a modern non-stick pan without any fat. Do this right over the firebox.
Next, place pieces of boneless chicken in the hot butter. Ideally, you would have had time to defrost these, but I've made this several times when that wasn't the case, and everything works just fine. Sprinkle the tops of the chicken pieces with the seasoning of your choice. I was in a hurry and unashamedly used Mrs. Dash.
Leave the skillet over the fire and cover it tightly. The chicken will begin to cook, thawing as it does so, and the steam trapped in the pan will speed the process.
At this point, you could begin to fry one slice of bacon for each piece of chicken that you are cooking. In the pictures below, we used pre-cooked bacon which had been given to us.
Turn the chicken so that it can brown a little on both sides, watching carefully that it doesn't get too dry. I add a little hot water from the teakettle every once in a while to make sure that there is always plenty of steam to speed the cooking. You don't want to flood the chicken because then it won't brown at all, and you want the subtle change in flavor that browned meat gets. However, you really aren't out to fry the chicken either.
Once the chicken has browned a bit on both sides, you can move the chicken away from the fire to a much lower heat to continue cooking until it is done, keeping the lid on the skillet. For the boneless thighs that you see in the picture, they were basically cooked by the time they had gotten to this point, but keep in mind that they were considerably thinner than what a chicken breast would be, for example. I always cut into the thickest piece of chicken to see if the juices run clear in order to tell whether it is cooked.
Once the chicken is completely cooked, place quarter-inch slices of Monterey Jack cheese atop each piece.
Replace the lid on the skillet to let the cheese begin to melt. Once the cheese has started melting, place strips of cooked bacon on top of the cheese.
Return the lid to the skillet long enough to let the heat and steam inside of the pan heat the bacon and let it stick to the cheese. This takes very little time. The chicken is now ready to be served.
Here are some variations of this dish that we think have been successful:
1. Instead of bacon, sliced, canned mushrooms make a delicious and low-fat (but not low-sodium) substitute.
2. When they are in season, a slice of ripe tomato between the chicken and the cheese is very appetizing. Wait to put on the cheese until the tomato has cooked a little, though. I have also used home-canned, whole tomatoes in the same manner and had good results.
3. I have eaten a similar, fancier version of Chicken Monterey that was cooked under a broiler where slices of artichoke hearts were put on top of the chicken with the slice of fresh tomato.
As I've done it here, this dish is embarrassingly easy, but it is a tasty main dish for a busy day.
The first thing to do is melt a little butter (about a Tblsp.) in the bottom of a skillet for which you have a tight-fitting lid. If you are a conscientious objector when it comes to butter, you could use a little olive oil or (gasp!) go completely rogue and use a modern non-stick pan without any fat. Do this right over the firebox.
Next, place pieces of boneless chicken in the hot butter. Ideally, you would have had time to defrost these, but I've made this several times when that wasn't the case, and everything works just fine. Sprinkle the tops of the chicken pieces with the seasoning of your choice. I was in a hurry and unashamedly used Mrs. Dash.
 |
| Frozen pieces of chicken placed in the hot butter and seasoned with a little Mrs. Dash. These are boneless thigh pieces that we buy in bulk at Sam's Club. Did you notice my well-loved Magnalite skillet? It belonged to Great-Grandma Gladys. She died before I was born, but I have a few pieces of her cookware. |
At this point, you could begin to fry one slice of bacon for each piece of chicken that you are cooking. In the pictures below, we used pre-cooked bacon which had been given to us.
 |
| A glimpse of the chicken after the lid has been on for awhile and it has been turned once. |
Once the chicken has browned a bit on both sides, you can move the chicken away from the fire to a much lower heat to continue cooking until it is done, keeping the lid on the skillet. For the boneless thighs that you see in the picture, they were basically cooked by the time they had gotten to this point, but keep in mind that they were considerably thinner than what a chicken breast would be, for example. I always cut into the thickest piece of chicken to see if the juices run clear in order to tell whether it is cooked.
 |
| The chicken is completely cooked and has been moved over to the coolest part of the cooktop near the reservoir. |
 |
| Thick slices of Monterey Jack cheese on each piece of chicken. |
 |
| Cooked bacon strips added to the top of the chicken and cheese. |
 |
| Poor Man's Chicken Monterey, a brown rice and mushroom pilaf that I concocted (which Nancy tasted and spit out and I considered delicious) and fresh pineapple wedges: our noon dinner two Sundays ago. |
Here are some variations of this dish that we think have been successful:
1. Instead of bacon, sliced, canned mushrooms make a delicious and low-fat (but not low-sodium) substitute.
2. When they are in season, a slice of ripe tomato between the chicken and the cheese is very appetizing. Wait to put on the cheese until the tomato has cooked a little, though. I have also used home-canned, whole tomatoes in the same manner and had good results.
3. I have eaten a similar, fancier version of Chicken Monterey that was cooked under a broiler where slices of artichoke hearts were put on top of the chicken with the slice of fresh tomato.
As I've done it here, this dish is embarrassingly easy, but it is a tasty main dish for a busy day.
Saturday, April 13, 2013
Grandma Ruth's Apple Pie
I've mentioned my great-grandma Ruth in an earlier blog post, saying that even though she has been dead for over twenty-five years, she is still regarded as an excellent cook by those family members who knew her. Our recipe boxes have several of her signature recipes in them, and I don't recall a Thanksgiving where her version of escalloped corn was not on the menu.
Grandma Marian credits Great-Grandma Ruth (Grandma Marian's mother-in-law) with having taught her to cook. Grandma Marian always has said that when she was growing up, she was not interested in watching her own mother cook. Thus, she says that when she got married, her repertoire in the kitchen was pretty limited. However, upon her marriage, Grandma Marian and Great-Grandma Ruth became next door neighbors, so there were plenty of opportunities for Grandma Marian to study under Grandma Ruth's expert tutelage.
Grandma Ruth's method for making apple pie is our standard go-to recipe for this American favorite. My sister won the grand champion spot with this recipe at our county fair, and it has been a request of my students at school, too. There is really very little to it, and as Grandma Marian points out, one of the advantages of baking a double-crusted fruit pie is that once it is assembled and put into the oven, the work is done. You don't have the tedious, labor intensive work of baking several pans of cookies, and you don't have to frost it as you would with a cake.
As with any wood cookstove cooking or baking, the first thing that you want to do is to begin heating your oven. Our stove is being fired constantly right now, so heating the oven for pie baking merely involved shutting the oven door and adding small pieces of fuel to bring the oven up to around 400 degrees or a little more. You can find more information about managing your wood cookstove oven for pie baking in my first pie baking post here.
Next comes mixing the pie crust. I've read lots of different recipes for pie crusts, but I must confess that I haven't tried any other recipe than what is below. Grandma Marian has preached to me for years that a good pie crust is thin and flaky, and she has been quite vocal about what a travesty the thick crusts of bakery and restaurant pies are. Not too long after Nancy and I were married, we took a pie down to her grandparents' home for a family dinner. After tasting a piece of the pie, Nancy's grandma asked me what I used for a crust recipe. I recited the recipe, and Ruth's response was, "And to think, I've been wasting my time with an egg in my pie crust all these years." I took that to mean that she thought my crust was good. This is a pretty common recipe, but here is what my family does:
To the peeled, sliced apples, add anywhere from one to two cups sugar depending on how sour the apples are. I added only one cup of sugar to the apples in the picture because one of the para-educators at school has been inspiring me to experiment with cutting back on the amount of sugar in dessert recipes. Unfortunately, that ended up being a little severe for these apples, and the filling was pretty tart. Another quarter of a cup of sugar would have been better. Had I used Jonathan apples, I probably could have gotten away with the single cup of sugar. If I had been using Yellow Transparent apples, I would have put two cups of sugar in and not thought twice about it.
To thicken the filling, Grandma Ruth always added two- three tablespoons of flour. That is all I've ever added, and as long as I have baked the pie for a sufficient time to get the filling to bubble, it is sufficient. (Incidentally, I've never messed around with tapioca as a fruit pie thickening. I love tapioca pudding, but I think that it adds a character all its own to pie filling and detracts from the fruit.)
Now, I know that many people like to add various spices to their pie filling, but Grandma Ruth and Grandma Marian were always adamant that the fruit should be what you taste in a pie, not the spices. For that reason, we only add a sprinkling of cinnamon to apple pie filling--nothing else!
At this point, as long as your crust is ready (or close to ready), you may stir the apples, sugar, flour,
and cinnamon together so that the apples are evenly coated. The reason that I say that your crust must be ready before stirring the filling is that the sugar will immediately begin to draw the juice out of the apples, and if they are allowed to sit for any length of time, they can become quite soupy and result in a bottom crust that is of poor quality.
Put the apples in the bottom crust (which is already in the pie tin). Then, put the top crust on, centering whatever you are using for a vent in the top crust. Then, gather the edges of extra crust, pinch together to seal edges, and do whatever you want to flute them. I just pinch them between my thumb and first finger. Trim any excess crust away from the edge of the pan. Sprinkle the top of the pie with a little sugar.
I like to bake fruit pies on a drip guard as you see here. Cleaning the oven of a wood cookstove is probably easier than cleaning the oven of a modern stove, but cleaning the bottom of any oven is really not fun. Furthermore, since our stove has been fired almost constantly since sometime last fall, there has been virtually no time when the oven has been cool enough to clean it any more than quickly wiping the dust off the bottom.
As with any double crusted fruit pie, this pie should be put into a hot oven for the first ten-fifteen minutes of the baking time. The oven heat can then be permitted to cool to moderate heat until sufficient time has passed to cook the filling (about forty-five minutes). As I've written before,
another method which I have used successfully is to bake the pie for around an hour between 375 and 400 degrees. I'm sure many cooks wouldn't agree, but it seems to me that very little about cooking is an exact science. What you absolutely have to be sure of is that the filling is boiling and looks as though it has thickened before you take it out of the oven. I like to see a nicely browned crust, also.
As always, feel free to add your thoughts and questions in the comments fields below. I like to hear from readers!
Grandma Marian credits Great-Grandma Ruth (Grandma Marian's mother-in-law) with having taught her to cook. Grandma Marian always has said that when she was growing up, she was not interested in watching her own mother cook. Thus, she says that when she got married, her repertoire in the kitchen was pretty limited. However, upon her marriage, Grandma Marian and Great-Grandma Ruth became next door neighbors, so there were plenty of opportunities for Grandma Marian to study under Grandma Ruth's expert tutelage.
Grandma Ruth's method for making apple pie is our standard go-to recipe for this American favorite. My sister won the grand champion spot with this recipe at our county fair, and it has been a request of my students at school, too. There is really very little to it, and as Grandma Marian points out, one of the advantages of baking a double-crusted fruit pie is that once it is assembled and put into the oven, the work is done. You don't have the tedious, labor intensive work of baking several pans of cookies, and you don't have to frost it as you would with a cake.
As with any wood cookstove cooking or baking, the first thing that you want to do is to begin heating your oven. Our stove is being fired constantly right now, so heating the oven for pie baking merely involved shutting the oven door and adding small pieces of fuel to bring the oven up to around 400 degrees or a little more. You can find more information about managing your wood cookstove oven for pie baking in my first pie baking post here.
Next comes mixing the pie crust. I've read lots of different recipes for pie crusts, but I must confess that I haven't tried any other recipe than what is below. Grandma Marian has preached to me for years that a good pie crust is thin and flaky, and she has been quite vocal about what a travesty the thick crusts of bakery and restaurant pies are. Not too long after Nancy and I were married, we took a pie down to her grandparents' home for a family dinner. After tasting a piece of the pie, Nancy's grandma asked me what I used for a crust recipe. I recited the recipe, and Ruth's response was, "And to think, I've been wasting my time with an egg in my pie crust all these years." I took that to mean that she thought my crust was good. This is a pretty common recipe, but here is what my family does:
Pie Crust
1 1/2 cups all-purpose flour
1/2 cup vegetable shortening
1/2 tsp. salt
4-5 Tblsp. cold water
1. Cut the shortening into the flour and salt using a pastry blender. Grandma Ruth's original instructions to my mother stated that you were to cut the shortening and the flour/salt mixture together until "it is the size of small peas."
2. Add the water, and combine to form a ball of dough. I usually stir it with a soup spoon. The key is that you don't want to overwork the dough at this point.
 |
| The flour, salt, and shortening ready to be blended together. |
 |
| What the flour, salt, and shortening mixture looks like when it is ready for the water to be added. |
 |
| The water has been added, and the dough is now ready to be divided in half. |
At this point, I divide the dough in half and roll out the bottom crust and put it in the pie tin. Then I roll out the top crust, putting some kind of design in the center of it to serve as a vent to let the steam from the filling escape.
It is only fair to tell you that I pretty much guess on the measurements for all of the ingredients in the pie crust, but the recipe seems pretty forgiving. The measurements for the pie filling are even more vague. Grandma, Mom, and I all have a set of the multi-colored Pyrex bowls that were popular in the late 1940s. Grandma and Grandpa were married in 1947, and Grandma received two sets as wedding gifts. She kept them both and uses them to this day. I remember that when I was first learning to bake apple pie, she and I were discussing how many apples to use for filling. I'll never forget what she said:
"I don't know how many apples I use. It has always depended on what size the apples are and what kind of shape they are in. I just know what looks right in my green bowl from that Pyrex set."
As an inexperienced cook, that was not the helpful advice that I was looking for at the time, but now I know exactly what she means. Now I always use the green bowl for any kind of fruit pie filling that is not cooked before it is put into the pie shell, because I too know "what looks right." For the 9" pie
in the pictures below, I used four large Granny Smith apples which were uniform store-bought apples. If you enlarge the pictures, you can see that I like to slice the apples pretty thinly. This is because all of my female pie-baking ancestors preached about the cardinal sin of baking an apple pie in which the apples are not fully cooked.
A side note about apples: Often, we make apple pie out of our own homegrown apples. Since we do not spray, the quality and size can vary widely and can also be dependent on how long they have been in storage. As I noted above, I used Granny Smith apples for the pie in the pictures. When my sister won grand champion apple pie at our county fair, however, she used Yellow Transparent apples from the tree in our orchard. A Yellow Transparent is a sour green apple which ripens in early July here in southwestern Iowa (the name comes from the fact that when it is overly ripe, the skin becomes yellow and transparent). It is certainly our family's preference for this pie, but they are difficult to come by. My other favorite apple to cook with is the Jonathan. Basically, you want to use an apple that is in the tart to sour range which has a firm flesh--in other words, the very opposite of the common Red Delicious apple.
A side note about apples: Often, we make apple pie out of our own homegrown apples. Since we do not spray, the quality and size can vary widely and can also be dependent on how long they have been in storage. As I noted above, I used Granny Smith apples for the pie in the pictures. When my sister won grand champion apple pie at our county fair, however, she used Yellow Transparent apples from the tree in our orchard. A Yellow Transparent is a sour green apple which ripens in early July here in southwestern Iowa (the name comes from the fact that when it is overly ripe, the skin becomes yellow and transparent). It is certainly our family's preference for this pie, but they are difficult to come by. My other favorite apple to cook with is the Jonathan. Basically, you want to use an apple that is in the tart to sour range which has a firm flesh--in other words, the very opposite of the common Red Delicious apple.
 |
| The peeled, cored, and sliced apples. |
To thicken the filling, Grandma Ruth always added two- three tablespoons of flour. That is all I've ever added, and as long as I have baked the pie for a sufficient time to get the filling to bubble, it is sufficient. (Incidentally, I've never messed around with tapioca as a fruit pie thickening. I love tapioca pudding, but I think that it adds a character all its own to pie filling and detracts from the fruit.)
Now, I know that many people like to add various spices to their pie filling, but Grandma Ruth and Grandma Marian were always adamant that the fruit should be what you taste in a pie, not the spices. For that reason, we only add a sprinkling of cinnamon to apple pie filling--nothing else!
 |
| The sugar, flour, and cinnamon atop the apples, ready to be stirred together. |
and cinnamon together so that the apples are evenly coated. The reason that I say that your crust must be ready before stirring the filling is that the sugar will immediately begin to draw the juice out of the apples, and if they are allowed to sit for any length of time, they can become quite soupy and result in a bottom crust that is of poor quality.
 |
| The apples, sugar, flour, and cinnamon once they are stirred together. |
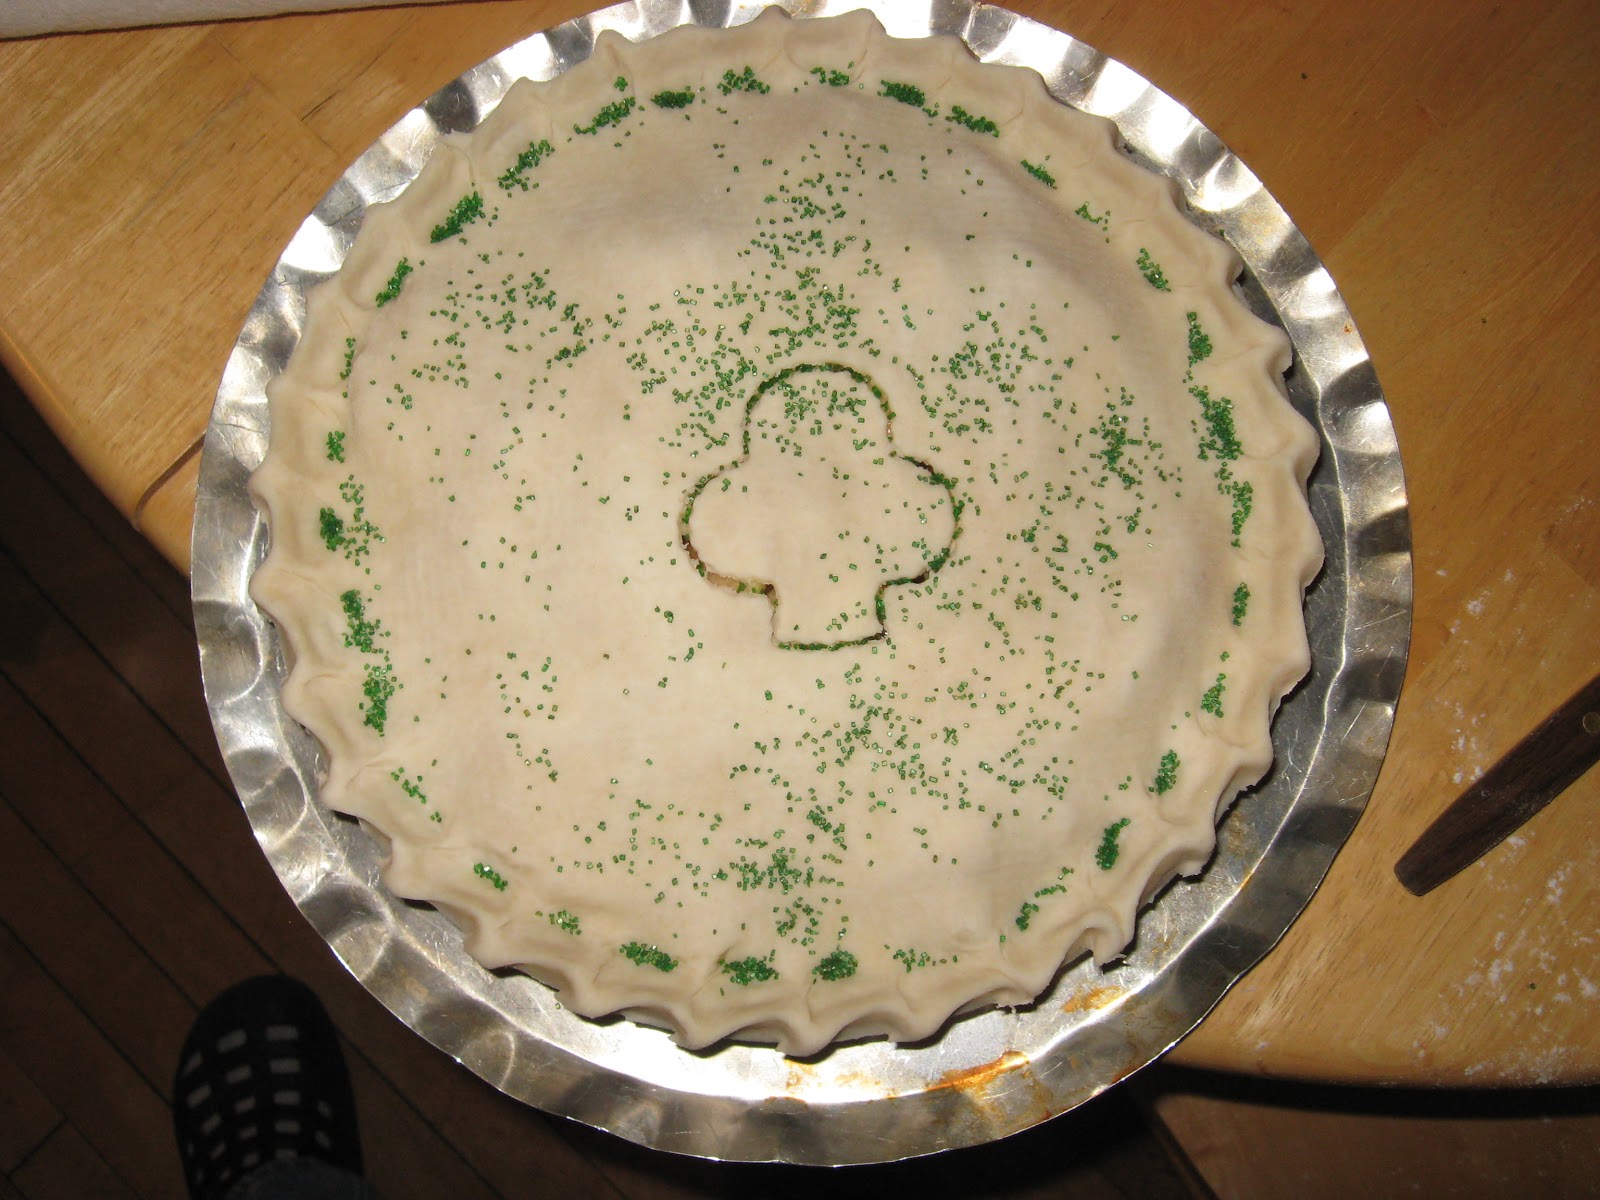 |
| The assembled apple pie. This pie was taken to a church potluck which happened to be on St. Patrick's Day this year (hence the clover- shaped vent and green sanding sugar). Hmm. You'd think I'd have the sense to not photograph my own foot, wouldn't you? |
As with any double crusted fruit pie, this pie should be put into a hot oven for the first ten-fifteen minutes of the baking time. The oven heat can then be permitted to cool to moderate heat until sufficient time has passed to cook the filling (about forty-five minutes). As I've written before,
another method which I have used successfully is to bake the pie for around an hour between 375 and 400 degrees. I'm sure many cooks wouldn't agree, but it seems to me that very little about cooking is an exact science. What you absolutely have to be sure of is that the filling is boiling and looks as though it has thickened before you take it out of the oven. I like to see a nicely browned crust, also.
 |
| The finished apple pie. I did rotate it about a quarter of a turn during baking. You can see that the left side of the pie is a little darker than the right since the firebox side of our cookstove is on the left. |
As always, feel free to add your thoughts and questions in the comments fields below. I like to hear from readers!
Wednesday, April 10, 2013
M&M Bars from Pinterest
Nancy is a Pinterest user. I am not, but I'll be honest and admit that I am fascinated by many of the things that I have seen on Pinterest, and I'm grateful that Pinterest has contributed so many readers to this blog.
Nancy has been hinting that she wanted me to try a recipe for M&M bars that she found on Pinterest for a couple of weeks now. She bought a bag of M&M's at Fareway, but alas, we ate them before we managed to get the bars made. Oops. Don't you hate it when that happens? I'm embarrassed to admit that this "accident" happens too frequently around here. Anyway, I finally got around to baking them last night, and they turned out to be delicious.
You can access them by going here: http://fantasticfamilyfavorites.blogspot.com/2011/06/thick-and-chewy-m-cookie-bars.html
Naturally, the reason that I am posting them on this blog is because I think they are a good wood cookstove recipe. First, the recipe says to melt the butter and then let it partially cool, and you know how I like recipes that take advantage of the cookstove's heat as the oven reaches the appropriate temperature. We melted the butter for these bars by putting it in a metal mixing bowl atop the reservoir. Our butter was at room temperature, and we just let it partially melt; it worked beautifully.
We have been experiencing a wonderful spring storm here for the last two days which has delivered us a much needed, gentle, soaking rain. We are very thankful for that, but it does make trips to the woodshed less pleasant, so I didn't have the normal variety of firewood sizes in the house last night that I like to have on hand for baking. This brings me to the next reason that these bars are a good wood cookstove recipe. They are supposed to be baked for 24-28 minutes at 325. I ended up baking them for closer to 35 minutes at about 300, and they still turned out exactly like the picture above. I'm sure that one could not bake them at a high temperature for a short time and get the same results, but I do think that they are pretty forgiving of an imprecise oven temperature.
Usually, I always make new recipes exactly the way they are written the first time. However, with this one, I did not put all of the dry ingredients together separately like the recipe says. I used Meme's method of mixing cookie dough which is to cream the fat and sugars, then add the eggs. Next, beat in the soda and vanilla. Add the flour and candies last. I like this method because it works well for cookies, and I have one less dirty bowl at the end of the mixing process.
Also, we just lightly greased the 9x13 pan that we used rather than lining it with foil. As near as I can tell, lining a pan with foil for a recipe like this is just intended to make cleanup easier. Since I am a raging skinflint, I can't see wasting a foot and a half of tin foil when the bars don't stick badly anyway.
Next time I make these, I will omit the salt. I don't think that it is necessary, and my blood pressure doesn't either. The salt in the butter is sufficient.
Beware. These will disappear fast!
Nancy has been hinting that she wanted me to try a recipe for M&M bars that she found on Pinterest for a couple of weeks now. She bought a bag of M&M's at Fareway, but alas, we ate them before we managed to get the bars made. Oops. Don't you hate it when that happens? I'm embarrassed to admit that this "accident" happens too frequently around here. Anyway, I finally got around to baking them last night, and they turned out to be delicious.
You can access them by going here: http://fantasticfamilyfavorites.blogspot.com/2011/06/thick-and-chewy-m-cookie-bars.html
 |
| This picture of the bars is from the Fantastic Family Favorites Blogspot. Ours looked exactly like these except that we used pastel Easter M&Ms. |
Naturally, the reason that I am posting them on this blog is because I think they are a good wood cookstove recipe. First, the recipe says to melt the butter and then let it partially cool, and you know how I like recipes that take advantage of the cookstove's heat as the oven reaches the appropriate temperature. We melted the butter for these bars by putting it in a metal mixing bowl atop the reservoir. Our butter was at room temperature, and we just let it partially melt; it worked beautifully.
We have been experiencing a wonderful spring storm here for the last two days which has delivered us a much needed, gentle, soaking rain. We are very thankful for that, but it does make trips to the woodshed less pleasant, so I didn't have the normal variety of firewood sizes in the house last night that I like to have on hand for baking. This brings me to the next reason that these bars are a good wood cookstove recipe. They are supposed to be baked for 24-28 minutes at 325. I ended up baking them for closer to 35 minutes at about 300, and they still turned out exactly like the picture above. I'm sure that one could not bake them at a high temperature for a short time and get the same results, but I do think that they are pretty forgiving of an imprecise oven temperature.
Usually, I always make new recipes exactly the way they are written the first time. However, with this one, I did not put all of the dry ingredients together separately like the recipe says. I used Meme's method of mixing cookie dough which is to cream the fat and sugars, then add the eggs. Next, beat in the soda and vanilla. Add the flour and candies last. I like this method because it works well for cookies, and I have one less dirty bowl at the end of the mixing process.
Also, we just lightly greased the 9x13 pan that we used rather than lining it with foil. As near as I can tell, lining a pan with foil for a recipe like this is just intended to make cleanup easier. Since I am a raging skinflint, I can't see wasting a foot and a half of tin foil when the bars don't stick badly anyway.
Next time I make these, I will omit the salt. I don't think that it is necessary, and my blood pressure doesn't either. The salt in the butter is sufficient.
Beware. These will disappear fast!
Sunday, March 31, 2013
Lemon Meringue Pie Pic
I'm sorry that I haven't posted very much recently. Rest assured, the Margin Gem has been very busy; unfortunately, so have I. There is so much to tell everyone that I have several posts started, but haven't had the time to finish any of them. Hopefully, things will get better soon.
We were busy baking yesterday and had a great noon dinner with a new recipe that I'll share sometime. Made two pans of sticky rolls for breakfast at church, two pans of orange glazed rolls for dinner at Mom and Dad's, a braid for our supper, a pecan pie, and a lemon meringue pie for dinner today. Used the stovetop oven for the pecan pie, and it worked like a charm. Took a quick photo of the lemon meringue pie as it was coming out of the oven.
Hope everyone had a blessed Easter celebrating the Resurrection of Jesus Christ!
We were busy baking yesterday and had a great noon dinner with a new recipe that I'll share sometime. Made two pans of sticky rolls for breakfast at church, two pans of orange glazed rolls for dinner at Mom and Dad's, a braid for our supper, a pecan pie, and a lemon meringue pie for dinner today. Used the stovetop oven for the pecan pie, and it worked like a charm. Took a quick photo of the lemon meringue pie as it was coming out of the oven.
 |
| Lemon meringue pie coming out of the oven on the Margin Gem for our Easter dinner. |
Monday, March 11, 2013
Baking Potatoes in Your Wood Cookstove
I know that Irish potatoes have been on the receiving end of a lot of bad press lately, and I understand the reasons for this, but I have to admit that I'm still a loyal potato fan. Hands down, my favorite way to eat potatoes is to have them mashed, however, Nancy and I like baked potatoes too.
Over the weekend, winter storm Triton hit our area with much needed rain on Friday night and Saturday, some ice early Sunday morning, and then what was supposed to be a little bit of snow. The one to four inches which were forcast became somewhere between eight and nine inches yesterday afternoon with blizzard conditions. School was cancelled today, which was a gift from God, since we had been gone to State Speech Contest in Nevada, Iowa, over Friday night and during the day on Saturday, and I needed some time to get caught up with some paper checking.
Unfortunately, we didn't get a chance to cut firewood on the weekend before last, and with the weather being so uncooperative this weekend, things are looking pretty grim in the woodshed. To conserve fuel, we had forgone having a fire in the Jotul heating stove, and we were trying to get by on just the heat from the cookstove. This has made it much more chilly in the house than we are used to because the Margin Gem is not able to heat our drafty farmhouse by itself.
I checked papers next to the open oven door this morning, and I really didn't want to close it in order to make my noon dinner, so I planned my menu accordingly. For my staple, I decided that a couple of baked potatoes sounded really good. Of course, one can very easily bake potatoes in the oven of a wood cookstove. My preference is to bake them at about 400 degrees for an hour. One could also use various pans or stovetop ovens to bake them on the stovetop, but this would have reduced the heat that was radiating from the stove into the room--something that I certainly didn't want today--and I was only going to be baking a couple of medium-sized spuds. I've also read about people wrapping them in foil and baking them in the ash pan beneath the fire. I think that accessing the ash pan for cooking is messy, though, so I developed a different method several years ago.
After washing and piercing the potatoes with a fork, I wrap them tightly in foil. Then, I remove one of the lids above the oven and lay the potatoes on top of the oven box with the small sides facing the firebox. Don't put the potatoes with their long sides toward the firebox because you don't want to impede the draft of the stove any more than necessary. I turn the potatoes so that the opposite short side is toward the fire after about twenty minutes.
The amount of time that it takes the potatoes to cook thoroughly is dependent on how hot the fire is, how large the potatoes are, etc. I've seen them be completely cooked in as little as a half hour, but they can take a full hour too. I always test them to see if they are done by squeezing them. If they give, they are done.
I rounded out today's dinner with home-canned round steak (probably the smartest thing I've done with round steak--soooo tender!) and some leftover baked beans. It was delicious.
Certainly, one cannot bake a large number of potatoes using this method because you don't want to hamper the draft of your stove, but if you are going to only bake a couple of potatoes, this does the trick. I know that some people who read this will think that a microwave is is great for baking just a couple of potatoes in a hurry. All I can say is don't get me started on what I think of microwaved baked potatoes!
Over the weekend, winter storm Triton hit our area with much needed rain on Friday night and Saturday, some ice early Sunday morning, and then what was supposed to be a little bit of snow. The one to four inches which were forcast became somewhere between eight and nine inches yesterday afternoon with blizzard conditions. School was cancelled today, which was a gift from God, since we had been gone to State Speech Contest in Nevada, Iowa, over Friday night and during the day on Saturday, and I needed some time to get caught up with some paper checking.
Unfortunately, we didn't get a chance to cut firewood on the weekend before last, and with the weather being so uncooperative this weekend, things are looking pretty grim in the woodshed. To conserve fuel, we had forgone having a fire in the Jotul heating stove, and we were trying to get by on just the heat from the cookstove. This has made it much more chilly in the house than we are used to because the Margin Gem is not able to heat our drafty farmhouse by itself.
I checked papers next to the open oven door this morning, and I really didn't want to close it in order to make my noon dinner, so I planned my menu accordingly. For my staple, I decided that a couple of baked potatoes sounded really good. Of course, one can very easily bake potatoes in the oven of a wood cookstove. My preference is to bake them at about 400 degrees for an hour. One could also use various pans or stovetop ovens to bake them on the stovetop, but this would have reduced the heat that was radiating from the stove into the room--something that I certainly didn't want today--and I was only going to be baking a couple of medium-sized spuds. I've also read about people wrapping them in foil and baking them in the ash pan beneath the fire. I think that accessing the ash pan for cooking is messy, though, so I developed a different method several years ago.
After washing and piercing the potatoes with a fork, I wrap them tightly in foil. Then, I remove one of the lids above the oven and lay the potatoes on top of the oven box with the small sides facing the firebox. Don't put the potatoes with their long sides toward the firebox because you don't want to impede the draft of the stove any more than necessary. I turn the potatoes so that the opposite short side is toward the fire after about twenty minutes.
 |
| The potatoes wrapped in foil and resting on top of the oven box. Please excuse the unattractive state of the cooktop. What can I say? The stove is under hard use. The beauty of the wood cookstove is that those marks (some accidental drippings from the side of a cast iron skillet) will eventually just cook away since the stove is continually fired. |
 |
| The perfect finished product. |
I rounded out today's dinner with home-canned round steak (probably the smartest thing I've done with round steak--soooo tender!) and some leftover baked beans. It was delicious.
Certainly, one cannot bake a large number of potatoes using this method because you don't want to hamper the draft of your stove, but if you are going to only bake a couple of potatoes, this does the trick. I know that some people who read this will think that a microwave is is great for baking just a couple of potatoes in a hurry. All I can say is don't get me started on what I think of microwaved baked potatoes!
Sunday, March 3, 2013
Maintaining an Even Oven Temperature in a Wood Cookstove, Part 4
What I Do
This post is intended to be an accurate and detailed account of what I do to keep the temperature of my wood cookstove ovens steady. Remember, however, that every stove and every chimney is different, and it is entirely possible that for another wood cookstove user, none of this information will prove useful.
The first steps in baking in either of the cookstoves that we currently use is the same: start the fire. The process of establishing a steady fire should result in a bed of coals being present in the bottom of the firebox. A bed of coals serves to prevent the oven temperature from fluctuating drastically, but I find that coals alone provide insufficient heat for baking. Furthermore, it doesn't take long--especially in the Margin Gem--for the coals to "ash over." "Ashing over" is my own term to describe the process of the outer layer of a glowing coal becoming ash as combustion of the burnable material is totally completed. If you've ever burned charcoal, you are familiar with this situation and know that the bed of charcoal needs to be stirred a bit when you can no longer see the glowing coals for the layer of ash that has accumulated on their outsides. Once coals have ashed over, the heat which radiates from them is significantly diminished.
Before I go on with the next steps, it is important to understand another characteristic of the wood-fueled fire: the amount of heat radiating from the fire is determined by the amount of surface area of the burning firewood. The greater the surface area which is burning, the greater the heat radiated. Suppose you have a log which is four inches in diameter and eighteen inches in length. If that log is put into the firebox and ignites, the maximum surface area which will be radiating heat is approximately 251.2 square inches. Now suppose that the same size log is split into four smaller pieces and all four pieces are put into the fire at once. The same volume of fuel has been added to the fire, but the surface area of those four pieces is now 539.2 square inches. Thus, the four smaller split pieces will burn hotter than the one whole log, but they will not burn as long.
This whole geometry lesson is important because once you have established your bed of coals, you control the temperature of the oven by adding appropriately sized pieces of firewood to keep the oven at the temperature that you desire, using larger pieces for cooler temperatures and smaller pieces for hotter temperatures.
Managing the baking fire in the vintage Riverside cookstove and managing the fire in the new, airtight Margin Gem cookstove are two distinctly different processes, so I'd like to talk about the two stoves separately now. We'll start with the Riverside. Maintaining the oven temperature in the Qualified was basically the same process, by the way.
 |
| A small log burning in the Riverside Bakewell. |
The firebox on the the Riverside (and the Qualified) is quite small compared to wood stoves which are built for heating. Once the fire has a well established bed of coals and the oven is near to the needed temperature, I would add one fair-sized split piece or whole log--there isn't room for much more--for a moderate oven. This needs to be quite dry and ready for burning. This should be sufficient for keeping the oven at a moderate temperature. Once this log has perhaps burned to about half its useful life, I would add another piece of similar size. While the second log is igniting, the first log is finishing its combustion. This keeps the second log from suffocating or significantly cooling a fire which has completely gone to coals.
If a hot oven is needed, then I would continually fire with smaller pieces of wood which would be added at more regular intervals. Since the firebox is small, large pieces are not really an option, anyway.
 |
| Riverside Bakewell firebox full of small pieces of wood. A fire like this would be needed for a hot oven. |
Managing the oven temperature on the Margin Gem has proved to be quite a bit more challenging for me than I had expected. We have used the Margin Gem exclusively for our baking since August of 2012. I haven't ruined anything, but the Margin Gem's firebox operates on an entirely different principle of combustion than that of older style stoves like the Qualified and the Riverside. Basically, in the Margin Gem, air enters the firebox above the fire rather than from beneath the fire. Also, since the firebox itself is so much larger than the Qualified or the Riverside, I've discovered that adding only one piece of wood at a time is not sufficient for keeping the oven hot. Instead, I always have to add at least two pieces of wood at a time.
 |
| Two pieces of wood burning in the Margin Gem cookstove. |
I mentioned this to Mrs. Detweiler, an Amish acquaintance who has a Gem Pac cookstove. She understood exactly what I meant and advised keeping the bed of coals to a minimum and making sure that they were frequently stirred down. This causes the firebox to operate more like older style cookstoves where the oxygen enters the fire from beneath. This certainly works, but it is not always easy to get the coals stirred down sufficiently.
What seems to work best is to make sure that I have plenty of small pieces of wood available when I am baking because they offer a more controllable heat. The small pieces not only burn hot, but they burn quickly which provides an added measure of control.
I also have to remember that I cannot let each load of wood burn quite so far into its total combustion time as I would have in the Qualified or the Riverside before adding more wood. Because the ignition time on new wood is longer in the Margin Gem, it is important to add the new wood to the fire sooner than what I was accustomed to.
I have also tried filling the firebox to the top and then controlling the amount of heat which the fire emits through the use of the drafts. This method has not been as successful as I would like because the fire tends to eventually burn quite hot. I'll continue to experiment and update the blog as I learn more.
Hmmmm. I feel that I must again say that baking in a woodburning cookstove looks a lot more complicated in print than it is in real life. Don't let any of these posts intimidate you. They are merely well-intentioned help for those wondering how to manage the heat of a cookstove. Each wood cookstove cook will develop his or her own techniques which will work best for each stove. The biggest key is to pay attention to what gets results and to be observant. Besides, the rewards of learning to bake in a woodburning cookstove are great. For some reason, when I cook on a modern range anymore, it just doesn't feel like cooking. That sounds funny, I know, but I can't describe it any other way.
Subscribe to:
Posts (Atom)