Sunday, March 31, 2013

Lemon Meringue Pie Pic

I'm sorry that I haven't posted very much recently.  Rest assured, the Margin Gem has been very busy; unfortunately, so have I.  There is so much to tell everyone that I have several posts started, but haven't had the time to finish any of them.  Hopefully, things will get better soon.

We were busy baking yesterday and had a great noon dinner with a new recipe that I'll share sometime.  Made two pans of sticky rolls for breakfast at church, two pans of orange glazed rolls for dinner at Mom and Dad's, a braid for our supper, a pecan pie, and a lemon meringue pie for dinner today.  Used the stovetop oven for the pecan pie, and it worked like a charm.  Took a quick photo of the lemon meringue pie as it was coming out of the oven.

Lemon meringue pie coming out of the oven on the Margin Gem
for our Easter dinner.
 Hope everyone had a blessed Easter celebrating the Resurrection of Jesus Christ!
 

Monday, March 11, 2013

Baking Potatoes in Your Wood Cookstove

I know that Irish potatoes have been on the receiving end of a lot of bad press lately, and I understand the reasons for this, but I have to admit that I'm still a loyal potato fan.  Hands down, my favorite way to eat potatoes is to have them mashed, however, Nancy and I like baked potatoes too. 

Over the weekend, winter storm Triton hit our area with much needed rain on Friday night and Saturday, some ice early Sunday morning, and then what was supposed to be a little bit of snow.  The one to four inches which were forcast became somewhere between eight and nine inches yesterday afternoon with blizzard conditions.  School was cancelled today, which was a gift from God, since we had been gone to State Speech Contest in Nevada, Iowa, over Friday night and during the day on Saturday, and I needed some time to get caught up with some paper checking.

Unfortunately, we didn't get a chance to cut firewood on the weekend before last, and with the weather being so uncooperative this weekend, things are looking pretty grim in the woodshed.  To conserve fuel, we had forgone having a fire in the Jotul heating stove, and we were trying to get by on just the heat from the cookstove.  This has made it much more chilly in the house than we are used to because the Margin Gem is not able to heat our drafty farmhouse by itself.

I checked papers next to the open oven door this morning, and I really didn't want to close it in order to make my noon dinner, so I planned my menu accordingly.  For my staple, I decided that a couple of baked potatoes sounded really good.  Of course, one can very easily bake potatoes in the oven of a wood cookstove.  My preference is to bake them at about 400 degrees for an hour.  One could also use various pans or stovetop ovens to bake them on the stovetop, but this would have reduced the heat that was radiating from the stove into the room--something that I certainly didn't want today--and I was only going to be baking a couple of medium-sized spuds.  I've also read about people wrapping them in foil and baking them in the ash pan beneath the fire.   I think that accessing the ash pan for cooking is messy, though, so I developed a different method several years ago.

After washing and piercing the potatoes with a fork, I wrap them tightly in foil.  Then, I remove one of the lids above the oven and lay the potatoes on top of the oven box with the small sides facing the firebox.  Don't put the potatoes with their long sides toward the firebox because you don't want to impede the draft of the stove any more than necessary.  I turn the potatoes so that the opposite short side is toward the fire after about twenty minutes.

The potatoes wrapped in foil and resting on top of the oven box.
Please excuse the unattractive state of the cooktop.  What can I say?
The stove is under hard use.  The beauty of the wood cookstove is that
those marks (some accidental drippings from the side of a cast iron
skillet) will eventually just cook away since the stove is continually fired.
The amount of time that it takes the potatoes to cook thoroughly is dependent on how hot the fire is, how large the potatoes are, etc.  I've seen them be completely cooked in as little as a half hour, but they can take a full hour too.  I always test them to see if they are done by squeezing them.  If they give, they are done.

The perfect finished product.


I rounded out today's dinner with home-canned round steak (probably the smartest thing I've done with round steak--soooo tender!) and some leftover baked beans.  It was delicious.

Certainly, one cannot bake a large number of potatoes using this method because you don't want to hamper the draft of your stove, but if you are going to only bake a couple of potatoes, this does the trick.  I know that some people who read this will think that a microwave is is great for baking just a couple of potatoes in a hurry.  All I can say is don't get me started on what I think of microwaved baked potatoes!

Sunday, March 3, 2013

Maintaining an Even Oven Temperature in a Wood Cookstove, Part 4

What I Do
This post is intended to be an accurate and detailed account of what I do to keep the temperature of my wood cookstove ovens steady.  Remember, however, that every stove and every chimney is different, and it is entirely possible that for another wood cookstove user, none of this information will prove useful.

The first steps in baking in either of the cookstoves that we currently use is the same: start the fire.  The process of establishing a steady fire should result in a bed of coals being present in the bottom of the firebox.  A bed of coals serves to prevent the oven temperature from fluctuating drastically, but I find that coals alone provide insufficient heat for baking.  Furthermore, it doesn't take long--especially in the Margin Gem--for the coals to "ash over."  "Ashing over" is my own term to describe the process of the outer layer of a glowing coal becoming ash as combustion of the burnable material is totally completed.  If you've ever burned charcoal, you are familiar with this situation and know that the bed of charcoal needs to be stirred a bit when you can no longer see the glowing coals for the layer of ash that has accumulated on their outsides.  Once coals have ashed over, the heat which radiates from them is significantly diminished.

Before I go on with the next steps, it is important to understand another characteristic of the wood-fueled fire: the amount of heat radiating from the fire is determined by the amount of surface area of the burning firewood.  The greater the surface area which is burning, the greater the heat radiated.  Suppose you have a log which is four inches in diameter and eighteen inches in length.  If that log is put into the firebox and ignites, the maximum surface area which will be radiating heat is approximately 251.2 square inches.  Now suppose that the same size log is split into four smaller pieces and all four pieces are put into the fire at once.  The same volume of fuel has been added to the fire, but the surface area of those four pieces is now 539.2 square inches.  Thus, the four smaller split pieces will burn hotter than the one whole log, but they will not burn as long.

This whole geometry lesson is important because once you have established your bed of coals, you control the temperature of the oven by adding appropriately sized pieces of firewood to keep the oven at the temperature that you desire, using larger pieces for cooler temperatures and smaller pieces for hotter temperatures. 

Managing the baking fire in the vintage Riverside cookstove and managing the fire in the new, airtight Margin Gem cookstove are two distinctly different processes, so I'd like to talk about the two stoves separately now.  We'll start with the Riverside.  Maintaining the oven temperature in the Qualified was basically the same process, by the way.
A small log burning in the Riverside Bakewell.

The firebox on the the Riverside (and the Qualified) is quite small compared to wood stoves which are built for heating.  Once the fire has a well established bed of coals and the oven is near to the needed temperature, I would add one fair-sized split piece or whole log--there isn't room for much more--for a moderate oven.  This needs to be quite dry and ready for burning.  This should be sufficient for keeping the oven at a moderate temperature.  Once this log has perhaps burned to about half its useful life, I would add another piece of similar size.  While the second log is igniting, the first log is finishing its combustion.  This keeps the second log from suffocating or significantly cooling a fire which has completely gone to coals. 

If a hot oven is needed, then I would continually fire with smaller pieces of wood which would be added at more regular intervals.  Since the firebox is small, large pieces are not really an option, anyway. 

Riverside Bakewell firebox full of small pieces of wood.  A fire
like this would be needed for a hot oven.


Managing the oven temperature on the Margin Gem has proved to be quite a bit more challenging for me than I had expected.  We have used the Margin Gem exclusively for our baking since August of 2012.  I haven't ruined anything, but the Margin Gem's firebox operates on an entirely different principle of combustion than that of older style stoves like the Qualified and the Riverside.  Basically, in the Margin Gem, air enters the firebox above the fire rather than from beneath the fire.  Also, since the firebox itself is so much larger than the Qualified or the Riverside, I've discovered that adding only one piece of wood at a time is not sufficient for keeping the oven hot.  Instead, I always have to add at least two pieces of wood at a time.

Two pieces of wood burning in the Margin Gem cookstove.
In the Margin Gem, it has been my experience that more logs or split pieces make a hotter fire, and fewer makes a cooler fire.  However, I have encountered some challenges.  If the bed of coals in the firebox is quite deep, it can sometimes take quite a while for wood which has just been added to the fire to begin burning, and the oven cools because the new wood is preventing the heat from the coals from moving through the stove. 

I mentioned this to Mrs. Detweiler, an Amish acquaintance who has a Gem Pac cookstove.  She understood exactly what I meant and advised keeping the bed of coals to a minimum and making sure that they were frequently stirred down.  This causes the firebox to operate more like older style cookstoves where the oxygen enters the fire from beneath.  This certainly works, but it is not always easy to get the coals stirred down sufficiently.

What seems to work best is to make sure that I have plenty of small pieces of wood available when I am baking because they offer a more controllable heat.  The small pieces not only burn hot, but they burn quickly which provides an added measure of control.

I also have to remember that I cannot let each load of wood burn quite so far into its total combustion time as I would have in the Qualified or the Riverside before adding more wood.  Because the ignition time on new wood is longer in the Margin Gem, it is important to add the new wood to the fire sooner than what I was accustomed to.

I have also tried filling the firebox to the top and then controlling the amount of heat which the fire emits through the use of the drafts.  This method has not been as successful as I would like because the fire tends to eventually burn quite hot.  I'll continue to experiment and update the blog as I learn more.

Hmmmm.  I feel that I must again say that baking in a woodburning cookstove looks a lot more complicated in print than it is in real life.  Don't let any of these posts intimidate you.  They are merely well-intentioned help for those wondering how to manage the heat of a cookstove.  Each wood cookstove cook will develop his or her own techniques which will work best for each stove.  The biggest key is to pay attention to what gets results and to be observant.  Besides, the rewards of learning to bake in a woodburning cookstove are great.  For some reason, when I cook on a modern range anymore, it just doesn't feel like cooking.  That sounds funny, I know, but I can't describe it any other way.


Saturday, February 16, 2013

Maintaining an Even Oven Temperature in a Wood Cookstove, Part 3


What Works for Other People

As I wrote in part I of this series, every wood cookstove baker has his or her own method of managing the temperature of the oven.  What works for one baker does not necessarily work for another.  Truth be told, what works for a baker on one day may not work for the same baker using the same stove on the next day.  The variables that go into baking in a wood cookstove are responsible for this, which is why I spent part II discussing them. 

In this post, I'd like to discuss what I know that other successful wood cookstove bakers do (or did) to maintain the temperature in the ovens of their cookstoves.  Unfortunately, there is next to no information available about what processes wood cookstove cooks have used to keep the heat steady in their ovens.  This seems odd when one takes into account that for a period of about one hundred years, most households were equipped with this sort of cooking appliance.  However, in my research for this post, I have read over cookbooks and websites and articles to no avail.  I even have original cookbooks which came with ranges made by Riverside, Home Comfort, and Malleable Steel Range, and they say nothing about the process of maintaining an even oven temperature.  Thus, this will be a short post!

Here is the paltry bit of information that I can offer:

1) I live in the Corn Belt where, historically, corn cobs were commonly used as cooking fuel.  I'm planning on writing an entire post about using corn cobs for fuel in a woodburning cookstove at some point in the future.  For now, it is sufficient for you to know that corn cobs burn for only a short time, but they burn quite hot.  One of my aunts told me that when her mother was a little girl in the days when cookstoves were the only cooking appliances in farm kitchens, her grandmother enlisted her mother's help on baking days.  Her mother would be stationed at the open firebox door with a bushel basket of cobs at her feet.  In order to keep the heat of the oven constant, she was to put one corn cob at a time into the fire at regular intervals.  This would have been a really uncomfortable job on summer baking days!

2) Jane Cooper, in her excellent book Woodstove Cookery: At Home on the Range (1977), writes the following:

"I find it easier to bake with coals rather than with flames--the oven temperature is no longer building and there is less chance that the goods will burn.  For short baking times (up to an hour), a bed of glowing coals will maintain the heat long enough without needing more wood.  The draft is opened a crack, and the damper closed.  For longer periods, I add unsplit hardwood sticks, one at a time, to the bed of coals."

This, dear readers, is the extent of any information that I could find from outside sources about how to maintain an even oven temperature, and neither of these methods works for me.    I'll try to hurry with the next post (part IV) about the specifics of what I do to maintain even oven heat.  However, if you are a fellow wood cookstove user, please feel free to fill the comments section of this post with information about how you manage your fire in order to bake successfully.  I'm looking forward to reading what you've got to say!

Tuesday, January 29, 2013

Maintaining an Even Oven Temperature in a Wood Cookstove, Part 2


Variables to Consider

The contractor whom we chose to refurbish the walls in our living room and dining room a few years ago used to run a country inn where she had cooked on a vintage wood cookstove.  Both of us preferred cooking on our woodburning ranges over a modern stove, and we had great conversations where we compared notes.  I said to her that one of the reasons that I liked to bake in the woodburning range better than the electric stove was because I felt like I was in control of the woodburning range.  

"I know exactly what you mean," she agreed, "but not just anyone would understand what you just said."  

I've thought of that conversation several times over the years, and though it might seem strange to the layperson, I think that it makes all kinds of sense to experienced wood cookstove users.  When you use a modern oven, the only control that you have over that oven is the thermostat.  When you bake in a woodburning cookstove, you actually have a broad array of things that you can do to control the heat of your oven.  Thus, maintaining an even oven temperature is entirely dependent on the knack and skill of the baker.  That said, it seems appropriate to discuss several variables that are present when one is baking in a woodburning cookstove.  

The information below might seem intimidating in its scope, but my aim is to equip the reader of this blog with an arsenal of information and techniques in order to make the wood cookstove baking experience as easy and rewarding as possible.  As I said in Part I of this series, baking in a wood cookstove is not difficult.  It just looks that way in print.  Fear not!

Variables You Can't Control

These aspects can affect your baking experience.  You can't control them, but you may need
to take them into consideration as you evaluate what is happening while you bake.

1. Weather  This usually isn't a significant concern, but I would be remiss if I didn't mention it.  Cooler weather creates a better draft in your chimney and will make your stove respond better to what you do to control the fire.  Warmer weather reduces draft and can make controlling your fire a bit more challenging--though certainly not impossible.

2. Food You Are Baking  Sometimes you haven't got a choice about what it is that you are baking, and what you are baking will determine the temperature that you need your oven to be and for how long.

Variables You Can Control
 

This is a list of what is up to you to govern to make your baking experience successful.

1. Food You Are Baking  Sometimes you have got a choice about what you are going to bake.  If you are having trouble achieving a hot oven, but a moderate oven is attainable, make Danish pastry instead of cream puffs, or a cake instead of baked Alaska.
 
This seems to be the most appropriate place to also point out that some baked goods will demand that you open the oven door more frequently during the baking process than you would for others.  Cookies, for example, involve frequently accessing the oven at shorter intervals of time than you would for a cake or pie.  Each time you open the oven door, experts estimate that the oven loses twenty-five degrees of heat.  In a modern range, the thermostat cycles to bring the oven back up to temperature; with a wood cookstove, you've got to manage your fire in such a way as to compensate for the additional heat loss.
 
2. Fuel  When you are baking, I think that it is best to have a variety of woods available for use.  Different types of trees yield firewood of different densities, heat values, and burn times.  If all of the firewood available to you is the same variety of tree, do not despair.  Having different sized pieces of the same wood usually offers quite a bit of control over the fire too. 
 
In the future, I would like to write a few posts about firewoods, but for now I'll just touch on a couple of points:

a) Small diameter, lighter weight pieces of wood burn very hot, but don't last long.

b) Pieces with larger diameter and greater weight burn hot, but less so, and they last longer.

In the picture below, you can see the variety of firewood pieces that were in our woodbox last night.  We had a combination of cottonwood and elm and something else that my folks brought us that a storm brought down at their house.  You can see that we had pieces of various diameter which were whole as well as split.


Different varieties and sizes of firewood available for baking.


3. Distribution of Fire in Firebox  I know that this sounds funny, but it is important.  If your fire is not spread evenly in the firebox front to back, the oven will not heat evenly either.  Thus, if the hottest part of your fire is in the back of the firebox, the back of your oven will be hotter than the front--and so on and so forth with wherever the hottest part of your fire is located.

A picture from the post about grilling on a cookstove.  This
shows a time when I purposely did not distribute the fire
evenly in the firebox.  At the time this photo was snapped,
the front of the oven would have been hotter than the back.

 
4. Oxygen Supply to the Fire  For combustion to occur, oxygen must be present.  In general, the more oxygen supplied to a fire, the hotter the fire burns.  This is why the old blacksmith forge was fitted with a hand-cranked fan or bellows to rush oxygen through the coals and create the intense heat needed to make metal malleable.

To cool a fire in a cookstove, you decrease the oxygen flow by closing the drafts.  To cause the fire to burn hotter, you increase the oxygen flow by opening the drafts.  HOWEVER, there is a caveat: opening the drafts too widely will make the fire burn hotter, but will also allow extra, unused fresh air to circulate around the oven and will result in a lower oven temperature.  This "point of diminishing returns" can only be learned with experience, and because weather conditions affect draft, it is also mobile.

 
5. Amount of Unheated Air Circulating Around the Oven  If the fire is too hot for the baking temperature that is necessary, permitting cool air to circulate around the oven will keep the oven temperature from getting too high.  Some stoves are equipped with a "check draft."  This is a draft which is located above the fire so that, when opened, cool air is permitted to enter the stove above the fire and around the oven.  Fellow cookstove user katlupe has a great picture of her Jewel cookstove at this link.  The check draft is the three little openings on the pouch feed on the left side of the cooktop.

I've never had the privilege of cooking on a stove that was equipped with a check draft.  However, I've read that a similar effect can be accomplished by simply tipping open a few of the cooktop lids above the oven, thus permitting the cool air to circulate around the oven in the same fashion as a check draft is designed to do.

6. Amount of Fly Ash Above the Oven  Since most wood cookstove ovens heat from the top down (see the Part 1 of this series), some ovens tend to cook foods thoroughly on the top, but not on the bottom.  One way to help make sure that the oven is of more uniform temperature from top to bottom is to leave a layer of fly ash resting on the roof of the oven beneath the cooktop.  Fly ash is ash that floats up from the fire and either gets stuck somewhere in the flue path of the stove or travels up the chimney.  Except for when I had to move the Qualified range, I never scraped away all of the fly ash from above its oven in the entire time that I used that stove.

7. Use of Baffles in the Oven  When I was in college at Iowa State University in Ames, I once visited the kitchen store in downtown Ames which sells AGA cookers.  The sales lady there explained to me how one can use the "cold plain shelf" in the AGA ovens to create two different baking temperatures in one oven.  Covering an oven rack with a piece of aluminum foil produces the same effect in a wood cookstove oven.

8. Location of the Food in the Oven  Foods placed closer to the top of the oven will cook differently than foods placed nearer to the bottom of the oven.  This is true in modern ovens too, so this is nothing that would surprise the experienced cook.  It is also a variable that the wood cookstove baker has at his disposal.


I'm always stressing to my students that writing is a process of revisions upon revisions, and I'd just like to take this opportunity to say that readers of this post might want to occasionally revisit this location in the future.  I have a sneaking feeling that I have inadvertently left something out, but I can't think of anything that is missing at the moment.  If I find that something has been omitted here, I will add it in the future.  Also, if you are a wood cookstove user, please take advantage of the comments section to tell me about other variables which I have neglected to include here.

Now, I realize that I still haven't actually told you what processes one might use to maintain an even oven temperature.  The next two posts on this topic will provide you with that information, I promise.

Jump to the next post about "what other people do" to maintain an oven temperature here.

Saturday, January 19, 2013

Maintaining an Even Oven Temperature in a Wood Cookstove, Part 1


How the Oven on a Wood Cookstove is Heated


One of the most common questions that people ask me about cooking on a woodburning cookstove is how to maintain an even oven temperature.  I think that this question is so popular for two reasons: a) people have heard all manner of folklore about temperamental cookstove ovens and b) though it was once as common a skill as combing one's hair, people no longer have the foggiest ideas about how to control a wood fire.  Trust me when I say that baking in a wood cookstove is really not that difficult.  It is, however, a topic that is complicated to write about, so this is the first of a series of posts about how to manage the oven of a woodburning cookstove.

As with many aspects of cooking with a woodburning range, each experienced wood cookstove cook will develop a sytem which works best for him or her.  All I can do here is share what I know works for others and for me, knowing that each stove and chimney behaves differently than the next.  To begin with, though, it seems like it is necessary to first discuss how a wood cookstove oven heats.

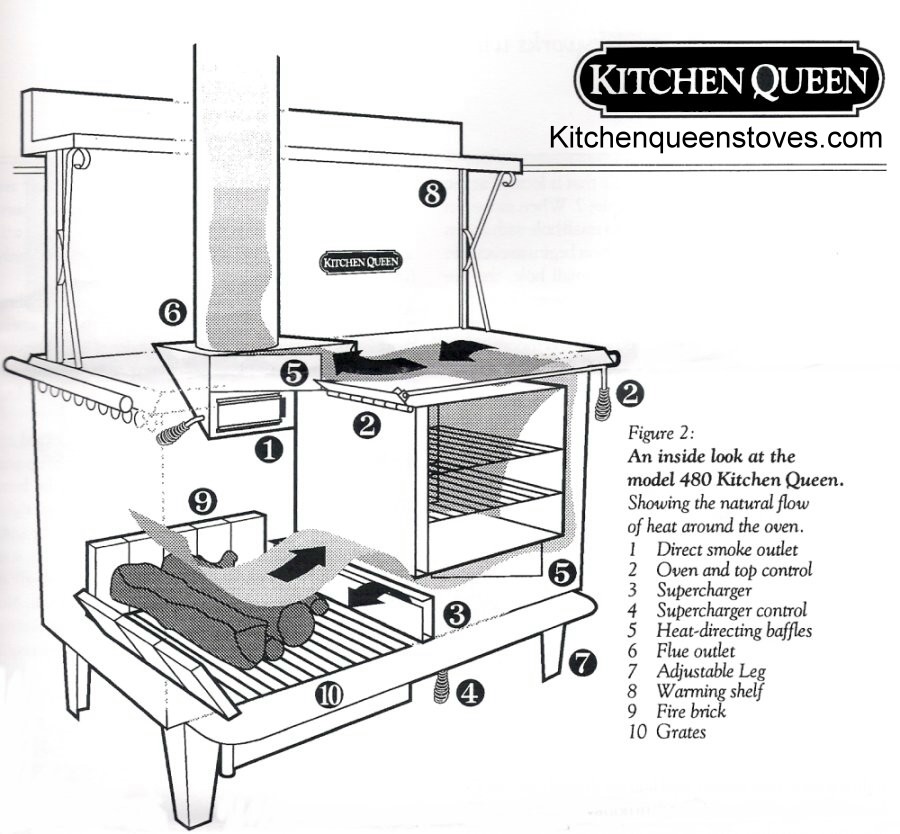
As far as I know, what I'm about to tell you is true about all of the cookstoves being manufactured today with the exception of the the Vermont Bun Baker (or Baker's Oven), the Kitchen Queen, and Enterprise-Fawcett's reproduction Queen Cook.   The Vermont Bun Baker's firebox sits squarely above its oven, and from what I've read, the heat and smoke from the fire are routed down around the oven before exiting via the flue.  The Kitchen Queen and the Queen Cook are both designed so that their ovens are heated from the bottom.

The Vermont Bun Baker.  Photo from
www.vermontwoodstove.com. 


A drawing of the Kitchen Queen wood cookstove which
shows the flue path when it is in the baking mode.  Photo
from www.kitchenqueenstoves.com.

Enterprise-Fawcett's Queen Cook.  The
oven is the box at the rear with the nickel-plated
image of Queen Victoria on it.  Photo from
www.farmallclub.com.

To the best of my knowledge, all the rest of the woodburning cooktoves which are being manufactured today are designed in basically the same way.  Furthermore, this design has been standard in woodburning ranges since the last two decades of the nineteenth century.   From everything that I have seen or read about the new cookstoves on the market currently, the major differences between the stoves of today and the stoves of yesteryear are mostly due to adjustments in the fireboxes, draft systems, and cosmetic appearances.

Generally, the firebox is on the left side of the stove, and the oven damper is located in the middle rear of the stove just under the stovetop.  The oven damper is a little door which, when open, allows smoke and heat to travel in the most direct route possible from the fire and up the chimney.  When closed, the oven damper forces the smoke and heat to flow around the oven before exiting the stove, thus heating the oven.

The following picture is a scan of p. 283 of John Vivian's 1978 book entitled The New Improved Wood Heat, which was illustrated by Liz Buell and published by Rodale Press.  All of the wood cookstoves that I have worked with, cooked on, or fully examined (over a dozen) were configured in the manner illustrated in the top design.  The only difference is that the three cookstoves that I have cooked on regularly here at home--the Margin Gem, the Qualified, and the Riverside Bakewell--all have a baffle centered under the oven.  This baffle extends from the back of the stove to about half way to the front of the stove, forcing the smoke and heat to travel under the oven and toward the front of the stove before taking a left and traveling to the back of the stove and then out the stovepipe.


Liz Buell's illustrations from John Vivian's book The New Improved
Wood Heat.  The shaded strips represent the path that heat and smoke
take around the oven in a cookstove when the oven damper is closed.
The photos below show the oven damper lever on the left side of the Margin Gem, and the middle rear lid of the Margin Gem cooktop is removed to show the actual oven damper itself.

A picture of the left side of the Margin Gem.  The
oven damper lever is the one with the black knob
on the end of it next to where the top water pipe
exits the waterjacket.  When the lever is down like
this, the oven damper is open.

The Margin Gem's oven damper in the open position so that
smoke and heat can go directly up the chimney.


This picture from the post entitled "Perfect Roast
Beef from Your Wood Cookstove" shows the oven
damper lever in the up position.  This means that the
damper is closed and the oven is heating.

The Margin Gem's oven damper in the closed position, forcing
all of the heat and smoke from the fire to be diverted around the oven.

Now, we are very happy with the Margin Gem for many reasons, but one feature of the Qualified range that I miss is that it had a sliding oven damper.  The Riverside Bakewell range down in the summer kitchen is equipped with a sliding oven damper as well.  I prefer the sliding oven damper over the levered oven damper because you can decide how widely you'd like the oven damper to be open.  The following pictures are of the oven damper of the green and cream Riverside Bakewell in various positions.
Riverside Bakewell cookstove's oven damper handle in the "open"
position.

The middle "French plate" or "blank plate" is removed to show
the oven damper in the open position. 

The oven damper handle in the partially closed position.

The oven damper on the Riverside Bakewell partially closed.


The oven damper handle in the position "to bake."

The Riverside Bakewell's oven damper closed for baking.
The Margin Gem's oven damper is either closed or open; there is no in between.  While I do like the added flexibility and control of the sliding oven damper, it is important to note that I have not been inconvenienced at all by the Margin Gem's style of oven damper either.  Many old stoves were manufactured with the same style of hinged oven damper, and I've never read of anyone clamoring about it as much as I just have.  Furthermore, you can also see that when the oven damper is open, the hole that it creates is really not that large, so some smoke and heat still always travel around the oven to exit the stove.

I am surprised at the variety of places that oven damper levers are found on different woodburning cookstoves.  I've taken the liberty of drawing a cookstove with arrows pointing to the various places where I've seen oven damper levers placed.

Each arrow shows a location where the oven damper has been located on
wood cookstoves that I have seen.

Hmmmm.  I suspect that the aforementioned John Vivian might have artistic abilities which are about as poor as mine, thus causing him to have collaborated with Liz Buell for his book's illustrations.  I'm thoroughly embarrassed that all of you now know the limited extent of my talent in the field of visual arts.

The Waterford Stanley cookstove seems to have a pretty unique baffle and damper system which operates on the same basic principles as I have recorded here, but it is manipulated by using a lever in notched dials on the cooktop itself.  A good place to see how all of that works is at a website called Granny Miller.  You can see the article here.

Now that you know how the heat from the fire gets to the oven of a woodburning cookstove, stay tuned for posts on how to control the heat.

Quick Links:  Maintaining an Even Oven Temperature in a Wood Cookstove, Part 2 Variables

Maintaining an Even Oven Temperature in a Wood Cookstove, Part 3: What Other People Do

Maintaining an Even Oven Temperature in a Wood Cookstove, Part 4: What I Do

Monday, January 14, 2013

Enjoying Free Hot Water

What would you do differently if you had unlimited, free hot water?

In the winter, our cold water is really cold.  The screaming-pain-in-your-hands-when-you-wash-them kind of cold.  For as long as I can remember, I have always peeled and washed vegetables in cold water because it seemed a waste of energy to use any warm water for that task.  Furthermore, when using the wringer washer, I would always put straight cold water in the rinse tubs, making rinsing the clothes an experience in torture.  I just couldn't justify using any hot water when it wasn't necessary.

Enter Marjorie the Margin Gem cookstove with her waterfront and range boiler.  It has taken me a while, but I'm breaking my old habits and living more comfortably because we have a lot of VERY hot water.  With the cookstove being fired constantly, we've got hot water to spare, and we're not paying anything extra for it!  I really don't think that we even have any increased wood consumption.  We're not using more water, but we are using more hot water, and there is no guilt attached to doing so.

As you can tell, I'm very happy about that.