I am not dead.
Sorry. I've done so little blogging lately that I couldn't resist the temptation to borrow the above line from Alice Walker's The Color Purple.
Life has been so busy here that I haven't had time to do much blogging--a fact which I find very discouraging because I've got a lot to tell you. However, I just wanted to write a quick post for documentation purposes.
Nancy and I just arrived home a few minutes ago (a little after 10:00 p.m. CST) after spending the day at the Iowa High School Speech Association's Large Group All-State Festival in Ames. Two of the speech groups that I co-coach were honored there today, and we are very proud of their success. We actually stayed in Ankeny with the kids last night so that we would be able to arrive at C.Y. Stephens Auditorium on the ISU campus before 7:30 a.m. without having to wake up long before the crack of dawn.
This brings me to the point of this post. Tonight I had to do something that I haven't done since Nov. 9 of last year: start the fire in the kitchen cookstove from scratch. By my calculations, that means that the last fire that we had burned for 103 days straight: a new record for us.
When Nancy came home early from work yesterday, she loaded the stove and shut all the dampers and drafts, and I honestly thought that it would hold fire better than what it did. There were a few small embers in the ashes when we came home tonight, but not enough to start a fire. The thermometer in the dining room read 49.5 degrees Fahrenheit since the furnace was set at 50, and the range boiler was completely cold to the touch. Both fires are started again, and we are already into the fifties.
Anyway, I've got to get to bed now. We've got a really busy week ahead so that the speech team can be ready for district individual contests next Saturday. I hope to get caught up with all of you soon.

This is a blog about cooking on a woodburning cookstove. Here you will find recipes, methods, other uses, and miscellaneous information about using a woodburning range. I've searched the net for any and all information about cooking on one of these amazing appliances, and I've found a lot of interesting things, but none of them have been what I've been looking for. Therefore, this is my attempt at creating what I've been in search of.
Saturday, February 22, 2014

Friday, January 31, 2014
Sweeping the Chimney: A Task for a Warm Winter's Day
In our corner of the world, the temperatures in January were a real roller coaster. We've dipped below zero a few times, and we've been up near sixty. Fortunately, the warmest days have landed on the weekends, and we've taken advantage of them.
So what do wood cookstove owners do on those warm days?
We cut, split, and stack firewood, and sweep the chimney, of course!
When we were using the Qualified range, I only swept the chimney once per year in the fall, and really there was never much to sweep out as long as we were burning good, seasoned hardwood. However, the Qualified wasn't airtight, and though we would load it up and shut it down during the day and at night, it couldn't hold a fire long, so it was consistently burning hot.
The Margin Gem is a different story, though. When we are home, it is burning hot, but during the days and at night, we load it up and shut it down, too, and it actually holds a fire for a long time (our record is over 24 hours). Since it has the capability of a slow burn, creosote naturally does accumulate more than it did with the Qualified.
As most of you probably already know, the creosote that I'm talking about is a product of the incomplete combustion of wood. This black or dark brown substance clings to the inside of a flue, and unfortunately, it is flammable. Thus, it is what is responsible for the dangerous chimney fires that wood burners want to work hard to prevent.
A couple of weekends ago, we swept our chimney for the third time this heating season. The process is fairly simple. The first thing that I usually do is disconnect the stovepipe from the chimney and cover the flue opening with a plastic grocery bag held in place with the elastic band from a discarded pair of underwear.
What? Too much information?

The reason I cover the chimney opening is twofold. First, the soot is prevented from falling all over the stove and the floor as it falls down the chimney. Second, this helps stop the regular draft of the chimney, so less of the soot is flying into my face while I'm on top of the roof.
We have been maintaining the same fire in the cookstove since Nov. 9. (It would have been longer than that, but that was the day of our wood cookstove workshop, and we wanted our guests to have the experience of starting the stove.) Therefore, even though we waited until there was only a small bed of coals in the bottom of the firebox, I skipped this step because I didn't want the smell of the burning coals to simply be escaping the stove into the house for that long. Thus, I got a face full of soot.
Next, I climb to the top of the roof with my chimney sweeping brush and lengths of rod which screw together at intervals to push the brush down the chimney and pull it back up again.

The north side of our roof isn't that steep as roofs go, and it is covered with asphalt shingles which generally afford pretty good traction, but it still bothers me a little to go up there. I don't really understand it, either. When I was in junior high, my grandparents on my dad's side re-roofed the dairy barn here on our farm. At the time, Granny was a spry 72 years old, and she was the one who had to do all of the high work, so it was she who straddled the ridge pole to nail the cap back on, and I remember getting up there and straddling it with her for a lark. I don't know what changed for me, but you wouldn't catch me dead up there now, so I generally don't like to get up on the roof to sweep the kitchen chimney. However, I learned something this year. If I sweep the chimney on a warm enough day, I can do the job barefooted, and I don't feel at all like I'm in danger of slipping and falling down the roof. Weird, I know, but I thought I'd tell you about it in case it will help any of you reading this.
As you run the brush up and down the chimney, the larger chunks of creosote fall down to the bottom. Some chimneys have small square clean out doors for the removal of this refuse, but since our kitchen chimney is the original chimney of the house with a new stainless steel liner in it, the bottom of the chimney is now where the stovepipe enters. Thus, the creosote must be raked out of the chimney there.
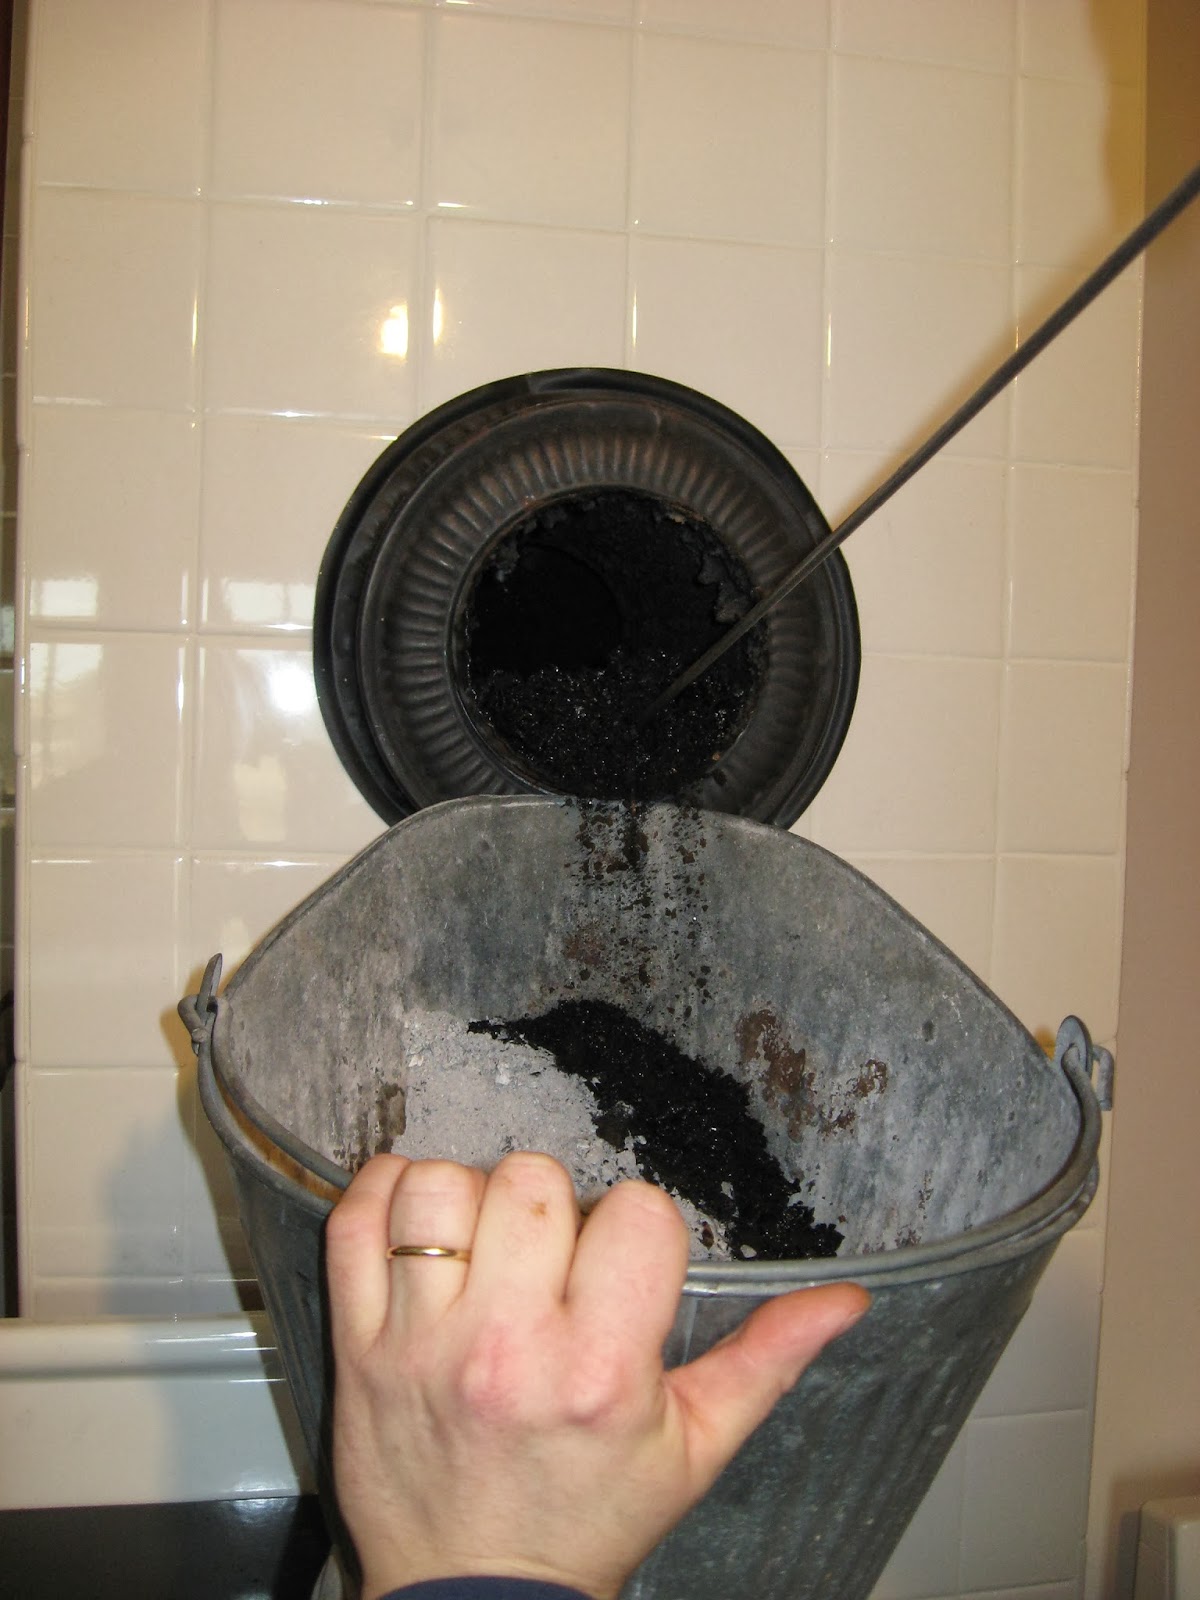
Another thing that I have learned in our second year of having the Margin Gem is that sweeping the chimney is made much easier and more effective if the fire which precedes the sweeping is a really hot fire of small, very dry pieces of wood. This makes the creosote in the chimney very flaky and easy to dislodge.
Of course, if your cookstove is vented through a chimney which exits through the ceiling--like the chimney for our Jotul heating stove--this whole process is much easier and can be accomplished while standing securely on the floor in the house.

Sweeping a chimney is a little messy, and it does take some time, but it is one of those things that responsible wood burners have to do occasionally in order to keep the fire department from coming over for a visit. I hope your wood fires are burning brightly and your chimneys are drawing well!
So what do wood cookstove owners do on those warm days?
We cut, split, and stack firewood, and sweep the chimney, of course!
When we were using the Qualified range, I only swept the chimney once per year in the fall, and really there was never much to sweep out as long as we were burning good, seasoned hardwood. However, the Qualified wasn't airtight, and though we would load it up and shut it down during the day and at night, it couldn't hold a fire long, so it was consistently burning hot.
The Margin Gem is a different story, though. When we are home, it is burning hot, but during the days and at night, we load it up and shut it down, too, and it actually holds a fire for a long time (our record is over 24 hours). Since it has the capability of a slow burn, creosote naturally does accumulate more than it did with the Qualified.
As most of you probably already know, the creosote that I'm talking about is a product of the incomplete combustion of wood. This black or dark brown substance clings to the inside of a flue, and unfortunately, it is flammable. Thus, it is what is responsible for the dangerous chimney fires that wood burners want to work hard to prevent.
A couple of weekends ago, we swept our chimney for the third time this heating season. The process is fairly simple. The first thing that I usually do is disconnect the stovepipe from the chimney and cover the flue opening with a plastic grocery bag held in place with the elastic band from a discarded pair of underwear.
What? Too much information?
The reason I cover the chimney opening is twofold. First, the soot is prevented from falling all over the stove and the floor as it falls down the chimney. Second, this helps stop the regular draft of the chimney, so less of the soot is flying into my face while I'm on top of the roof.
We have been maintaining the same fire in the cookstove since Nov. 9. (It would have been longer than that, but that was the day of our wood cookstove workshop, and we wanted our guests to have the experience of starting the stove.) Therefore, even though we waited until there was only a small bed of coals in the bottom of the firebox, I skipped this step because I didn't want the smell of the burning coals to simply be escaping the stove into the house for that long. Thus, I got a face full of soot.
Next, I climb to the top of the roof with my chimney sweeping brush and lengths of rod which screw together at intervals to push the brush down the chimney and pull it back up again.
The north side of our roof isn't that steep as roofs go, and it is covered with asphalt shingles which generally afford pretty good traction, but it still bothers me a little to go up there. I don't really understand it, either. When I was in junior high, my grandparents on my dad's side re-roofed the dairy barn here on our farm. At the time, Granny was a spry 72 years old, and she was the one who had to do all of the high work, so it was she who straddled the ridge pole to nail the cap back on, and I remember getting up there and straddling it with her for a lark. I don't know what changed for me, but you wouldn't catch me dead up there now, so I generally don't like to get up on the roof to sweep the kitchen chimney. However, I learned something this year. If I sweep the chimney on a warm enough day, I can do the job barefooted, and I don't feel at all like I'm in danger of slipping and falling down the roof. Weird, I know, but I thought I'd tell you about it in case it will help any of you reading this.
As you run the brush up and down the chimney, the larger chunks of creosote fall down to the bottom. Some chimneys have small square clean out doors for the removal of this refuse, but since our kitchen chimney is the original chimney of the house with a new stainless steel liner in it, the bottom of the chimney is now where the stovepipe enters. Thus, the creosote must be raked out of the chimney there.
Another thing that I have learned in our second year of having the Margin Gem is that sweeping the chimney is made much easier and more effective if the fire which precedes the sweeping is a really hot fire of small, very dry pieces of wood. This makes the creosote in the chimney very flaky and easy to dislodge.
Of course, if your cookstove is vented through a chimney which exits through the ceiling--like the chimney for our Jotul heating stove--this whole process is much easier and can be accomplished while standing securely on the floor in the house.
Sweeping a chimney is a little messy, and it does take some time, but it is one of those things that responsible wood burners have to do occasionally in order to keep the fire department from coming over for a visit. I hope your wood fires are burning brightly and your chimneys are drawing well!
Wednesday, December 25, 2013
A Christmas Card from Us to You
Merry Christmas!
Things have been very hairy here over the last few days as we made the last mad preparations for Christmas, so I'm late getting my Christmas blog post out to my readers. I should have completed this earlier so that I could have posted it this morning before we spent the day away from home first at my parents' and then at Nancy's folks'. I'll play the sick card, though, as I have been under the weather for a little over two weeks and still feel miserable.
As I blog tonight, I'm waiting for the fire in Marjorie the Margin Gem to burn down a little bit. I loaded her up for the night, but got a little over-zealous, so the lids over the firebox didn't fit down snugly. There is very little danger of fire when this is the case because the strong draft of our chimney generally pulls any sparks that the fire may put off away from the loose lids, but I'm not taking any chances.
Marjorie the Margin Gem has been a very busy lady. The current fire in her was the one that was started on November 9th when we hosted our wood cookstove workshop. We have not had to restart her from scratch since then. Over the last two days, she has turned out several batches of candy, cookies, Chex Mix, and I don't remember what all.
 |
| Marjorie the Margin Gem sporting the Apricot/Raisin Tea Ring that I baked for Christmas Breakfast. |
I hope you all have had a chance to reflect on the reason that today was special:
"And the Word was made flesh, and dwelt among us, (and we beheld his glory, the glory of the only begotten of the Father,) full of grace and truth." John 1:14 KJV
Monday, December 23, 2013
Boiled Fudge: A Vintage Christmas Tradition
As we get close to Christmas, the people on my Mom's side of the family cannot help but think about our aunt Meme, who is mentioned in the "About Me" section on the left side of this blog. As she is the one who really got me interested in cooking on a woodburning cookstove, I also wrote about her at length in the post about her toy cookstove.
Christmas was definitely Meme's favorite time of year. In the days before macular degeneration got the better of her eyesight, she would spend time making lots of Christmas crafts. She anticipated Christmas presents in much the same way that a child does, and I never will forget how funny she was when our family was opening gifts. You see, because she was born in 1895, she had been the oldest person in our family since 1962 when her older brother (my great-grandfather) died. Unfortunately for her, that side of the family has the tradition of having the youngest person unwrap one of his gifts first; then the second youngest gets to unwrap one of his gifts, and so on and so forth until the oldest person gets to unwrap one of her gifts, after which the whole process starts again with the youngest. Meme couldn't bear the wait, and very often we would glance over at her and catch her secretly unwrapping a corner of one of her gifts. In fact, sometimes she would have all of the tape undone on a present by the time we got to her, and all that would be left for her to do would be to pull the paper away in one fell swoop.
As we were making plans for the two geese that my brother purchased for our Christmas dinner this year, my mother and my aunt recalled how much Meme liked to have roast goose on Christmas because that had been the traditional Christmas dinner of her childhood. She also was the one who made all of the old-fashioned Christmas candies for the family. The three that she made most often were penuche, divinity, and fudge.
Meme started having me help her with the Christmas candy making in 1985. I remember that specifically because for my fifth grade Valentine party later that school year, she and I made divinity that was flavored with strawberry jello, and I remember thinking that the plain old white stuff was better. By that time, Meme had quit making penuche, but she and I made fudge and divinity together every Christmas from 1985 through 1991. In the late winter of 1992, Meme had a bout of bad health that spelled the end of her ability to live on her own, so I have made the Christmas candy by myself since then, with occasional help from others. Today, my sister was my helper. She and I figured out that the last time we made Christmas candy together was in 1995--before I had purchased the Qualified range. Of course, all of today's cooking was done on the Margin Gem.
Of all of the candies that we make, I think that my favorite is Meme's old-fashioned, boiled fudge. I suspicion that the recipe belonged to her mother, so the recipe has passed the century-old mark some time ago. Meme told me that when she and her sister were old enough to make the candy on their own, it became their responsibility. Their mother didn't help with the candy making because she did all of the other cooking. This fudge is not the creamy, buttery fudge that is common today. In my book, that kind of fudge is okay, but the problem is that it often calls for chocolate chips.
WARNING: I'm about to write something disparaging about chocolate chips! This may seem sacrilegious to some people, so I thought I'd give you fair notice.
I love chocolate chips in cookies and bars (and occasionally by the handful), but in fudge I don't want to be able to detect that old familiar, any-old-Tuesday-afternoon taste. This fudge couldn't be called fancy or gourmet, but it is out of the ordinary.
Meme's recipe simply read as follows:
2 c. white sugar
1 c. half and half
1 1/2 squares unsweetened chocolate
2 TBLSP white corn syrup
1 tsp. vanilla
And here's the kicker: The directions for the recipe consist of one word--"Cook."
Well, it's a good thing that I had a few years to have Meme teach me how to make fudge. Otherwise, I would have had a terrible time figuring out how to "cook" this. Here is what you do:
Combine sugar, half and half, chocolate, and corn syrup in a heavy bottomed saucepan. I use a 3-quart one.
Bring to a boil over medium high heat (I usually start this directly over the fire). Stir enough to get everything evenly mixed.

When the mixture begins to boil, you can move it away from the fire. You just need to keep it at a slowly rolling boil. Meme always warned me to only stir it occasionally while it is cooking--just enough to make sure that it is not sticking to the bottom of the pan--because you don't want it to get sugary.
As the fudge cooks, you'll see the chocolate become more thoroughly mixed into the sugar, and of course, the sugar will begin to darken a little too.

The length of time that you cook the fudge is totally dependent upon what you desire the texture of the final product to be like. Meme always made her fudge a little grainy, so she would cook it past the soft ball stage. I like it to be more smooth, so I cook it only to the soft ball stage. I use the cold water test, as I talked about in depth in my post about Christmas caramels.
As soon as it has reached the stage that you desire, remove it from the fire and start beating it. Add a teaspoon of vanilla flavoring at this point.
Immediately, begin beating the fudge until it thickens and looses its glossiness.
Pour the fudge into a buttered 8x8 cake pan and let it finish cooling and setting up. Once it is cool, you can cut the fudge into squares and store it in tins.

I'll be the first to admit that this recipe for fudge is not for everyone. My dad misses the fudge that my grandmother on that side of the family used to make (complete with melted chocolate chips and marshmallows), but this old recipe is what I consider my favorite Christmas candy.
Christmas was definitely Meme's favorite time of year. In the days before macular degeneration got the better of her eyesight, she would spend time making lots of Christmas crafts. She anticipated Christmas presents in much the same way that a child does, and I never will forget how funny she was when our family was opening gifts. You see, because she was born in 1895, she had been the oldest person in our family since 1962 when her older brother (my great-grandfather) died. Unfortunately for her, that side of the family has the tradition of having the youngest person unwrap one of his gifts first; then the second youngest gets to unwrap one of his gifts, and so on and so forth until the oldest person gets to unwrap one of her gifts, after which the whole process starts again with the youngest. Meme couldn't bear the wait, and very often we would glance over at her and catch her secretly unwrapping a corner of one of her gifts. In fact, sometimes she would have all of the tape undone on a present by the time we got to her, and all that would be left for her to do would be to pull the paper away in one fell swoop.
As we were making plans for the two geese that my brother purchased for our Christmas dinner this year, my mother and my aunt recalled how much Meme liked to have roast goose on Christmas because that had been the traditional Christmas dinner of her childhood. She also was the one who made all of the old-fashioned Christmas candies for the family. The three that she made most often were penuche, divinity, and fudge.
Meme started having me help her with the Christmas candy making in 1985. I remember that specifically because for my fifth grade Valentine party later that school year, she and I made divinity that was flavored with strawberry jello, and I remember thinking that the plain old white stuff was better. By that time, Meme had quit making penuche, but she and I made fudge and divinity together every Christmas from 1985 through 1991. In the late winter of 1992, Meme had a bout of bad health that spelled the end of her ability to live on her own, so I have made the Christmas candy by myself since then, with occasional help from others. Today, my sister was my helper. She and I figured out that the last time we made Christmas candy together was in 1995--before I had purchased the Qualified range. Of course, all of today's cooking was done on the Margin Gem.
Of all of the candies that we make, I think that my favorite is Meme's old-fashioned, boiled fudge. I suspicion that the recipe belonged to her mother, so the recipe has passed the century-old mark some time ago. Meme told me that when she and her sister were old enough to make the candy on their own, it became their responsibility. Their mother didn't help with the candy making because she did all of the other cooking. This fudge is not the creamy, buttery fudge that is common today. In my book, that kind of fudge is okay, but the problem is that it often calls for chocolate chips.
WARNING: I'm about to write something disparaging about chocolate chips! This may seem sacrilegious to some people, so I thought I'd give you fair notice.
I love chocolate chips in cookies and bars (and occasionally by the handful), but in fudge I don't want to be able to detect that old familiar, any-old-Tuesday-afternoon taste. This fudge couldn't be called fancy or gourmet, but it is out of the ordinary.
Meme's recipe simply read as follows:
2 c. white sugar
1 c. half and half
1 1/2 squares unsweetened chocolate
2 TBLSP white corn syrup
1 tsp. vanilla
And here's the kicker: The directions for the recipe consist of one word--"Cook."
Well, it's a good thing that I had a few years to have Meme teach me how to make fudge. Otherwise, I would have had a terrible time figuring out how to "cook" this. Here is what you do:
Combine sugar, half and half, chocolate, and corn syrup in a heavy bottomed saucepan. I use a 3-quart one.
Bring to a boil over medium high heat (I usually start this directly over the fire). Stir enough to get everything evenly mixed.

When the mixture begins to boil, you can move it away from the fire. You just need to keep it at a slowly rolling boil. Meme always warned me to only stir it occasionally while it is cooking--just enough to make sure that it is not sticking to the bottom of the pan--because you don't want it to get sugary.
 |
| The fudge mixture boiling in the middle of the stovetop. |

 |
| You can see how the look of the fudge has changed by the time this picture was snapped. The fudge is just about finished cooking. |
The length of time that you cook the fudge is totally dependent upon what you desire the texture of the final product to be like. Meme always made her fudge a little grainy, so she would cook it past the soft ball stage. I like it to be more smooth, so I cook it only to the soft ball stage. I use the cold water test, as I talked about in depth in my post about Christmas caramels.
As soon as it has reached the stage that you desire, remove it from the fire and start beating it. Add a teaspoon of vanilla flavoring at this point.
 |
| Of course, the saucepan is very hot, so I always cover my lap with a folded bath towel. |
 |
| You can see that the fudge is just about ready to be poured. |
Pour the fudge into a buttered 8x8 cake pan and let it finish cooling and setting up. Once it is cool, you can cut the fudge into squares and store it in tins.

I'll be the first to admit that this recipe for fudge is not for everyone. My dad misses the fudge that my grandmother on that side of the family used to make (complete with melted chocolate chips and marshmallows), but this old recipe is what I consider my favorite Christmas candy.
Saturday, December 14, 2013
Wood Cookstove Clearances
Disclaimer: I am not a woodburning expert. I do not claim to know everything about the codes for installing woodburning appliances of any nature, so please consult with contractors, building inspectors, fire protection agencies, and your insurance providers before installing any woodburning appliance.
A longtime, faithful blog reader posted a comment this morning, and here is an excerpt:
"While I love the look of the older stoves, I have been leaning towards a new stove due to the smallish space I have in which to place the stove. It is my understanding that greater clearances are required for the older stoves. I note that the pic of the stove in your summer kitchen shows your vintage stove very close to the walls. Can you talk a little about clearances?"
She is quite right that the green and cream Riverside Bakewell is installed very close to the wall in our summer kitchen. The picture at the top of this blog shows that it is basically up against the wall behind it. This wall is protected by 1/4" cement board mounted to the studs with ceramic electric fence insulators used as spacers. There is no drywall behind the wall protection.
However, it is very important to note that we were only able to do this because we do not carry insurance on the summer kitchen.
For the installation of any vintage wood cookstove, the most recent requirements that I have say that the clearance from the stove to any combustible wall (or furniture, etc.) is 36". The required distance between single-wall stovepipe and combustibles is 18". These distances can be cut in half by using approved wall protection.
Furthermore, the reader is correct that newer stoves often need lower clearances. This reason for this is twofold:
1. Most new wood cookstoves are tested and certified by Underwriters Laboratories. They can establish different clearances for different sides of the stove, etc.
2. Many new wood cookstoves are equipped with heat shields which are standard parts of the stoves' construction.
Such is the case with our Margin Gem. The entire rear part of the main body of the stove is covered with a heat shield. This makes it so that the rear clearance from the back of the Margin Gem to a combustible wall is only 6". This was a major consideration for us as we chose our stove.
Our contractor fireproofed the wall behind the stove so that we could reduce the clearances to 3", but the stove actually sits nearly five inches from the wall to accommodate the bend in the stovepipe as it makes its way to the chimney.
As I mentioned before, most new stoves are UL listed. Your home insurer may require that your wood cookstove be UL listed, which would then make it impossible to have a vintage stove, so be sure to look into that before purchasing.
If space is a concern, many great new stove options still exist, so don't give up the dream!
Readers: Please be sure to click on Stephen B.'s informative comment below for valuable additional information.
P.S. (12/28/2013) It occurred to me to add that stove owners need to exercise some common sense, too. When I purchased the Qualified range, the installation instructions that came with it said that only 8" of clearance were needed on the right (non-firebox side) of the stove. This was not a concern in either of the places that it has been installed so far since nothing was that close to the right side of the stove. However, after operating the stove, it became quite obvious that the 8" listing was for Qualified ranges which were equipped with a reservoir. I don't believe that 8" would have been at all safe for that stove's right side.
A longtime, faithful blog reader posted a comment this morning, and here is an excerpt:
"While I love the look of the older stoves, I have been leaning towards a new stove due to the smallish space I have in which to place the stove. It is my understanding that greater clearances are required for the older stoves. I note that the pic of the stove in your summer kitchen shows your vintage stove very close to the walls. Can you talk a little about clearances?"
She is quite right that the green and cream Riverside Bakewell is installed very close to the wall in our summer kitchen. The picture at the top of this blog shows that it is basically up against the wall behind it. This wall is protected by 1/4" cement board mounted to the studs with ceramic electric fence insulators used as spacers. There is no drywall behind the wall protection.
 |
| This picture shows the wall protection behind the stove in the summer kitchen better. |
For the installation of any vintage wood cookstove, the most recent requirements that I have say that the clearance from the stove to any combustible wall (or furniture, etc.) is 36". The required distance between single-wall stovepipe and combustibles is 18". These distances can be cut in half by using approved wall protection.
Furthermore, the reader is correct that newer stoves often need lower clearances. This reason for this is twofold:
1. Most new wood cookstoves are tested and certified by Underwriters Laboratories. They can establish different clearances for different sides of the stove, etc.
2. Many new wood cookstoves are equipped with heat shields which are standard parts of the stoves' construction.
Such is the case with our Margin Gem. The entire rear part of the main body of the stove is covered with a heat shield. This makes it so that the rear clearance from the back of the Margin Gem to a combustible wall is only 6". This was a major consideration for us as we chose our stove.
 |
| The rear of the Margin Gem. |
 |
| The Margin Gem in place. |
As I mentioned before, most new stoves are UL listed. Your home insurer may require that your wood cookstove be UL listed, which would then make it impossible to have a vintage stove, so be sure to look into that before purchasing.
If space is a concern, many great new stove options still exist, so don't give up the dream!
Readers: Please be sure to click on Stephen B.'s informative comment below for valuable additional information.
P.S. (12/28/2013) It occurred to me to add that stove owners need to exercise some common sense, too. When I purchased the Qualified range, the installation instructions that came with it said that only 8" of clearance were needed on the right (non-firebox side) of the stove. This was not a concern in either of the places that it has been installed so far since nothing was that close to the right side of the stove. However, after operating the stove, it became quite obvious that the 8" listing was for Qualified ranges which were equipped with a reservoir. I don't believe that 8" would have been at all safe for that stove's right side.
Tuesday, December 10, 2013
Oven-Roasted Cauliflower: A Cold Weather Side
With much of the nation in the grip of a cold snap this week, I imagine that many wood cookstove users have had their stoves operating at full tilt. The recipe that I want to share with you tonight is perfect for these very cold days when we are maintaining hot fires in our ranges for home heating purposes.
This recipe has only been in our possession for a week. Last Wednesday, we hosted a potluck for one of the ladies' auxiliaries of the church where Nancy grew up. This recipe for Oven-Roasted Cauliflower was brought by one of the ladies in attendance that night. It was a big hit, so I passed out recipe cards, and those of us who were interested quickly took down the recipe. The lady who brought it was not sure where the recipe came from because her husband had given it to her. She said that she thought the recipe must have originated in some kind of a diet cookbook because it said that a serving counted as "two points." If anyone recognizes it and knows where it came from, please let me know in the comments section.
Here is what you'll need:
6 cups of fresh cauliflower florets (be sure to use the stalks too)
1/4 cup olive oil
1/2 cup Parmesan cheese
juice from 1/2 a lemon
3 cloves of garlic, minced
salt and pepper to taste (go especially easy on the salt; you don't need much)
Combine all and toss to coat.


Place all in a baking dish and bake at 450 degrees for one hour, stirring occasionally. That's right: 450 degrees for one hour! This is what makes it perfect for cooking on these days when our stoves are running hot.
Another aspect of this recipe that makes it a good wood cookstove recipe is that it is pretty flexible. The lady who brought it to the potluck said that she only cooked hers for 45 minutes at 450. Our oven temperature fluctuated between 425 and 450, and we left ours in for a whole hour.
Nancy had not eaten any at the potluck because she didn't notice it on the table, but she loved it tonight. I ate mine with a helping of the leftover beans and wieners that my nephew helped us make for supper on Saturday night. It was a great supper!
I know that some people would say that this should be a summer recipe because that's when cauliflower would be in season in our part of the world. I can see that point of view, but when cauliflower is in season, the last thing that I would want to do is have an oven of any variety heated to 450 degrees for an hour, so I'll spend the money to buy out-of-season cauliflower.
Hope you enjoy it!
This recipe has only been in our possession for a week. Last Wednesday, we hosted a potluck for one of the ladies' auxiliaries of the church where Nancy grew up. This recipe for Oven-Roasted Cauliflower was brought by one of the ladies in attendance that night. It was a big hit, so I passed out recipe cards, and those of us who were interested quickly took down the recipe. The lady who brought it was not sure where the recipe came from because her husband had given it to her. She said that she thought the recipe must have originated in some kind of a diet cookbook because it said that a serving counted as "two points." If anyone recognizes it and knows where it came from, please let me know in the comments section.
Here is what you'll need:
6 cups of fresh cauliflower florets (be sure to use the stalks too)
1/4 cup olive oil
1/2 cup Parmesan cheese
juice from 1/2 a lemon
3 cloves of garlic, minced
salt and pepper to taste (go especially easy on the salt; you don't need much)
 |
| The ingredients for Oven-Roasted Cauliflower. |
Combine all and toss to coat.


Place all in a baking dish and bake at 450 degrees for one hour, stirring occasionally. That's right: 450 degrees for one hour! This is what makes it perfect for cooking on these days when our stoves are running hot.
 |
| The cauliflower mixture going into a quick oven. |
 |
| I stirred at roughly twelve minute intervals. |
Another aspect of this recipe that makes it a good wood cookstove recipe is that it is pretty flexible. The lady who brought it to the potluck said that she only cooked hers for 45 minutes at 450. Our oven temperature fluctuated between 425 and 450, and we left ours in for a whole hour.
 |
| The finished product. Note that the cauliflower shrinks quite a bit during the roasting. Hmmm . . . not really looking forward to washing this dish. |
Nancy had not eaten any at the potluck because she didn't notice it on the table, but she loved it tonight. I ate mine with a helping of the leftover beans and wieners that my nephew helped us make for supper on Saturday night. It was a great supper!
I know that some people would say that this should be a summer recipe because that's when cauliflower would be in season in our part of the world. I can see that point of view, but when cauliflower is in season, the last thing that I would want to do is have an oven of any variety heated to 450 degrees for an hour, so I'll spend the money to buy out-of-season cauliflower.
Hope you enjoy it!
Saturday, November 30, 2013
Big News! My Brother's New-to-His-Family Wood Cookstove
That's right, folks. I am no longer the only wood cookstove owner in my family. My brother and his family now are also the proud owners of a vintage woodburning cookstove! When they took their family vacation just before harvest started a couple months ago this fall, they stopped at an antique store in Oklahoma and found this cute little Montgomery Ward cookstove. My sister-in-law had posted a picture on Facebook of my nephew standing next to it, saying that he walked right up to it and started taking the lids off like an old hand. This made me proud. He has helped me start the Margin Gem, and whenever he is here while the stove is going, he always wants to see the fire.
Kevin called me to see if I thought that the price was reasonable. He had inspected it thoroughly and found it sound, and I thought that the price was certainly reasonable, so he bought it and brought it home. After they got back, I couldn't wait to get over there to take a look at it. My nephew was more than happy to show it to me. Since it is just his size, he is under the impression that it is his. He removed all of the lids for me and gave me a tour.
I inspected the stove pretty closely, poking and tapping on every surface. A couple of missing bolts make the cast-iron cooktop loose, but they will be easily supplied. I was disappointed to see that the door for the oven clean out was missing since that meant that the stove could not be fired until a replacement could be made.
However, while I was completing my inspection, I decided to poke the camera into the oven clean out opening, and with the flash and camera screen discovered that the clean out door was simply reposing inside the oven flue. Thus, the stove is complete. (At this point, I would just like to sing the praises of the digital camera. When I was growing up and my parents took the occasional photograph, we would not know what the pictures looked like until the film was developed, and sometimes this would be months after the photo was snapped. I'm not usually one who gets very excited over the latest technological advancements, but I think that it is wonderful to be able to see the pictures that you've taken immediately so that you can delete the terrible ones and get a retake before your subject flies the coop.)
I was surprised at how large the firebox is for such a small stove. I was also fascinated by the grate. It is what is called a dump grate where the whole grate pivots on a single axis and "dumps" the ashes down into the ash drawer.
I don't know enough about serial numbers to know exactly when this stove was manufactured, but I have a small collection of antique catalogs, and this model stove appears in the 1958 Spring and Summer Montgomery Ward catalog. At that time, the stove retailed for $22.95.
Here is what the text in the catalog says:
Economy Cook Stove
Welded steel body, steel oven--17 3/4 x 13 1/2 x 9 1/2 in. high. Four 8-inch cooking lids. Easy-to-clean white porcelained panels. Cast-iron cooktop. Cast-iron firebox, 17 x 7 x 7 1/2 in., has flat dump grate; burns soft coal, 18-inch wood. Size overall: 26 x 21 in. deep, 25 in. high. Use 6-in. stovepipe--see Notice, Page 906. Pay Freight from Factory near St. Louis, Mo.--shipped promptly. Ship. wt. 120 lbs. 68 A 1518F-$2.50 Down; Cash $22.95
When all of the lids are removed from the cooktop, I can lift the stove by myself. I was surprised at how roomy the oven is. Had I known that the catalog didn't include the dimensions of the oven, I would have measured it and included them here. Suffice it to say that a 9 x 13 pan would easily fit with a little room to spare.
Now here is the part where all of you readers will discover just how weird I am:
I don't consider myself a prepper, but the fact that Kevin has this stove makes me feel a little bit more secure. You see, on the farm where he lives, there are three homes: Kevin's, my grandmother's, and my cousin's. Each of these homes is equipped with only electric stoves for cooking. I feel better because in some kind of drastic emergency, this little cookstove could be easily put into service. It wouldn't take a huge crew of men to transport it to my grandmother's basement where a furnace duct could be taken down and fashioned into a stovepipe that would be sufficient to attach it to one of the two old, but lined and safe chimneys which can be accessed down there. My grandmother would probably be able to remember a little about cooking on a wood cookstove, and my sister-in-law is a brilliant cook who could probably prepare a five-course, gourmet meal over a can of Sterno, so I know they will all be able to eat because she would easily be able to figure out how to cook on a cookstove.
As it is, I'm looking forward to the day when we can try out this little cutie, and of course, I'll write a post about how it works so that you'll all know too.
Kevin called me to see if I thought that the price was reasonable. He had inspected it thoroughly and found it sound, and I thought that the price was certainly reasonable, so he bought it and brought it home. After they got back, I couldn't wait to get over there to take a look at it. My nephew was more than happy to show it to me. Since it is just his size, he is under the impression that it is his. He removed all of the lids for me and gave me a tour.
 |
| HD showing me "his" cookstove. |
 |
| You can see in this picture that the oven clean out door was missing. Other than that, the stove was complete. The lid with the concentric circles is not original to the stove, but fits perfectly, and I think it adds to the value of the stove. I am hoping to eventually find a lid like that to fit the Riverside Bakewell down in the summer kitchen. |
However, while I was completing my inspection, I decided to poke the camera into the oven clean out opening, and with the flash and camera screen discovered that the clean out door was simply reposing inside the oven flue. Thus, the stove is complete. (At this point, I would just like to sing the praises of the digital camera. When I was growing up and my parents took the occasional photograph, we would not know what the pictures looked like until the film was developed, and sometimes this would be months after the photo was snapped. I'm not usually one who gets very excited over the latest technological advancements, but I think that it is wonderful to be able to see the pictures that you've taken immediately so that you can delete the terrible ones and get a retake before your subject flies the coop.)
 |
| The oven clean out door hiding in the flue beneath the oven. |
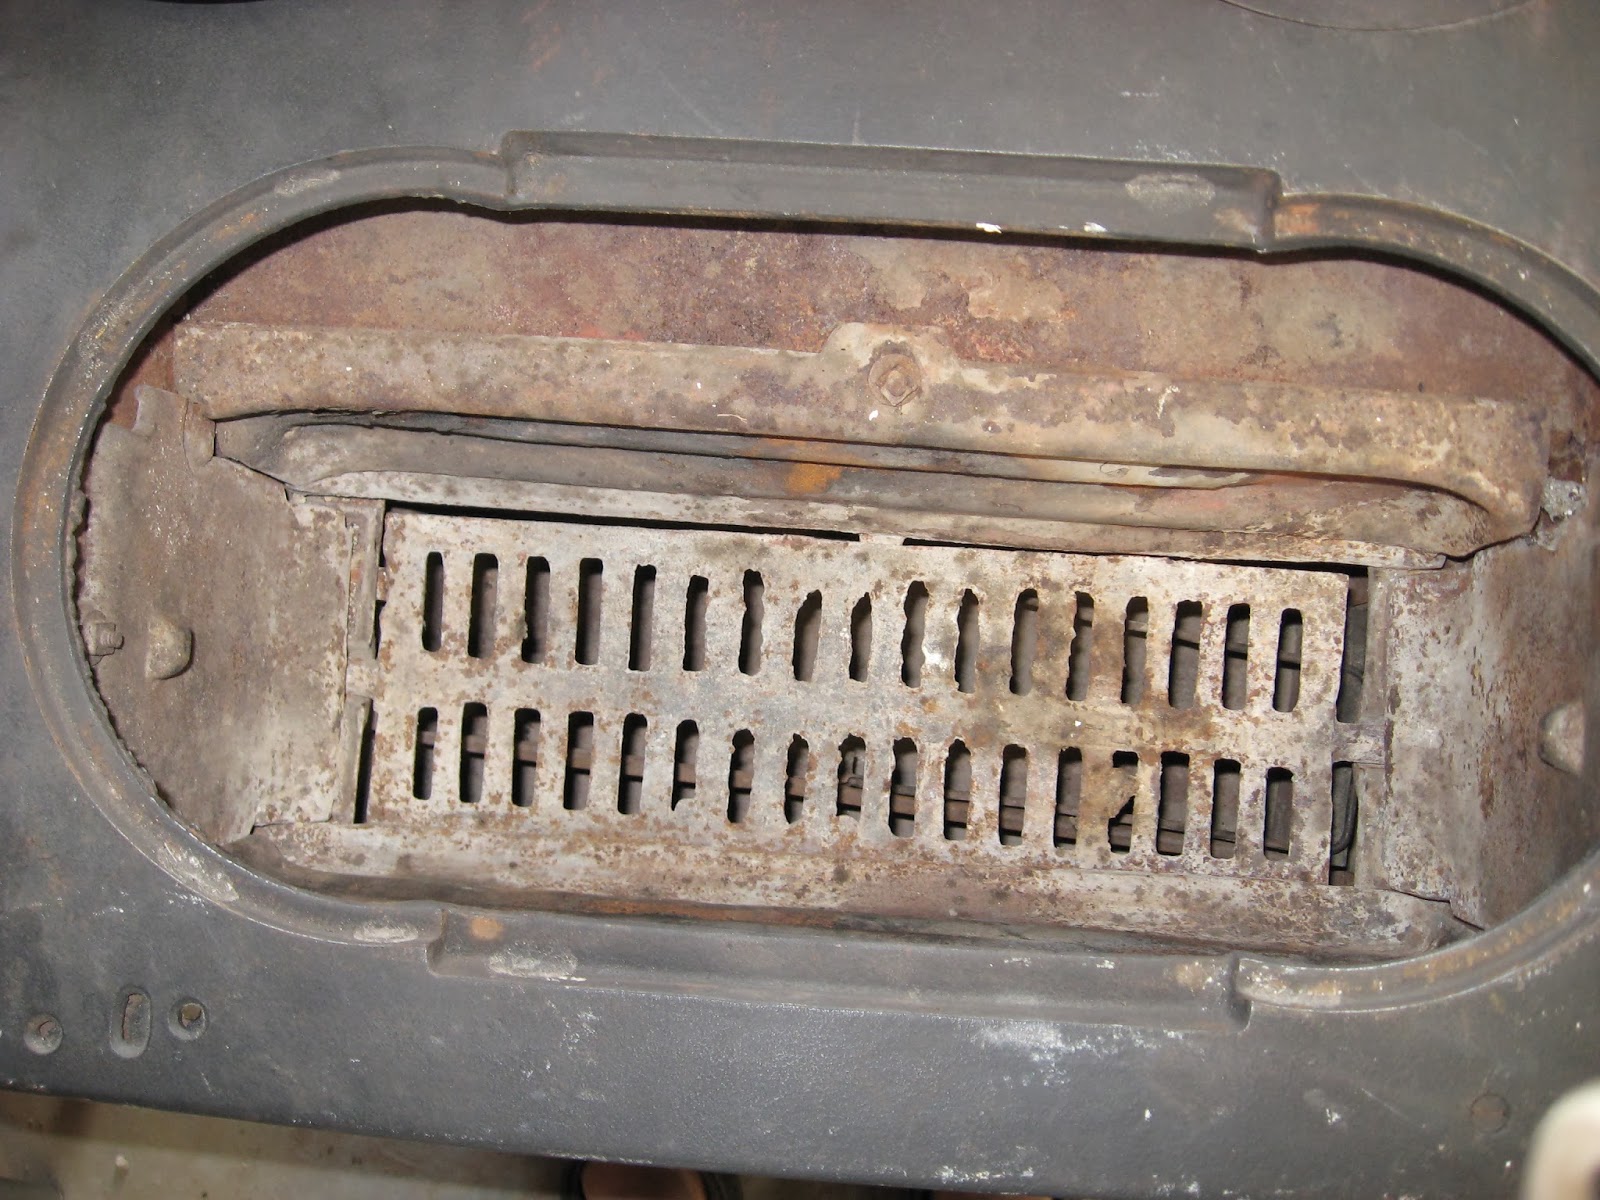 |
| A picture of the inside of the firebox and the dump grate at the bottom. |
 |
| The clean out door is in position, and HD is busily replacing the lids in the cooktop for the umpteenth time. |
 |
| A scan of part of the page from the 1958 Montgomery Ward catalog where Kevin's stove appeared. |
Economy Cook Stove
Welded steel body, steel oven--17 3/4 x 13 1/2 x 9 1/2 in. high. Four 8-inch cooking lids. Easy-to-clean white porcelained panels. Cast-iron cooktop. Cast-iron firebox, 17 x 7 x 7 1/2 in., has flat dump grate; burns soft coal, 18-inch wood. Size overall: 26 x 21 in. deep, 25 in. high. Use 6-in. stovepipe--see Notice, Page 906. Pay Freight from Factory near St. Louis, Mo.--shipped promptly. Ship. wt. 120 lbs. 68 A 1518F-$2.50 Down; Cash $22.95
When all of the lids are removed from the cooktop, I can lift the stove by myself. I was surprised at how roomy the oven is. Had I known that the catalog didn't include the dimensions of the oven, I would have measured it and included them here. Suffice it to say that a 9 x 13 pan would easily fit with a little room to spare.
Now here is the part where all of you readers will discover just how weird I am:
I don't consider myself a prepper, but the fact that Kevin has this stove makes me feel a little bit more secure. You see, on the farm where he lives, there are three homes: Kevin's, my grandmother's, and my cousin's. Each of these homes is equipped with only electric stoves for cooking. I feel better because in some kind of drastic emergency, this little cookstove could be easily put into service. It wouldn't take a huge crew of men to transport it to my grandmother's basement where a furnace duct could be taken down and fashioned into a stovepipe that would be sufficient to attach it to one of the two old, but lined and safe chimneys which can be accessed down there. My grandmother would probably be able to remember a little about cooking on a wood cookstove, and my sister-in-law is a brilliant cook who could probably prepare a five-course, gourmet meal over a can of Sterno, so I know they will all be able to eat because she would easily be able to figure out how to cook on a cookstove.
As it is, I'm looking forward to the day when we can try out this little cutie, and of course, I'll write a post about how it works so that you'll all know too.
Subscribe to:
Posts (Atom)