As I was reflecting a little bit further on my post about pressure canning on the wood cookstove, and as we are in the height of the canning season again, I wanted to offer a few thoughts about what to consider if a person is going to be purchasing a canner for use on a woodburning cookstove.
In my opinion, one should consider the following three items when choosing a pressure canner for use on a wood cookstove:
a) Choose a pressure canner that has a completely flat bottom. For quite some time, the only new Presto canners that I saw in stores had bottoms in which the center had a circle approximately the size of the large burner on an electric stovetop. This center circle protruded slightly from the rest of the bottom of the canner. This is a good design for a canner which will be used on an electric or gas range for a number of reasons, but this is not a good design for use on a woodburning range. A completely flat bottom on a canner will ensure the maximum amount of heat transfer from the range top to the canner because the whole stovetop on a woodburning range emanates heat, not just a comparatively small burner.
Last year, I did see new Presto canners with completely flat bottoms, and I believe that the All-American canners have flat bottoms, too.
b) What jar capacity do you desire for your canner? I've canned with seven different pressure canners over the years, and it seems that many canners hold seven quart jars or nine pint jars in a single layer. Some canners allow you to have two tiers of jars being canned at once. This has the potential to double the capacity of your canner. I sought a canner that was tall, not because I wanted to can two tiers of jars, but because I wanted to be able to pressure can in two-quart jars. This is no longer recommended by the USDA, so please don't tell them that I do it. All I can say is that I haven't killed anyone yet, even though I might have wanted to.
Unfortunately, one must also remember that the flipside of increased canner capacity is increased weight, and this leads us right to the third consideration that one must make:
c) How much will the canner weigh when it is full? The reason that this is a concern is because when the canner is finished with its processing time, it will have to be removed from the cookstove in order for it to cool and release its pressure. This means that you have to choose a canner that, when full, is not going to be heavier than you can lift off the stove and carry to wherever you want it to cool. You can't just turn off the heat of a wood cookstove like you can on other heating devices. Thus, extra large canners that might be wonderful on a modern range or an outdoor turkey fryer will probably do a fine job of canning on a woodburning cookstove, but will present a huge, heavy, hot, and potentially dangerous problem once the canning time is finished.
If you have experiences--good or bad--with canners and woodburning cookstoves please feel free to share them in the spirit of trying to help others learn by commenting on this post.

This is a blog about cooking on a woodburning cookstove. Here you will find recipes, methods, other uses, and miscellaneous information about using a woodburning range. I've searched the net for any and all information about cooking on one of these amazing appliances, and I've found a lot of interesting things, but none of them have been what I've been looking for. Therefore, this is my attempt at creating what I've been in search of.
Wednesday, July 25, 2012

Tuesday, July 24, 2012
Things I'm Learning from Baking for the Monday Market
I'm starting this post on the evening of July 9th. I don't know when I'll get a chance to finish it, though, so I wanted to make it clear that when I refer to "today," today was July 9th.
Today was the fourth Monday Market for which we've baked breads, cookies, pies, rolls, or cakes. All of this baking has been completed in the woodburning cookstoves here at the farm. On the first Market day, I didn't yet have a rhythm figured out, and we had to fire up the Riverside Bakewell down in the summer kitchen in order to get everything baked on time--or nearly on time. Since then, we have managed to do all of the baking in the house on the Margin Gem.
When I say "all of the baking," that phrase may not mean much unless I give you a rundown of what we have been hauling to the market. Here was today's inventory: 19 loaves of potato and whole wheat bread (this doesn't count the four loaves of experimental raisin bread that I deemed not good enough to sell yet), 11 double-crusted fruit pies, five and a half dozen cinnamon rolls, and various other items which were not baked. Last week's inventory was similar except that we only had six pies, but had two batches of cookies, three more loaves of bread, and two half-size angel food cakes.
Needless to say, I've been learning a lot about operating the Margin Gem cookstove each Sunday afternoon and Monday. Here is a rundown of my new knowledge.
a) I've learned that the oven thermometer on the Margin Gem, which I had previously thought was woefully inaccurate, actually just continually registers about 30 degrees cooler than the oven really is. With this knowledge, I have been able to remove the freestanding oven thermometer which I had placed inside the oven, making it easier to maneuver all of the pans.
b) The waterfront on the Margin Gem produces a lot of hot water. I'm beginning to wonder about what we will do with so much hot water when the cookstove is being fired 24/7 during the winter months. Perhaps a radiator can be rigged up to provide a little heat to the basement?
c) The Margin Gem and the Vaughn range boiler combine to create a much greater thermal mass than what was afforded by the Qualified Range. I foresee our house being much warmer this coming winter than ever before. Not only does the stove hold its fire much longer than the Qualified ever could have, but it also holds heat longer due to its larger size and presence of such large pieces of firebrick in the firebox as well as the presence of the water reservoir. In addition, the boiler itself radiates a great deal of heat. In fact, after we return home from the Monday Market, we make it a point to use as much hot water as possible to get the kitchen cooled off.
d) Even though the oven on the Margin Gem does a beautiful job of browning the bottoms of the loaves of bread and rolls (see post entitled "Little Things Mean a Lot"), I still have to finish cinnamon rolls with the sticky caramel topping on the stovetop after they have baked sufficiently.
e) Finishing sticky rolls on the top of the stove can be messy. The beautiful cooktop on our Margin Gem bears witness to what happens when a couple of eight-inch round pans of sticky rolls boil over.
f) If your oven is full, you can "bake" a casserole on the stovetop. Since the oven is full all day on Monday, the noon dinner for my help and me has to be cooked on top of the stove. I took the extra oven rack, put it on the top of the stove. Then I put the liner of an electric roaster upside down on top of it. Thus, we were able to have a "baked" casserole without using the oven. In truth, the bottom of the casserole was pretty brown, but it was certainly edible.
I've been shopping around a little bit for a stovetop oven so that we could increase the oven capacity for Monday Market baking, but I haven't bought anything yet. Has anyone out there used a stovetop oven on the top of a wood cookstove? If so, please comment and let me know how it has worked for you.
g) I'm a bit embarrassed to admit this last one, but here goes. It isn't the end of the world to run the air conditioner and the woodburning cookstove at the same time. Don't worry, the kitchen is closed off from the rest of the house. We've been using the Riverside Bakewell down in the summer kitchen fairly frequently this summer, but the trek is just too far to make baking on this scale feasible down there. At least the electric hot water heater gets a rest on summer Mondays!
Today was the fourth Monday Market for which we've baked breads, cookies, pies, rolls, or cakes. All of this baking has been completed in the woodburning cookstoves here at the farm. On the first Market day, I didn't yet have a rhythm figured out, and we had to fire up the Riverside Bakewell down in the summer kitchen in order to get everything baked on time--or nearly on time. Since then, we have managed to do all of the baking in the house on the Margin Gem.
When I say "all of the baking," that phrase may not mean much unless I give you a rundown of what we have been hauling to the market. Here was today's inventory: 19 loaves of potato and whole wheat bread (this doesn't count the four loaves of experimental raisin bread that I deemed not good enough to sell yet), 11 double-crusted fruit pies, five and a half dozen cinnamon rolls, and various other items which were not baked. Last week's inventory was similar except that we only had six pies, but had two batches of cookies, three more loaves of bread, and two half-size angel food cakes.
Needless to say, I've been learning a lot about operating the Margin Gem cookstove each Sunday afternoon and Monday. Here is a rundown of my new knowledge.
a) I've learned that the oven thermometer on the Margin Gem, which I had previously thought was woefully inaccurate, actually just continually registers about 30 degrees cooler than the oven really is. With this knowledge, I have been able to remove the freestanding oven thermometer which I had placed inside the oven, making it easier to maneuver all of the pans.
b) The waterfront on the Margin Gem produces a lot of hot water. I'm beginning to wonder about what we will do with so much hot water when the cookstove is being fired 24/7 during the winter months. Perhaps a radiator can be rigged up to provide a little heat to the basement?
c) The Margin Gem and the Vaughn range boiler combine to create a much greater thermal mass than what was afforded by the Qualified Range. I foresee our house being much warmer this coming winter than ever before. Not only does the stove hold its fire much longer than the Qualified ever could have, but it also holds heat longer due to its larger size and presence of such large pieces of firebrick in the firebox as well as the presence of the water reservoir. In addition, the boiler itself radiates a great deal of heat. In fact, after we return home from the Monday Market, we make it a point to use as much hot water as possible to get the kitchen cooled off.
d) Even though the oven on the Margin Gem does a beautiful job of browning the bottoms of the loaves of bread and rolls (see post entitled "Little Things Mean a Lot"), I still have to finish cinnamon rolls with the sticky caramel topping on the stovetop after they have baked sufficiently.
 |
| Sweet rolls with sticky topping finishing their cooking on the hot stovetop. |
 |
| The top of a pan of sticky rolls after they've been turned out. |
 |
| I guess this means that I'll have to do a post about how one goes about cleaning the cast-iron top of a wood cookstove. |
f) If your oven is full, you can "bake" a casserole on the stovetop. Since the oven is full all day on Monday, the noon dinner for my help and me has to be cooked on top of the stove. I took the extra oven rack, put it on the top of the stove. Then I put the liner of an electric roaster upside down on top of it. Thus, we were able to have a "baked" casserole without using the oven. In truth, the bottom of the casserole was pretty brown, but it was certainly edible.
 |
| The improvised casserole cooker atop the Margin Gem. |
I've been shopping around a little bit for a stovetop oven so that we could increase the oven capacity for Monday Market baking, but I haven't bought anything yet. Has anyone out there used a stovetop oven on the top of a wood cookstove? If so, please comment and let me know how it has worked for you.
g) I'm a bit embarrassed to admit this last one, but here goes. It isn't the end of the world to run the air conditioner and the woodburning cookstove at the same time. Don't worry, the kitchen is closed off from the rest of the house. We've been using the Riverside Bakewell down in the summer kitchen fairly frequently this summer, but the trek is just too far to make baking on this scale feasible down there. At least the electric hot water heater gets a rest on summer Mondays!
Saturday, June 23, 2012
Purchasing a New Woodburning Cookstove
Those of you who have been following this blog or know us personally know that a year ago this month was when we ordered Marjorie the Margin Gem cookstove. The Margin Gem is actually the second wood cookstove that I have purchased new, and I want to share with you what factors I considered when choosing a cookstove. As I've read other wood cookstove owners' accounts of how they decided to purchase the various cookstoves that they own, I notice that each is unique. Our story is too, and perhaps someone will benefit from reading about it.
I took the following things into consideration when making my choices. They are not necessarily listed in order of importance.
a) Cost. Unfortunately, this is always a consideration. When you consider this, though, think about what kind of return your stove will potentially give you. We don't have to pay for our firewood. As my brother says, "Jim can't burn enough wood to keep up with the dead trees around here." Therefore, other than our time (which would be spent cleaning up the tree mess in some way in any event) and woodcutting supplies (chainsaws, chains, saw fuel, sledge hammer handles, etc.) it costs us nothing to operate our stoves once they are installed. Thus, our cookstove considerably cuts down on our use of propane for heating and cooking, and now that the Margin Gem heats our hot water, we have additional savings there.
I've never heated our house entirely on propane during a winter, but I think that a conservative estimate (given our high-efficiency furnace, the size of our house, and its draftiness) would be that we would burn a thousand gallons of propane during a normal winter if it was our sole source of heat. That means that it would cost us at least a thousand dollars to heat our house for one season if we used only propane. When you look at the cost of a stove and prorate what it will save you in heating expenses during its useful life, that can change the way you look at your initial investment quite significantly.
b) Location. You have to consider where you will be putting your stove quite carefully; then choose a cookstove that will fit there. However, you must also figure in the clearances! This is so important! The measurements of a stove are not a representation of its true footprint in your house. Clearances can be reduced with appropriate materials, but those materials will have measurements of their own. Measure, research, measure!
The clearances on woodburning cookstoves vary drastically because of the different designs that are out there. If you are planning on purchasing a true antique cookstove, you can pretty much plan that your home insurer is going to ask that 36" of space be between your cookstove and any combustible surface, and 18" of space will need to be between single-walled stovepipe and anything combustible.
c) Looks. This might be the least of many people's concerns, but for me this is an issue. I know that many of the new wood cookstoves that are on the market are designed to keep costs low for those who want a functional and efficient stove, but I also want one that is at least somewhat traditionally pretty to look at, too. Sorry. I can't help it.
I'm still reconciling myself to the more modern look of the left side of the Margin Gem. I prefer the antique look of the Oval's left side, but I still feel that the Margin Gem was the right choice for us.
d) Purpose of the Stove. What are you planning on doing with your woodburning cookstove? If you are only going to be using it during the occasional power outage or for weekend ambiance, your approach to choosing a stove can be quite different from what it would be if you are planning on using your stove as your main--or even sole--means of cooking.
Before we purchased the Margin Gem, I talked to an Amish man who owned a Gem Pac (slightly smaller and less ornate sister of the Margin Gem). The man whom I was talking to and his wife were planning on building a new house in the near future, and when I told him that we were thinking about replacing the Qualified, he offered some interesting insight. He said, "My wife would like a Margin Gem for the new house. She told me that she wants a cookstove, not a heating stove that you can cook on. My brother's stove has to be so hot to get the oven up to temperature that it will drive you out of the kitchen before you can bake anything." I'm glad that we don't have to be sweltering just to bake.
e) Oven size. To me, this was a top priority. I knew that there would be considerably less joy in using a wood cookstove regularly if I felt like the size of the oven was preventing me from using the baking utensils that I was accustomed to. Thus, as a twenty-one-year-old, I pored over the specifications for the ovens in the cookstoves which were available and affordable at that time. Then, with a yardstick, I drew lines in the pile of my living room carpet which represented the width and depth of the ovens. Next, I retrieved all of the biggest baking utensils that I had: my largest cookie sheet, the biggest jelly roll pan, and my largest enamelware roaster. I placed them on the floor to see whether they would fit in the oven. When I got to the roaster, I also put the lid on it and held my thumb on the yardstick to represent the height of the oven to make sure that I would still be able to use it with its lid.
The fact that the oven on the Qualified Range was the largest in the stoves that were in my price range had a great deal to do with my choosing it. I went through the same set of tests with the same cookware before deciding to purchase the Margin Gem, too (only I didn't draw in the carpet--I guess I'm growing up).
f) Ease of fueling. Perhaps this wouldn't be as much of a factor if I hadn't started out with the Qualified range. The Qualified has a coal feed hatch on the left side of the firebox, a door in the front of the firebox behind the white cabinet door, and removable lids, "T", and cast iron frame above the firebox. In other words, if you have a piece of firewood that is the right size, you have all kinds of options for getting it to the fire. The best thing about fueling the Qualified was that unless you had such a large piece of wood to add that you had to lift the "T" or the entire cooktop frame, it rarely let any smoke escape into the room.
Several of the new stoves on the market today do not have very many fueling options. Some can be fed only through the top. This seems impractical to me, especially when you are in the throes of canning. The last thing you will want to do is to move a large canner full of jars away from the firebox in order to refuel. The Margin Gem has a larger front door on its firebox than the Qualified, and I find that I feed through the front much more often now. I still tend to favor feeding through the front cooktop lid, however. I think this is because I don't have to bend down to see what I'm doing. For feeding large pieces of wood, the Margin Gem is equipped with a handle which raises the entire section of cooktop above the firebox. I imagine that we will use this more often in the winter, but we haven't used it much right now because a great deal of smoke hits you in the face when you open the stove this way.
g) Cooking flexibility. When we ordered the Margin Gem, the sales representative tried hard to convince me to opt for the Flameview. I think his words were that it was "the perfect stove." Indeed, it has features that I think we would have liked, but two things prevented me from choosing it. First, it has a greater heating capacity than the Gem. This would be great if we only used the stove in the winter time, but since we have an additional heating stove to help heat the house in cold weather, why put up with extra heat when we just want to cook in the warmer seasons? Second, the Flameview is only sold with a solid cooktop--no removable lids. I'm far too accustomed to being able to remove a lid or lids and grill directly over the fire or speed the cooking of something. Nancy can attest to my occasional inflexibility, and I didn't want to give up those options.
If you are a wood cookstove cook, please comment and share what things you considered before making your purchase. My hope with this post is that it will help wood cookstove shoppers with their considerations before making a purchase. No matter which range one chooses, it will become a major part of one's home, so careful consideration is a must.
Some readers may still be at a point in the process of choosing a stove where they are trying to convince themselves or others that a woodburning cookstove is a good idea. For information about why we chose a wood cookstove, visit this post.
I took the following things into consideration when making my choices. They are not necessarily listed in order of importance.
a) Cost. Unfortunately, this is always a consideration. When you consider this, though, think about what kind of return your stove will potentially give you. We don't have to pay for our firewood. As my brother says, "Jim can't burn enough wood to keep up with the dead trees around here." Therefore, other than our time (which would be spent cleaning up the tree mess in some way in any event) and woodcutting supplies (chainsaws, chains, saw fuel, sledge hammer handles, etc.) it costs us nothing to operate our stoves once they are installed. Thus, our cookstove considerably cuts down on our use of propane for heating and cooking, and now that the Margin Gem heats our hot water, we have additional savings there.
I've never heated our house entirely on propane during a winter, but I think that a conservative estimate (given our high-efficiency furnace, the size of our house, and its draftiness) would be that we would burn a thousand gallons of propane during a normal winter if it was our sole source of heat. That means that it would cost us at least a thousand dollars to heat our house for one season if we used only propane. When you look at the cost of a stove and prorate what it will save you in heating expenses during its useful life, that can change the way you look at your initial investment quite significantly.
b) Location. You have to consider where you will be putting your stove quite carefully; then choose a cookstove that will fit there. However, you must also figure in the clearances! This is so important! The measurements of a stove are not a representation of its true footprint in your house. Clearances can be reduced with appropriate materials, but those materials will have measurements of their own. Measure, research, measure!
The clearances on woodburning cookstoves vary drastically because of the different designs that are out there. If you are planning on purchasing a true antique cookstove, you can pretty much plan that your home insurer is going to ask that 36" of space be between your cookstove and any combustible surface, and 18" of space will need to be between single-walled stovepipe and anything combustible.
c) Looks. This might be the least of many people's concerns, but for me this is an issue. I know that many of the new wood cookstoves that are on the market are designed to keep costs low for those who want a functional and efficient stove, but I also want one that is at least somewhat traditionally pretty to look at, too. Sorry. I can't help it.
I'm still reconciling myself to the more modern look of the left side of the Margin Gem. I prefer the antique look of the Oval's left side, but I still feel that the Margin Gem was the right choice for us.
d) Purpose of the Stove. What are you planning on doing with your woodburning cookstove? If you are only going to be using it during the occasional power outage or for weekend ambiance, your approach to choosing a stove can be quite different from what it would be if you are planning on using your stove as your main--or even sole--means of cooking.
Before we purchased the Margin Gem, I talked to an Amish man who owned a Gem Pac (slightly smaller and less ornate sister of the Margin Gem). The man whom I was talking to and his wife were planning on building a new house in the near future, and when I told him that we were thinking about replacing the Qualified, he offered some interesting insight. He said, "My wife would like a Margin Gem for the new house. She told me that she wants a cookstove, not a heating stove that you can cook on. My brother's stove has to be so hot to get the oven up to temperature that it will drive you out of the kitchen before you can bake anything." I'm glad that we don't have to be sweltering just to bake.
e) Oven size. To me, this was a top priority. I knew that there would be considerably less joy in using a wood cookstove regularly if I felt like the size of the oven was preventing me from using the baking utensils that I was accustomed to. Thus, as a twenty-one-year-old, I pored over the specifications for the ovens in the cookstoves which were available and affordable at that time. Then, with a yardstick, I drew lines in the pile of my living room carpet which represented the width and depth of the ovens. Next, I retrieved all of the biggest baking utensils that I had: my largest cookie sheet, the biggest jelly roll pan, and my largest enamelware roaster. I placed them on the floor to see whether they would fit in the oven. When I got to the roaster, I also put the lid on it and held my thumb on the yardstick to represent the height of the oven to make sure that I would still be able to use it with its lid.
The fact that the oven on the Qualified Range was the largest in the stoves that were in my price range had a great deal to do with my choosing it. I went through the same set of tests with the same cookware before deciding to purchase the Margin Gem, too (only I didn't draw in the carpet--I guess I'm growing up).
f) Ease of fueling. Perhaps this wouldn't be as much of a factor if I hadn't started out with the Qualified range. The Qualified has a coal feed hatch on the left side of the firebox, a door in the front of the firebox behind the white cabinet door, and removable lids, "T", and cast iron frame above the firebox. In other words, if you have a piece of firewood that is the right size, you have all kinds of options for getting it to the fire. The best thing about fueling the Qualified was that unless you had such a large piece of wood to add that you had to lift the "T" or the entire cooktop frame, it rarely let any smoke escape into the room.
Several of the new stoves on the market today do not have very many fueling options. Some can be fed only through the top. This seems impractical to me, especially when you are in the throes of canning. The last thing you will want to do is to move a large canner full of jars away from the firebox in order to refuel. The Margin Gem has a larger front door on its firebox than the Qualified, and I find that I feed through the front much more often now. I still tend to favor feeding through the front cooktop lid, however. I think this is because I don't have to bend down to see what I'm doing. For feeding large pieces of wood, the Margin Gem is equipped with a handle which raises the entire section of cooktop above the firebox. I imagine that we will use this more often in the winter, but we haven't used it much right now because a great deal of smoke hits you in the face when you open the stove this way.
 |
| A pic of the Margin Gem that Nancy snapped on the night we were hooking it up. The pic shows the cooktop and front door open, comprising two of the ways to add fuel. |
g) Cooking flexibility. When we ordered the Margin Gem, the sales representative tried hard to convince me to opt for the Flameview. I think his words were that it was "the perfect stove." Indeed, it has features that I think we would have liked, but two things prevented me from choosing it. First, it has a greater heating capacity than the Gem. This would be great if we only used the stove in the winter time, but since we have an additional heating stove to help heat the house in cold weather, why put up with extra heat when we just want to cook in the warmer seasons? Second, the Flameview is only sold with a solid cooktop--no removable lids. I'm far too accustomed to being able to remove a lid or lids and grill directly over the fire or speed the cooking of something. Nancy can attest to my occasional inflexibility, and I didn't want to give up those options.
If you are a wood cookstove cook, please comment and share what things you considered before making your purchase. My hope with this post is that it will help wood cookstove shoppers with their considerations before making a purchase. No matter which range one chooses, it will become a major part of one's home, so careful consideration is a must.
Some readers may still be at a point in the process of choosing a stove where they are trying to convince themselves or others that a woodburning cookstove is a good idea. For information about why we chose a wood cookstove, visit this post.
Thursday, June 21, 2012
Strawberry Preserves
 |
| One of the two pictures of the first batch of strawberry preserves. |
I had started writing this post several weeks ago. Those of you who keep up with this blog regularly will remember that I mentioned that I had made strawberry preserves in my June 2nd post about water bath canning on a wood cookstove. However, I had only taken two photographs of the process and decided that they were not enough to make a quality post.
Well, one thing and another happened after that. First, it got quite dry in our section of Iowa for a while (Thank you, God, for the recent rains!), and all of my June-bearing strawberries decided that it felt way too much like July to continue bearing fruit. Thus, I was hoping to collect enough berries from my everbearing strawberry patch to make another batch of preserves and get better photos. It was looking good until one of my cows got out and visited the strawberry bed. Apparently, if you are a cow, the foliage of a strawberry plant is every bit as tasty as the fruit. The strawberries appear to me like they will come out of their bovine-induced trauma, but it is going to take a while.
Actually, our little town started what we call Monday Market, so Nancy and I (and last Monday our mothers, too) baked up a storm on both functioning cookstoves. We took with us several loaves of bread, some pies, some cookies, and some angel food cakes, and sold all of them within the first forty-five minutes that the market was open. Now we are figuring out ways to be able to produce more, and thus we bought strawberries (GASP!--so not the same as what you grow yourself!) in order to sell some strawberry preserves.
The strawberry preserve recipe that my family has always used is attributed to my great-grandma Ruth. In our family, she remains a legendary cook, even though she passed away twenty-some years ago. There were two large strawberry patches on our farm when I was growing up, and I can remember strawberries being sent to Grandma Ruth's house so that she could make the preserves for us. That was in the late 1970s. By the 1980's my mother was coping with huge amounts of strawberries pretty much by herself, but with the occasional help of my grandmothers. We kids, of course, were pressed into service to pick them, and we were taught early-on the value of letting strawberries ripen on the vine. The large berries were frozen whole and would appear as side dishes, in salads, or as topping for ice cream and cake at our family birthday parties. The small, scrubby ones were relegated to the preserve kettle, but they were enjoyed just as much.
One of my favorite summer memories from my childhood has to do with these strawberry preserves. On the morning after we had picked strawberries, Mom would get up early in the morning to cook the preserves while the house was still cool. Until you have smelled these preserves cooking with real, homegrown, vine-ripened strawberries, you cannot appreciate how wonderful it was to wake up to a house filled with that heady aroma. I can remember my nose practically dragging me down to the kitchen, plopping me into a brown vinyl kitchen chair to wait anxiously for a piece of toast slathered with this red nectar.
While I was in junior high, Granny got a wild hair and decided to move the strawberry beds, but the result was disastrous. I tried to salvage and restart them several years ago but had no luck. Then my sister Janet, bless her, made some of these preserves from strawberries that she and her husband raised at their home in northern Nebraska. She was present when I got a taste of them at my parents' home, and she got to see what I'm sure was a look of ecstasy on my face as I was transported back in time twenty years. Seeing the opportunity to give me ONE OF THE BEST CHRISTMAS GIFTS EVER, she gave me a whole pint of these preserves that year for Christmas. This got me inspired. The next year, Nancy, her dad, and I put in three raised beds, and we now have strawberries again.
That is, until drought and Houdini cows hit them.
Anyway, these strawberry preserves are for those who want an intense strawberry taste. I have a friend who was just starting to learn to can several years ago after she had begun to be a successful gardener, and she had made strawberry jam using the recipe that comes in the package of Sure-Jel. It was good, she said, but it didn't taste sufficiently "strawberry-y" for her. I gave her this recipe, and she was delighted with the results. Here is what you do:
1. Wash and pare three cups of strawberries. If you have to deal with those freakishly large, nearly tasteless, usually barely ripe blobs that are sold as strawberries in grocery stores like I did, cut the berries into half-inch pieces. Put the berries into a bowl and pour two cups of sugar on them. If you have sufficient strawberries, you may double the recipe, but DO NOT DO MORE THAN A DOUBLE BATCH AT A TIME! I don't know why, but it doesn't work. Trust me on this one.
Note to sister-in-law Susan: It dawned on me several days after we got home that this is why the first batch of preserves that I made at your house was not as good as the second. The first kettle had four batches in it. I had been told not to do that years ago, but I forgot it. Sorry!
 |
| Three cups of strawberry pieces with two cups of sugar on top. This is what they looked like this morning. |
2. Grandma Ruth recommended putting them in the refrigerator overnight to let the sugar draw the juice out of the berries. I just put a plate over the bowl and left them on the counter in the kitchen because I knew that I would be getting back to them this evening.
 |
| The same strawberry/sugar mixture several hours later. |
 |
| The strawberry and sugar mixture coming to a boil over the firebox. |
 |
| The strawberry preserves cooking gently now. The waterbath canner is heating up at the left rear. |
5. If you are going to waterbath can them, this is the time when you would put your canner over the fire to heat and get your lids into the hot water to soften the sealant. This recipe also freezes well if that is your preference.
6. This is where things get tricky. There is no set amount of time that these preserves have to cook like in conventional jelly making with pectin. You can test for doneness in three ways: a) see if the juice sheets off the spoon like in the pictures in the Ball Blue Book, b) put a couple of drops of the juice onto a plate which has been in the freezer. If after coming into contact with the plate it is the consistency you desire when you scrape it off with your finger, it is done, or c) look to see whether the strawberries are "glassy" since that is another indication of doneness. The last method is the one our family prefers.

 |
| These pictures were taken one right after the other, but I don't know which one shows the "glassy" look of the strawberries better. |
7. Remove from the stove, and stir down the foam as much as you can.
8. Pour into jars, adjust lids and bands, and process. (Again, I used room-temperature jars and let them boil for over ten minutes.)
 |
| You can see in this picture that I removed the front lid over the firebox and put the canner there. For some reason, the hottest part of the fire was in the front of the firebox at that time. |
 |
| The lever with the black knob in the middle left of the picture is the oven damper. When it is in the down position, that means that some of the heat and smoke can escape up the chimney right away without having to circulate around the oven. |
A couple of notes if you are dubious about the lack of an exact cooking time:
If the preserves are cooked too long, they will be very thick and difficult to spread, but I think you could dilute them with a little water while heating them and remedy that.
If the preserves are not cooked long enough, they will be runny, but they would be outstanding as ice cream topping! However, you can actually put them back on the stove and cook them longer after they have cooled so that you can get them to the right consistency.
Hmmm . . . pretty tough ingredient list, huh? Strawberries and sugar and . . . and that's it!
Tuesday, June 12, 2012
Perfect Roast Beef from Your Wood Cookstove
For nearly a year now, I've wanted to blog about my favorite method for cooking roast beef in a wood cookstove, and tonight I finally get to do so. Here is what I do:
If you are starting with a cold stove, the first thing to do is to start a brisk fire a little before the time when the roast needs to start cooking in order to be done at the desired hour. Once the kindling is burning and a good draft is established, shut the oven damper as soon as possible so that the oven is heating. Then, take advantage of the hot cooktop! Place the bottom of your roaster over the firebox. Sometimes I add just a little bit of butter, but today I gave it a quick squirt of non-stick cooking spray. Then, put the roast in with whatever you consider the top side down.
Once the top of the roast is seared, turn it over with a fork and sear the other side. I often sear the vertical sides, too. While the bottom is searing, season the roast with salt and pepper and then lay several bay leaves on top of the roast. Pour enough hot water from the teakettle into the bottom of the roaster to just cover the bottom of the pan.
Place the lid on the roaster and put the roast in the oven, which should be plenty hot at this time. Mine was at four hundred degrees. Of course, you won't want the roast to continue cooking at such a high temperature.
This afternoon, I had to go to my parents' house for awhile once the roast was in the oven, so I put two large pieces of wood in the firebox.
Then I closed the bottom draft on the ash door, closed the side draft almost completely down, and shut the damper most of the way. This slowed the fire, but kept a gentle roasting heat for the time that I was gone.
When I came back about two hours later, the house smelled heavenly, and the little chuck roast was done to a turn. It was tender and juicy, and it was swimming in a beautiful brown juice which would have made the perfect gravy. (I don't always make gravy because I'm not a gravy lover. The beautiful juices from this roast went to the barn cats.)
Of course, the side dishes weren't done yet because I hadn't been home, so the roast went into the warming oven where it would remain hot but not continue cooking until the rest of the meal was ready.
Because it is summertime and we don't have a fire in the stove each day, I was multi-tasking, cooking not only supper, but also maidrites for lunches this week and black raspberries for jelly.
I'm sure that the number of methods to cook roast beef on a wood cookstove is equal to the number of people who use these stoves, but this method has always yielded a great final product for me. I've used two other methods for cooking roast beef, but they are more suitable to cold weather cooking, so please stop in again to see other options. If you've got your own method, as always, please share!
If you are starting with a cold stove, the first thing to do is to start a brisk fire a little before the time when the roast needs to start cooking in order to be done at the desired hour. Once the kindling is burning and a good draft is established, shut the oven damper as soon as possible so that the oven is heating. Then, take advantage of the hot cooktop! Place the bottom of your roaster over the firebox. Sometimes I add just a little bit of butter, but today I gave it a quick squirt of non-stick cooking spray. Then, put the roast in with whatever you consider the top side down.
 |
| Beef roast searing over the firebox. |
 |
| This is a shot of the fire which was burning under the roast in the picture above. As you can see, it is pretty brisk. |
Once the top of the roast is seared, turn it over with a fork and sear the other side. I often sear the vertical sides, too. While the bottom is searing, season the roast with salt and pepper and then lay several bay leaves on top of the roast. Pour enough hot water from the teakettle into the bottom of the roaster to just cover the bottom of the pan.
 |
| The seasoned roast, seared on both sides, is getting a little drink from the teakettle. |
Place the lid on the roaster and put the roast in the oven, which should be plenty hot at this time. Mine was at four hundred degrees. Of course, you won't want the roast to continue cooking at such a high temperature.
 |
| The roast beef in the oven. By the way, the roaster was purchased last year on our trip to The Dutchman, the Amish and Mennonite equivalent of Wal-Mart in Cantril, Iowa. |
 |
| Two large pieces of wood placed on the hot fire which was seen in a picture above. Sorry about the pic. being off center. |
Then I closed the bottom draft on the ash door, closed the side draft almost completely down, and shut the damper most of the way. This slowed the fire, but kept a gentle roasting heat for the time that I was gone.
 |
| The stovepipe damper on the Margin Gem. |
When I came back about two hours later, the house smelled heavenly, and the little chuck roast was done to a turn. It was tender and juicy, and it was swimming in a beautiful brown juice which would have made the perfect gravy. (I don't always make gravy because I'm not a gravy lover. The beautiful juices from this roast went to the barn cats.)
 |
| The perfect beef roast cooked on the wood cookstove. |
Of course, the side dishes weren't done yet because I hadn't been home, so the roast went into the warming oven where it would remain hot but not continue cooking until the rest of the meal was ready.
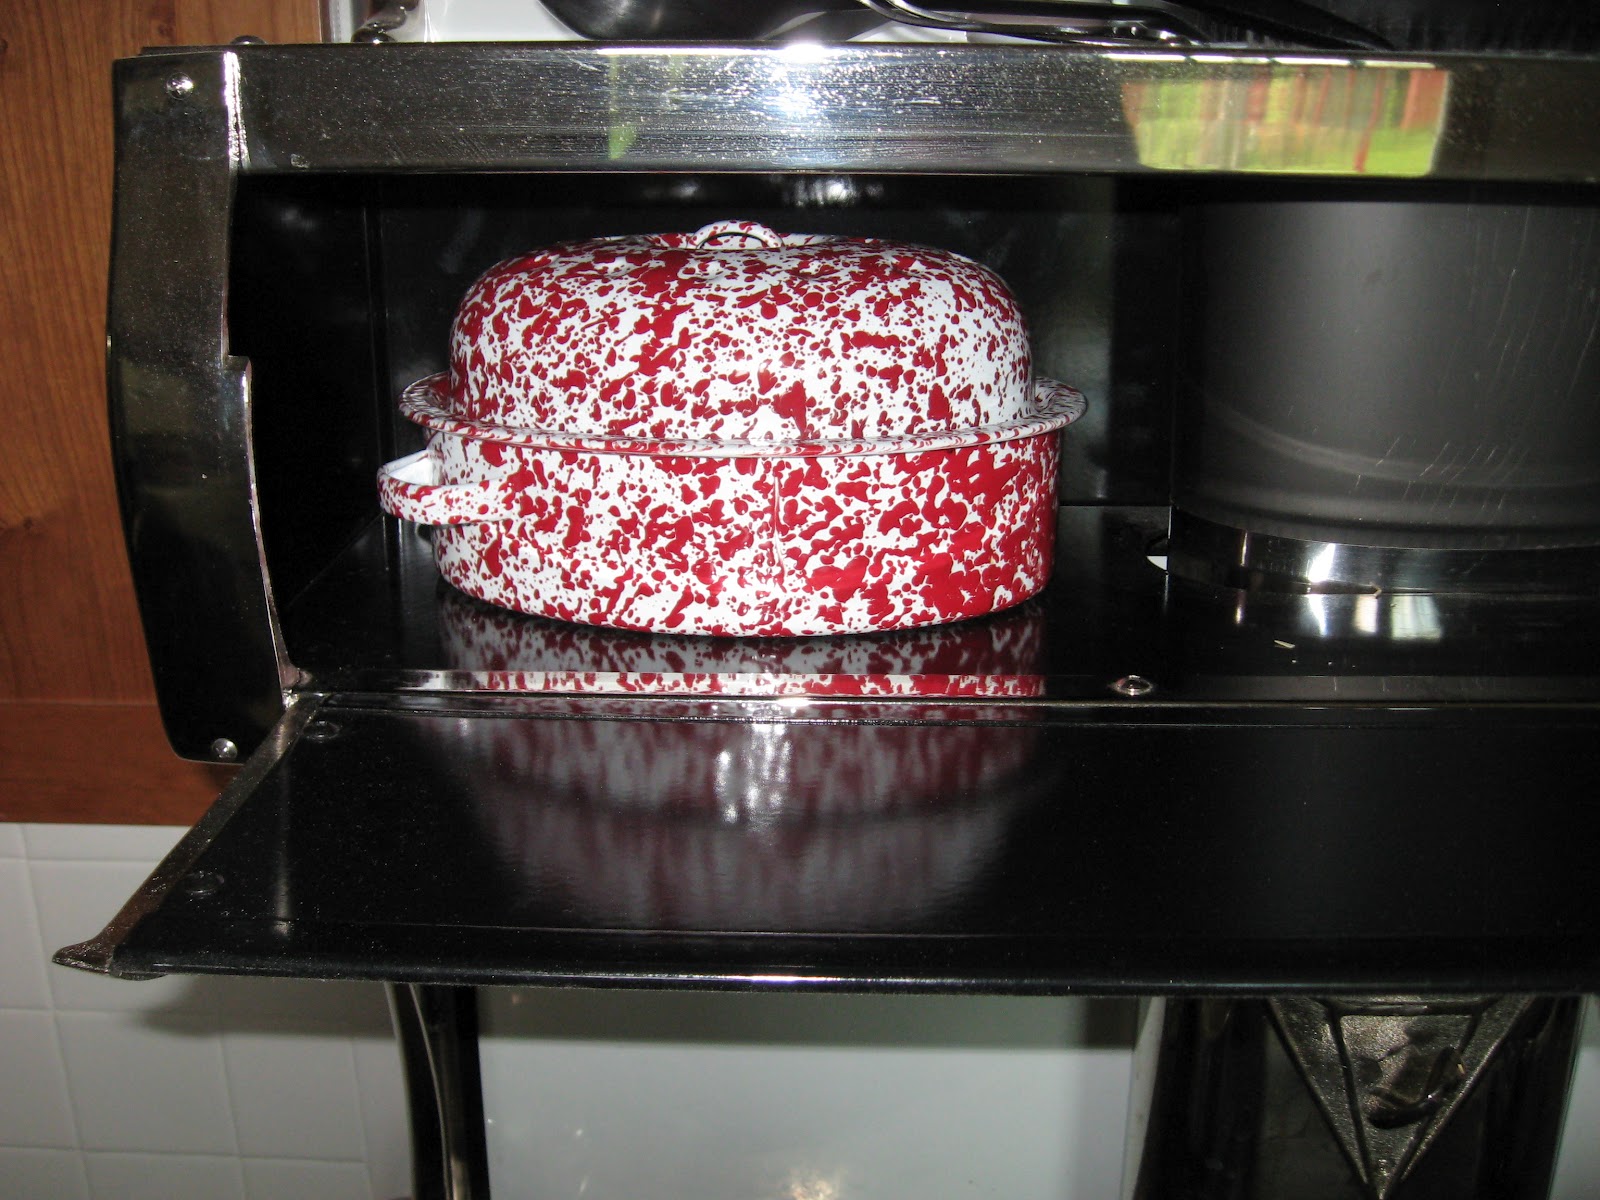 |
| The beef roast hanging out in the warming oven until the rest of the meal was ready. |
Because it is summertime and we don't have a fire in the stove each day, I was multi-tasking, cooking not only supper, but also maidrites for lunches this week and black raspberries for jelly.
 |
Saturday, June 2, 2012
Water Bath Canning on a Wood Cookstove
Last week, I finally got finished with school for the year, and on my first official day of summer vacation, I spent some time getting caught up with some canning that I've been putting off. I make all of our own pancake syrup (don't get excited; it's just imitation maple syrup, not the real thing). Sometimes, I make just a single batch at a time, but this can significantly increase the time that it takes to make breakfast. Also, this is not such a big deal in the winter time when the stove is going anyway, but in the summer, when I might use the gas stove or electric skillet to make breakfast, having to also make syrup is inefficient. I like homemade syrup better than anything that I've found on the grocery store shelves, but the problem with it is that since it doesn't have any preservatives in it, it molds quite quickly. Ironically, I figure that this means that this syrup is better for you than what you find on the store shelves. In fact, I know a lady who believes that no preservatives are healthy, and she says, "If it won't mold, I won't eat it." I don't know if any syrup could be considered healthy since they are all simply another way to pile sugar onto your food, but perhaps this is just "less bad." Hmmm . . . I think I've digressed. At any rate, canning the syrup allows me to make a large batch of it all at once but not use refrigerator space to store it.
Secondly, our Qualified range was removed from the kitchen in June of last year before the black raspberry season began. Thus, when I picked the raspberries last summer, I just washed them, cooked them, let them cool, and put entire pots of them into the deep freeze because I didn't want to spend the propane to make the jelly. Dragging the whole mess down to the summer kitchen didn't seem appealing, either. We were down to two jars of jelly on the jelly shelf in the fruit room of the basement, I wanted my pots back, and the room in the freezer was also needed, so I needed to make jelly, too.
Both the syrup and the jelly are canned using a water bath, and so I decided to multi-task. Water bath canning is a very easy task on a wood cookstove, and I actually think that it is a job that is easier on a wood cookstove than on a gas or electric stove because the cooking surface of most wood burning ranges is so large. This blog post documents what I did and shows my method of water bath canning on a wood cookstove.
First, on the right side of the stove (the part that is farthest away from the fire in our stove), I placed a metal rack from some long-forgotten appliance. This rack is more sturdily constructed than your average cooling rack since it was designed for some kind of oven, so I use it on the top of the cookstove for various reasons. On this particular occasion, I didn't want to put the frozen pots right on the stove because the temperature difference would be extreme and could cause damage, but I wanted to hasten the thawing of the raspberries.
 |
| Two pots of frozen, cooked black raspberries thawing on the cool section of the cookstove. The rack that they are resting on is about one inch tall. |
3 parts water
3 parts corn syrup
2 parts white sugar
1 part brown sugar
Flavor with X-tra Touch butter flavoring and Mapleine to taste.
The butter and maple flavorings are optional if you are using brown sugar, but I like the taste that they add. Be careful about the Mapleine, however; that is such powerful stuff that a little goes a long way.
 |
| The syrup is coming to a boil over the front of the firebox; the chicken is behind it. |
 |
| Water bath canner now placed over the back of the firebox. The syrup was now boiling. |
 |
| Testing the syrup for doneness. |
 |
| A picture to show that the canner is sitting directly over the fire. |
 |
| Putting the syrup into the jars and the jars into the canner. By this time, the frozen fruit had thawed enough to put the kettles directly on the stovetop. |
 |
| A shot of the fire at this time. Obviously, I didn't need a raging fire to do the water bath canning. You can see that the majority of the fire is placed to the rear of the firebox beneath the canner. |
 |
| Seven pints of pancake syrup boiling in the canner. |
First a word or two about making jelly on a wood cookstove:
Making jelly demands an intense heat under the jelly pot because you need a full rolling boil. In my experience, if it takes too long to reach this kind of a boil, the jelly can be ruined because too much steam escapes and changes the proportions of the mixture. In some instances, even though I've had a very hot fire underneath the jelly, it takes a long time to reach the full rolling boil that is needed. Thus, not only did I have less than perfect jelly, but it was also taking too much more time to make jelly over the cookstove than it did to make it over a gas or electric stove. I have solved this problem by removing the stove lid beneath the jelly pot. The pot is then directly over the fire, the cooking time is reduced, and the boil is much quicker.
As a side note, each of the stoves that I have used has had a traditional stove lid configuration on the cooktop. Therefore, removing the lid to cook directly over the fire is easily accomplished. There are several stoves on the market today (Kitchen Queen, Pioneer Maid, Ashland New Decade, Flameview--to name a few) which do not have the old-style, removable lids in their cooktops. If you, dear reader, happen to make jelly on one of these stoves, would you please leave a comment and tell me about your method--or whether this is an issue for you at all? I want this blog to be an information clearinghouse for all things cookstove, so your input would be helpful.
 |
| The jelly is to the left. Because the canner and the jelly kettle are too large to have the lids removed under both of them, the middle rear lid is removed and is under the teapot. The lid from beneath the jelly is on the stove's floor pad. |
Some astute observers may notice that I don't have jars sterilizing in another pot of water. I've read that if you water bath anything for ten minutes or more, you don't have to worry about sterilizing jars, so that's what I do now. I haven't had any trouble with sealing or spoiling using that method, and the set of the jelly remains unaffected.
In some respects, I prefer using Certo for pectin when making jelly on a cookstove because the order is reversed. When you use Certo, you bring the sugar and juice to a full rolling boil and then add the pectin. Therefore, while it takes longer to get to the initial boil, getting to the second boil takes very little time.
 |
| The jelly boiling after the sugar has been added. |
Saturday, May 26, 2012
Teakettles and Wood Cookstoves
You may have noticed that in each of the pictures of the three cookstoves that appear on this blog, a teakettle is resting somewhere on the cooktop. Our cookstoves are not unique in this characteristic at all. When I do a Google search for pictures of woodburning cookstoves, the vast majority of those ranges which are obviously in regular use have a teakettle sitting on them.
Other than the occasional cup of tea, we are not tea drinkers at all; however, our teakettle gets a workout. These soldiers of the kitchen serve many purposes, and I suspicion that when cooks began the transition from wood and coal-fired ranges to gas, kerosene, and electric stoves, the ever-present teakettle was sorely missed. I know that each summer as we start to do more of our daily cooking with a modern range, I find myself feeling inconvenienced when I no longer have that old friend ready at my fingertips.
Of course, a teakettle is merely a pot with a pouring spout which is intended to be used to heat water. When a house is equipped with hot running water, or when a stove is equipped with a hot water reservoir, it may seem redundant to have a teakettle heating water on the stovetop as well. However, the water in the teakettle is used for different purposes than the water in those other systems. The water in the teakettle is generally hotter than water from the reservoir or the tap, and if you spend any time reading over old, from-scratch recipes, you'd be surprised at how many of them call for boiling water rather than merely hot water. Obviously, the cooks of the olden days were used to having their teakettles at the ready.
Another difference is that the water in the reservoir was often rainwater, which was what people meant when they referred to "soft" water prior to the advent of fancy electric water softening systems. This water would have been used for all kinds of washing, but it would not have been consumed. Of course, not all homes were equipped with a rainwater cistern, so their reservoirs would have been filled with well water, which obviously was often simply called "hard" water. However, as my copy of The Foxfire Book of Appalachian Cooking* states, "As bread crumbs or other food might fall into the water in the reservoir, a kettle of fresh water was always kept on the stove for coffee or tea or for adding to food that was cooking." I am amazed at how often I grab the teakettle to add a little boiling water to this or that which is cooking merrily away, and the best part is that the cooking is not slowed by this addition because the water is already boiling.
Jane Cooper devotes a section of her book Woodstove Cookery: At Home on the Range to the teakettle. A contributor to that book wrote that her grandmother kept eggs in the teakettle so that at a moment's notice, one could have a hardboiled egg for a snack (I wonder how green the yolks would have been after cooking for so long). Ms. Cooper also notes that steam from the teakettle would add much needed humidity to the dry winter air. This is true, but I'd like to point out that the same humidity is not as welcome on a sultry summer day. I've also read warnings in vintage cookbooks which state that if the teakettle is not permitted to be on the range all the time, the buildup of lime deposits inside it will be kept to a minimum. We do struggle with the lime deposit problem, but we choose to combat it with vinegar rather than remove the teakettle from the cooktop.
Our teakettle is a German-made vessel which we purchased from an Amish store near Redding, Iowa. It holds over a gallon of water and has a lid that is equipped with a "whistle" in the handle which sounds remarkably like the wail of a freight train when it boils. I would advise anyone interested in seriously cooking on a wood cookstove to purchase the largest teakettle that can be found. In my opinion, there is no point in messing around with the dinky little designer models that grace most store shelves today. Heating the greater quantity of water is not going to cost you any more since the teakettle heats as an incidental result of your cooking or heating fire, and I've never heard of anyone complaining because too much hot water was available. Furthermore, if you ever do any serious canning, that large teakettle will be a necessity.
A side benefit of keeping a teakettle on the stove top is that when the water gets to a certain temperature, the teakettle begins to make that humming noise that all pots make prior to reaching the boiling point. You can often tell what your fire is doing even if you are not right next to the stove simply by listening to what the teakettle sounds like. I guess you could call it a primitive version of the baby monitor or remote sensor.
I'd like to close this post with a poem which appeared in the January 1968 edition of Ideals magazine. Obviously, I'm not the only one who is conscious of the sound of the teakettle.
* This is a very nifty book which I purchased for a dime when it was being purged from the Avoca Public Library's collection--probably the best thing I've ever bought for ten cents. It is full of pictures of people using woodburning cookstoves of every shape and variety and has some general instructions on how to not only cook on a wood cookstove, but also in a fireplace. It has quite a few wood cookstove memoirs in it, too.
 |
| The Riverside Bakewell cookstove in our summer kitchen. |
 |
| Marjorie the Margin Gem cookstove in the house kitchen. |
 |
| The Qualified Range in the house kitchen before beginning to remodel. |
Other than the occasional cup of tea, we are not tea drinkers at all; however, our teakettle gets a workout. These soldiers of the kitchen serve many purposes, and I suspicion that when cooks began the transition from wood and coal-fired ranges to gas, kerosene, and electric stoves, the ever-present teakettle was sorely missed. I know that each summer as we start to do more of our daily cooking with a modern range, I find myself feeling inconvenienced when I no longer have that old friend ready at my fingertips.
Of course, a teakettle is merely a pot with a pouring spout which is intended to be used to heat water. When a house is equipped with hot running water, or when a stove is equipped with a hot water reservoir, it may seem redundant to have a teakettle heating water on the stovetop as well. However, the water in the teakettle is used for different purposes than the water in those other systems. The water in the teakettle is generally hotter than water from the reservoir or the tap, and if you spend any time reading over old, from-scratch recipes, you'd be surprised at how many of them call for boiling water rather than merely hot water. Obviously, the cooks of the olden days were used to having their teakettles at the ready.
Another difference is that the water in the reservoir was often rainwater, which was what people meant when they referred to "soft" water prior to the advent of fancy electric water softening systems. This water would have been used for all kinds of washing, but it would not have been consumed. Of course, not all homes were equipped with a rainwater cistern, so their reservoirs would have been filled with well water, which obviously was often simply called "hard" water. However, as my copy of The Foxfire Book of Appalachian Cooking* states, "As bread crumbs or other food might fall into the water in the reservoir, a kettle of fresh water was always kept on the stove for coffee or tea or for adding to food that was cooking." I am amazed at how often I grab the teakettle to add a little boiling water to this or that which is cooking merrily away, and the best part is that the cooking is not slowed by this addition because the water is already boiling.
Jane Cooper devotes a section of her book Woodstove Cookery: At Home on the Range to the teakettle. A contributor to that book wrote that her grandmother kept eggs in the teakettle so that at a moment's notice, one could have a hardboiled egg for a snack (I wonder how green the yolks would have been after cooking for so long). Ms. Cooper also notes that steam from the teakettle would add much needed humidity to the dry winter air. This is true, but I'd like to point out that the same humidity is not as welcome on a sultry summer day. I've also read warnings in vintage cookbooks which state that if the teakettle is not permitted to be on the range all the time, the buildup of lime deposits inside it will be kept to a minimum. We do struggle with the lime deposit problem, but we choose to combat it with vinegar rather than remove the teakettle from the cooktop.
Our teakettle is a German-made vessel which we purchased from an Amish store near Redding, Iowa. It holds over a gallon of water and has a lid that is equipped with a "whistle" in the handle which sounds remarkably like the wail of a freight train when it boils. I would advise anyone interested in seriously cooking on a wood cookstove to purchase the largest teakettle that can be found. In my opinion, there is no point in messing around with the dinky little designer models that grace most store shelves today. Heating the greater quantity of water is not going to cost you any more since the teakettle heats as an incidental result of your cooking or heating fire, and I've never heard of anyone complaining because too much hot water was available. Furthermore, if you ever do any serious canning, that large teakettle will be a necessity.
A side benefit of keeping a teakettle on the stove top is that when the water gets to a certain temperature, the teakettle begins to make that humming noise that all pots make prior to reaching the boiling point. You can often tell what your fire is doing even if you are not right next to the stove simply by listening to what the teakettle sounds like. I guess you could call it a primitive version of the baby monitor or remote sensor.
I'd like to close this post with a poem which appeared in the January 1968 edition of Ideals magazine. Obviously, I'm not the only one who is conscious of the sound of the teakettle.
The Old Wood Stove
by Christel B. Ellis
The old wood stove would crackle
As the cedar dried and burned.
Through the grating coals would tumble,
Glowing red to black they turned.
And the firelight through the covers
Of that dear old kitchen range,
Turned the ceiling into patchwork
With each dancing fairy flame.
Like a warm and glowing magnet
We were drawn around the hearth,
And the high old corner woodbox
Was a warm and heavenly berth.
With our backs against the chimney
We would listen to the wind
As it swung the stovepipe damper
Up and down and back again.
Many crops were planned and planted
As the winter lingered on.
Near the hearth the neighbors gathered
Till the glowing coals were gone.
Woolen socks were always drying
Near the kitchen range back home.
The iron kettle hummed a love song
Folks today have never known.
I see the kitchen of my childhood,
Feel the warmth of that old range.
To have known its glow and comfort
Is a joy I'd not exchange.
I'm just happy that the sentiments recorded in the above poem can still be reality today!
* This is a very nifty book which I purchased for a dime when it was being purged from the Avoca Public Library's collection--probably the best thing I've ever bought for ten cents. It is full of pictures of people using woodburning cookstoves of every shape and variety and has some general instructions on how to not only cook on a wood cookstove, but also in a fireplace. It has quite a few wood cookstove memoirs in it, too.
Subscribe to:
Posts (Atom)