Thursday, December 31, 2020

An Egg Coddling Party around the Wood Cookstove

When my parents were married back in 1971, they were given a pair of egg coddlers for a wedding gift.  I only remember one or two times that Mom and Dad made coddled eggs while the three of us kids were at home, but that is understandable since they only had two egg coddlers.

My brother Kevin and I have taken to buying these little beauties whenever we see them, so between the two of us, we have now amassed enough of a fleet that we could have an egg coddling party.


Thus, last night my sister and her family, my brother and his family, my parents, and my aunt all came to our house and we coddled eggs and made Aebleskiver.

In the photo below, I'm beginning to fry Aebleskiver while Janet and Kevin work on preparing the accessories to the coddled eggs.  Mom commented that it was rare to see all three of us working over the same stove, but I think that has only never happened because no other stove besides a woodburning range would be big enough to accommodate all of us.  I will write a whole post about making Aebleskiver later, I promise.


The egg coddlers are little porcelain jars with stainless steel screw-top lids.  They are made by Royal Worcester and come with the following instructions:

"Lightly butter the inside of the cup.  Break egg into it.  Add butter, salt and pepper for flavor.  Screw on lid.  Cook six minutes in enough boiling water to cover coddler.  Lift cup from water by metal ring.  When you unscrew the top, grasp the whole cover.  If the egg is not cooked enough, replace the lid and return the coddler to the boiling water.

For variety, add flaked fish, cheese, herbs, chopped ham, mushrooms, etc. to the egg.  Coddlers are also ideal for heating baby foods."

What Kevin and Janet were working on in the picture above was sautéing mushrooms and cooking two different kinds of sausage as well as warming some diced ham.  We also had some chopped bell peppers and onions.


We beat a bunch of eggs together, poured a little into each coddler,  and mixed whatever other things we wanted into them and basically cooked our own individual egg casseroles.  My brother and brother-in-law wish that we had left the eggs whole, but we'll have to wait until next time to do it that way again.

The next picture is actually from the last egg coddling party that we had a couple of years ago.  You can see both the green enamel sweet corn kettle that we used again last night and my five-quart Magnalite Dutch oven.  The Dutch oven was nice because it was more shallow and therefore made it easier to retrieve the coddlers from the boiling water.


This time, we only used the green sweet corn kettle because I wanted to be able to remove the lid of the cookstove beneath it in order to facilitate the fastest boil possible.  This made it difficult to get the egg coddlers out of the water, though.  Thus, Kevin and Jason created a new kitchen tool out of a wire clothes hanger:

It worked like a charm, and I have been instructed to save it until the next egg coddling party.


We've found that six minutes is not quite long enough to suit our general taste, especially since we put so many coddlers down into the water at once, thereby reducing the water temperature below the boiling point for a while.  You can also see from the picture above that we have some coddlers that are larger than others; they naturally need some more time.  In general, we were cooking them for ten to twelve minutes.

Once the time has elapsed, unscrewing the lids is a process that needs caution and two hot pads.


When the eggs are cooked, they come out in little bell shapes.


Coddling eggs is a very labor-intensive and time-consuming way to prepare them for large groups of people, but getting together was the main point of last night's gathering.  Though we all live within an eleven mile radius, because of Covid-19, we have only been together twice since March: once on Mothers' Day and then again on Christmas.  We figured since we were already exposed to each other on Christmas, we might as well get together once more, and I really enjoyed having Janet and Kevin and their families back here with me in the house where we grew up.


Wednesday, December 23, 2020

Granny's Texas Pralines

Marjorie the Margin Gem and I have been very busy the last couple of days.  Yesterday we made Chex mix, Christmas Crack, and what we call "Angel Poop."  Today, in the middle of a powerful winter storm, the real cooking commenced with Meme's fudge, Meme's divinity, Meme's penuche, and Granny's Texas pralines.  "Granny" was what we called my grandmother on my dad's side.  She and Gramps lived next door for the first nineteen years of my life--first in the home where Nancy and I live now, later in the little house just to the west where my folks lived when I was born.

Granny was an excellent cook, but by the time I came along, her candy and cookie making days had given way to store-bought treats.  Older members of the family remember her filling the north porch at Christmas time with all manner of homemade confections, but my food memories of her center around the wonderful Midwestern dinners she made.  As was always the tradition with farm families around here, dinner was the noon meal, and supper was a lighter, less labor intensive affair.  Granny's dinners were known for the creamiest mashed potatoes, homegrown vegetables, and some of the best meats I've ever tasted.

During Christmas break of either my freshman or sophomore years of college, I went up to Gramps and Gran's and rifled through Granny's recipe box, copying whatever struck my fancy.  Unfortunately, the foods that I remembered the most fondly were the results of Granny's instincts, not written recipes.  (Her meatloaf was to die for, and I later discovered that it was the result of her Danish heritage, but I have yet to find a recipe that is close.)  

I did copy her recipe for Texas pralines, though I didn't really know what they were.  When I brought the recipe home, I showed it to my mom, who remembered it right away.

"Oh, those are SO good!" Mom said.  

Well, once again Mom was right: this is an outstanding candy recipe that I enjoy more and more each year.  Here is what you'll need:

2 c. granulated sugar

1 c. cultured buttermilk

1 teaspoon baking soda

1 T. butter

1 tsp. vanilla

pecan pieces or halves

Here is what you do:

1. In a 3- or 4-quart heavy bottomed saucepan, combine the sugar, buttermilk, and soda.  The buttermilk and soda will react and become quite foamy, which is why you need the large pan.  Bring these to a boil directly over the firebox, stirring constantly.

2. Once the mixture has come to a full boil, continue stirring constantly and move the pan to a cooler part of the stove to keep boiling gently.  Boil until it reaches the soft ball stage.  (I test in cold water, but you can use a candy thermometer if you prefer.) 

You can see from these photos that the mixture turns brown and its foaminess reduces as it cooks.


3. When the soft ball stage has been reached, remove from the fire and add the tablespoon of butter and teaspoon of vanilla.  Beat for awhile until it begins to thicken and looks like the picture below.

4. Add the pecans at this point.  There was no measure given in the recipe, so just add enough for it to look right as a dropped candy.  Continue beating until the candy thickens and loses most of its glossiness.

5. Drop by tablespoonfuls onto waxed paper.  Let cool completely and store in an airtight container.


If cooked according to these directions, this candy should be a very smooth coating to the pecans.

A northwest wind has howled all day long here with gusts so strong at times that it sounds like a semi-truck is approaching.  When I got up this morning at a little after six, the temperature was 43ºF.  It has dropped all day, and the snow started to blow this afternoon.  It was a perfect time to make this candy because standing and stirring constantly at the wood cookstove was a pleasure!

Tuesday, December 15, 2020

Vintage Recipe: Auntie Freda Sieck's Sour Cream Sugar Cookies

This post was requested by one of The Ivers Girls.  The Ivers Girls grew up as neighbors to my maternal grandparents, but to call them simply neighbors or family friends doesn't begin to describe the relationship that our two families share.  For well over fifty years, our lives have intertwined in so many ways that I'm not even able to number them all.  Over that half century, many, many recipes have been exchanged between the two families, so when the youngest of The Ivers Girls mentioned to me earlier this fall that she wished she had my grandma Marian's sugar cookie recipe, I was surprised.

"You mean Grandma never gave that to you?" I asked.

"Whenever I asked about it, all Marian would say was that there was 'nothing special in it,'" she responded.

This is very surprising to me because my Grandma was not one to keep any recipe a secret, especially one like this that she used so frequently.  When I was young, these cookies would show up about once per month from October to April.  In October, they were cut in the shapes of pumpkins and leaves and were frosted with orange tinted icing.  Come November, they appeared in the shapes of turkeys with orange or brown frosting.  Of course, in December they were cut in all sorts of Christmas shapes, and the frosting would be white, pink, and pastel green.  (Grandma didn't believe in darkly colored frosting; she said that you shouldn't have to taste the color.)  In late December, Grandma would make another batch and cut them all into bells to "ring in the new year."  These always had white frosting and usually a cinnamon candy for the clapper.  In February, they appeared as pink frosted hearts; in March, green-frosted shamrocks.  Finally, in April dozens of eggs, crosses, and churches would be cut out.

My mother's favorite story about these cookies is from the Christmas season that was most likely my freshman year of high school.  She had just returned to teaching full-time, and we were extremely busy with activities, too.  Mom had mixed a batch of these and put the dough to chill on our enclosed north porch, which often serves as a walk-in cooler in the winter months.  She always covered the mixer bowl with a luncheon plate, making it easy to access.  As we kids walked in and out of the kitchen door, it was too easy to just lift the plate and grab a bite of cookie dough.  None of that batch of dough actually made it to the oven.  While I would feel terribly irresponsible if I recommended eating cookie dough with raw eggs and flour in it, I will admit that this dough is really good!

My grandma actually sold these cookies for a short time in the 1990s, and while most people associate this recipe with her, she got the recipe from her paternal aunt, and she forever referred to them as Auntie Freda's Sour Cream Cookies--hence the title of this post.  

So, without further ado, here is the big "secret."  Here are the ingredients:

2 cups sugar

1 cup shortening

2 eggs

1 cup sour cream (commercial or country, but not too sour if using country)

1 tsp. soda

2 tsp. vanilla

dash salt

4 1/2 - 5 1/2 cups flour (or more)

And here is the method:

Cream the shortening and sugar.


Beat in the eggs.

Add the sour cream.

Stir in the soda, salt, and vanilla.

Beat well and then begin adding the flour a cup at a time.

Add the flour a cup at a time until you have a dough that 
is not quite stiff enough to roll.  I had just a tad extra sour
cream in this batch because I wanted to finish out the
container, and I had to put in six cups of flour to get the
dough to the right consistency.

Chill the dough for at least two hours; overnight is better.


Now, here is the first real "secret" to getting these to turn out like Grandma Marian's.  When you roll these cookies out, you can choose what you like best.  My mom likes to roll them wafer thin because she likes them thin and crispy.  If you want a really thick cookie, these will work for that too.  However, Grandma always rolled them out to about a quarter of an inch, maybe less.

The next secret to getting them just like Grandma's is in the baking.  These need to be baked in a moderate oven, but here again, the length of time they are baked depends on your personal preference.  Mom likes them best when they are brown all over.  They are good that way, too, but just be aware that the flavor is completely different than if you bake them just until the edges begin to show that they are turning a light brown.  Grandma was adamant about this.  I can still see her standing at her wall oven watching these cookies like a hawk.  As soon as the first hint of brownness began to appear at the edges, she whipped them out of the oven.  Depending on the heat of your oven, eight minutes may even be too long for these cookies to bake.

A word to my fellow wood cookstove users about baking cookies in a woodburning cookstove:

Remember that when you are baking cookies, you'll need to build your fire a little hotter than what you ordinarily would for the desired baking temperature.  Basically, if you need a 350ºF oven, build your fire in whatever way would give you a 375ºF oven.  The reason for this is that with cookie baking, you will be opening the oven door far more frequently than you would if you were baking a pie or a cake, for example, and a wood cookstove oven doesn't recover its heat as quickly as a modern one does.


A sheet of sour cream sugar cookies in the oven of
the Margin Gem cookstove.

Once the cookies have baked, immediately remove them from the cookie sheet to either a cooling rack for crispier cookies or a paper towel-covered countertop for a softer cookie.  You can tell what my preference is by looking below.
Grandma would say that the top and the third cookies
in the stack nearest the bottom of the photograph are baked too long.

The last and biggest secret to getting these cookies to taste exactly like Grandma's is in the frosting.  She would always just mix up a buttercream icing with powdered sugar, butter, water, and vanilla, BUT she would also add just a hint of almond flavoring--not so much that you would be able to immediately identify it, but enough that you can definitely taste it.  This little dab of almond flavoring really sets these cookies off.

Once the frosting has set enough to handle, pack these cookies into airtight containers, putting waxed paper between the layers to prevent the frosting from gluing them all together.  The frosting will soften the cookies over the next few hours, and the end product is deliciously addictive.

I wish I could give you an estimated yield, but I had put this dough out on the aforementioned north porch and did a poor job of resisting the temptation to snitch from it here and there.  Keep in mind, though, that with 5 1/2 cups of flour, this recipe makes a lot of cookies.  Enjoy!

Saturday, November 28, 2020

Book Review: "The Prepper's Cookbook" by Deborah D. Moore

It's been a quite a while since I've posted a book review on this blog, but I recently read a cookbook that has been in my collection for perhaps a couple of years: A Prepper's Cookbook: Twenty Years of Cooking in the Woods by Deborah D. Moore.  I don't remember where I found this little gem, but it is available from retailers online.  Originally, I purchased this because the advertisement I saw said that it contained information on how to cook on a woodburning cookstove.  It does indeed.

Situated in Michigan's Upper Peninsula, Ms. Moore's home is remote, and she has to be ready to be snowed in for days at a time.  Thus, she keeps a very well-stocked pantry that is a combination of home-preserved and store-bought foods.  Ms. Moore has also cooked on her Enterprise King wood cookstove for more than twenty years, so she definitely qualifies as an expert on prepper cooking.  For me, though, the best thing about this cookbook is that it is a modern collection of recipes that have all been regularly prepared on a woodburning range.


Ms. Moore has included a very wide variety of recipes in her cookbook.  With Harvest Chowder on page 19 and Pecan Chicken on page 165, she's got literally everything from soup to nuts.  The recipes vary greatly in their difficulty levels too: some are a lot of work; others are simple, but all are made with ingredients that could easily be a part of any well-stocked pantry and freezer. 

Before each section of the cookbook, Ms. Moore has placed brief essays on many different subjects.  This is where she includes five pages of information about cooking on a woodburning cookstove.  In such a short space, Ms. Moore does an excellent job of giving the basics.  The only thing she says that I would disagree with is that she advises cleaning all of the ashes off the top of the oven box.  I'm sure that on her stove that gives her the best baking results.  However, in both the Qualified Range and the Margin Gem, I have found that leaving at least a half inch of ash on top of the oven box is beneficial.  See, in these models of cookstove, the oven basically heats from the top down, so to create the most even heating, it is important to keep the flue on the bottom of the oven clean, but a layer of insulation on the top is good.  Other than that, Ms. Moore and I are largely in agreement about these wondrous appliances.

On a side note, I read a negative review of this cookbook online from a reader who said she was disappointed because the information about cooking on a woodburning range was so short.  I wish I could get a hold of her and direct her to my blog!

My only negative criticisms are that there was some kind of a printing error on one of the recipes, making it obviously incomplete.  I also did not enjoy some of the essays at the beginning of the different sections of the cookbook.  These are generally small, though, so they aren't a big problem for me.

When I read this book in the late summer, one of the recipes that really caught my eye was the one for "Canned Cole Slaw."  I did not grow any cabbage in my garden this summer, but I had everything else the recipe called for, and the idea of having cole slaw in a jar was intriguing.  I tried it, following the recipe to the letter.


On Sunday, October 18th, I opened a pint of it to see what it tastes like.  Following Ms. Moore's advice, I rinsed the slaw twice.  This allowed much of the sugar, vinegar, and celery seed to come off.  I then mixed some sugar and a little pepper into some mayonnaise and folded that into the slaw.  The end product was good, if a bit krauty, but even Ms. Moore says in her narrative that the recipe is not meant to be a substitute for fresh cole slaw, rather a close second during the long winter months when fresh produce is harder to come by.  

I'm looking forward to trying other recipes from this cookbook in the future.

Thursday, November 26, 2020

Vintage Recipe: Grandma Ruth's Escalloped Corn

Well, Marjorie the Margin Gem's complete Thanksgiving meal count is now officially two.  Last year, I blogged about the first entire Thanksgiving meal that was cooked on her.  This year, because of Covid-19 gathering size restrictions, Nancy and I elected to celebrate Thanksgiving at home.  Nancy's parents had elected to do the same, and since we were going to cook a full dinner anyway, we called them when the meal was ready.  We plated enough for them and slid it all into the back of their van so they could take it home to eat.  Thus, we cooked Thanksgiving dinner for only four people so we didn't have to use the stovetop oven like last year.  Though you can't see all four dishes in the oven, here is a shot of the cookstove with all of the food ready:

The Margin Gem with all of the hot dishes for Thanksgiving Dinner ready.
From the top left, our 10 lb. turkey and the roaster bottom full of gravy. On
the stovetop is the kettle of mashed potatoes.  In the oven, the top rack holds
the dressing in the front with the sweet potato souffle' behind it.  The bottom
oven rack holds the green bean casserole, and behind that is the escalloped
corn.  (The Magnalite pan on the reservoir is empty.)

The recipe that I want to share today is for my great-grandma Ruth's escalloped corn.  This is a very simple and economical old-fashioned dish that has been a staple on my family's dinner tables since my grandfather was a boy.  I'm sure my great-grandmother originally made this in her woodburning cookstove, and it cooks beautifully in mine every time, too.  What's also nice is that it seems to bake equally well on the floor of the oven or up on the middle rack, making it particularly easy to cook with other things in the oven at the same time. 

For a single batch, start by beating two eggs. 


To the eggs, add 2 Tablespoons of sugar, a 1/2 teaspoon of salt, and a dash of pepper.


Then beat in 3/4 cup of saltine cracker crumbs, 1/2 cup milk, and 1/2 cup cream.


Lastly, add one can of cream style corn.  Mix well and pour into a greased casserole dish.


Bake in a moderate oven for 30 - 45 minutes.  During the last ten minutes of baking, sprinkle buttered cracker crumbs over the top.


Hints and Remarks:
  • If you don't want to spring for the cream, you can omit it and increase the milk to 3/4 c.  The texture of the final product won't be quite so fluffy, but you won't notice any difference in the flavor.
  • The reason for the huge range in baking time is because how long this needs to bake is dependent on upon the depth of the corn in the dish you chose to use--the deeper the corn, the longer the baking time will need to be.
  • You can tell that this is done baking when the whole thing is slightly mounded in the center and it doesn't jiggle anymore when you shake the pan.
  • If you crush one sleeve of saltine crackers, you will have the perfect amount for the 3/4 c. in the corn as well as the buttered crumbs on the top.
  • If you want to reduce the carbs in this recipe, feel free to omit the crumbs on the top.  You will never miss them.  
  • This recipe serves about six.  If you double it, it fits well in a 9x13 dish.
And here is the recipe in a little more accessible form:

2 eggs
2 T. sugar
1/2 tsp. salt
dash pepper
3/4 c. saltine cracker crumbs
1/2 c. milk
1/2 c. cream
1 15 oz. can cream style corn

Bake 30-45 minutes at 350ºF in greased casserole dish, sprinkling buttered
cracker crumbs on the top during the last ten minutes.

Hope you all had a Happy Thanksgiving!

Thursday, November 19, 2020

Burning Cow Chips in a Wood Cookstove

A century and a half ago, it was not uncommon for residents of America's Great Plains to use cow or buffalo dung as fuel in their cookstoves.  Trees were limited on the prairie, and often wood would have to be hauled from quite a distance to the kitchen range.  Thus, corncobs, "cats" of twisted grass, sunflower stalks, and animal dung became familiar fuels to our pioneer ancestors.

We don't have any shortage of wood on our farm, and we don't have a shortage of cow chips either.  For the sake of this blog and for the learning experience, I collected some cow chips late in the summer and burned them in the Margin Gem.  Below are several photographs of the cow chips during combustion along with some of my general observations about their performance.

Looking through the front "eye" over the firebox at the flames
from the cow chips.

Cow Chip Selection

Just as one might evaluate different pieces of firewood for their heating potential, one will want to be selective about which cow chips are chosen for the stove.  I don't want to be too indelicate, but...well...not all cow chips are created equal.  The best chips for fuel purposes will come from cows which have had plenty of dry roughage in their diets.  This creates the driest, most fibrous chip which will remain cohesive during handling and will provide the most heat potential too.  The buffalo chips on the prairie were such good fuel because the bison would have only had prairie grass and other fibrous vegetation to eat.  The more grain in the bovine diet, the poorer quality fuel the chips will be.


A closer view of the flames as the cow chips burn.

The quality of cow chips is also seasonal.  Pasture grass in the spring and early summer tends to be richer in moisture and other nutrients, causing cattle's bowels to be pretty loose.  The nature of cattle's output during this time makes finding anything that resembles a "chip" pretty difficult.  Later in the season, as the rains slack off and both the grass and the weather tend to be drier, what the bovine produces is more likely to be deposited in the "cow pie" form and is thus more easily collected.

Yet another shot of the combustion of cow dung in the wood cookstove.

Once the cow chip has been manufactured, the weather will be what determines when it can actually be used for fuel because sufficient time and sunshine must elapse in order for the dung to become firm enough to be handled and dry enough to burn.  Basically, when you pick up the chip, you don't want to see any evidence of moisture in it.  Because it was so much dryer than normal around here in late August and the very earliest part of September, that is when I collected the fuel that you see burning in the pictures.  

One must also keep in mind that a cow chip can be quite dry on the top, but very moist on the bottom side.  Therefore, to make the chips burnable, they may need to be inverted in good, warm sunshine for a while.


As the chips continue to burn, you can see that the edges are
beginning to form coals, just like wood does.

Directions for Use

To use cow chips for fuel, one must first start the fire using kindling wood or corncobs in the normal fashion.  Once the fire is burning well enough that it would be ready for split pieces of wood, one can add the dry cow chips.  The drafts should be open so that plenty of oxygen is available to aid in the ignition of the fuel.  Once the first chips are burning, add additional chips as frequently as you would if you were burning lightweight firewood such as poplar or cottonwood, leaving the drafts and stovepipe damper open enough to keep the flue gases exiting the house at a pretty good clip.  Trust me when I say that no one wants this kind of smoke escaping into the house.

As the cow chips burn, they put out a good, hot heat.  They also will form relatively short-lived coals that are similar to those of lightweight wood or corncobs, but they are coals nonetheless.


Additional Considerations

Despite the availability of cow chips, I'm going to stick with wood as my primary cooking fuel.  I find the smoke from burning cow chips has a disagreeable odor, and they are more susceptible to taking on moisture than wood, too.  Furthermore, it would take an awful lot of cow chips to create the same amount of heat that a pickup load of wood would yield.

That said, the most important takeaway here is that--unlike an electric or gas range which can only utilize one type of energy source--a wood cookstove has quite a range of fuel versatility.  

If you have any personal experience or historic stories about cooking and heating with cow chips as fuel, please share in the comments!  

Friday, October 30, 2020

Link to a Great Cookstove Video

With the latest uptick in Covid-19 cases around here, I've taken to eating my school lunch alone in the classroom in which I am substituting to minimize my exposure.  And since I'm by myself, I watch Youtube videos while I eat.  Among other things, I watch whatever videos I can find about cooking on a wood cookstove, and I found a fantastic one this week.  

Cape Cod couple Tom and Lauren own and use an antique Herald C range made by O. G. Thomas in Taunton, Massachusetts.  They've had the range since the 1970s and had it restored in the 1990s.  Besides supplementing their home heating, the range does a lot of their cooking as it is conveniently located between their kitchen and living room.

The reason I'm excited to link to this video is because it contains excellent footage of the flue path around the oven, the oven damper, and the oven clean out door for this style of range.  I've mentioned before that the woodburning ranges which were manufactured in the Northeast are entirely different from those manufactured in the Midwest, and I've never seen a stove like this in person, so this video is an excellent resource for those of us who are unfamiliar with this style of stove.  The video contains several points of new learning for me, and I was totally fascinated.

The first thing that caught my attention was the tool that he demonstrates at 00:39.  I've never seen something that could lift the "T" and the two lids over the firebox at once.  I might have to put one of these on my Christmas list sometime for use on the Hayes-Custer!

The second surprise for me was at 1:22 when we get to see the oven clean out door.  I did not know that some of these were located so that they opened into what is called the "hearth" on this style of stove.  It seems to me like this would be a much cleaner way to remove the soot from the flue path around the oven than having the door open at the front of the stove.

Starting at 2:00, you can see the flue path around the oven.  In the diagram's below from John Vivian's book Wood Heat, you can see two flue paths.  I'm used to the version on the top, but the video shows an excellent version of the lower design.

The oven damper is demonstrated at 3:28, and I've never seen another one like it.

At 14:10 Tom does an excellent job of explaining the function of the check draft on the upper left side of the firebox, too.  To me, this is one of the most informative Youtube videos I've ever seen about a wood cookstove.

So after all of that advertising, here is the link:

https://www.youtube.com/watch?v=NkIXYG7GRzU&t=5s

Please do them a favor and hit the like button on the video.  For bonus content, you can see them making a Cape Cod Clam Boil along with appetizers on the cookstove at this link:

https://www.youtube.com/watch?v=XfKriNvj1nw

I hope you all enjoy these videos as much as I did, and I'm very thankful for Tom's permission to link to them here.

Friday, October 16, 2020

Economizing with Your Wood Cookstove

In the autumn of 2019, we didn't turn off our electric water heater and make the annual switch to wood heated water and daily firing of the Margin Gem until October 11.   Well, the fall of 2020 has been much cooler here, and with the economic uncertainties of the world today, it seemed prudent to make this transition much earlier.  Thus, we turned off our electric hot water heater on August 30 of this year, and with the exception of running it again for an hour and a quarter on Labor Day, which happened to be hot, all of our water has been heated by the Margin Gem since then.  And because the Margin Gem has been fired daily, the vast majority of our cooking has been done on it too.  This is the earliest we've ever made that transition, and the monetary savings has already been borne out in our most recent electric bill.

This got me to thinking about wood cookstove economics.  If you don't have to pay for your fuel, the wood cookstove can be an enormous money saver.  Yes, buying and installing a woodburning range is quite an investment, but as long as you can harvest and work up your own fuel, you begin to save money starting with the first fire you use in your range.  In the face of dire economic circumstances, I think a woodburning cookstove can be a tremendous tool for making a household as cost-efficient as possible.  Below you will find a list of some ways to take advantage of the money-savings a woodburning cookstove can provide.  Links are provided to posts which go into more detail.

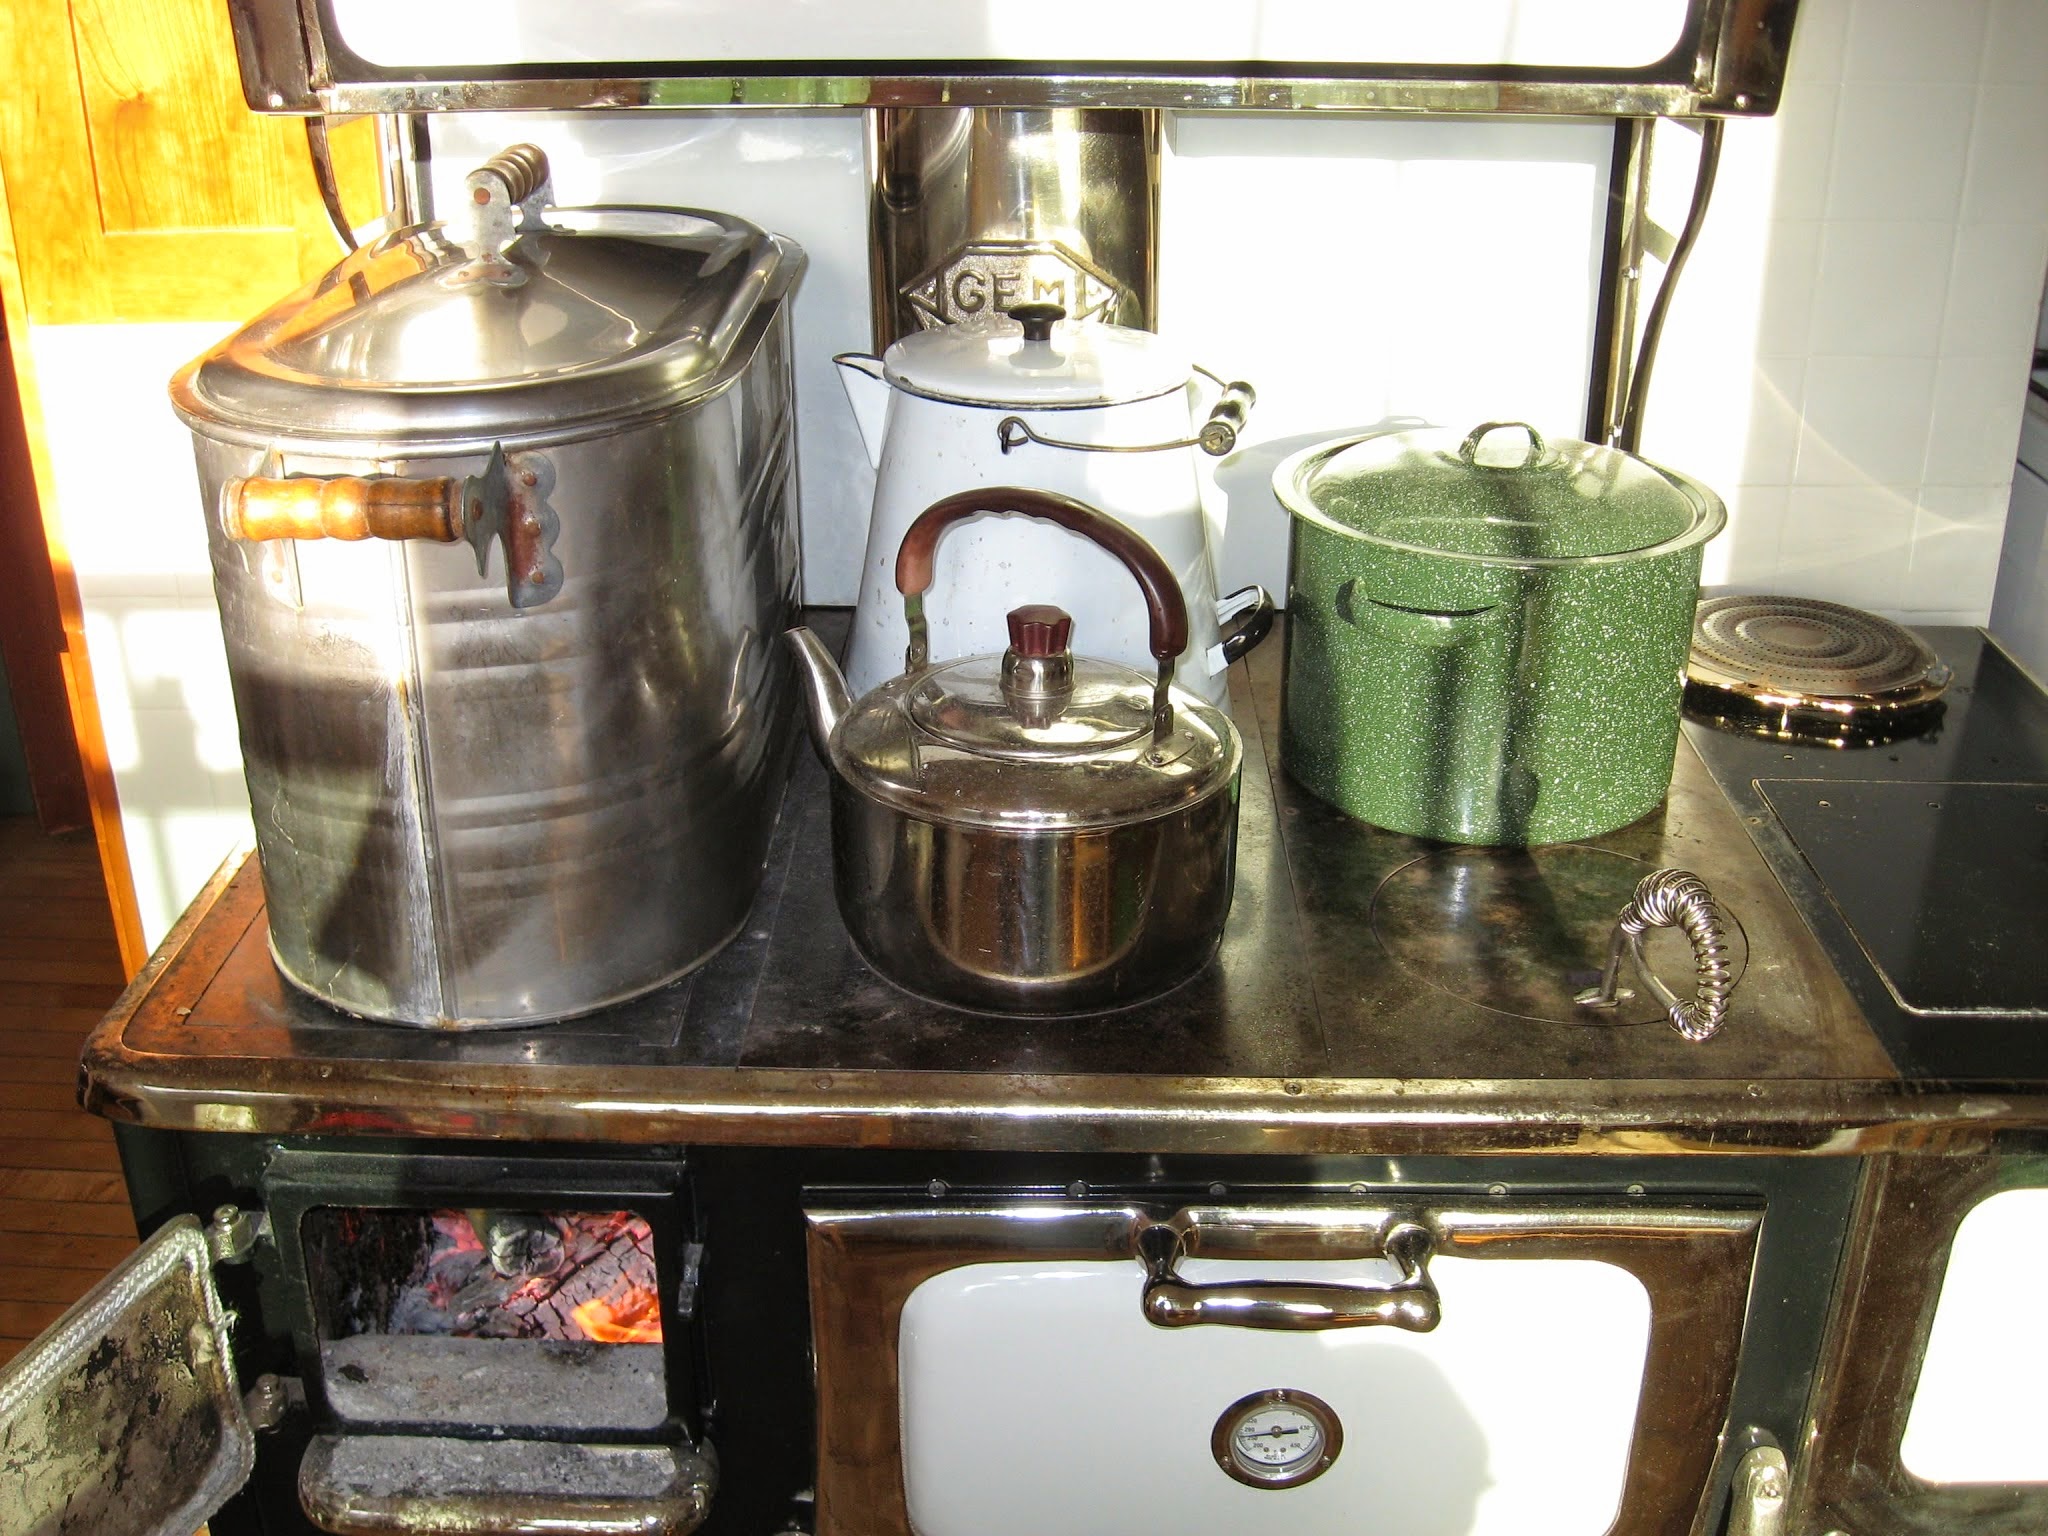
A). Use a Wood Cookstove to Heat Domestic Hot Water

Shutting off our electric hot water heater shaves a minimum of $20 from our electric bill each month.  I figure that by the end of this calendar year, having our water heated by the Margin Gem will have saved us at least $1300 over the life of the system so far.  This means that the extra cost of the range boiler, the water jacket, and the specialized plumbing has paid for itself, and there are many years of continued service left in them.  If your water system and local codes will allow the installation of a range boiler system on your woodburning cookstove, I highly recommend it.

However, even if hot running water from your cookstove is not an option, heating water with your cookstove can be accomplished in a number of other ways.  Most cookstoves have a water reservoir option for heating water that is manually drawn from the stove.  In my experience, water heated in the range's reservoir is much hotter than the temperature at which most people would set their automatic water heaters.  Thus, a water reservoir that only holds five gallons actually provides far more hot water than its capacity because the super-heated hot water will have to be tempered with additional cold water before it can be used.


In addition to a reservoir, water can be heated in vessels on top of the stove.  The most commonly found is the old-fashioned teakettle; its spout makes using the water from it quite convenient, too.  You'd be surprised how many dishes can be washed and rinsed in a mere gallon of boiling water that has been diluted with cold water to a usable temperature.  You may find it impossible to turn off your automatic water heater, but you can still save a little money by supplementing it with a little hot water here and there from your wood cookstove.


B. Take Advantage of the Home Heating Capacity of Your Woodburning Range

The woodburning cookstove can be a powerful heater.  In fact, new ranges even come complete with BTU ratings and information about the number of square feet that they can heat.  I'm kind of amused by that because when you look at old cookstove advertisements, the heating capacity of the range is never mentioned.  Instead, they were always about the quality of the stove's construction, its fuel efficiency, and ALWAYS about its superior baking capabilities--even though history is replete with stories about cookstoves being the sole source of heat for many homes.  Nowadays, advertisements tout the cookstove's heating capacity, but they don't say much about how well a stove can bake.  Oh, the pendulum swings we see in life!

To maximize the heating capabilities of your woodburning range, keep the cooktop as free from extra kettles and miscellaneous as possible in order to let the heat radiate into the room.  Open that oven door, too!  The greater the surface area that is exposed, the greater the heat sent into the room.

Also, a strategically placed fan can move the heat through your house better, making you feel warmer when you are not standing right next to the stove.  You can see our wood stove fan to the right on the Qualified Range below.  For more details about getting the most heat from your wood cookstove, visit this post. 


C) Use Your Woodburning Range Instead of Your Small Kitchen Appliances

Conventional kitchen wisdom is that electric countertop appliances use less energy than utilizing your kitchen stove to accomplish the same cooking task.  This is the complete opposite of what happens when your kitchen stove is a woodburning range.  Here is a list of small electrics that can stay in the cupboard when the cookstove is in use:

The Electric Skillet
French Toast cooking on the wood cookstove.

The Toaster

For a very lengthy post about the many ways you can toast bread on a wood cookstove, visit here and here.

The Microwave

In the pictures below, you can see me using the warming ovens on both the Riverside Bakewell and the Margin Gem to soften or melt butter and to defrost homemade applesauce.  Susan Fenoff, in her video about using wood cookstoves, calls the warming oven her "Amish microwave."


The Waffle Iron


Waffles are delicious, but waffles cooked on a wood cookstove are a step above in my opinion.


The Slow Cooker or Crock Pot

There are actually many ways that you can use your cookstove as a slow cooker/crock pot, but the method discussed in this post creates the most similar heat by using your wood cookstove's oven with the door open.

The Electric Wok

I don't know anyone with an electric wok anymore, but I know they exist.  However, you don't need one because you can cook wonderful Oriental food in a stovetop wok on a wood cookstove.

The Insta-Pot

I am almost afraid to point this one out since I know many people are in love with their Insta-Pots, but you can use a pressure cooker on top of a wood cookstove quite easily.  Sure, it won't do all of the things that an Insta-Pot can do, but you can pick up a cheap used pressure cooker in second hand stores very easily, and the food possibilities are endless and fast.


My favorite thing to cook in a pressure cooker is tougher cuts of meat, but you can quickly cook vegetables, rice, and even hot cereals in them.

The Popcorn Popper

You'll need a very hot fire, but you can easily pop popcorn on top of a woodburning cookstove, and don't worry about having a fancy hand-cranked popper.  You can get popcorn that is every bit as delicious by shaking it in a plain old saucepan.

The Deep Fat Fryer

Of course you have to be careful, but the wood cookstove is great for deep fat frying.  Historically, wood cookstove cooks favored frying over baking because it is easier to control the temperature of the oil than the oven.  In the picture above, you see homemade chicken nuggets frying on the Margin Gem, and in the post I wrote about them, I discuss the details and cautions that are necessary to deep fat fry on a wood cookstove.

Some readers may look at the above points and note that specialized equipment is sometimes necessary.  For example, in order to bake waffles on your wood cookstove, a stovetop waffle iron is a requirement.  They are increasingly hard to come by in antique stores, and the price has risen exponentially in the last twenty years.  However, new stovetop waffle irons are still available from Lehman Hardware, and at anywhere between $30 - $60, they are competitively priced with new electric ones.  Stovetop waffle irons can be used on gas and electric coil-type modern ranges too, so they are not a bad investment when your countertop waffle iron gives up the ghost.

D. Use Your Wood Cookstove in Place of Other Non-Cooking Appliances

Your wood cookstove can do the jobs of other energy consuming appliances as well.  Here is a list of non-cooking appliances that you can unplug:

The Scentsy® Warmer

Wonderful aromas can be sent wafting through your home by simmering potpourri on top of your wood cookstove.  You'd be amazed how many things resting quietly in your spice rack can be put to use as perfumes for your house without having to spend a ton of money on a ceramic warmer and individually packaged lumps of colored soy oil.

Still, if the colored lumps are your preference, you can melt them in a pan on the cool end of the range just as well as in the expensive warmers.  The same can be said of candles in glass jars.  When we get down to the bottom of a candle which has a scent we really enjoy, instead of lighting the candle, we just put the glass jar as far away from the fire as possible.  The warmth of the stove still melts the wax so that it can emit the scent.  Eventually, the aroma wears away and the candle can move onto its next stage of usefulness, but we've taken all possible advantage of its perfume.  NOTE: Just be sure not to put any glass candle vessels where the heat of the fire is so intense that it could break the glass.  That could be a disastrous fire hazard!

The Clothes Iron

I know, I know.  Some of you are laughing because it's been years since you've ironed any clothes at all.  Well, more power to you.  But for those of us for whom ironing is still a very real chore, ironing can still be accomplished with a wood cookstove as your source of heat.  That's all I'll say about that here.

The Clothes Dryer


American households have to be the worst in the world about wasting energy to dry clothing.  Oops!  Sorry, I jumped up on one of my soapboxes there for a second.  Seriously, though, a clothes rack placed near the wood cookstove can speed along the drying process for freshly laundered clothes.  In the past, woodburning ranges were even equipped with rods for drying towels, mittens, and socks.  Cookstoves can still be used to cheaply and quickly dry clothes.  The double advantage in this is that your can also unplug your home humidifier if you are hanging your clothes to dry indoors.

E. Eat Leftovers

Reducing food waste is one of the easiest things a household manager can do to save money.  In the future, I hope to write a series of posts which give hints and recipes for making leftover foods into entirely new dishes.  I will admit that reheating leftovers is the primary function of our microwave oven, but there are many more tasty ways that leftovers can be reheated or re-made using the wood cookstove.  For example, instead of tossing mashed potatoes in the microwave and having them come out smelling unappetizing and looking no better, making mashed potato patties requires only a little extra effort, and the end product is three times as delicious.

Two posts that I already have which deal with leftovers include one about how to use leftover roast beef and gravy that is very good.  However, if you are really serious about stretching your grocery dollar, the most economical food discussed on this blog is definitely pot-au-feu.

A bowl of Pot-a-Feu.

Literally translated from the French, pot-a-feu means "pot on the fire."  It is as delicious as you want it to be, it is never the same twice, and it is only feasible on a wood cookstove.  

In short, to get the largest financial return from a wood cookstove, make it the energy center of the home.  This is most certainly the way our ancestors used their kitchen ranges, and if one of today's households is blessed with a working wood cookstove, it still has every capability of serving in that capacity.

So, dear readers, what have I missed?  Fill up the comments below with what you do, what you remember your ancestors doing, or what you have heard others did to save money with a wood cookstove.  I'm anxiously awaiting your feedback.