Friday, December 31, 2021

Grandma Ruth's Gingerbread

I am not dead.

I can understand why my faithful readers may have thought so over the few months since there has been radio silence from me on this blog since July.  To sum up the events which have happened since then, we hosted a family reunion in early August (such a privilege to be able to do that), I returned to full-time teaching later that month (nobody's more surprised than I am), both Nancy and I contracted Covid-19 (despite being vaccinated), and I feel like I've been chasing my tail ever since.

As a matter of record keeping, we didn't start daily firing of the wood cook stove until the latter half of October of this year.  We'd had a few fires here and there as temperatures in the house and our cooking needs dictated, but it wasn't until the weather became regularly chilly that we made the commitment to shutting off the electric water heater and having a wood fire every day.  That was a full month and a half later than it was in 2020.

From then until a couple of days ago, Marjorie the Margin Gem was embarrassingly filthy, and she would not have stood to have her picture taken for blogging.  She finally got her long-overdue bath last Tuesday and with the exception of the interior of her oven, she is ready to pose for the camera once more.

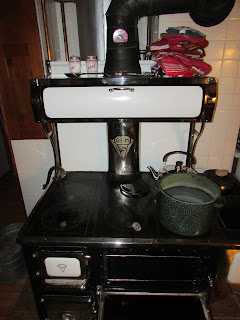
A picture of Marjorie snapped this evening.
She looked even better before Nancy and I
fried bacon on her this morning.

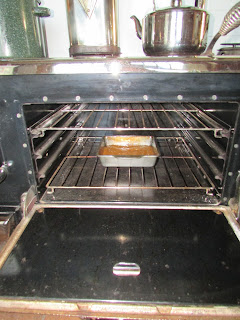
With the extremely busy schedule we've been keeping, I haven't cooked anything very interesting or that hasn't already landed on this blog in some way or another.  We were invited to supper at my best-friend-since-second-grade's house last night, though, and when I asked what we could bring, "Dessert" was the answer.  Thus, I pulled out an ancient recipe that I haven't made for at least eighteen years because Nancy had never had it: Grandma Ruth's Gingerbread.

I think it is interesting how certain members of the family will always be known for the special foods they make.  My dad, for example, will be forever known as the creator of the "Super Duper" a microwaved sandwich whose genesis in the early 1980s went completely unnoticed in the culinary world, but whose presence on our supper plates during that decade was a fairly regular occurrence.  Mom was the family donut maker, and Granny's mashed potatoes were the smoothest and fluffiest (she credited them to her powerful arms which she swore were the result of milking cows for so many years).  Meme was known for her cinnamon rolls, her old-fashioned candies, and the endless flow of cookies that came from her oven.  

My grandma Marian was probably the best all-around cook in my family, but she would always say that her mother-in-law, Grandma Ruth, was who taught her to cook.  Born in 1897, Grandma Ruth was the second of nine children in a prosperous farming family south of Council Bluffs, Iowa.  Her older sister Olive preferred to work outside in the barns or garden, so Grandma Ruth was employed in the kitchen with her mother and a hired girl named Olga.  

With eleven members of the family, Olga, and at least two hired men, preparing all of the food for fourteen every day caused Grandma Ruth to become a good cook in short order.  I consider Grandma Ruth our family's first "foodie."  Once she had her own kitchen, my grandpa remembered her as a person who often tried new recipes.  However, she didn't like making food that she considered sub-par.  Grandpa specifically remembered her making a new recipe for some kind of fruity ice cream that he and his father just loved.  "But she didn't like it, and we never saw it again," Grandpa lamented.  

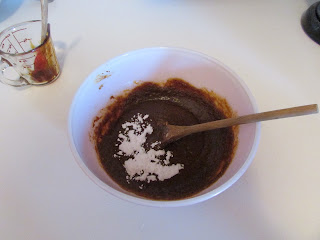
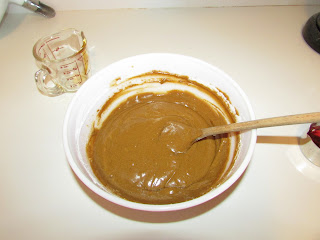
Grandma Ruth was known for her cakes and pies.  One of the recipes that I associate with Grandma Ruth is gingerbread.  Her gingerbread is of the cake variety, not the cookie type.  In today's world, it seems like desserts run toward chocolate more often than anything with fruits being a close second, but in years past, spices were what cooks relied on to keep things interesting, and brown sugar and molasses were more affordable sweeteners than white sugar.  The age of this recipe is shown by its use of these ingredients along with its half cup of boiling water from the wood cookstove's ever-present teakettle.  In addition to the boiling water, here is what is needed to make this old-fashioned dessert:


1/3 cup brown sugar
1/3 cup shortening
1 egg
1/3 cup molasses (I think mild flavored is best for this.)
3/4 teaspoon nutmeg
3/4 teaspoon cloves (I scant this)
1/4 teaspoon ginger
dash vanilla
3/4 teaspoon baking powder
3/4 teaspoon baking soda
1 1/2 cups sifted flour

Of course, as is so often the case with Grandma Ruth's recipes, the instructions for this recipe are sparse.  They simply say, "If mixing by hand, be sure to alternate flour and water."  I'll be a little more specific than that for all of you.

If baking this in a wood cookstove, build your fire such that you will have a moderate oven (350ºF).  Grease an 8" x 8" square cake pan.

1. Cream the brown sugar and shortening.


2. Add the egg and molasses and beat them in.

3. Add the nutmeg, cloves, ginger, and vanilla.


4. Beat in the baking soda and the baking powder next.


5. Alternately add the sifted flour and the half cup boiling water by starting with a half cup flour, then a quarter cup of the water, another half cup of flour, the rest of the boiling water, and the remaining half cup of flour.  The batter will become fluffy as the boiling water reacts with the leavening agents.


6. Pour the batter into your prepared pan and bake in a moderate oven until it tests done.  Mine took 23 minutes.


7. In my family, gingerbread is always served with sweetened whipped cream on top.

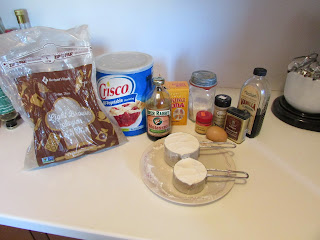
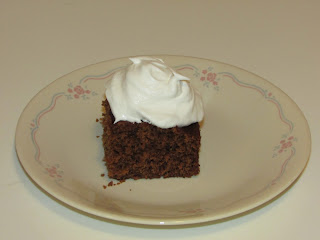
This recipe has what I would call "old world flavor."  The molasses and spices hearken back to a time when people's tastes in desserts were entirely different from what we are used to now, and with each forkful my imagination runs wild with what my great-great grandparents might have been thinking as they enjoyed this same recipe over a century ago.

Tuesday, July 6, 2021

Recreating One of My Favorite School Lunches on the Wood Cookstove

You would never have caught me saying that I loved school lunches when I was growing up.  The food that my mom, grandmothers, and aunts made at home was far superior to anything that was served to us at school.  There were a couple of meals, however, that I did really like.  One was maidrites (or sloppy joes or taverns--whatever you call them) and the other was beans and wieners.  I know, I know.  I suspect that most of the other kids thought what you're thinking because by the time I was in high school, we never had them anymore.

Beans and wieners were always served with a piece of delicious cornbread and a helping of canned pineapple.  This combination never changed, and that was fine with me.  These days, this is a meal that I make on one wood cookstove or another at least once a year using foods that I have canned on a wood cookstove.

In my previous post, I wrote about how to make homemade cornbread in a wood cookstove.  While that is baking, I use the heat of the stovetop to make my beans and wieners.  

In the picture below, you can see a home-canned jar of pork and beans processed on the Margin Gem last year that I wrote about in this post.  The half-pint jar is extra tomato sauce from when we canned Homemade Heinz Ketchup last summer.  You can read about that recipe at this post.  The jar on the right is a pint of home-canned pineapple.  I blogged about that here.  If you've ever had home-canned pineapple, you'll never want to buy a can of it in a grocery store again.  It is SO GOOD!  

Of course, the remaining item in the picture is the package of hot dogs.  I have to admit that, in my opinion anyway, the cheaper the hot dogs, the better the beans and wieners taste.  I don't even want to think about why.


For this batch of beans and wieners, I mixed the jar of beans and the jar of tomato sauce with a little extra brown sugar and a dash of dry mustard and cinnamon and the tiniest sprinkling of ground cloves.  These are the spices that go in the homemade ketchup recipe.  Under ordinary circumstances, I would have just added some homemade ketchup to the jar of beans.  However, the beans in that batch were extremely dry, so I knew I needed more liquid than normal, and the half-pint of tomato sauce fit the bill perfectly.

I sliced maybe four hot dogs into the mixture, stirred it all together, and took it out to the Hayes-Custer cookstove in the summer kitchen.


Since you have to have a pretty hot oven to bake the cornbread, cooking the beans and wieners directly over the firebox is not a good idea because they will almost certainly scorch.  Thus, I had them in the middle of the cooktop.  I stir them frequently until they have come to a boil and the hot dogs are heated through.


By the time the beans and wieners are cooked, the cornbread should be done.


Now at school, of course, this meal was served on putrid-green lunch trays with all the divided compartments to keep the foods from running together.  Those trays were a source of particular frustration to me on Beans and Wieners Day because I discovered early on that the cornbread and the beans and wieners are best eaten together.  I used to labor diligently to make sure that each forkful had a piece of cornbread and a dollop of beans and wieners on it.

Now that I'm grown up and can serve this the way I want, I pour the beans and wieners right on top of the slab of cornbread.  Delicious!  It's definitely my favorite way to eat cornbread since it's a lot less work to make sure that each forkful has some of both.  

The home-canned pineapple sends this meal over the top, and I don't know why I don't make it more often.

Wednesday, June 30, 2021

Baking Cornbread in a Wood Cookstove

When I was growing up, I could take or leave cornbread.  My mom used the same recipe that her mother Grandma Marian used.  Maybe the recipe was even Grandma Gladys's or from further back in our family than that.  I don't know.  While it was just fine, it wasn't my favorite recipe for cornbread.

I remember enjoying the cornbread that was served in school lunch, though, and I mentioned that to Phyllis, a family friend and now one of the ladies who comes in to help with the Monday Market baking here in the summer.  Years ago, Phyllis invited me over for supper on a night when she was serving her family cornbread, and her recipe was just what I was looking for!

Phyllis has graduated to a cornbread recipe that she says is even better than this one, but I'm sticking with this version--which I've changed a little from the original version.  Here is what I do:

In a medium-sized bowl, place 1 cup all-purpose flour, 1 cup cornmeal, 1/3 cup sugar, 4 teaspoons baking powder, and 1/2 tsp. salt.


Whisk all of these dry ingredients together.


Into a glass measuring cup, put 1 and 1/4 cups buttermilk, 1/3 cup salad oil, and 1 egg.


Beat these wet ingredients together until well blended.


Add the wet mixture to the dry ingredient mixture and stir only until well combines.  You don't want to over mix at this step because that will make your cornbread tough.  Pour all into a greased 8" x 8" dark square pan.  


Bake in a moderately hot oven (400ºF) until edges are slightly brown and have begun to pull away from the pan and the center tests done when a toothpick comes out clean.


I find that pulling a pan of cornbread out of the oven of a woodburning cookstove feels somehow--what is the word? "nostalgic" maybe?--since we know that this was a staple on the supper tables of history.  I notice that our local Fareway sells cornbread alongside the other bakery goods, but I haven't dared try it.  For one thing, I know that homemade cornbread does not keep well at all, so I figure there must be all manner of preservatives in what they sell at the grocery store.  Besides, this is not a difficult recipe, and I don't think anything could come close to the flavor of it fresh out of the oven.  

When I was growing up, cornbread was served with white corn syrup or molasses.  This is not my preferred method of serving it, however.  Stay tuned for the next post to see how I like to eat mine!

Sunday, June 20, 2021

Cherry Bars Baked in the Hayes-Custer

In my last post, I said that I would be bringing a series of posts to you about cooking out in the summer kitchen.  I've started those, but this isn't one of them.  

We have five sour cherry trees here on our farm.  Three are courtesy of my grandparents, and the other two are volunteer children of our venerated Montmorency cherry tree.  The Montmorency cherries are my favorite, but they aren't quite ready yet.  Nancy and I did pick from the other two dwarf cherry trees yesterday, though, and as she is not a pie lover, I made cherry bars.  I've seen this recipe in several places, but we first had these in the early 80s after my aunt Rhonda Jo made them.  Now, they are a recipe that I will forever associate with her.

I think Rhonda Jo probably made them with canned cherry pie filling, but since we are starting with fresh fruit, the first thing we had to do is convert the cherries into pie filling.  To do that we use an old Kitchen Klatter recipe that my Great-Grandma Ruth very likely copied down as she was listening to the radio.  

For one batch of cherry pie filling, you need the following:

4 cups of fresh cherries

1 to 1 1/2 cups cherry juice (the juice from the cherries should be sufficient)

1 cup sugar

3 to 4 Tablespoons cornstarch

1/2 teaspoon almond flavoring

This avocado green plastic colander belonged to Granny,
my paternal grandmother, and I've been picking cherries
into it for almost forty years.

Of course, you first have to pit the cherries, saving as much of the juice as you can.  The process of pitting cherries by hand is messy and not an appropriate place for a camera, so there are no pictures of that step.  Sorry.  

Both of my grandmothers, Meme, and my mom were all very thrifty cooks, and very little of the produce that we grew here at home went to waste.  I grew up watching this team of women work for hours over dishpans of wormy apples just to save whatever they could for human consumption.  Hence, Granny always made us save the pits as we processed cherries.  She would then put just the tiniest bit of water on them in a saucepan and bring them to a boil on the stove to get as much of the cherry juice as possible.  I don't know whether this is necessary or not, but this is what she always did, so I continue the tradition.
  
The cherry pits and a splash of water coming to
a boil over a freshly started fire in the Hayes-Custer
in the summer kitchen.

The boiling cherry pits.

Once you have all of the juice drained off the pits, place the four cups of cherries, the juice, one cup of sugar and 3 to 4 Tablespoons of cornstarch in a heavy-bottomed saucepan.  

Start cooking this mixture directly over the firebox, but when it begins to thicken, move it to the middle of the cooktop to continue cooking until the desired thickness is reached.

Hint: This step can be a bit tricky.  Sometimes (often), this has not wanted to thicken for me.  I discovered that if you strain the cherries from the juice and cook just the juice, sugar, and cornstarch directly over the fire, once it reaches a good boil, it will thicken when you add the cherries back into the hot mixture.

It has been extremely dry around here this spring, though, and we had a hard time getting much juice to come out of the cherries at all.  Thus, yesterday, I actually had to add a little boiling water from the teakettle in order to thin the mixture to an appropriate consistency.  You just have to watch and be careful!


Remove the cherry mixture from the stove and stir in a 1/2 tsp. almond flavoring.  Set aside.

For the batter, you will need 1 cup of very soft butter (no substitutes) and 1 3/4 cups of sugar.  

Please pardon my avocado green Sunbeam Mixmaster.
It is uglier than sin.  It belonged to Granny, and when I 
inherited it 26 years ago, I thought I would just use it
until it died.  The thing has to be near to fifty years old now
and shows no sign of dying anytime soon.  How I wish she'd
bought a white one!

Cream the butter and the sugar together until smooth.


Add four eggs to the butter and sugar mixture.


To the above, beat in 1 tsp. vanilla, 1/2 tsp. salt, and 1 1/4 tsp. baking powder.


Stir in 3 cups of sifted all-purpose flour.  Good luck trying to keep from tasting the batter at this point.  It is SO GOOD!

Spread two-thirds of the batter into the bottom of a greased jelly roll pan.


Spread the cherry filling over the bottom layer of batter, and then dollop the remaining batter on the top.


Bake in a moderate oven for about a half hour until it begins to pull away from the edges and is golden brown.

Doesn't the Hayes-Custer do a nice job
of baking?

Notes:

If you want to freeze sour cherries for later use in pie filling, pour the cherry juice from cooking the pits, the four cups of cherries, and the cup of sugar into a freezer container and freeze.  When ready for use, thaw, drain the sweetened juice off, add the starch and cook.  Add the cherries once the juice and starch have come to a boil and thickened.

If you were going to make a cherry pie with the filling, I would recommend adding a dash of cinnamon to it along with the almond flavoring.  JUST a dash, though.

These bars can be made with any type of canned pie filling.  Strawberry is one that I've seen fairly frequently.

Some people drizzle a little vanilla icing over these bars.  Now, I love frosting and put it only lots of things, however, I will admit to thinking that these are sweet enough without it.  You do what you want, though.

Thursday, June 17, 2021

Cooking on the Hayes-Custer in the Summer Kitchen Again

Nancy has pronounced me crazy.

My insanity is not news, however.  My longtime, loyal readers and certainly those who know me personally had no doubt arrived at this conclusion long ago, so that is not the reason for this blogpost.

The reason for this blogpost and the reason that Nancy has pronounced me crazy are one and the same.  She made her proclamation when she saw me hauling a large skillet of cauliflower out to the summer kitchen a week ago Saturday.  

"You're cooking out there?" she said incredulously.

"Yes," I responded.

She looked at me strangely.

"I've told you how much I don't like cooking on that gas stove," I said, shrugging.

"You're crazy," said she.

Guilty as charged, I guess.  I've said before on this blog that no method of cooking compares to cooking on a woodburning cookstove, and now that I don't have to give it up for the summer, I don't plan to.

I had posted on May 22nd that we had turned our electric water heater back on.  However, we had some cooler weather after that, so I fired the Margin Gem again for a few more days.  We left the electric water heater on, but we used the valves in the basement to alternate using water heated electrically and water heated by the Margin Gem.  Once the first of June rolled around, however, the weather got quite warm again, so I have not had a fire inside the house since then.

I've put a two-burner electric hot plate on the reservoir of the Margin Gem in the house kitchen--something that was done quite frequently in history judging from the pictures I've seen.  I've used this for only very light cooking here and there.  Any serious cooking and baking has been hauled out to the summer kitchen.

I really think this Hayes-Custer is quite fuel efficient.  On just a few sticks, I can do quite a bit of cooking and baking.  Speaking of baking, I think it does a beautiful job of it.  In the picture below, I left the goods in the oven about three minutes too long (my fault entirely), but isn't everything a beautiful, uniform golden brown?  I didn't have to rotate anything during the baking time, either.

Bread and rolls coming out of the oven on the Hayes-Custer.  Notice how 
small a fire was required to keep the oven hot.

Oh, and I wish someone would explain something to me: Why do I like cinnamon rolls that are made out of bread dough so well?  I make very good cinnamon rolls using my own variation of my aunt Meme's recipe.  For Monday Market baking, I mix up 15 batches of those rolls, five batches at a time.  People stand in line to buy them.  But, when I'm baking bread for just Nancy and me, I sometimes make one loaf's worth of the dough into a pan of cinnamon rolls.  That's what I did in the picture above.  And I love them!  They have less fat and less sugar in the dough; they are not nearly so light.  In fact they're downright chewy, and I savor every bite!  But why?

Anyway, the picture below is my first ever attempt at tater-tot casserole.  It was very good, but I'm just not a huge fan of tater-tots.  I would like to try it as the recipe originally said, which was to make it with sliced potatoes.  We'll see.  Didn't the Hayes-Custer do a nice job of browning the tater-tots, though?  Nancy doesn't like vegetables to be in the casserole, so the two saucepans over the firebox have home-grown peas and sweet corn from our freezer in them.


During Covid-19 quarantine time, I learned to make hamburger buns from scratch.  The ones that I made on Tuesday of this week were the best batch ever.  The secret?  I think it was the fact that I used bacon grease in them instead of Crisco or vegetable oil.  I've never done that before.

The buns didn't taste like bacon at all, but they were very tender.  They look a little brown on the top, but they were actually just perfect.  I made them for the barbecued shredded pork that you can see in the smaller saucepan directly above the oven.  I made the shredded pork out of some that I had canned on the Margin Gem back in 2017.  The sandwiches were very delicious.

When I start a fire to do some cooking in the summer, I try to take advantage of the fire as much as possible in order to be more efficient.  The black saucepan on the warming shelf has hardboiled eggs in it that are being timed before their cold water bath.  The saucepan over the firebox was water coming to a boil for cooking pasta for a salad.

The last picture is of yesterday's breakfast--and supper and today's supper actually.  The pancakes and part of the bacon were the breakfast.  The rest of the bacon and the chicken breast hidden inside that small cast iron skillet on the back of the range all went into the aforementioned pasta salad.

Breakfast cooking on the Hayes-Custer wood cookstove.

There has been much more cooking done on the Hayes-Custer already this summer, but not every occasion has warranted a picture.  As you can see, the stove has been busy, and I must say, it's been very cooperative too.

I've got a series of posts using this stove coming up, so stay tuned!

Saturday, May 22, 2021

The End of the '20 - '21 Heating Season

 Just wanted to drop a quick post for record keeping purposes.  We turned on the electric water heater this morning after turning it off on August 31 of 2020.  I would have liked to hold out until June 1st, but two things happened.  The first is that Nancy and I received our Johnson and Johnson Covid-19 vaccination yesterday, and we haven't been feeling too perky today.  Our internal thermostats have been a little wacky, as a result, which brings me to the second thing.  We've had a lot of rain here lately, and the humidity was running very high overnight and this morning.  Thus, the idea of starting a fire for hot water just didn't sound at all appealing today, so we caved.  I don't regret it a bit.  The last thing I want from my wood cookstove is to be enslaved by it, so it was a wise choice.

School will be out after Thursday of this coming week, so I'm hoping to start cooking in the summer kitchen soon.  Look out for future posts centering around the Hayes-Custer!

Friday, April 30, 2021

In Praise of the Margin Gem's Waterfront

Things have been ridiculously busy in our lives over the last several weeks.  School has kept me occupied with both substituting and accompanying the choirs; our church has hired a pastor; after a futile housing hunt we prepared our little house here on the farm for him and his wife to live in; and our church is converting a former doctor's office into our new church building.

You will note from the list above that I haven't done any spring gardening or cleaning, and I didn't even put mowing on the list, though the yard is beginning to look like a jungle.  All of these necessary activities have prevented me from posting very regularly.

Through it all, we've still managed to be firing the Margin Gem on a daily basis.  My goal is to have it heat all of our hot water until the end of May, but we shall see.  Lots of factors play into this, such as how much time I have to keep gathering and cutting fuel, how hot the weather becomes, the levels of humidity indoors and out, whether I can keep enough dry fuel ahead, etc.

Today, though, I just wanted to write a quick post to say how truly impressed I am by the water heating capacity of our Margin Gem system.  In something I read or watched or in a phone conversation with Daniel Fenoff of Stoves and More LLC, where we purchased our Margin Gem back in 2011, I remember him saying that during the summer months they lit a fire in their cookstove each morning in order to cook breakfast.  That fire heated enough water to meet their hot water needs until they had another fire in the evening to cook supper.  

With our schedule as full as it has been, we haven't been doing a lot of cooking.  Last night we had a cold supper, for example, and the night before that, all I made was a dish that my niece calls "Bougie Ramen."  As that involves simply boiling water for three minutes, it was far faster to cook it on the electric stove down in the basement.  Thus, what we've been doing is not starting a fire in the cookstove until just before we go to bed.  Once the fire is well established, I put large chunks of wood in the stove and turn the draft down so that the fire will burn all night.  When we get up in the morning, there is a nice bed of coals that I rake together.  I throw some kindling on this, wait a few minutes after it has caught fire, and throw a few more small pieces in.  This fire is sufficient to fry a couple eggs or make French toast, and it tops off the hot water enough that we can shower and wash dishes in the mornings.

(Note: The above firing method of firing the cookstove can create an unduly large accumulation of creosote in the chimney.  In order to prevent that, I have to use the driest wood that I can find.)

You don't have to have a very hot fire in order to heat quite a bit of water.  I think this is due to the large surface area of the Margin Gem's waterfront.

The interior of the Margin Gem firebox.

In the picture above, you can kind of see the waterfront.  It is the whole left side of the Margin Gem's firebox and measures approximately 16" x 12" which results in about 192 square inches of heat exchanging space.  Coupled with a stone-lined 40-gallon Vaughn range boiler, the heating capacity of this system is impressive, I think.

A picture of the Vaughn range boiler before it
was attached to the Margin Gem.

If I were going to level any complaint against this water system of ours, it would be at the mixing valve which tempers the water as it leaves the tank and goes into the house plumbing.  

Our problematic mixing valve.

Sometimes in the middle of a shower (and perhaps it does this at other times too, but we have no way of knowing) it behaves badly, sending the water from very pleasant to too cold to uncomfortably hot for no apparent reason.  We notice that this happens most frequently when the water in the tank is extremely hot.  I believe this little defect to be the result of the fact that it was damaged by the plumber during installation.  While this is annoying, it hasn't proven to be dangerous, and getting it replaced will not necessarily be expensive, but it will be colossally inconvenient.

The longterm weather forecast is for fairly cool weather, so we'll see how long we can hold out until we switch to electrically heated water for the summer.

Friday, April 9, 2021

Chicken Pot Pie Baked in a Wood Cookstove

This is a picture of an earlier chicken pot pie which
was baked in the Margin Gem; it's not the one you
will see in the photos below.

One thing Nancy and I both love is good chicken pot pie, and we're pretty happy with the version that I make.  Pulling a meat pie out of the oven of a woodburning cookstove gives one a feeling of satisfaction that is a close second to that of a beautifully browned turkey or a golden loaf of bread.

As always with any wood coookstove dish that is going to be baked, the first thing you have to do is to build your fire and heat the oven.  You need a "hot" oven for baking a pot pie, so build your fire so that your oven will run at about 425ºF.

I think the second step to making a really good chicken pot pie is making the right crust, and I'm excited to share the recipe that I use.  It originated from my reprint of the 1950 Betty Crocker Picture Cookbook (Wiley Publishing, Inc. and General Mills, Inc.), and it was labeled "English Pastry."  For a meat pie, especially a chicken pot pie, I think people generally are looking for a thicker, richer crust than one might find on a homemade fruit pie, for example.  As always, I've tweaked the recipe a bit, and now it's exactly what I'm looking for.

The ingredient list for the crust is as follows:

2 cups sifted all-purpose flour

2 tsp. baking powder

1 tsp. salt

2/3 cup butter flavor Crisco

1/2 c. hot water

1 Tablespoon lemon juice

1 egg yolk

1 egg white

1 Tablespoon cold water

Here is what you do:

1. Sift the flour, baking powder, and salt together.


2. Measure the butter flavor Crisco and pour the half cup of hot water over it from the teakettle.  Obviously, this will soften the shortening significantly.

3. Add the tablespoon of lemon juice to the shortening/hot water mixture and stir around a little.

4. While stirring the above mixture vigorously, add the egg yolk.  You've got to stir while doing this so that the egg yolk doesn't cook.


5. Combine the wet ingredients with the dry, stirring until no lumps of shortening are visible.


6. Pop the crust mixture into the freezer to chill while you mix and cook the filling.  If you're not going to be assembling this pie immediately, just put the pastry dough into the fridge.

Now, in the pictures that you see below, I used a quart of chicken breast meat that I had canned on the Margin Gem last fall.  When I can chicken, I fill the jar loosely with pieces of meat, and then I fill the jar to an inch from the top with hot water and add a bouillon cube or two.  After the meat has been processed in the pressure canner, the chicken usually condenses down to a little over a pint of meat swimming in about that much broth.

Here is what I did for the filling.  I'm sorry that there aren't any hard and fast measurements for any of this; it is always just by guess and by golly.

7. Drain the quart of canned chicken, putting the broth in a tall-sided frying pan.  I use my Magnalite chicken fryer.  To the broth I added one bouillon cube and a teaspoon of chicken base.  Put that directly over the firebox to come to a good boil.

8. While that was heating, I poured about a 1/2 cup of heavy cream into it along with the juice from a six-ounce can of mushrooms.

9. Add a half teaspoon of paprika, a dash of pepper, and a sprinkling of seasoned salt.

10. I beat about six tablespoons of all-purpose flour into a cup of cold milk until it was smooth.  

11. While stirring the hot mixture constantly, I added the milk and flour mixture. 

12. Once the flour and milk is added, stir constantly with a fork until everything comes to a boil and begins to thicken.  Once that happens, add the canned chicken, the canned mushrooms, a tablespoon of onion flakes, and a cup or two of mixed vegetables.  Bring everything to a boil again, stirring quite frequently.


13. Move the filling mixture as far away from the fire as possible so that it will just simmer very gently while you work on the crust.


14. Whisk the egg white and cold water from the crust ingredients until they're a little frothy on top.


15. Remove the pastry dough from wherever you had it chilling.  Pat 3/4 of the dough into the bottom and up the sides of a deep dish pie pan.  I find that our Pampered Chef deep dish stoneware pie plate is perfect for this.


16. Roll out the remaining pastry dough until it is just large enough to fit over the top of the pie.  I didn't stop quite soon enough in the picture below.


17. Pour the hot filling into the bottom crust, leaving about a half-inch of space at the top so that the pie won't boil over in your oven.


18. Put the top crust on the pie, pinching the edges together to seal.  (I'm embarrassed at the looks of this one as I didn't center the crust right and had to go back and patch it.)

19. Poke holes in the top crust to vent the pie; then brush the egg white/water mixture over the top.


20. Slide the pie into the hot oven and bake for about 25 minutes or until the pastry is a beautiful brown.


I took a picture of the oven thermometer while the pie was in the oven.  If you look closely, you can tell that the thermometer doesn't indicate that the oven is anywhere close to 425ºF, but experience tells me that it is.  If the thermometer on your wood cookstove's oven is not accurate, that doesn't mean that it's not useful.  For example, after almost a decade of baking in the Margin Gem, I don't pay any attention to the numbers on the thermometer.  Instead, it is more helpful to think of the thermometer like a clock face.  If the needle is pointing to 10:00, the oven is at 350º.  Eleven o'clock is 375º; noon is 400º; one o'clock is 425ºF.  If the needle goes past three o'clock, I need to open the oven door! 


After three or four attempts at photographing what the fire looks like in order to maintain a hot oven in the Margin Gem, I settled on this one.


Watch the pie carefully during the last few minutes.  When you're baking at an oven temperature this high, you don't want to let the crust burn.

Doesn't the egg white wash make a nice looking
crust?


I took this picture because I wanted to show that when this crust
is baked in a stone pie plate, it pulls away from the edges once
it's done (as long as you've done a good job of sealing the edges
and none of the filling has boiled down between the crust and
and the pan). You can see it particularly well at the lower left side.

21. After you remove the chicken pot pie from the oven, let it cool for a few minutes before you cut into it.  That will let the filling thicken even more, and it will be easier to neatly remove a piece.  

A piece of the finished chicken pot pie.

We find that this version of chicken pot pie reheats into very tasty leftovers.  In this household, that is a very high recommendation for any recipe!


The picture below is of the pie in the picture at the beginning of this post before it was baked.  I included it to prove that I can actually make a top crust that doesn't have to be patched!