Saturday, November 24, 2012

"Automatic" Cooking on a Wood Cookstove

My mother has always taken great advantage of the "Time Bake" feature of her electric stoves in order to be able to have Sunday dinner cook automatically while we were at church.  Nancy and I would occasionally do the same thing with our 1951 Hotpoint electric range, which we sometimes used in conjunction with the Qualified Range until we began remodeling our kitchen.  Usually, whatever meat dish we were having would be cooked in the Hotpoint, and then we would cook the side dishes on the Qualified once we got home.  The reason that we never cooked the whole meal in the woodburning cookstove was because the Qualified couldn't hold a constant fire for the time that we were gone to church since it wasn't airtight.  It would have been able to start the cooking with no problem, but the oven temperature would have dropped to a point where meats couldn't have been safely consumed.

The 1951 Hotpoint was delivered to a used appliance store to hopefully be refurbished and resold shortly after we began serious work on our kitchen in 2011.  I will admit to having been sad to see it go.  However, it had some quirks that Nancy found particularly unforgivable, and the new plan for the kitchen doesn't allow any space for it anyway.  The good news is that because Marjorie the Margin Gem is an airtight cookstove and is able to easily hold a fire while we are gone, I've begun to experiment with having her cook our dinner while we are gone to church.

In The Foxfire Book of Appalachian Cookery, Addie Norton is quoted as saying, "If I put a fire in that woodstove and go out of the house, it's not gonna get hotter.  It's gonna get cooler.  That wood's gonna burn up and it's not gonna hurt nothing."  For the most part, I would say that is true.  The exception is that if you fuel the fire right before you leave it, the fire will first get hotter and then will get cooler.  In an old style cookstove, this cycle will take less time, and the extremes in the hottest point and coolest point in that short cycle are most likely to have a wider gap between them.  In an airtight stove, the burn time will be longer, and the extremes of temperature will not be as discrepant.

Knowing how the heat of the stove will behave governs one's decisions regarding how and what to cook when you are having your wood cookstove cook "automatically."  For our initial experiment, I chose pork roast and mashed potatoes.  I seasoned the roast, put it in our red spatterware roaster, and slid it into the oven.  The oven was running at about 400 degrees at the time that the roast was put in. 

The potatoes were peeled and quartered and then put in a Saladmaster saucepan with a vented lid.  I chose that particular pot because I could put the lid on it tightly, but the chances of the potatoes boiling over were lower because the steam vent on the lid would have reduced the chance of that happening.  I was also only cooking a small amount of potatoes, so the pan was plenty tall in order to provide additional protection against boiling over.  The potatoes were placed between the rear middle and right lids.

Pork roast in the oven and potatoes on top of the stove
ready to cook while we are gone to church.

I then filled the firebox with large pieces of wood, turned the damper down, and completely closed the drafts.  We left at about nine in the morning and got back home at about 12:45.  When we returned, this is what we saw.

Cooked potatoes that were still very hot but no longer boiling.
They did boil, though.  You can tell that by the starch that is clinging
to the sides of the pot.
A completely cooked pork roast.  I know that the top looks burnt,
but there was a thick layer of fat on the top side of the roast.  I cut
the blackened part away since it was not meat anyway, and a tender,
succulent pork roast lay underneath.  The oven was still at a safe
temperature to hold the meat.
 
I put a pint of home-canned green beans on the stove to boil while I mashed the potatoes and carved the meat.  Nancy cut some pre-cooked bacon into the green beans and set the table.  Within minutes of coming home, we sat down to a wood-cooked meal that looked like this:

Yumm!
We deemed this experiment a definite success and feel that we have yet another reason to be glad that we upgraded from the Qualified Range to the Margin Gem.  I can't wait to try other combinations of dishes.  If I were to cook another pork roast in this manner, I think that I would add a little water or stock because I think that a little added moisture would have prevented the top of the roast from becoming overly browned.  My grandmother-in-law says that I also should have put the potatoes in with the roast.  I would have thought of this with a beef roast, but I guess my mother never did that with pork roasts, so I didn't think of it.  I don't think that the moisture from the potatoes would have been sufficient to prevent the over-browning, though.  At any rate, stay tuned for more "automatic" cooking experiments!

Saturday, November 17, 2012

Roasting a Turkey in the Wood Cookstove

My parents will be hosting our family's Thanksgiving celebration this year, but Nancy and I have hosted it several times since we have been married, and it is certainly one of my favorite meals to cook.  Of course, the centerpiece of most Thanksgiving dinners is the turkey, and the last one that we roasted in the Qualified Range in 2010 was the best one yet.  Fred, one of our neighbors and a longtime family friend of my mom's side, was a guest at our dinner that year, and he raved about the turkey.  He swore up and down that the reason that the Turkey was so delicious was because it was cooked in a wood cookstove.  I have read that some people believe that foods cooked in the oven of a wood cookstove are better than those cooked in modern ovens because both electric and gas ovens are vented, whereas the ovens on wood cookstoves are basically sealed when the door is shut.  The thought is that this helps keep the flavor in the food.  All theories aside, 2010's bird was fantastic, and I want to share how we cooked it.

I didn't have the energy that year to get all of the pies baked on the Wednesday evening before, so Nancy and I had gotten up early to bake the pumpkin pies.  I tend to keep the oven pretty hot for pie baking (see my post about that here), and our timing was such that when the last pie came out of the oven, it was imperative that the turkey be put in right away.

To prepare the turkey, I used a Reynolds oven bag, following the directions on the box for shaking flour inside the bag before putting the turkey in and cutting slits in the top of the bag.  Then, I rubbed butter all over the top of the bird to add a little flavor and encourage browning.  I sprinkled the top of the turkey with salt, pepper, paprika, and probably some Mrs. Dash.  We stuffed the turkey's cavity with part of the dressing that we made according to our family's tradition (I'll blog about that sometime).  We sealed the bag and put it in the oven, which was running at about four hundred degrees at that time.

Just before putting the turkey in the oven, I had fueled the fire, so the oven continued to run hot for at least the first forty-five minutes that the turkey was in the oven.  The turkey developed a beautiful, golden brown crust right away.  After that, we let the oven cool to about 325 until the turkey was cooked, timing it according to the directions for the oven bags.  Ideally, you want your turkey to be finished cooking about a half hour before your meal is to take place.  A meat thermometer inserted in the thickest part of the breast should register 180 degrees.

We then spooned the stuffing out of the turkey's cavity and mixed it into the rest of the dressing.  The turkey was permitted to rest for at least fifteen minutes; then it was removed from the bag to a platter for carving while all of the wonderful juice that it had been swimming in was made into gravy.

At every Thanksgiving dinner we've hosted, as soon as the turkey is out of the oven, I add quite a bit of small fuel to the fire and return the oven to about 400 degrees in order to dry out the dressing a little, brown the marshmallows on the top of the sweet potatoes, and cook the gravy.

Making sure that the turkey gets a chance to brown well while it is roasting also helps to ensure that the turkey gravy will have an appetizing color.  If your gravy is too light to be appealing, though, don't despair.  My grandma taught me that a little coffee added to the gravy aids in giving it good color and is usually undetectable as far as flavor goes.  If no coffee is already made, I've seen her put a few granules of instant coffee into the gravy to get the same effect.  Trust me on this one; if you do it right, no one will be the wiser.  Just remember to always taste the gravy as you are making it, adjusting your seasonings to fit your palate.

If, while the turkey is cooking, the top of it begins to brown too much, just lay a couple of pieces of foil over the top. This may be necessary because most wood cookstove ovens are hotter at the top than at the bottom. If the turkey is cooking too slowly, it helps to remove the stuffing from inside the turkey and cook it separately from the bird.

An additional consideration that a wood cookstove cook must make while cooking Thanksgiving dinner is the fact that there is usually a large pot of potatoes to cook along with other top-of-the-stove side dishes.  Generally, when I'm using extra large vessels on the cooktop, I keep a hotter fire because of the extra BTU's needed to heat the larger pots.  However, the hotter fire would result in the oven being too hot for roasting the turkey.  Thus, I always have to remember to put the potatoes and other sides on earlier than I normally would because they will take longer to come to a boil.

The only pictures that I have of any of the turkeys that I have roasted in a wood cookstove are some that my aunt took in 1999.  This was actually the second turkey that I had roasted in the Qualified range.

Thanksgiving 1999's roast turkey at the Qualified.  Note the large
stockpot of mashed potaoes over the firebox.  The other two pots
are carrots and green beans.

Man was I young then!  I don't look anything like that anymore.

Making the gravy.  The potatoes have been removed from the
range for mashing, and the two vegetables have been moved to
the coolest part of the cooktop because they are finished.
Astute blog readers will notice that the stovepipe angle in the pictures above is not the same as in other pictures of the Qualified Range.  When these pictures were taken, the Qualified had only been installed in our current house for a few months (I had it installed in our little rental house next door for about a year and a half when I lived up there).  I hired a professional to line the old kitchen chimney with stainless steel and install the Qualified in my present kitchen in the summer of 1999.  He configured the stovepipe so that it had a very direct route to the chimney, which is what is recommended to optimize draft.

However, I didn't like the look of the funky angles, and it was difficult to take the pipe down and put it back up for routine cleaning, so I changed it after a while.  We didn't install wall protection behind the stove until 2005 (a year after Nancy and I married), so until then, the stove stuck out into the kitchen quite a bit further in order to meet the clearance requirements.  In fact, the wall protection was installed on the weekend before Thanksgiving that year because Nancy and I were hosting, and we wanted to have more room to work and for our guests to travel through the kitchen (Have you ever noticed how people tend to gather in the kitchen during get-togethers, even when they aren't helping with the meal preparation?).

Hopefully, our kitchen will be finished by Thanksgiving of next year so that we can host the celebration again.  I'm looking forward to cooking a really large meal on the Margin Gem since it is so much bigger than the Qualified and has a warming oven to boot.

Saturday, November 3, 2012

Using a Stovetop Oven on a Wood Cookstove

Nancy and I spent a few days in Storm Lake, Iowa, while I attended a conference there about Concept-Based Curriculum and Instruction this last week.  On the evening of the second day, we ventured downtown and stopped in a candy and antique store.  There, clean and bright, stood a stovetop oven.  For those who are unfamiliar with these little contraptions, they are metal boxes which are placed on a stovetop and thus heated for baking.  Historically, the most common use for these ovens was for baking atop kerosene cookstoves, most of which did not come equipped with an oven.  In our area, many homes had kerosene cookstoves for use during the summertime when the extra heat of a wood or corncob-fired cookstove was particularly undesirable or unnecessary.  My great-great aunt Meme, who taught me to cook, used to talk about using a kerosene cookstove and stovetop oven occasionally during the summers and on days when the weather conditions prevented them from being able to get a fire started in the Monarch wood cookstove.

We have been looking for a stovetop oven since this summer when we were baking for the Monday Markets.  While baking for the markets, we operated at peek capacity most of the time.  Something was usually in the oven from as early as possible in the mornings to just a few minutes before we left to set up our table.  Even at that, demand exceeded supply.  We could have fired up the Riverside Bakewell down in the summer kitchen (we did, in fact, on the first baking day), but the distance to the summer kitchen from the house was too great to make that really feasible.  Furthermore, the heat radiating into the kitchen from the cooktop of Marjorie the Margin Gem was extremely uncomfortable, and it seemed like we ought to figure out a way to make better use of it.

New stovetop ovens are still being manufactured and can be purchased from Lehman Hardware.  These are rather expensive, though, and we couldn't believe that we would make enough additional sales at the Monday Markets to offset the cost.  We found a couple of ovens in antique venues, but the only one that was large enough to be at all helpful was not only quite expensive, but also had some visible insulating material which looked alarmingly like asbestos.  Thus, Wednesday's find was a happy one, especially since its price tag was less than half that of the first suitable antique we had located.

Of course, I had to try it out as soon as possible.  My first foray into the stovetop baking world was with a batch of from-a-box blueberry muffins.  I'm ashamed to admit that I 
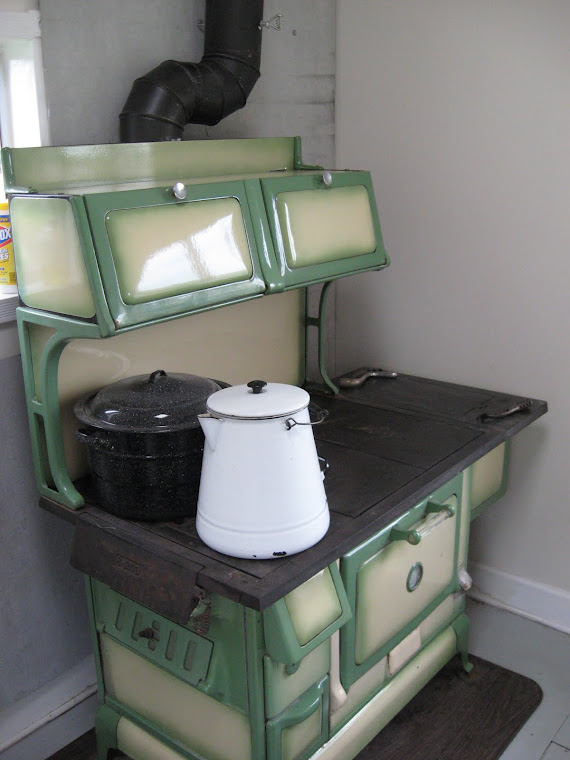
love from-a-box blueberry muffins.  There, I've confessed; now we can be done with that and move on.  I started with the oven positioned on the cookstove as shown below.

The stovetop oven heating on top of the Margin Gem.

I placed our trusty oven thermometer inside it because the thermometer in the door of it simply says "cold, BAKE, hot."  Don't you get a kick out of thermometers like that?

The oven thermometer inside the stovetop oven.  The shiny piece
of metal on the bottom is a baffle.  The right and left sides are
open to the stovetop below.
It didn't take too long for the oven to reach the appropriate temperature for baking muffins.


I popped them in and began to monitor their progress and the oven's temperature. 


I used one light pan and one dark pan to see which type of pan would work best. Just so the faithful blog readers who don't know me very well can get a glimpse into how tenaciously I hold onto the past, I'd like to point out that the pan on the left is one of a pair which belonged to my grandmother on my dad's side.  The pan on the right is one of a pair which belonged to the aforementioned aunt Meme. 

Obviously, I'm big into hand-me-downs.  Many people know this and give various wonderful things to me.  By the way, if you are the person (or know whom the person was) who left three pairs of blue jeans and a brown sort of mock suede shirt on our back porch, would you please make yourself known?  I really appreciate both your generosity and your belief--albeit mistaken--that I have a narrow enough waist to fit the jeans.  If you would like them back, you're going to have to forfeit your anonymity.  Otherwise, we're going to forward them to the Goodwill.

Where was I? 

The oven began to get too hot over the firebox, so I had to move it a little to the right.


After what was probably a little more than normal baking time, the muffins were done.  They weren't quite as brown on the top as they might have been had I baked them in the regular oven, but they were quite presentable.  You can also see from the second picture below that the bottoms were an acceptable brown also.


This was all very encouraging, but we don't sell from-a-box muffins at the Monday Market, so today I had to try baking bread in the stovetop oven.  I made a batch of whole wheat bread which should really have had more whole wheat flour in it, but when you don't measure much of anything, you are bound to turn out the occasional less-than-perfect-but-still-delicious batch of bread.

The oven beginning to heat while the loaves of bread rise in
Marjorie's warming oven.
Seven loaves of bread all ready to be baked at once.  Notice that
the thermometer in the oven door has moved to just a little to the
left of "BAKE."  The stockpot on the right is a mess of chicken
breasts being cooked for casseroles and salads next week.
I put four of the loaves into the Margin Gem's regular oven and initially put three loaves into the stovetop oven.  This was a mistake.  With three loaves in the oven, it was filled wall-to-wall with bread, and the heat rising from the cooktop was not allowed to sufficiently circulate within the oven to cook the tops of the loaves of bread.  I took the middle loaf out at about the halfway point, and the other two loaves immediately began to brown on the top--lesson learned.

The two loaves on the lower right were those which were baked
in the stovetop oven.  Their top crust is lighter due to the initial
presence of the third loaf.
The bottoms of the same loaves of bread.

Despite the difference in the complexion of the top crust, which I believe will be resolved next time since I won't try to cram too much into the oven, the loaves of bread baked in the stovetop oven were thoroughly cooked and identical to the other loaves in flavor.  All in all, we figure we have successfully accessorized our cookstove.  Not only have we increased our capacity for the Monday Markets, but as Nancy pointed out, we will be in better shape whenever we next host Thanksgiving dinner, too, since the foods that we traditionally make for that meal are mostly cooked in the oven.

As always, I hope this information is helpful to a reader, and if you've got information to add, please do so in the comments section.  I enjoy hearing from readers!