Friday, July 31, 2020

How to Can Using Glass Canning Lids and Top-Seal Rubber Rings

First of all, let me say right up front that I am NOT recommending that anyone can with glass lids.  The safest way to can foods at home is to use the flat metal dome lids that have the sealing compound attached to the outer rim.  I find that kind of lid to be extremely convenient and reliable, and the "ping" that you hear as they seal is one of the most rewarding sounds that I know.  They are definitely my favorite canning lids to use.

However, from what I read online and what I see in stores around here, we are currently in a nationwide shortage of that type of canning lid.  Our experiences so far in 2020 have taught us that supply lines can certainly become unreliable, so I think it is anybody's guess as to when canning lids will be readily available again.  And surely Nancy and I are not the only people in whose basement rest boxes of antique canning supplies which have been passed down from generation to generation simply because no one took the time to throw them out!

Now, part of this blog's purpose is the preservation of the nearly lost skill of cooking on a woodburning cookstove, and let's be honest: its tone is unmistakeable.  I am a huge proponent of using wood cookstoves.

This post is different, though.  This is not a ringing endorsement for the use of glass canning lids; it is merely an educational post so that information about another nearly lost skill is out there and available for others.  I'm afraid it could come in quite handy in the near future.

Enough with the disclaimers and onto the meat of the post:

The data that I'm going to share with you comes from my 1937 Ball Blue Book, my 1946 Kerr Canning Home Canning manual, and my 1953 Ball Blue Book.  While I wouldn't consider the canning time tables and the instructions for oven and open kettle canning pertinent anymore, the information on how to operate the canning hardware itself is still accurate for these vintage lids.

The equipment that you will need is unique to this type of jar closure.  Of course, the first necessity is the actual glass lid itself.  To be clear, there were two types of glass canning lid marketed in the first half of the twentieth century.  One type was for the bail-type jars and had a niche in the top in order to accommodate the upper wire bail which held it in place. These are larger in diameter and have a convex shape.

The lids that I'm talking about here are the same diameter as today's dome lids and fit over the opening of the jar just like they do.  They have a lip on the bottom side which fits down inside the jar.

A picture of a Presto brand glass canning lid.
These lids can only be used with metal bands that are specifically made for them.  I have two different styles of bands; one has the hour-glass shaped opening in the top, and the other looks like a standard canning jar ring.


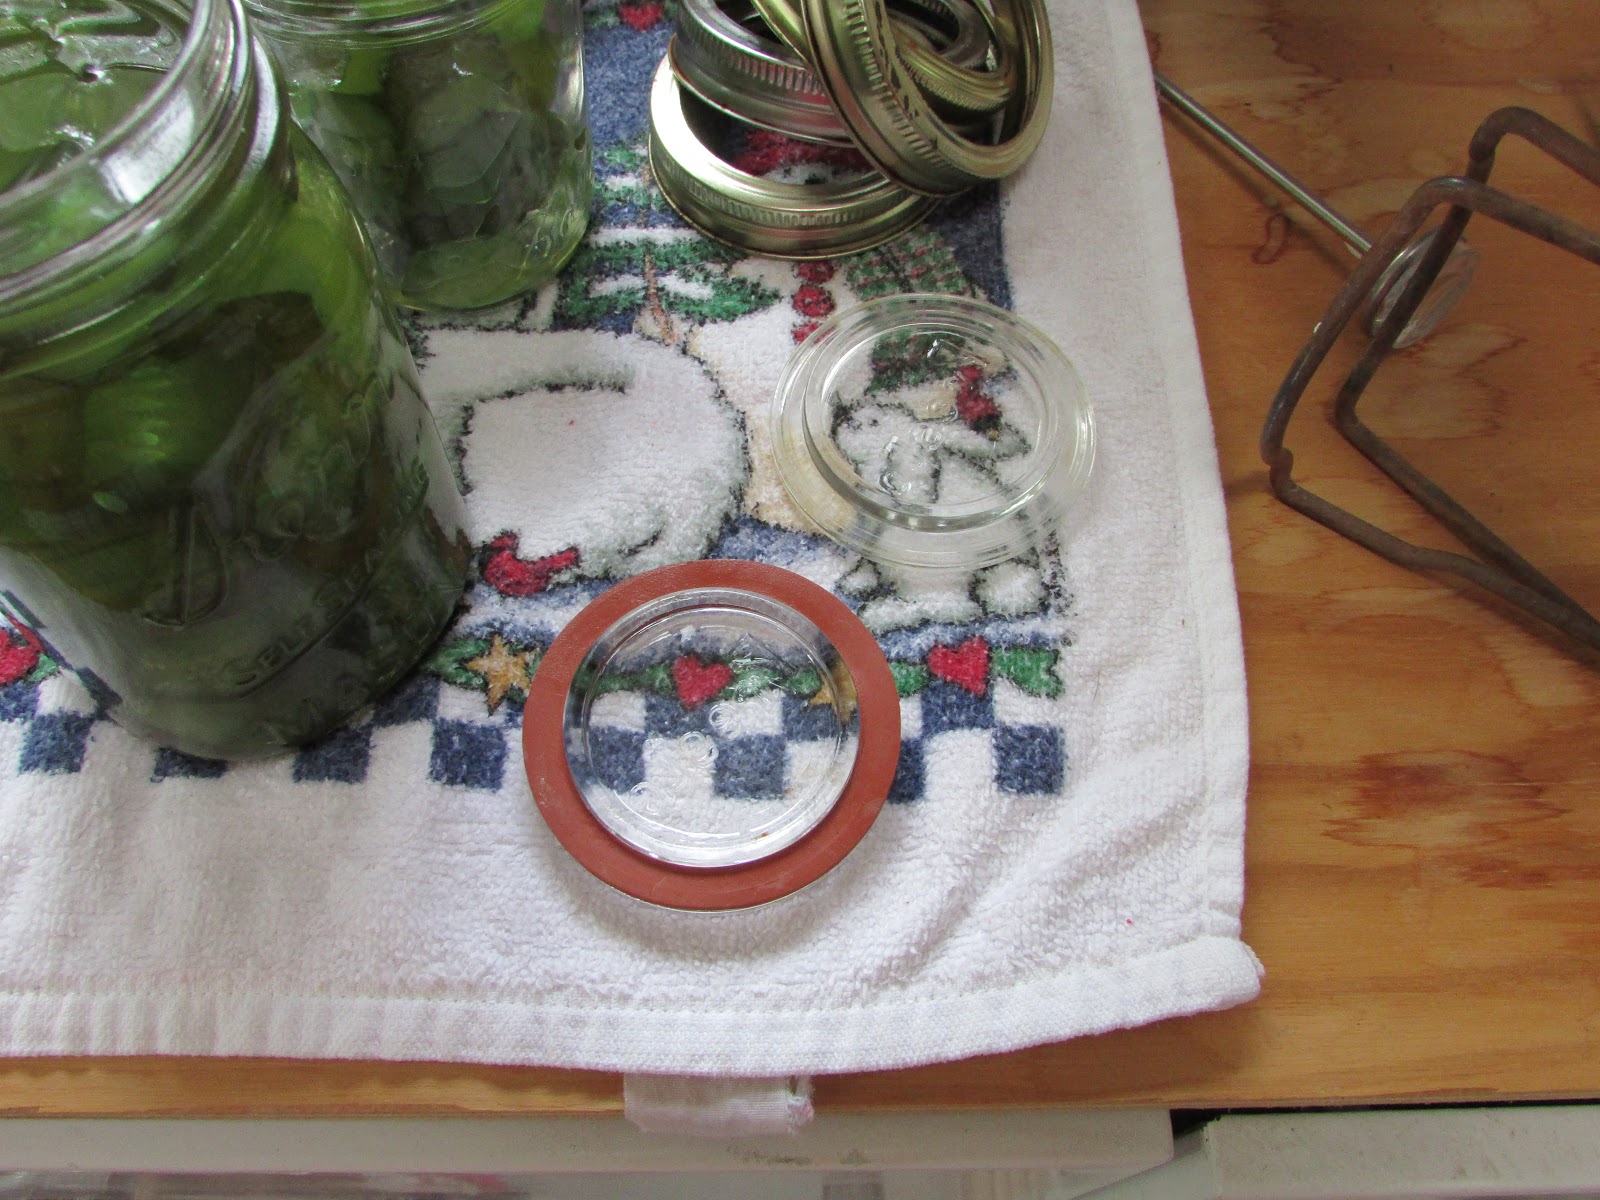
The picture below is of a canning ring for glass lids on the left and a standard ring for dome lids on the right.  You can see that the ring for the glass lids is taller than what is used today.  That is because the glass lid and the rubber ring are much taller than the sealing edge that a dome lid has.


To use glass lids, you also have to have a "top-seal" rubber ring.  These are entirely different than the rubber rings that are used with the old zinc canning lids; they are smaller in diameter and never have a tab.

When you are going to use them for canning, the rings must be softened and hydrated.  This is accomplished by scalding them and leaving them in hot water until you are ready to put them on the jar.  You can also boil them for five minutes.


Once your jars are packed with the food to be canned, fit the rubber ring around the outside of the bottom of the glass lid.  


Place the lid and rubber ring on the top of the jar.


The next step is to screw the ring onto the jar firmly tight.  Then unscrew the ring one quarter inch.


Process the food in whatever method you would ordinarily use for what you are canning.  In these pictures, I was canning Grammer's Sweet Pickles ("Grammer" is our name for my paternal great-grandmother who was the first woman to live in our house).


At the end of the processing time, remove the jar from the canner and set it on a towel.


Immediately tighten the ring that quarter of an inch that you backed it off before processing.


After the jar is completely cooled, you can check whether the jar has sealed by lifting the jar by the glass lid.  If you can lift it by the lid only, the jar is sealed.


To open the jar, insert the tip of a paring knife between the rubber ring and the lip of the jar.

I've read that glass lids are still popular with some home canners for extremely high acid foods like pickles because the food doesn't touch any metal.

Obviously, this kind of canning lid can be reused indefinitely.  Vintage instructions indicate that new rubber rings should be used, but rings were very often used multiple times.  I have used both new (unused old stock) and used rings with equal success so far.  I don't know whether the rubber rings available for use with the new Tattler lids would work for this type of lid, but I suspect not, due to the fact that their width is not the same.

One can usually purchase new old stock rubber rings on Ebay.  Be sure that they are labeled "Top Seal."  Common brands are Top Flite, Ball, Cuppers, and Bulldog.

Again, this is not a recommendation to use this type of lid, but who knows what skills we may need to revive in the future?

Let me know in the comments what you think.  Have you used this type of lid before?  Should I write a post about using the old zinc lids too?

Be safe, everyone!

Sunday, July 19, 2020

Using a Grill Roaster on a Wood Cookstove

Probably fifteen years ago, I purchased this blue enamel "Grill Roaster" at Cappel's Ace Hardware in Atlantic, Iowa.


What makes it a "grill roaster" is the fact that the bottom is perforated.


I bought it expressly for using on a wood cookstove because it looked like the round shape would fit perfectly in an eye over the firebox of the Qualified Range.  I think perhaps it is truly meant for roasting vegetables on the grill, but from the beginning I wanted to try cooking a beef roast in it. I don't know why, but I wasn't ready to try it right away when I bought it, so I relegated it to a shelf in the fruit room in the basement.  And there it sat until Friday when I brought it out, washed it, and finally got around to trying it.

The roaster does fit neatly over the eyes of the Qualified, the Hayes-Custer, and the Margin Gem.  Bingo!

For Friday night's supper, I seasoned a beef roast with seasoned salt and Mrs. Dash and put it in the grill roaster, the inside bottom of which I had coated with non-stick cooking spray.

My fire that night was fueled by a combination of mulberry, elm, and pear wood, and I didn't manage it any differently than I would have under ordinary circumstances--mostly because I was also cooking corn on the cob, fresh green beans, and frying angel hair nests.  (The fried angel hair nests sounded like a much better idea than they turned out to be.  Going to have to work on that one.)

I put the roaster over the rear opening above the firebox, removing the lid so that it was directly over the flames.


The juices that the meat dropped into the fire were burned immediately, and the summer kitchen (and the air outside the summer kitchen) smelled like I was grilling.  I could tell from the aroma early on that the roast was cooking pretty quickly, so I turned it not long after I had put it on to cook.


For the size roast it was, it didn't take long for it to cook at all.  I had to turn it frequently to make sure that neither side was burning, and it smelled awesome the whole time it was cooking.


The flavor of the roast was outstanding--exactly like grilled steak.  You would have thought I had used charcoal.  It was tough, however, but I do not attribute that to the cooking method or speed.  I knew from the start that the particular cut I had bought would never be tender.  It was not what I would ordinarily have bought for a beef roast, but it was cheap.  I'll do better next time, and there will be a next time.

Overall, I was very pleased with the way the grill roaster worked on the wood cookstove.  There was no noticeable difference in the firebox or ash pan due to the juices dropping into the fire, either.  We will certainly be trying other foods cooked in this manner.

Sunday, July 12, 2020

Summit Ranges from the Andes Range and Furnace Corporation

The posts I wrote about Kalamazoo and Quick Meal cookstoves a while back have proven to be some of the more popular posts on this blog, so I thought I'd share another piece of my cookstove library with you.  The following images are from a booklet published by the Andes Range and Furnace Corporation of Geneva, New York.  No date appears anywhere in its pages, but from the styles of wood and coal ranges that it advertises and from the fonts used, I would date it from the late 1930s to perhaps 1940.

The cover of the brochure on Summit ranges.
A little internet research tells me that the Andes Range and Furnace Corporation began as the Phillips & Clark Stove Company and moved to Geneva from Troy, New York, in 1885.  Phillips & Clark started the Andes line, and it became so popular that the company changed its name to the Andes Range and Furnace Corporation in 1924.  Sometime in the 1930s, the Andes Range and Furnace Corporation merged with the Summit Foundry, which signaled the beginning of their production of enameled ranges.  The company went out of business in 1951 (from Geneva by the Geneva Historical Society).


Even if I hadn't provided the address of the company, the experienced wood cookstove enthusiast will recognize that these ranges were made in the northeastern part of the United States.  The big giveaway is that the oven doors swing to the right rather than opening down.

No prices are listed anywhere in the brochure, but it appears to me that they started with their finest range.


The next four pages advertise their "Homestead" model ranges.  The first two pages show Homestead ranges with what are called "hearths."  These are the shelves on the left side of the range by the lower drafts.  Again, these were much more common on stoves in the Northeast than those in the Midwest.

The following two pages have Homestead ranges without hearths and with slightly different appearances.  The other features are the same.


The next pictures are what make me think that the date of this brochure is the very late 1930s or 40s.  Sleek, boxy, cabinet-style ranges like this came into fashion around that time.  Notice that these oven doors are also all hinged to open down.


These next pages are stamped "DISCONTINUED," and you can see that the styles of the ranges are a little more old-fashioned in nature.


And now for the piece de re´sistance: the double-oven ranges.  How I would like to cook on a range like these sometime!

Something I notice about several stove catalogs of this vintage is that their household ranges were modernized in appearance and enamel, but their "hotel" or "restaurant" ranges remained unchanged from the styles that were popular at the turn of the twentieth century.


The remaining pages of the booklet advertise their small line of coal and wood heating stoves and then has reprints of some of the pictures for the Royal, Manor, and Villa, which were also available as oil-burning ranges.

If anyone who reads this post has one of these ranges or can put a more definite date on this booklet, please use the comments feature below to let us all know.

Thursday, July 9, 2020

Oven Canning Dry Goods in a Wood Cookstove

I don't think I'm an alarmist, and I really wouldn't even consider myself a prepper, BUT...

I'll admit that when everything fell apart in practically the blink of an eye back in March, we were thankful that a) we had a well-stocked fruit room, pantry, and freezer, b) that for years now we have made it a practice to have more than enough toilet paper on hand at all times, c) we had kept a complete year's worth of garden seed (hadn't planned that intentionally--just a happy accident this time), and d) we had more than enough work, projects, puzzles, board games, and other activities to keep us so busy at home that there has been no time for boredom.

I don't have a crystal ball that lets me see into the future, and I think I'm like the vast majority of people who, if they are being truly honest, don't know which "experts" to believe regarding what the coming months of the continuing Covid Saga will look like.  And so, while most things are readily available again, we are slowly replenishing our stockpiles of a few things "just in case."

When we were at our local Sam's Club a few days ago, they had 25 lb. bags of long-grain white rice for under $10.00.  I don't know that we even eat five pounds of rice in a year, but we do like it, and in some kind of major catastrophe, it could be a welcome thing to have on hand.  As a regular habit, we keep rice in the freezer for a while and then transfer it to an antique two-quart canning jar that we use it out of.  However, we are in the season where our garden is steadily contributing to the contents of our already-full freezer, so we didn't want to sacrifice the real estate there to a large bag of rice.

I remembered reading an article in the May/June 2012 issue of Countryside & Small Stock Journal about oven canning dry goods.  I hunted up that article and reread it; then I did some further online research about oven canning flour, rice, beans, and such.  In a nutshell, the idea is that you heat the dry goods inside open canning jars for a length of time and at a temperature sufficient to kill any of the insect larvae that are inherently present in such foods.  The temperature needs to be low enough that you don't toast the food, of course.  Then, you put a hot canning lid on the hot jars of hot food, and the canning lids seal as a vacuum is created while everything cools.  This would allow us to store the rice on a shelf in the fruit room rather than in the precious space of the chest freezer, and it would be safe from both pests and environmental issues (aside from earthquakes).

However, another discovery that I made in my research was that there are no hard and fast rules for dry canning.  Each video I watched instructed me to use different times and temperatures ranging from a half-hour to an hour and a half at anywhere from 215-250ºF.

Initially, I thought I'd probably do this job in one of our modern stoves because I've never tried to maintain such a low oven temperature in a wood cookstove.  Being able to digitally set an exact temperature on our newer Frigidaire gas range was particularly enticing.  I wasn't excited about turning on one of the ovens in the air-conditioned house, though, and--truth be told--it seemed pretty hypocritical when I'm always saying that you can do anything on a wood cookstove that you can do with a modern gas or electric stove.

Then I remembered another truth that the modern appliance companies don't want to talk about much: oven temperatures in modern ovens are really not all that steady--especially in gas ovens.  I know this for a fact because when our gas oven is first turned on, it gives a reading of what the current oven temperature is.  Sometimes, I've accidentally turned it off and then had to turn it back on right away, and I can assure you that when you are choosing an oven temperature on a modern oven, you are choosing an average temperature.  Thus, I figured that oven canning in a wood cookstove was certainly possible and struck out on a new adventure with the Hayes-Custer out in the summer kitchen.

The first thing I did was wash a bunch of one-quart canning jars.  Then, to make sure that they were completely dry inside, I put them on a jelly roll pan in a slow oven for fifteen minutes.


After that, I removed them from the oven and filled them with the dry rice.  

It seems important to note here that one of the jars in this first batch had a regular mouth on it and the Atlas insignia on the bottom, though it didn't have the traditional "Atlas Strong Shoulder Mason" embossed on the side. We have used it for wet canning before, so I thought it would be fine for this application.  Not so.  The empty jar came out of the oven with fine lines that looked like crazing on the inside.  I ran my finger against the inside of the jar, and it came out with shiny glass powder on it. Obviously, the jar's useful life is over.  I know that there were lots of regular mouth glass jars which were used to package coffee, salad dressing, and other foodstuffs years ago, and many of them have been successfully used for home-canning against the advice of the jar companies and the USDA for a long time.  However, it appears that oven canning may be particularly hard on this type of jar, so I would advise strictly using canning jars.

Once the jars were full, everything went back into the oven.  I'm not going to share the time and temperature that I used (I'm not throwing my hat into that ring!), but I will tell you about regulating the oven temperature:

Longtime blog readers will no doubt be tired of me preaching the value of using little pieces of wood for building hot fires for high oven temperatures, but the same is true for maintaining the temperature of a slow oven.  The difference is that you just don't put so many pieces on the fire at once. Instead, let each piece burn down quite a bit before you add another.

Actually, there is another method for maintaining a slow oven, too: once you have a well-established bed of coals but before the oven is very hot, add a single large piece of wood which is dense and will burn slowly for a long time.  I used this method with a piece of black walnut on the second batch of jars, and it worked great, too.

As a side note, I think it would be rather difficult to do much other cooking while simultaneously oven canning just because you are keeping such a cool fire.  The fire might be perfect for stews and the like, though.


Place the lids and rings that you are going to use in a shallow baking pan. During the last fifteen minutes of the time that the jars of dry goods are in the oven, put the pan of lids and rings in the oven to heat up as well.  A nice feature of oven canning dry goods is that you can use canning lids that have already been used once.  I used half new lids and half used lids to see how it would go, and everything sealed just fine.  Tattler lids are not recommended for this application.

When the jars are ready to be sealed, take one jar out of the oven at a time.  Fix the lid and ring on the top and place the jar in a draft-free place to cool and seal.


In case you are curious and for my own record-keeping, 25 lbs. of rice fills 15 quart jars.

On that same day, I also canned our first small picking of green beans (on the right in the picture below), and then I tried something new and canned hamburger patties.  I've canned meat on a wood cookstove several times, but I've never canned hamburgers.  The idea came from Linda at the Youtube channel "First Coffee Then Life Sustainably Off Grid & Happy." We'll see what we think when we open them.

I will take the rings off the jars of beans and meat before putting
them on the shelf, but I can see no reason to remove the rings from the rice.

Everything I have read about oven canning dry goods tells me that the shelf life of foods stored in this way is anywhere from 20 - 30 years.  I know it won't take us that long to use this rice!  Another advantage is that as long as you've got plenty of jars (we do), have kept a few used canning lids and your firewood is free, storing rice in this manner costs only your time.

Friday, July 3, 2020

Cooking Beef Tongue on the Wood Cookstove

I know this post won't appeal to everyone who reads this blog, so my feelings will not be a bit hurt if you skip over this one.  I think it's kind of a timely post, though.  Because of Covid-19's effect on the meatpacking industry, meat prices and availability have fluctuated hugely across our nation.  In our area, the retail price of beef was particularly volatile for a while, and farmers worried about whether they would be able to market their hogs and cattle.

A result of this was a surge in demand for the work that our local independent butcher shops do.  Last I heard, both of our nearest meat lockers are booked for custom processing through January of 2021, and I understand this to be a fairly universal situation in our state.  Thus, I imagine that there will be a lot of people who will be putting a beef tongue in their freezer over the next several months.

Now I know some people just cook tongues for their dogs, but I like tongue, and I dislike the idea of wasting good beef on pets.  Besides, the dog will get a few pieces of this meat anyway since there are parts of the tongue that have a little too much connective tissue to be palatable.

Here is one way to prepare it:

1) Place the beef tongue in a pressure pan.  Tongue can be a little tough, so the pressure cooker helps tenderize it.


2. Season the tongue generously.  For this one, I used seasoned salt, Mrs. Dash, onion flakes, and bay leaves.  If you'd rather, I think the bay leaves could be exchanged for a heavy dose of garlic with excellent results, too.


3. Cook the tongue for one hour at ten pounds of pressure.  I was not maintaining a very hot fire when the following picture was taken, so I just left the pressure cooker directly over the firebox for the whole time.  The fire wasn't hot enough to make the pressure regulator jiggle constantly, but it did keep it jiggling the required two to three times per minute.


4. Once the pressure has been released, remove the lid of the pressure cooker to remove the cooked tongue.


5. The next step is the one that will be most stomach churning for the faint of heart: you have to peel the tongue.  The outer layer of a bovine tongue is incredibly rough (as you know if you've ever been affectionately licked by Old Bossy), but once the tongue is cooked, the outer skin is easily removed.


6. Unfortunately, the shape of the tongue is still recognizable.  Nancy finds this particularly unappetizing to look at, so it is best to slice the tongue and rearrange the pieces on the plate.


7. At this point, I also removed the parts on the bottom of the thick end of the tongue which are heavy on the connective tissue and set them aside for the dog.  You could eat the tongue like roast beef at this point, but we were taking this one a step further.


8. Since I was going to put sauce on this meat for barbecue sandwiches, I chopped the slices into smaller pieces. 


9. I put the sauce onto the meat and returned it to the stove to come to a boil while I toasted the homemade hamburger buns.  I put different sauce on the meat than I usually do, and we didn't like it as well, so I'm not going to share that part of the recipe with you.


10. Enjoy the finished product!  Anyone who was not in on the preparation of the meat would never know that they are eating tongue.