Saturday, September 30, 2017

Piccalilli: An End-of-the-Garden Relish

My grandparents' neighbor Fred used to talk about his family making a relish called "piccalilli."  He used to reminisce about it fondly, so I was excited when I ran across a recipe for it in my 1975 Kerr canning handbook. (Actually, I should say "Mom's" 1975 Kerr canning handbook.  I'm fairly certain that I found it amongst her cookbooks some 20 years ago and cabbaged onto it.)

Another reason I was pleased to see the recipe was because I had raised all of the vegetables it called for in our garden this year.  Here is the way the recipe reads:

Piccalilli

1 quart chopped cabbage
1 quart chopped green tomatoes
2 sweet red peppers, chopped
2 sweet green peppers, chopped
2 large onions
1/4 cup salt
1 1/2 cups vinegar (5% acidity)
1 1/2 cups water
2 cups firmly packed brown sugar
1 tsp. dry mustard
1 tsp. turmeric
1 tsp. celery seed
 
 
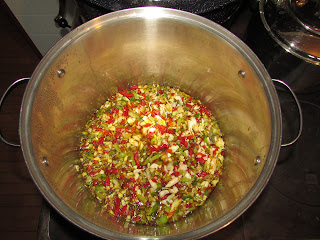
All the vegetables to use in piccalilli.  I'll confess that I decided to
use purchased onions.  I have onions from my garden, but I've
already used the big ones and the little ones that are left are best
for use as pearl onions.

 
Chop the cabbage, tomatoes, peppers, and onions.  
 
The chopped vegetables with the salt sprinkled on top.  This
antique crock belonged to my great-great aunt Meme who
taught me to cook and is partly responsible for my fascination
with wood cookstoves.
 
Mix with the salt and let stand overnight.

Vegetables and salt mixed together.  This is one of those pictures
where I wish we had smell-o-vision because the aroma of this mixture
was fantastic.

Next morning, drain and press to remove all liquid possible.

The chopped vegetables draining in a colander.

I used a plate to press as much liquid out of the vegetables as possible.

Boil vinegar, water, sugar, and spices five minutes. 
The sugar, vinegar, water, and spice mixture coming to a boil
directly over the firebox.

Add the chopped vegetable mixture. 


The vegetables coming to a boil after being added to the vinegar/sugar solution.
You can see the water bath canner right behind this kettle over the firebox.


Bring to a boil and pour into sterilized Kerr jars to within 1/2 inch of top.  Put on cap, screw band firmly tight.  Process in boiling water bath five minutes.  Yield: 6 pints.

Now, here are the things I did a little differently:

1. The green peppers that I wanted to use were a little small, so I used three instead of two.

2. I don't like messing with sterilizing jars, so I just had my jars hot by putting them on top of the reservoir.  Then once they were filled, I processed them for ten minutes in the boiling water bath.

3. Maybe my onions weren't large enough, but my batch yielded only four pints and a four ounce jar of piccalilli.

The finished piccalilli.


Since making this recipe of piccalilli, I've researched this stuff a little more and found out that piccalilli varies widely by geographic area.  This particular recipe may be a little more "northeastern United States" in nature because what I've read seams to indicate that Midwestern piccalilli tends to have cucumbers in it.  However, I consulted my 1926 West Pottawattamie County Farm Bureau Women's Cookbook, and the two recipes for piccalilli listed there are very similar to this one.  The major difference seems to be the spices.  Neither one calls for turmeric or celery seed, but both call for cloves.  Further, both call for white sugar instead of brown.  The method is exactly the same, though.
 
I talked to a friend who lived in Maine for a number of years, and she said that piccalilli was served as a relish on the side there.  I've read that others put it on hot dogs, sausage, or hamburgers.  I'm not sure how I'll eat mine, but I know I'm going to enjoy looking at it on the shelf in the fruit room for a while first.
 
Use the comments section below to tell me what piccalilli is like in your area of the world.
 
Note 10/2/2017: Had some of this on top of my BBQ beef sandwich tonight.  It was delicious and added an excellent crunch!
10/18/2017: Also excellent atop a pork burger (no bun) which I served with a mashed potato patty and corn.

Saturday, September 23, 2017

Cheating with Your Wood Cookstove: Creamed Chicken over Biscuits

I don't remember exactly when my mom started making creamed chicken over biscuits, but I remember that I was not a little kid anymore, that it was an instant hit, and that I wondered why she hadn't tried it on us earlier.  Of course, maybe it was all very strategic.  If she had served it to us too early, our palates wouldn't have been developed well enough to fully appreciate the pleasure of this stick-to-your ribs dish, and we might have summarily rejected it as we did with several more "grown up" foods that she tried on us.  She likes to tell people how long her list of recipes-to-try-again-when-the-kids-are-gone was when we were young.

At any rate, it was Mom who initially got me hooked on this entree.  My mother-in-law also has her family hooked on her version of Creamed Chicken over Biscuits, but her method for making it is entirely different.  Both recipes are delicious, but in this post I'm going to share my mom's version.  

You can see from the labels on this post, that this is a dish made from leftovers.  Therefore, prior to this meal, you need to have roasted a chicken (to read about one way to do that in a wood cookstove click here) and made gravy from the drippings.  We had several people in my family as guests for a Sunday dinner back in August and served a roasted chicken with all the trimmings.  After the meal, Nancy picked the leftover chicken off the bones, and we saved the leftover gravy too.  A few days later, we made Creamed Chicken over Biscuits.

The first thing to do is to build a really hot fire.  Biscuits bake best in a quick oven, and so I always use a lot of little sticks, or "biscuit wood," to accomplish this.

The hot fire built of "biscuit wood" in the Margin Gem wood
cookstove.
 
To make biscuits, I used to always cut the shortening into the flour, but I've taken to a different method of incorporating shortening that my friend Leah told me about.  Now, while the oven is heating, I melt my shortening on the stove.  Sometimes I use the warming oven, other times the lid of the reservoir--wherever I think the heat will be sufficient.  This time I used a very small saucepan on the top of the stove.  I melted perhaps a 1/3 cup of Crisco.


While the shortening is melting, sift two cups of flour into a mixing bowl and add around a tablespoon of baking powder to it.  At this point you might sprinkle a little salt in too if you wish.  Mix all the dry ingredients together.

Once the shortening has melted, pour it into a heat-proof measuring cup. Then add enough cold milk or buttermilk to make one cup altogether while stirring constantly.  The coldness of the liquid causes the shortening to congeal again, thus allowing it to be evenly incorporated into your flour. Brilliant!  (I hate washing the pastry blender.)


Pour the buttermilk/shortening mixture over the flour mixture and toss lightly to mix.  Don't work the dough too hard as that will make for tough biscuits later!


Turn the dough out onto a floured board.


Knead the dough a few times, then pat out until it is about an inch thick.


Cut the biscuits in the shape and size you desire.  For many years I cut biscuits with an old metal drinking glass that Gramps kept by the utility room sink when our house was still his home.  The problem was that cutting the biscuits resulted in compressing the air in the glass, and sometimes it would "burp," causing the biscuit to become misshapen.  Last year, one of the fundraisers at school had a set of biscuit cutters on it, and I'm very pleased with my four various sized biscuit cutters.

Six beautifully cut biscuits and one not so beautiful because
it is the trimmings patted together.

Let the biscuits rest for at least five minutes.  The baking powder will cause them to rise a little, and they will be nice and light.

The next step is to put together the creamed chicken.  Here is where this recipe really qualifies as what I would call "cheating."  To whatever leftover gravy you have from the roast chicken dinner, add a can of cream of chicken soup.  Add whatever leftover chicken you have to the gravy/soup mixture.


Pop the biscuits into the hot oven now.


Put the chicken/gravy/soup mixture on the stove to come to a boil.  You probably won't want to put this right over the firebox since your fire will be so hot for baking the biscuits.  You can see in the picture below that mine was closer to the reservoir than to the fire.

If the gravy was quite thick, you may need to add a little water or milk. Don't do this until you've had a chance to warm the gravy/soup mixture, though, because leftover gravy congeals in the refrigerator and may look deceptively thick until it is heated through.


The soup/gravy/chicken combination coming to a boil over
gentle heat.
Once the creamed chicken has come to a good boil, move it to a place where it can be kept hot while your biscuits finish baking.

The biscuits finishing up in the oven while the
creamed chicken is staying warm on a simmering
pad on the back of the range.
To serve, pour the creamed chicken over the biscuits and enjoy.  I like to drizzle a bit of honey over the top of it all.

The finished product.

Notes:
 
1. You could make your own white sauce instead of using the can of cream of chicken soup.  Then this recipe is no longer cheating.
 
2. My favorite side dish for this is peas, which I like to mix into the creamed chicken mixture.  Peas are not Nancy's favorite side dish, though, so you don't see them in the picture.
 
3. As with most chicken recipes, turkey can be substituted in this dish, and this is one of our family's favorite post-Thanksgiving meals.

Monday, September 11, 2017

Cookstove Road Trip to Mill Creek Antiques in Paxico, Kansas

Nancy had a total replacement done on her left knee in June, and she is having the right one done as I type this post.  Since she spent most of the summer recovering from the first surgery and since her recovery used up her vacation time, we didn't take any vacation this summer.  Instead, we've opted for a couple of day trips.

On Labor Day, we went to Jamesport, Missouri, which has a large Amish settlement.  We only saw one cookstove, a small Windsor that was a decoration in a cheese shop.  There was a cookstove dealer in the area, and after a few wrong turns we were able to locate his shop.  He did not have any cookstoves on display, however, as he mostly sets up direct shipments from manufacturer to buyer.  In the course of visiting with him, he told me that in the last seven or eight years, their settlement began allowing the use of propane cooking stoves, so most of the younger Amish families used them for their cooking now.  This was no surprise to me since I've noticed this trend in other Amish areas that we have visited.

Last Saturday, we trekked to Paxico, Kansas, to visit Mill Creek Antiques.  To my knowledge, this is the antique stove store that is closest to us. Neither of us had ever been there before, but it is a most impressive place, and I am already looking forward to going back.

Storeowner and expert stove restorer Steve Hund was on hand at the store as well as his very personable and entertaining assistant salesman, whose name I'm embarrassed to have forgotten.  I have been in a lot of antique stores, but this one was extraordinary in that it is not cluttered up with the usual run of mid-twentieth century glassware and bric-a-brac.  Further, the store is set up to feel much more like you've walked back into time and are shopping in an old fashioned stove and furniture shop.

When we walked in the front door, we took an immediate left and saw several period gas stoves, but the salesman directed our attention to an Acorn combination range that was extremely unique.  The only other Acorn cookstove that I've been in contact with is discussed in this post about the wood cookstoves at Living History Farms in the Des Moines area.  Acorn manufactured quality stoves, but the one we saw in Paxico was fascinating. This was the view that we had when we walked into the room.  You can see the gas cooktop and the high gas oven stack on the right.

The Acorn combination gas/wood cookstove.


I could see that there is a wood or coal burning firebox on the lower left with an oven to the right.


The salesman pointing out where the grate shaker
is located while I snapped a view of the left side
of the stove.

Then the salesman showed me one of the most surprising features of a stove I have ever seen.  The gas cooktop was hinged so that when you wish to cook on solid fuel, you just fold the gas cooktop into the back splash, revealing the second cooktop!  I had never seen anything like it.

The Acorn combination stove with the gas cooktop
latched in the up position.

Interior shot of the long, narrow oven which is heated by the
wood or coal fire.

The room with the Acorn had two toy wood cookstoves in it, which I took a couple of quick snaps of.


Then we traveled to the main stove room, which was just beautiful.

The main stove display room.  If I'd have been
thinking at all, I would have shot this in black
and white because then it would have been hard
to tell this photo from one of those period
pictures you see of hardware stores in the past.

Of course, I was immediately drawn to the Majestic cookstove in the right rear part of the room.  You can't imagine my delight at finding that a fire had been lit in it, and a round link of homemade German sausage was cooking. This stove is gorgeous, and my photograph does not begin to do it justice. For one thing, you cannot see how the nickel plating gleams.  This stove is ready to turn out many more delicious meals while gracing whatever kitchen it lands in.

The Great Majestic cookstove with its firebox door
open to show the fire.  The sausage link is cooking
in the pan over the fire.  I wish you could see how
shiny this stove is.

Other cookstoves in this room included the ones below, all ready to begin cooking again.

A Monarch range.  My guess is that this stove is
from the 20s or early 30s.  This stove looks like it
may be the same model that blog reader Tim in
Minnesota has.  Tim's post can be read here.

A cute, smaller, later model Majestic than the
one that had the fire in it.

This stove is listed on Mill Creek Antiques'
website as a Malleable Cookstove.  The right
side of this stove used to have four gas burners,
but they have been replaced with a big piece
 of cast iron to make a convenient, heat safe
work surface.  The gas oven and broiler are
above.

A Home Comfort Range with a stovepipe oven resting
on its cooktop.  Home Comforts had reputations as
real work horses, and many of them are still in regular
use today.

One thing I would like to add about the stoves being sold at Mill Creek Antiques is that I felt the pricing was quite reasonable for the quality work that each stove exhibits.  A short conversation with owner/restorer Steve Hund assured me that he knows exactly what he is doing when it comes to stove restorations, and his 40+ years of experience make him a valuable resource for information.

In addition to stoves, Mill Creek Antiques carries high quality antique furniture, most of which is quite unique.  They are also an Aladdin Lamps Authorized Dealer, and they carry a huge selection of flat wick antique oil lamps and other light fixtures.

Paxico has a number of other antique stores in its small business district, but I don't think any of the other store owners would argue with me when I say that Mill Creek Antiques is the town's crown jewel.  Nancy and I are already looking forward to our next trip to Paxico.  I hope it will be in the dead of winter when the store's many heating stoves will be in use!


Monday, September 4, 2017

It Can Be Done: Using Two Pressure Canners Simultaneously on a Wood Cookstove

I had wondered.

I had plotted and planned.

I had reasoned and pondered.

But I did not know whether it would work.

I'm here now to tell you that it can be done.  You can can  (see what I did there?) in two different pressure canners at the same time on a wood cookstove!

You might be wondering why this is a big deal, especially since one could easily can in two different pressure canners on most modern ranges and since it is not difficult to pressure can with a single canner on a wood cookstove.  (See my initial post about that here.)  To understand the significance of my discovery, you have to remember that to adjust the heat when you are cooking on a woodburning range, you move your cooking vessel closer to or away from the fire.  It is not as simple as turning a pair of dials.  Furthermore, as soon as a pressure canner has reached the necessary pressure, you must reduce the heat in order to maintain the adequate pressure without having it continue to climb.  Thus, I wasn't sure that it would be possible to move two very large canners across the top of the stove in order to accurately maintain the pressure in both of them.  But it worked!  Let me tell you how it went.

First, you need to know that one of the canners that I was using is a weighted gauge canner, and the other has a dial gauge.  This is very important.  I'm not going to go into all the details about the difference between the two types of canners here because you can find that information in many other places on the Internet.  However, it is important to know that a weighted gauge canner releases any extra pressure from the inside of the canner, while a dial gauge canner does not.

To be sure that you are maintaining adequate pressure in our weighted gauge canner, the weight must jiggle at least three to four times per minute.  This is much easier to manage than keeping our dial gauge canner at 11 pounds of pressure, which is the amount that I use because of our elevation.  Therefore, I started the weighted gauge canner first.

Always at the beginning of the pressure canning process, I have a raging fire going.  This is particularly easy to do when you are using summer fuel.  To retain as much of the nutrient value of the food being canned as well as the physical quality of the food, you want to keep the total time that the food is in the canner to a minimum.  Thus, you want the raging fire so that the canner reaches the desired pressure as quickly as possible.

Now, a big teakettle is an integral part of the canning process because you need boiling water to pour over the food inside the jars.  For that reason, when your fire is first started, the teakettle is perched directly over the firebox.  A small saucepan with your canning lids covered by hot water is placed far away from the firebox so that they stay hot but do not boil.  I put the kettle portion of the canner with the necessary water inside it on the middle part of the cooktop to heat the water.  This way, you reduce the risk of jars breaking if a hot jar of food and boiling water makes contact with cold water in the bottom of the canner.

Once the weighted gauge canner was loaded, I put the lid on it, and it was moved so that it sat directly over the firebox to begin building pressure.  More water was put into the teakettle, and it was also put over the firebox so that it could come back to a boil in order to fill the jars in the second canner (Sorry!  I forgot to get a picture of these first steps.)  The second canner was also put on the middle of the stovetop so that it could begin getting hot.

By the time the weighted gauge canner had reached the correct pressure and the weight had begun to jiggle, the dial gauge canner was loaded, so I switched the locations of the two canners so that the dial gauge was now directly over the fire and the weighted gauge was in the middle of the cooktop and began counting the canning time for the weighted gauge canner.  I snapped a photo of that, so it will be easier for you to understand what I'm talking about now.


Two pressure canners on the wood cookstove.
You can see the weighted gauge canner on the
right.  It had reached pressure before this photo
was snapped.  On the left is the dial gauge canner.
It has already exhausted; if you zoom in on the
picture, you can see that it is at about seven pounds
of pressure at this point.  The small saucepan in
front of the canners is filled with the beans that
were too many to cram into the jars but not enough
for an additional jar.  I cooked them so that they
would just have to be warmed up for Sunday dinner.
On the back right side is a 16-quart kettle filled with
tomatoes and onions cooking down for homemade
ketchup.
Once the dial gauge canner reached the desired pressure, "the dance" began.  I call it a dance because you have to move the canner around until you find that sweet spot that maintains the correct pressure.  You can see that I moved the weighted gauge canner back over the firebox, but I offset it quite a ways so that it wasn't receiving the full heat of the fire.  The dial gauge canner took a trip to the far right.

At this point in the process on this particular evening, I quit adding fuel to the fire because I knew I was not going to can anything more.  So, in the next two pictures, you will see the dial gauge canner slowly migrating closer to the firebox in order to maintain its pressure.  The weighted gauge canner was quite happy to stay right where it was for the duration of the canning time.  Its weight jiggled more than three to four times a minute, but that is all right.  It didn't jiggle constantly, and because of the way that the weighted gauge canner works, it was maintaining the correct pressure on its own.


The weighted gauge canner completed its canning time first and was removed from the stove to cool on top of our modern gas stove just to the right of the wood cookstove.  The dial gauge canner then remained on the wood cookstove for a little longer to reach its specified time.


I was extremely pleased at how easily this worked, and I'm looking forward to doing it again sometime.  It certainly increases the efficiency of the canning process when one fire can do so much!