Thursday, October 31, 2013

The Art of Creating a "Duo-Temp" Oven in a Wood Cookstove

I think that I have an oven fixation.

There, I admitted it. 

Even when looking at a modern range, the first thing that I'm interested in is the oven.  In fact, when we were at the Iowa State Fair this summer, I spent what my wife and her family considered an interminable amount of time touring travel trailers, but I was only interested in the trailers that had stoves with ovens on them.  I wouldn't even consider buying a camper if its stove didn't have an oven.

Oops.  Sorry, I'm getting carried away.  I wasn't actually considering buying any of the trailers which had ovens in them either.  Our budget would certainly not allow such a thing. 

It's just that cooktops hold no real fascination for me, which I think is why I'm not very interested in cooking on woodburning heaters.  If I had been satisfied with that, our old Englander woodstove would have placated my appetite for cooking on wood quite sufficiently.  I'll admit to being intrigued by watching the Youtube videos of Misty Prepper doing a lot of cooking and even baking biscuits on top of her Fisher woodburning heating stove, but for me a cookstove isn't a cookstove without an oven.

That said, it can sometimes be a bit frustrating to me that both of the working cookstoves here only have a single oven.  The first two stoves that my mother cooked on in her married life were both equipped with two separate ovens.  My grandmother on my dad's side had two ovens on her stoves for the last twenty-six years of cooking that she did, and my grandmother on my mom's side is famous for cooking in two different ovens simultaneously.  In fact, for Thanksgiving 2011, Grandma was cooking in three different ovens all at once--and she wasn't even hosting the dinner that year!  Obviously, I'm used to having some "oven flexibility."

Of course, the advantage to having two different ovens is twofold: a) more space for more foods, and b) the ability to cook at two different oven temperatures.  The acquisition of the stovetop oven last fall certainly helps with both of these, but I had been creating a "duo-temp" oven using the single built-in cookstove oven fourteen years before purchasing the stovetop one.

I formed the idea for this trick after I remembered a conversation that I had once had with a saleslady at Kitchen, Bath & Home in Ames, Iowa.  While I was in college at Iowa State, I would occasionally take some time to visit historic downtown Ames.  Of course, I was drawn to Kitchen, Bath & Home because they had a beautiful red AGA cooker in their front display window.  One Saturday morning, I ventured inside the store and spent a pleasant half-hour visiting with one of the salesladies about cooking on an AGA.  Naturally, I told her that what I really wanted was to cook on a woodburning range, but she was a dedicated employee and did her best to persuade me that an AGA would make me every bit as happy. 

In the course of our conversation, she taught me how one uses the AGA Cold Plain Shelf in the roasting oven of an AGA.  The super-condensed version is that the shelf is inserted in the middle or toward the top of the oven, and a cooler baking space is thereby created between the floor of the oven and the Cold Plain Shelf, while a hotter roasting space is created in the top part of the oven.

Knowing that the ovens on most wood cookstoves are heated from the top down like the AGAs (for more information about this, see this post), it didn't take me long to try this in the Qualified range.  I can still remember the first meal on which I used this technique.  Mom and Dad and I had supper together in the little house, so it was in the first year that I had the Qualified, and we had roast chicken, baked potatoes, dressing, and escalloped corn--pretty starchy, I know, but so delicious.

What I do is to cover one of the oven racks with aluminum foil.  Then, I place that rack in the middle position.  Since the oven is heated from the top down, the area above the rack will be hotter than the area below the rack.  I don't know what the actual temperature difference is because I've never had more than one oven thermometer to measure both spaces simultaneously, but I can tell you that it has worked every time.

Baking potatoes in the hotter, upper part of the oven while
green bean casserole is cooking in the cooler, lower part of the oven.
I used this technique for cooking our supper last night.  I mentioned in an earlier post that my preferred method for baking potatoes is to cook them for an hour at 400 degrees.  Green bean casserole only has to cook for half an hour at 350.  Thus, the "duo-temp" oven method worked great in this situation.

I have also used this technique at Thanksgiving dinners.  Once the turkey is out of the oven, I put my makeshift cold plain shelf in so that I can bake the dinner rolls down below in the moderate section while I brown the marshmallows on top of the sweet potatoes and dry out the dressing a little in the hot upper section.

A couple of things to keep in mind:

1) I never scrape all of the fly ash from the top of the oven chamber in the flue area beneath the cooktop.  Doing so would probably result in an even larger temperature difference between the two chambers created in the oven by using this method.  I would just be extra careful about the top of the food cooking too quickly in comparison to the bottom.  Some foods can be turned or stirred, though, and that would eliminate this concern.

2) Using this method renders the reading on the oven thermometer useless except to give you a general idea of how hot the oven is.  Since most oven thermometers are in the middle of the door right about where the foil-covered rack is going to land, they are only going to present a happy medium between the two temperatures of the upper and lower parts of the oven.

As usual, I hope that this little hint helps someone else make his or her wood cookstove cooking adventures more successful.  If you are a wood cookstove cook who does something similar or has something more to add, please take advantage of the comments section below.  Happy cooking!

Sunday, October 27, 2013

The Stove that Started It All

I credit my great-great-aunt Meme with getting me interested in woodburning cookstoves.  Born in 1895, she was in her eighties by the time I was born, but she was still walking beans (for those of you who are too young or from an urban background, that is what we called it when people walked the soybean fields in order to hoe or cut the weeds in the days before herbicides made this practice obsolete) and keeping very active.  She was my maternal grandfather's aunt and grew up on the farm where my grandmother, brother, and cousin all make their homes today.  My grandfather was both an only child as well as an only grandchild since Meme and her sister never married.  Meme expended all of her motherly instincts on my grandfather, in many ways becoming much closer to him than his own mother was. 
 
When my mother's generation was growing up, it always felt to them like they had an extra grandmother because Meme was very much a part of the family at all times.  With her great-nieces and nephew she did things like take them to see Mary Poppins when it first came out in theaters, but by the time I came along, her driving days were numbered, so the majority of the time that I spent with her was in her apartment, where we played together and she started baking cookies with me very early on.
 
As I mention in the "About Me" column beneath the labels index on the left, Meme and her sister had been given a toy wood cookstove when they were young.  She reminisced about how the two of them would collect small sticks in the yard and burn them in the stove, baking tiny pies in the oven and cooking small pots of things on the top.  Eventually, Meme's sister-in-law (my great-grandmother) convinced her to give the stove to some cousins to play with.  During that time, several of the stove lids were lost, a frying pan handle was broken, and the long stovepipe extension went AWOL.  Meme always indicated that she saw the stove on a visit to their house after the children were grown, and she was heartbroken to see it in such a state of neglect, so she asked for it back.  Her wish was granted; she brought it home and cleaned it up, using baby food jar lids to replace the missing stovetop lids.
 
Thus, it came to be that I always played with it while visiting her.  She left her home on Grace Street in 1977, and I remember playing with it on the living room floor there, so I had to be very young when I started enjoying it.  Once she moved to her apartment, my sister and brother and I spent countless hours in the second bedroom, which she had fitted up as a sort of sewing/play room, "cooking" buckeyes, acorns, and some other nut that I haven't been able to identify.
 
The enjoyment of this toy stove was compounded by the fact that Meme's last real-life cookstove reposed comfortably in the summer kitchen out on the farm.  I made frequent forays into the dilapidated old building to gaze at the beautiful Monarch range with its rusted nickel trim and white enamel panels.  When I was in high school, I even re-blacked it in an effort to keep the rust in check so that I would be able to use it when I got my own home.  Sadly, some unidentified reprobates burgled it while I was in college. 
 
At any rate, imagine my surprise while I was cruising e-bay and ran across another toy stove exactly like Meme's!  I've seen many toy and salesman sample stoves over the years, but this is only the third one of these that I have seen.  You can visit the ebay auction here.  The photographs that go with the entry are quite inclusive, so I want to document them here because this truly is the stove that started my fascination.


Looking at these pictures brings back the memory of many happy hours spent with Meme.  Goodness knows how many "meals" of buckeyes she pretended to eat for us.  While she attended our dinners or patronized our imaginary restaurants, she would recall the days when she and her mother cooked on the Monarch cookstove.  She would vehemently deny that she had romanticized wood cooking for me, but she did.  I remember telling her as a little kid that I wanted to cook on a real wood cookstove someday.  She told me that she thought it was silly and would then talk about the days when they couldn't start a fire due to poor weather conditions and chimney draft problems, but I was already hooked.
 
I can't justify spending the money on the price listed on this "buy-it-now" auction, but I sincerely hope that whoever the lucky buyer is gets just a fraction of the enjoyment out of this stove that Meme's stove brought to us.   


Friday, October 18, 2013

The Height of Irony: Frozen Pizza Cooked in a Wood Cookstove

Tonight's supper: frozen pizza.  It got a little more brown than
we might have liked because we were glued to kmaland.com while
we followed the local high school football scores.  Go Vikes and Eagles!

Q: What do a tired teacher and his wife have for supper on the last day of the first quarter of school?
A: Frozen pizza.

Yup.  It's sad.  Very, very sad.

However, this English teacher's mind appreciates the irony of cooking the quintessential modern convenience food in the appliance which symbolizes the kitchens of a century ago.  I can't help but smile whenever I think about it.  Weird, I know.  I never have claimed to be normal.

I told Nancy that I'd been wanting to blog about cooking frozen pizza in a wood cookstove for quite some time, but I was a little ashamed to do so.  She--ever the pragmatist--said that it would be a good post because it shows that wood cookstove cooks can be regular people too.  Pretty wise sometimes, isn't she?

The Margin Gem is particularly convenient for baking a frozen pizza on a busy night because, as I mentioned in an earlier post, it is so easy to get the oven hot in a hurry.   To do so, I just build the fire with a lot of small pieces of wood--usually nothing larger than two inches in diameter. 

I've discovered that the thermometer in the oven door is not only inaccurate, but it is also slow.  The oven thermometer that is to the right of the pizza in the picture above seems to be very accurate, and it shows that as the oven heats, it is always hotter than the thermometer in the door indicates.  This proves true that some wood cookstove thermometers merely measure the temperature of the oven door rather than the oven.

Once the oven has reached the appropriate temperature, you want to back off on adding so much fuel because you don't want the temperature of the oven to continue to climb.  In fact, depending on how much fuel is in the firebox and at what phase of combustion it is in when the oven reaches temperature, I can just close the drafts on the Margin Gem, and that will maintain the oven temperature for the short amount of cooking time that a frozen pizza needs.

My mother always served homemade applesauce on pizza nights, and now both my brother and I (and maybe my sister too, but we haven't discussed it) feel like pizza has to be served with the wonderful stuff.  I didn't know that he had this same penchant until his wife mentioned how strange it seemed to her.

When we have frozen pizza, however, it is a last-minute, when-we-don't-have-a-better-plan event, so there is rarely defrosted applesauce waiting in the refrigerator.  This used to mean that we'd have to negotiate thawing a tub of it in the microwave or chip away at it and eat it as slush.  Now, I just put a container of it in the warming oven as soon as we are beginning to heat the oven for the pizza.  By the time the pizza is cooked, enough of the applesauce is thawed to be able to serve it with the pizza.

Well, there you go: the ultimate "cheating with your cookstove" post.  If you would like to comment, please be gentle.

Oh, and please don't tell me how evil frozen pizzas are.  My imagination is probably more vicious than the facts.

Saturday, October 12, 2013

A Request for Tomato Information

On page 184 of my well-loved copy of Jane Cooper's Woodstove Cookery: At Home on the Range (Storey Publishing, 1977), there is a recipe for tomato sauce which is simmered for two days.  Hmmmm . . . . perhaps I am being overly generous when I call it a recipe.  It includes no measurements for anything and merely says to pare a bunch of tomatoes; to put them in a heavy, non-aluminum pot; to simmer them for two days until you've reached the desired thickness; and to add whatever else you would like to flavor it at about halfway through.

This "recipe" has a certain element of romance and intrigue to it, doesn't it?  I mean, it seems to me like anything that has to simmer for two days ought to come to a savory climax that, upon one taste, transports a person to a completely different time period when people slaved for interminable hours over a wood fire creating all manor of delicacies which have been lost to the twenty-first century palate.  Furthermore, the recipe seems perfect for the wood cookstove because that is the only appliance for which I am willing to foot the bill for such a long cooking time.

I have tried this at various times over the last several years, and I have to say that I've never been transported anywhere but to a state of frustration.  First, I decided that what was happening was that I was adding sugar to the tomato sauce too early.  I theorized that the longer the sugar was cooking, the more caramelized it was becoming, and that was what was causing a slightly burned flavor to creep into the sauce.

Here's what has made me begin to wonder, though.  Recently, we have been making my sister-in-law's pizza sauce, which doesn't have any sugar in it, and I still managed to ruin it.  The first time we made it, we didn't simmer it all that long because we had used Roma tomatoes, so the fresh pulp from them was not too juicy.  The sauce turned out great.  This last batch was made with a combination of Roma and regular tomatoes, so the pulp was very runny.  I put nothing in the pulp and simmered it very gently for two days before putting the spices and lemon juice in it, but I could tell before I even added anything to it that it was going to have that old familiar slightly burned taste to it.

The long simmering time appears to be mainly intended to evaporate the excess moisture from the sauce.  Before finding the ketchup recipe that I shared here on the blog, I had tried this long simmering method to reduce the tomato pulp for ketchup, but always got similar results.  Now, however, I think I'm really partial to the "draining by hanging in a bag" method.

My question, readers, is this: can anyone explain to me why the burned flavor appears in the two-day simmered sauce?  I'm cooking it slowly in a stainless steel stockpot.  It has not scorched or even mildly stuck to the bottom of the pot.  I don't understand it, but I've not had the years and years of tomato cooking knowledge and experience that some of you have undoubtedly accumulated.  Does anyone else use this method for reducing tomato sauce but end up with a desirable end product?  Please be generous with your advice down in the comments.  I'm anxious to have this mystery solved.

Saturday, September 28, 2013

Making Jelly on a Wood Cookstove

I mentioned in an earlier post that a job that I would far rather do on a wood cookstove than a gas range is to make and can jelly.  I had never made jelly on a gas stove until I made a batch of strawberry jelly on the new gas range back in July.  The reason that I didn't like making jelly that way was because so much heat was traveling up the side of the pot that stirring it was a very uncomfortable experience.

A veteran gas stove user told me a couple of years ago that if a lot of heat was traveling up the outside of the cookware, the flame is too high, so I lowered the flame.  No dice.  I still nearly burned my arm trying to make the jelly.  In late August, we were over at my parents' house putting up sweet corn using the 1950s gas range in their basement, and I was surprised to note how little heat was traveling up the side of the pots.  I attribute the difference to a change in the structure of new gas ranges from old ones; the burner grates on our new range lift the pots a lot farther above the flame than the old style grates did.  That's the only way that I can account for the difference.

At any rate, here is how I go about making jelly on the wood cookstove:

1. The first thing to do is to build a very brisk fire.  I fill the water bath canner about half full of water and place it and the full teakettle directly over the firebox.  Once the water in the teakettle is hot, I pour a little of that over my canning lids and place them away from the fire over low heat.


A brisk fire in Marjorie the Margin Gem, getting ready to make jelly.
2. Next, I pour the measured fruit juice into the heavy-bottomed stockpot that I use for jelly making.  If I am using powdered pectin, I put the pectin into the fruit juice.  If I am using Certo, it is the measured sugar that is put into the fruit juice right away.

It is in this step that one has two options.  Most jelly recipes say that you are to bring the fruit juice mixture to a boil quickly.  I think that this is very important.  When I've had batches of jelly that I've brought to a boil too slowly, it seems that the firmness of the set is adversely affected.  Since the "high" heat over the firebox is usually not quite as hot as the "high" setting on a gas or electric range, what I've taken to doing is removing one of the lids over the firebox and boiling the jelly directly over the fire.  This speeds the time that it takes to bring the fruit juice to a boil.  However, some jelly recipes don't call for a lot of juice, so I've successfully made jelly without removing any of the lids in those situations.

The jelly kettle is moved slightly to the right just
for this photograph so that you can see that the lid
over the firebox is removed.

Marjorie is so embarrassed.  She needs a bath
really badly, but she's been busy doing a lot of
canning recently and hasn't been cold when we
had the time to give her one.
3. Once either the sugar or the Certo is added, bring the jelly back to a good rolling boil and boil it for one minute.

4. Remove the jelly from the fire.  Skim the foam and put the jelly into the jars.

Now, according to what I read online from the USDA, canning jars do not need to be sterilized prior to canning if they are going to be used in a pressure canner or if they will be in a boiling water bath for longer than ten minutes.  I hate messing with hot jars, so even though many jelly recipes say to just water bath jellies for 10 minutes, I usually water bath jelly for 12-15 minutes, and I've never had a problem with the end product.

If you are worried about jars breaking when the hot jelly is poured into them while they are cold, the niftiest place to keep jars warm is in the warming oven.  When we made so many batches of peach jam on the Riverside Bakewell down in the summer kitchen last year, I kept all of the jars in there.

The warming oven of the Riverside Bakewell keeping
jelly jars warm and ready for peach jam back in 2012.
5. Fix the lids on the jelly jars and place them in the water bath for the required amount of time. 

This is where the teakettle comes in handy.  I am not good at guessing how much water needs to be in the canner to cover the jars sufficiently when they are all inside it.  Taking extra water out of the canner is a mess, so I find it much more convenient to have the teakettle of boiling water ready to put extra water into the canner if I need it.

6. After the processing time has elapsed, remove the jars of jelly to a towel in an area free of drafts so that the jelly will set and seal.

In the picture below, the canner is actually what is called a "sweet corn pot" which we purchased from Bomgaar's this year.  Our last kettle which was just like it had sprung a leak, so it would leave its autograph on the cooktop after we had used it.  I like to use "sweet corn pots" as small water bath canners because their bottoms are flat so they make good contact with the stovetop and facilitate efficient heat transfer.

Most real enamelware water bath canners have the familiar corrugated bottom of concentric circles.  This works just fine on gas stoves and is all right on an electric stove.  However, it is very inefficient on a wood cookstove because only about half of the bottom of the canner is making contact with the hot stovetop.  Removing the stove lid beneath one of these fixes that problem, so I have done a lot of water bath canning directly over the fire, too.

The jelly is now in the water bath canner, and you can see that
the fire doesn't have to be so brisk to keep it boiling.


Another added advantage of making jelly on a wood cookstove as opposed to making it on our gas stove is that on the gas stove, the only burner that is small enough to use for keeping the lids warm is the burner that is behind the biggest burner.  Thus, you always have to reach around either the canner or the jelly pot to reach the canning lids.  On a wood cookstove, the small pan with the canning lids is always to the side of the big kettles rather than behind them.

Well, there you have it. Making jelly on a wood cookstove is not really an involved process, but it does have some unique idiosyncrasies.  As always, if you are a wood cookstove user who makes jelly on his or her stove, please chime in by using the comments section and tell me what you find works best with your stove.


Thursday, September 19, 2013

A Blog Reader's Cookstove - II


Mark, a blog reader in Missouri, contacted me this week with a very nice comment on a recent post.  He wrote that he has recently begun learning to cook on a vintage Glenwood #8 cabinet style cookstove installed in the kitchen of the newly built home that he shares with his wife.  He gave the address of his blog, where he has posted a few pictures of this grand old lady in her new home.

Reader Mark at his Glenwood #8 cabinet style
cookstove.

You can visit Mark's blog to see more pictures of his stove and to read what he says about it by clicking on his posts at this link, this link, and this link.  Glenwood stoves were manufactured in Taunton, Massachusetts, and this stove was refurbished and sold by The Love Barn in Orland, Maine.  You can visit their website here.

I wanted to include pictures of Mark's cookstove here on my blog because I want people to see how Mark and his wife and their builder incorporated a working antique cookstove into a modern kitchen design.


As you look at the pictures of Mark's stove, several things are noteworthy:

a) To bring the stovetop up to a height that is even with the countertops, a steel base was custom-made for the stove to sit on.

b) Mark's builder made some clever modifications to the walls next to the stove to offer reduced clearances.  He gives more information about that in his blog posts.

c) This particular model Glenwood was chosen because it fit in the space that was available, and as I study the pictures, I notice that this model is doubly convenient for Mark's situation since the pouch feed is on the front of the firebox rather than on the left side.  The proximity of the wall to the left side of Mark's stove would have made a left-facing pouch feed pretty useless, so the front pouch feed is perfect.  Our Qualified Range was equipped with a pouch feed on the left side, and I used that quite frequently for refueling and poking the fire, and I miss that feature on the Margin Gem. 

d) The pouch feed door is equipped with what is called a check draft.  Once the fire has been burning for awhile and has become hot, the check draft can be opened to allow cool air to be drawn across the top of the fire.  In theory, this will slow the combustion of the fuel and lower the heat of the cooktop.  I'm anxious to hear from Mark about whether this works since I've never cooked on a stove that has  this feature.

e) Most of the surviving antique cookstoves in the Midwest have bodies which are made of part cast iron and part steel.  These stoves, such as Home Comfort, Monarch, Kalamazoo, and Majestic brands, were manufactured in Michigan, Wisconsin, or Missouri.  Most of the surviving antique stoves made in the New England states, though, were either completely cast iron or at the very least had a higher percentage of cast iron.  It looks to me like, with the exception of the backsplash and warming oven, this stove is completely cast iron.  I've read that this is supposed to make them better bakers because the oven temperatures will not fluctuate as much.

As always, it was great to hear from a fellow wood cookstove user, and I hope that Mark will feel free to comment on my blog to share a Glenwood cookstove user's point of view.


Tuesday, September 10, 2013

Marjorie's Busy Weekend

Last weekend was a very busy one.  Besides visiting Carstens Farm on Saturday and having a potluck brunch and church service in the park on Sunday morning, pretty much the rest of the weekend was taken up with canning and preserving.

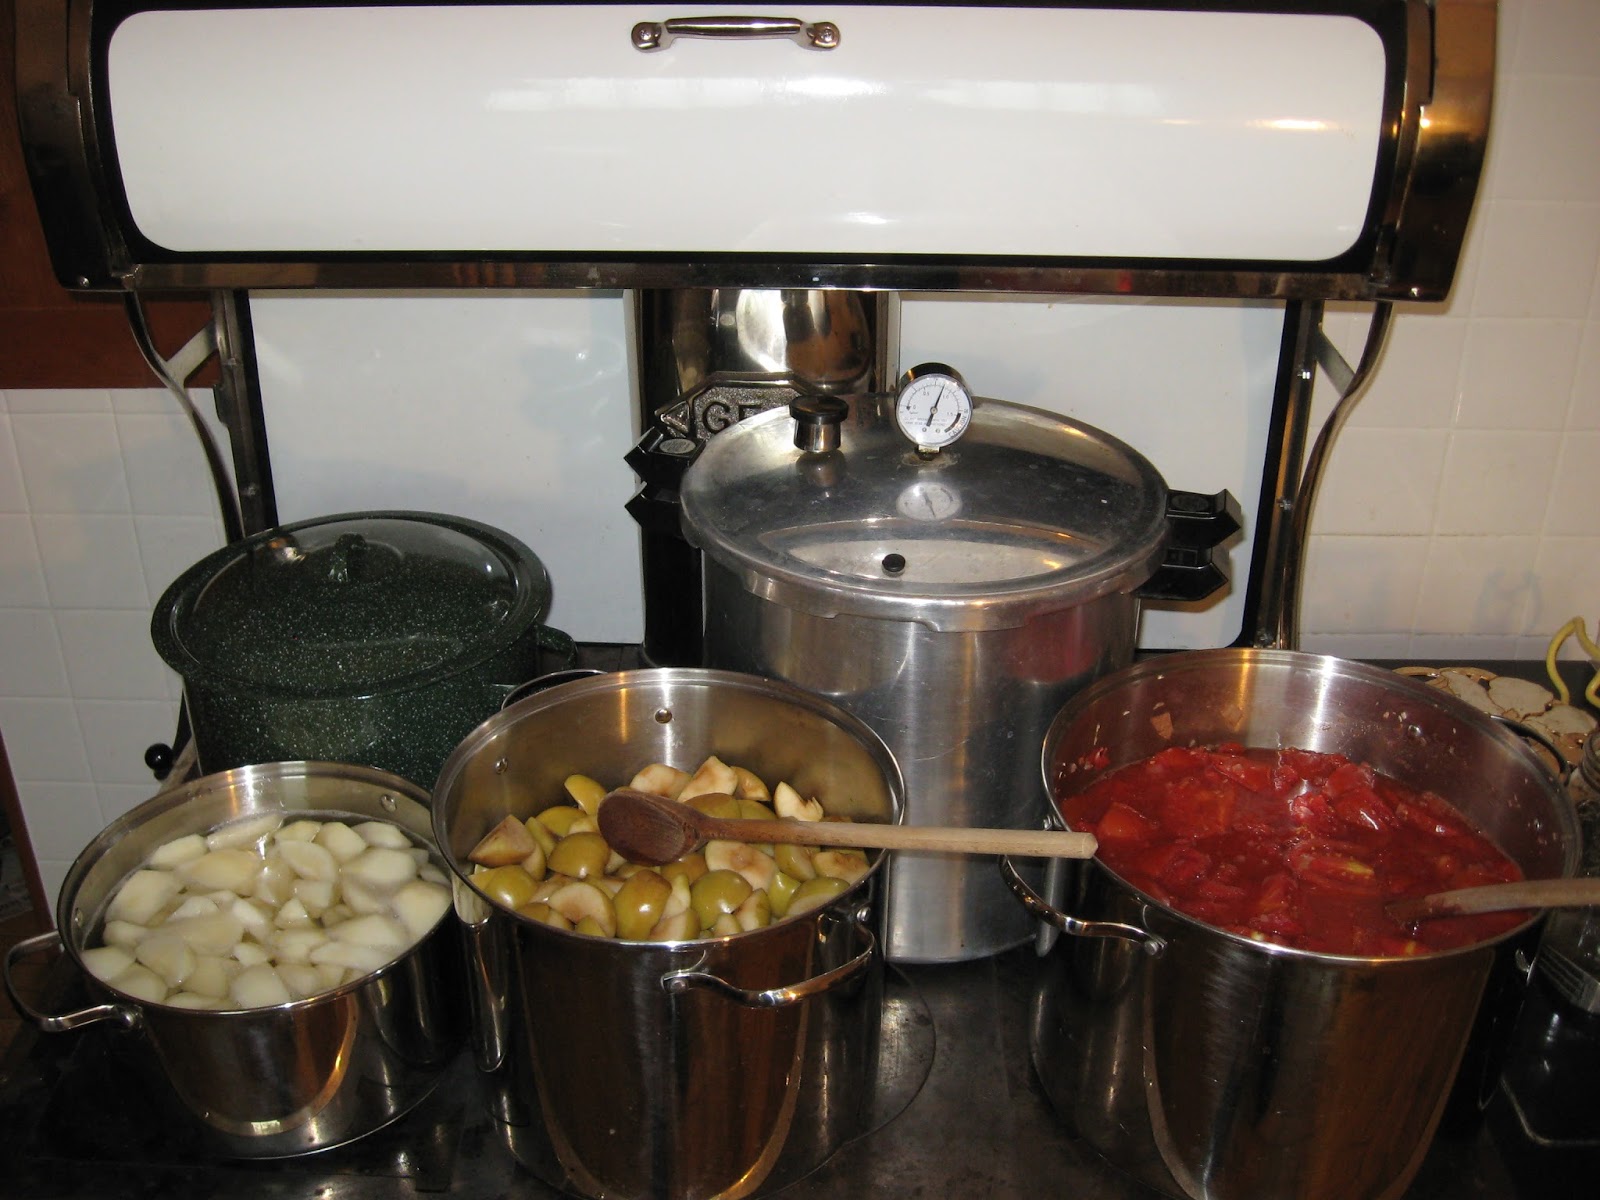
Many different produce items are currently ripe in our corner of the world, so we had a wide variety of tasks to complete, and despite temperatures in the 90s and considerable humidity, we fired up Marjorie the Margin Gem to do the canning.  First, we quickly canned the small batch of sweet pickles that my mother had been working on for the last two weeks.  She used my great-grandmother's recipe, which all of my dad's side of the family is quite fond of.  While they were in the canner, we started making pectin out of the unripe Jonathan apples which we plucked from the broken branches of my favorite apple tree in our orchard.  We also put a kettle of Roma tomatoes from my mother-in-law on the stove to cook down for homemade ketchup.  Then, we canned green beans from my sister-in-law's garden, and began to work on canning the pears from the tree in our orchard.  All of this kept the Margin Gem's cooktop quite full.


A very busy Margin Gem cookstove pressure
canning and water bath canning at the same time.

Notice in these two photos that the Margin Gem is accommodating seven vessels.


A closer picture of the many pots on the cooktop.  Pears boiling
to be hot-packed are on the lower left.  The apples being cooked
for pectin are in the middle rear; the tomato and onion mixture is
in the right rear.  The two canners, the teakettle, and scalding lids
round out the picture.


Things had to move once the pressure canner reached the
appropriate point. 
On Sunday afternoon, the stovetop looked quite similar except that the pears were replaced with peaches.  The pectin was on its second cooking, and we filled the sixteen-quart kettle with a second batch of tomatoes.

I'm terrible at guessing quantities of food to be canned, and I frequently miss my guess when it comes to how much fruit it will take to fill the canner.  Therefore, one of the things that I really like about using the wood cookstove for water bath canning is the reservoir.  If I have more fruit prepared than I can actually fit in the canner, what I've taken to doing is going ahead and filling the extra jar with the fruit and boiling syrup, putting the lid on it, and then placing it in the hot water in the reservoir.  This way, the jar won't seal prematurely (like it would if you were open-kettling), and I'm quite sure that the high temperature of the reservoir prevents any bacteria growth in the short time before the jar of fruit is removed to the canner once the initial batch of jars is finished processing.

I have read that if your stove's water reservoir is capable of reaching the boiling point, you can just do your water bath canning in the reservoir.  So far, the water in the Margin Gem's reservoir has not gotten hot enough to boil.

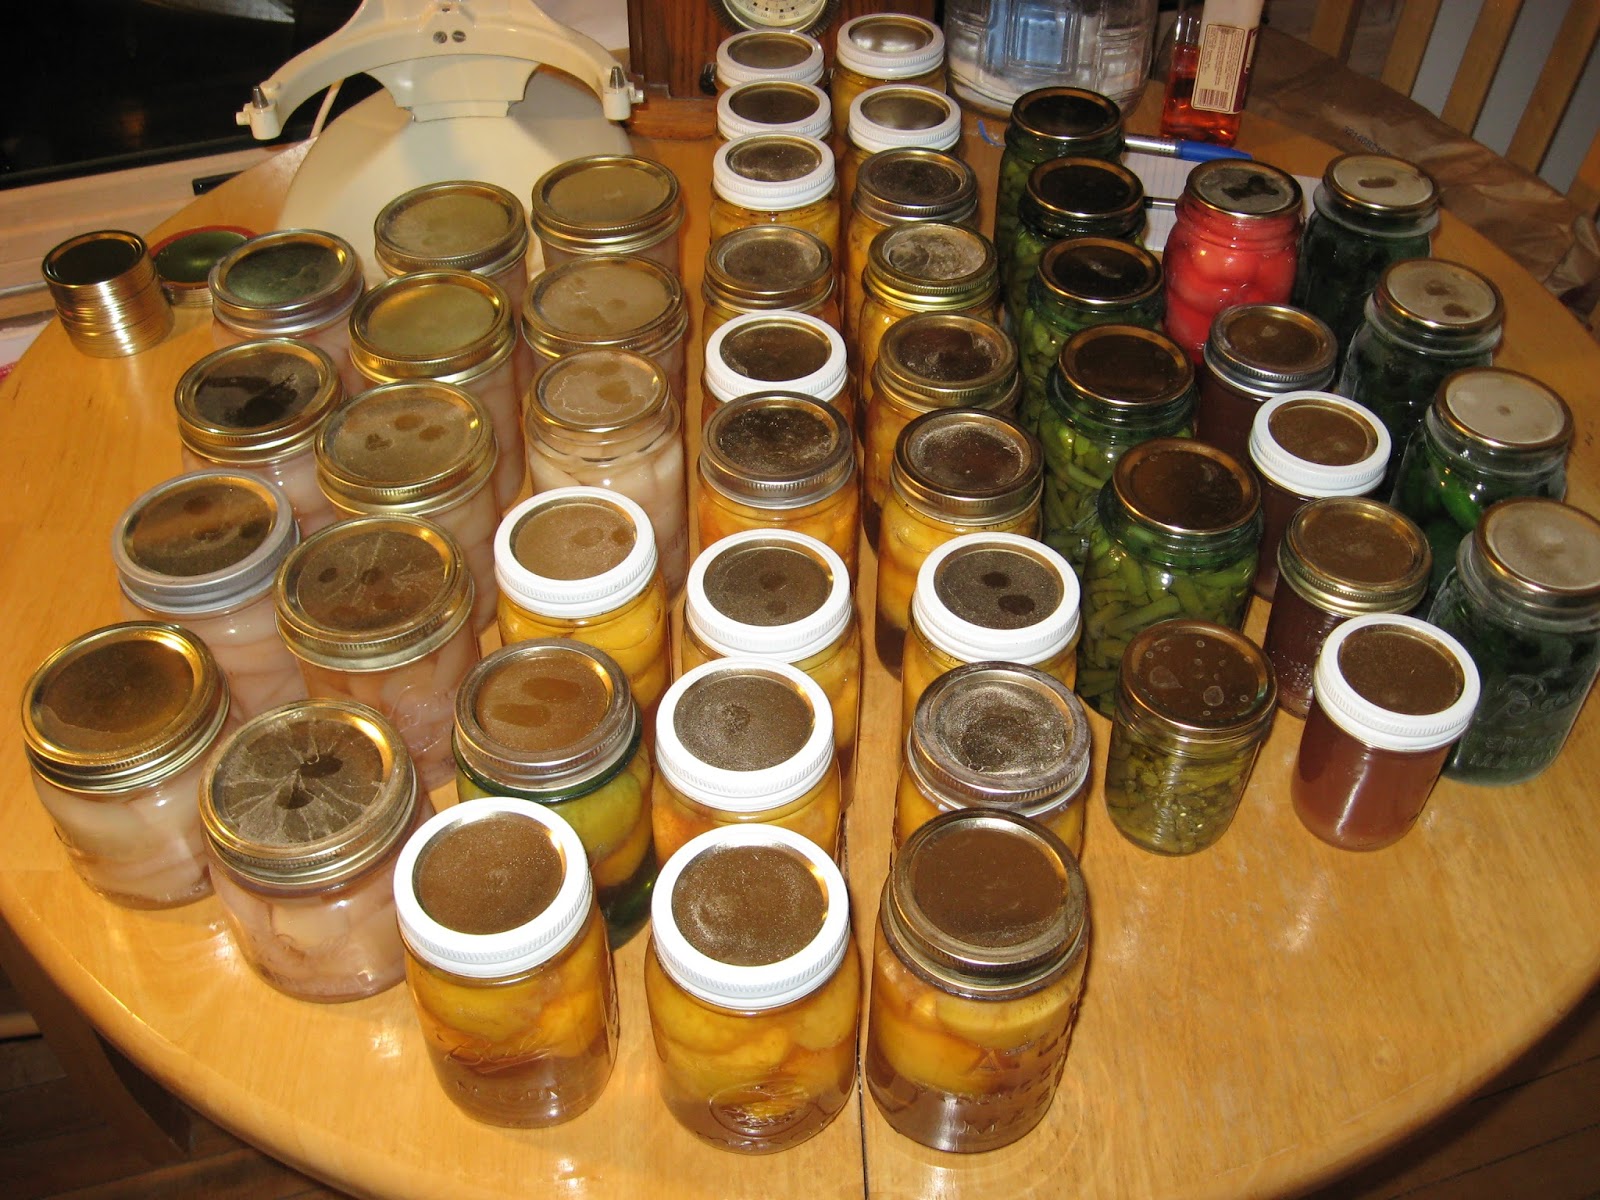
The final products ready to be washed and carried down to the
fruit room.  It isn't a large number of total jars, and they don't
include the ketchup yet because we were not finished with it at
the time of the photo.
I am quite fascinated by the whole prospect of making our own pectin.  I found the method here on Pinterest while looking at one of the boards that someone else had pinned our blog to.  My great-great-aunt Meme, who is mentioned in the "About Me" section to the left, used to reminisce about making pectin when she was a young girl, and I had read some vague accounts of how it was done, but this was the first time that I had seen very much in the way of directions.  Because of two exceedingly long cooking times, making pectin is a process which is well suited to the wood cookstove.

Everything worked according to what I read at the site, but one thing puzzles me.  The pectin gelled like it was supposed to when I tested it in the rubbing alcohol, and when I put it in the jars, it poured like honey.  However, now that it has been canned and allowed to cool, it is almost as runny as water, so I'm a little concerned about it.  I also have no idea how to use it.  I was able to find directions for that at this link: http://www.pickyourown.org/makeyourownpectin.htm.  I think I'll start by using the proportions for Certo and see what happens.  I'd better make a batch of jelly with it as soon as possible in order to find out whether it is going to work.  If the jelly is successful, I'd like to make more because commercial pectin has become so expensive.  If any of my readers have experience with this and can offer advice, please do!

Another thing that I wondered about frequently during our weekend was energy efficiency.  While we had the cookstove fired, we had the kitchen shut off from the rest of the house, but we had the air conditioning going.  Of course, it ran nearly constantly after the stove had been going for a while.  So, would it have been more energy efficient to use the gas stove?  In some ways, I think the gas stove throws an equal amount of heat into the house, and there is no way that we could have had any more than four pots in use at once when using it.  Also, when the cookstove is being fired, it is heating lots of hot water for us.  I don't know how one would figure this out, but it is a question that intrigues me.

At any rate, the forecast for the next several days shows much, much cooler weather on the way.  It doesn't look like we'll be needing the air conditioning anymore in the foreseeable future, so there won't be any wondering which method of canning will be the most energy efficient.