Wednesday, July 31, 2013

Summer Cookstove Fuel

Unless I am canning or doing a long day of baking, the fuel that I use in the cookstoves in the summer is quite different than what I use during the winter.  During the winter, we always want a fire that will be both hot and long lasting.  In the summer, we still want a hot fire, but we want that fire to go out as soon as whatever is being cooked is finished.  Therefore, in the winter, the fuel of choice is hardwood logs or split pieces as you see in the picture below.

A wheelbarrow full of split maple, elm, and mulberry.
The fuel of choice in the summer is anything that is small in diameter or light in weight.  Either characteristic guarantees that its heat producing lifespan in the cookstove firebox will be brief.  This is good because an unused fire in a cookstove can quickly make a kitchen a sweltering place to be. 

Summer fuel can be found anywhere: the maple twigs that have fallen on top of the chicken run, the small pieces of wood which seem to multiply on the ground in the pasture, the sticks which should be picked up before mowing the yard, the stray scraps of lumber which any construction project inevitably produces, the dry corn cobs that can be found everywhere in my world, or the pile of bark which falls off logs as they are split for winter fuel.  The list is endless.  Truthfully, a great deal of my summer fuel comes from my 86-year-old grandmother who is constantly picking up various combustible materials from her farmstead.  She puts them into used cat food sacks and ice cream buckets and brings them over when the pile in her garage gets too big.

A wheelbarrow of summer cookstove fuel.
Often, summer fuel could easily be the same as kindling.  The key thing to remember when collecting it is that you want biomass--in other words, something that was completely alive at one time.  I say this because I have seen people be fooled by some of the manufactured building materials that are used today.  Particle board and plywood, for example, have glues and other chemicals in them which, when burned, produce a hot flame but also a thick black smoke that you don't want coating the inside of your stove and chimney.  Several plastics are also available which look a great deal like wood, but they will make a mess in your firebox as they melt before they burn.  Be judicious.  Oh, and be careful not to use treated or painted woods, including old pieces of treated wooden fence posts.  Again, their smoke is obnoxious.

The key thing to remember when burning summer fuel is that the fire will have to be tended much more frequently than a fire made with winter fuel would be.  But that is what you want: a fire that will go out as soon as you are done with it.  If you are using a wood cookstove for summer cooking, using appropriate summer fuel will help to make it a less uncomfortably hot experience.


Tuesday, July 30, 2013

Applesauce on the Wood Cookstove

I would like to admit right away that while the vast majority of the cooking that I have done since I left my parents' home has been on one wood cookstove or another, while I was growing up, everyone in my family had electric stoves, so that was what I was accustomed to until I purchased the Qualified Range in 1997.

If you read my last post, you know that we purchased the modern propane stove which is going to be our summer cooking alternative in the house kitchen.  Before I say anything else, let me just also admit that for the Monday Market summer baking, the convection oven on this new stove has been wonderful.  When we are baking on such a large scale for the market, the new stove has made things much easier on us.  (We are able to bake ten loaves of bread or nine pans of cinnamon rolls at a time using the propane stove.)

However, I have discovered two large-scale cooking activities that I much prefer using the wood cookstove for: applesauce and jelly making.

I'll talk more about making jelly on a wood cookstove in a later post.  The main cooking project that has been going on around here (other than the baking for the Monday Markets) is the production of a boat load of applesauce.  The apples from our Yellow Transparent apple tree--along with everything else--are late this year due to the interminable winter weather that we had this spring, but the tree is loaded with them, and they are beautiful.  We do not spray the trees, so in some years we spend hours and hours paring away damaged spots and worm holes, but this year the apples are gorgeous.

The tree was planted many years ago by my grandparents, and we have enjoyed applesauce and apple pies from it for as long as I can remember.  Using apples from this tree, my sister won Grand Champion Apple Pie at our county fair with the recipe that is featured in my post about apple pie.  We also consider applesauce from this tree to be far superior to any other applesauce.  My grandmother on my dad's side, whom we all called "Granny," spearheaded the applesauce making days when I was young, and we carry on the tradition today.  At our house, we've had three large applesauce making days so far this summer, and I doubt that we are done yet.  Here is what we do:

We start by quartering the apples, removing the stem, and paring out any bad spots.  I also tend to cut out the blossom end of the apple, but I don't think that this step is really necessary.  We do not peel the apples.  Granny always believed that the most nutritious part of the apple was right under the skin and thought that it was best not to peel them.  I don't know whether this is really true, but I can still hear her saying it as we made applesauce.

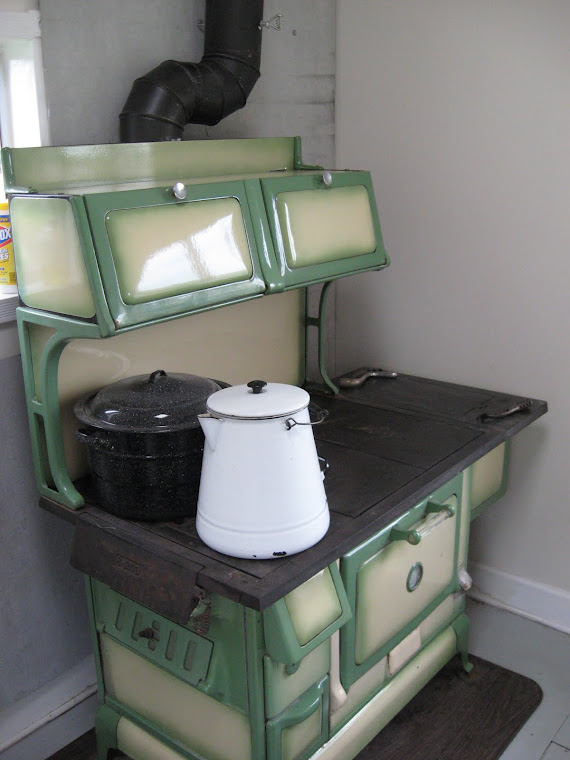
Put the apples into a heavy bottomed-kettle.  I have several Chef-Mate stock pots that were given to us as wedding presents.  I think that these are the perfect kettles to use for applesauce making because the bottoms are about a 1/2 inch thick and they are fitted with glass lids.  Add only enough water to have it rise about an inch from the bottom of the kettle while it is full of apples.  Place the kettle directly over the fire to begin with, but watch it carefully!  Once the apples begin to soften, it can easily scorch.
A 16-quart kettle of Yellow Transparent apples
beginning to cook directly over the firebox.
On the day that I was making the batch of applesauce in the pictures, I was also planning on doing some other cooking, so my fire was pretty brisk because I needed higher heat for the other tasks.  You will see a picture at the end of this post that was taken on a different day when the only cooking project was applesauce.  On that day, I kept only a small, slow fire going because the apples do not need a high heat in order to cook down.  Therefore, because the fire was brisk in the first set of pictures, I had to move the apples away from the fire once they began to cook.

Here the same kettle of apples had been moved to
the middle of the cooktop because they have begun
to cook.
The apples need to cook long enough that each chunk has become soft enough that it breaks apart when you press it against the side of the kettle with your stirring spoon.  Frequent stirring is a must during this time because the apples can scorch so easily.

As I said, I was taking advantage of the fire on this cool summer day and accomplishing several tasks.  I made and water-bath canned strawberry jelly and baked a chocolate zucchini cake.  The strawberries were from our own patch, but the zucchini came from my sister-in-law.  The zucchini cake recipe is from my friend Tanya's friend Crystal's boyfriend's Grandpa Ollie (or Ali?).  Tanya, if you read this, would you let me know if I can share that recipe here?  I will understand if the answer is no.  I don't share unpublished recipes on my blog that are not mine unless I have permission from my source.  At any rate, the applesauce had to eventually be moved to the coolest part of the stove because my fire was fairly hot.

Marjory working hard.  The jelly is directly over the fire, the
canner is in the middle, and the applesauce from has been moved
all the way to the right.
Once the apples are completely cooked, they will look as they do in the picture below.

The same kettle of apples that was in the first picture after cooking.

The next thing that we do is run the apples through a food mill.  Granny always called this machine a ricer, but I think that term is supposed to be only used to describe the hand-held potato ricers.  The food mill that you see in the picture below is not Granny's.  My sister has that one, but this one is exactly like it.  I purchased it at Templeman's, a second-hand store in Atlantic, Iowa, for twenty dollars.  I consider it money very well spent.

Perhaps someday I'll learn not to photograph the
camera strap!  The vintage Sunbeam mixer that
you see behind the applesauce was an early1950's
gift from my grandparents on Mom's side to my
great-great aunt Meme who taught me to cook.
I used it to make the zucchini cake. 
Once the apples have been put through the food mill, we sweeten the applesauce with sugar--quite a bit of sugar to be truthful.  People outside of the family have accused our applesauce of being candy.  However, if they knew how sour Yellow Transparent apples are, they would understand the need for the sugar.  The applesauce is then put into various plastic containers (Cool Whip, margarine, yogurt, sour cream, etc.  We believe in recycling at home.) and then frozen.  I have canned applesauce, but our preference is for freezing it.

So why do I think that the wood cookstove is the best way to make applesauce?   Well, on the first day that we worked on applesauce, we used the gas stove and the same kettles that you see in the pictures here in this post.  Remember that I told you that they have heavy bottoms?  I think that we were watching things pretty closely, but EVERY pot of applesauce scorched that day.  And I don't mean a little bit.  Using a trick that my mother-in-law taught me about how to get the gas flames even lower than the low setting on each dial did not even help.  The scorched place was always right above the burner.  It was exceptionally frustrating.  I don't have nearly that much trouble with scorching when making applesauce on a wood cookstove.  Admittedly, we did have a tiny bit of minor scorching in one of the kettles in the picture below, but you could not taste it like you could in the applesauce made on the gas stove, and it was such a light scorch that it was much easier to clean off the bottom of the kettle than that which had been scorched over the gas flame.  Furthermore, the whole bottom of the kettle was in contact with the heat, rather than having a central place of more intense heat and the rest of the bottom of the kettle just receiving the "leftover" heat as it traveled to the outside of the kettle.

Also, the vast cooktop of the woodburning range accommodates multiple large kettles so much more conveniently than the cooktop of a 30" range.  Yes, you have to move them around to get the desired level of heat, but you have the room to do it.

Three kettles of apples (2 12-quart and 1 16-quart) cooking over
a low fire in the Margin Gem on the third applesauce making session.
If our weather remains cool, I'll be able to make more applesauce on the Margin Gem in the house.  Otherwise, I'll probably fire up the Riverside Bakewell in the summer kitchen.  I should probably give it another try just to be fair, but I'm afraid that making applesauce on the propane stove will be a last resort from now on.

Wednesday, July 17, 2013

A Review of the First Year with the Margin Gem


The Margin Gem cookstove busy baking Christmas cookies, boiling
fudge, steaming pudding, and heating a bowl of soup while she is
heating our hot water and our home on a cold December night in 2012.

It has been over a year now since Marjorie the Margin Gem was installed in our kitchen, and I would like to use this post to document how the Margin Gem affected our household over the last year.

First, a little review:

Marjorie the Margin Gem Cookstove was installed on March 9, 2012.  She was in daily use until the latter part of April when the weather got warm enough that we began only sporadic use until mid-June when we started firing her every Sunday afternoon and Monday while baking for the Monday Markets.  Most of spring 2012 saw above average temperatures.

Once school started in August, use was again sporadic until the weather became cool enough for continual use.  Autumn 2012 was plenty warm, but just a few days before Christmas, the weather became cold and stayed cold until the first part of May.  I think it was late October when we turned off the electric water heater for the winter.  The Margin Gem was then fired nearly continuously until the first week in May--when we actually had snow!  It happened that we began to run very low on firewood at about that same time (I didn't have time to cut wood because I was so busy with research paper checking), so using the stove was sporadic in May.

We continue to work on the kitchen remodel little by little, so we purchased our new gas range in June.  However, it was not hooked up in time for the first Monday Market (the farmers' market/misc. market in our local town), so all of the baking for the first Monday Market of 2013 was completed on the Margin Gem.  Since then we have used the gas stove, but Marjorie has been fired occasionally when the weather is reasonable.

So, what major differences exist between life with the old Qualified Range and life with Marjorie the Margin Gem?

1. WE DIDN'T BURN A SINGLE DROP OF PROPANE FOR HOME HEATING ALL WINTER!  Words cannot express how happy and proud this makes me.  I can truthfully say that this feat has never happened since my grandparents installed the first propane furnace in this house in the late 1960s.  The house has had auxiliary wood heat since they installed the first heating stove after enclosing the south porch in about 1977, but propane was the main source of heat for them and for my parents when they lived here.  I switched to burning mostly wood when I moved in in 1998, but there were always a few cold snaps when the furnace had to be turned on--even after the Qualified Range was installed in the kitchen in 1999.

But that isn't all.  Before Marjorie came to live with us, I had a very strict routine before going to bed at night.  Besides banking the fires, I would be sure that the door to the pantry and the door to the utility room (both doors open to the north off the kitchen) were closed tightly to preserve as much heat in the main living area of the house overnight.  Even with the two fires banked and the doors shut, the temperature on the main floor always dipped into the fifties overnight.  It was also not uncommon to see temperatures in the forties!  The upstairs was even worse.  It was cold in our house in the winter.

The pantry door was removed during the remodel because it was neither original nor period, so it could not be shut this winter, and we never worried about shutting the utility room door.  However, this year, even with seasonably cold winter temperatures, the temperatures only dropped into the upper fifties a couple of times!  For a variety of reasons that I'll talk about in later posts but mainly because Marjorie is such a good heater, the upstairs of our house was also much warmer.  We used to sleep under five quilts during the winter, but this year we were often too warm with just two.

2. I WAS ABLE TO SLEEP ALL THE WAY THROUGH MOST WINTER NIGHTS WITHOUT HAVING TO GET UP TO TEND FIRES.  Because the Qualified Range was not airtight and our Jotul is so small, Nancy would always wake me in the middle of the night when she got up to go to the bathroom so that I could go down and fuel the fires.  This only happened on the very coldest of nights this winter since the firebox is not only large but airtight on the Margin Gem.

3. NOT A SINGLE WATT OF ELECTRICITY WAS USED TO HEAT WATER FOR SIX MONTHS STRAIGHT! What a savings on our electricity bill! We enjoyed the abundant hot water from the cookstove. In fact, Nancy told me that even though she was ashamed to admit it, once we began using the electric hot water heater again in May, she missed having hot water from the cookstove. There were only a couple times that we had to schedule showers/loads of laundry carefully due to the availability of hot water, but we have to do this with our electric hot water heater too, so it was not out of the ordinary for us.

What we liked about the hot water from the wood cookstove was that it was quite a bit hotter than what we get from our electric heater. Clearly, we could adjust the temperature of our electric hot water heater to make it so that it has hotter water than it currently does, but this would result in significantly higher power bills when it is in use.

4. INSTEAD OF HAVING TO BUILD A NEW FIRE EVERY DAY AFTER WE RETURNED FROM WORK AND SCHOOL, WE JUST STIRRED UP THE COALS AND REKINDLED THE SAME FIRE.  In fact, I think that one of our fires lasted for over a month.  We used a lot less newspaper than we used to.

5. WE HAD TO CLEAN THE KITCHEN CHIMNEY MORE OFTEN THAN BEFORE.  With the stove having a fire burning in it for more hours each day than before, and since it was airtight and we purposely had a long, slow burn during the night and while we were away during the day, more creosote accumulated in the chimney.  Creosote accumulation inside the stove itself and inside the stovepipe was only a little greater than what we would have seen in the Qualified.

6. I'M ASHAMED TO ADMIT THAT I'M STILL LEARNING HOW TO CONTROL THE HEAT OF THE OVEN.  I haven't ruined anything, but I've had my challenges.  I've done a great deal of baking in the Margin Gem, and more and more it seems that the biggest key is to have plenty of small pieces of fuel available.

7. WE BURNED MORE WOOD THAN WE DID BEFORE.  That said, the wood was doing more than it had ever done before, and since we didn't burn any propane at all, I'm fine with the increased wood consumption.  We have so much firewood available to us here on the farm that increased consumption will not be a concern for several years--if ever.

Overall, we are very happy with the Margin Gem, and I feel that it was definitely the right model stove for us.