Saturday, May 26, 2012

Teakettles and Wood Cookstoves

You may have noticed that in each of the pictures of the three cookstoves that appear on this blog, a teakettle is resting somewhere on the cooktop.  Our cookstoves are not unique in this characteristic at all.  When I do a Google search for pictures of woodburning cookstoves, the vast majority of those ranges which are obviously in regular use have a teakettle sitting on them.

The Riverside Bakewell cookstove in our summer kitchen.

Marjorie the Margin Gem cookstove in the house kitchen.

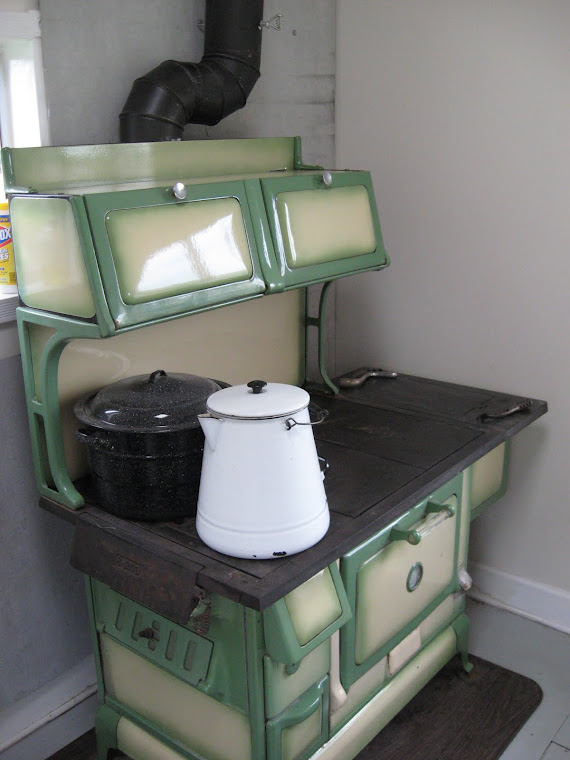
The Qualified Range in the house kitchen before beginning to remodel.


Other than the occasional cup of tea, we are not tea drinkers at all; however, our teakettle gets a workout.  These soldiers of the kitchen serve many purposes, and I suspicion that when cooks began the transition from wood and coal-fired ranges to gas, kerosene, and electric stoves, the ever-present teakettle was sorely missed.  I know that each summer as we start to do more of our daily cooking with a modern range, I find myself feeling inconvenienced when I no longer have that old friend ready at my fingertips.

Of course, a teakettle is merely a pot with a pouring spout which is intended to be used to heat water.  When a house is equipped with hot running water, or when a stove is equipped with a hot water reservoir, it may seem redundant to have a teakettle heating water on the stovetop as well.  However, the water in the teakettle is used for different purposes than the water in those other systems.  The water in the teakettle is generally hotter than water from the reservoir or the tap, and if you spend any time reading over old, from-scratch recipes, you'd be surprised at how many of them call for boiling water rather than merely hot water.  Obviously, the cooks of the olden days were used to having their teakettles at the ready.

Another difference is that the water in the reservoir was often rainwater, which was what people meant when they referred to "soft" water prior to the advent of fancy electric water softening systems.  This water would have been used for all kinds of washing, but it would not have been consumed.  Of course, not all homes were equipped with a rainwater cistern, so their reservoirs would have been filled with well water, which obviously was often simply called "hard" water.  However, as my copy of The Foxfire Book of Appalachian Cooking* states, "As bread crumbs or other food might fall into the water in the reservoir, a kettle of fresh water was always kept on the stove for coffee or tea or for adding to food that was cooking."  I am amazed at how often I grab the teakettle to add a little boiling water to this or that which is cooking merrily away, and the best part is that the cooking is not slowed by this addition because the water is already boiling.

Jane Cooper devotes a section of her book Woodstove Cookery: At Home on the Range to the teakettle.  A contributor to that book wrote that her grandmother kept eggs in the teakettle so that at a moment's notice, one could have a hardboiled egg for a snack (I wonder how green the yolks would have been after cooking for so long).  Ms. Cooper also notes that steam from the teakettle would add much needed humidity to the dry winter air.  This is true, but I'd like to point out that the same humidity is not as welcome on a sultry summer day.  I've also read warnings in vintage cookbooks which state that if the teakettle is not permitted to be on the range all the time, the buildup of lime deposits inside it will be kept to a minimum.  We do struggle with the lime deposit problem, but we choose to combat it with vinegar rather than remove the teakettle from the cooktop.

Our teakettle is a German-made vessel which we purchased from an Amish store near Redding, Iowa.  It holds over a gallon of water and has a lid that is equipped with a "whistle" in the handle which sounds remarkably like the wail of a freight train when it boils.  I would advise anyone interested in seriously cooking on a wood cookstove to purchase the largest teakettle that can be found.  In my opinion, there is no point in messing around with the dinky little designer models that grace most store shelves today.  Heating the greater quantity of water is not going to cost you any more since the teakettle heats as an incidental result of your cooking or heating fire, and I've never heard of anyone complaining because too much hot water was available.  Furthermore, if you ever do any serious canning, that large teakettle will be a necessity.

A side benefit of keeping a teakettle on the stove top is that when the water gets to a certain temperature, the teakettle begins to make that humming noise that all pots make prior to reaching the boiling point.  You can often tell what your fire is doing even if you are not right next to the stove simply by listening to what the teakettle sounds like.  I guess you could call it a primitive version of the baby monitor or remote sensor.

I'd like to close this post with a poem which appeared in the January 1968 edition of Ideals magazine.  Obviously, I'm not the only one who is conscious of the sound of the teakettle.


The Old Wood Stove
by Christel B. Ellis

The old wood stove would crackle
As the cedar dried and burned.
Through the grating coals would tumble,
Glowing red to black they turned.
And the firelight through the covers
Of that dear old kitchen range,
Turned the ceiling into patchwork
With each dancing fairy flame.

Like a warm and glowing magnet
We were drawn around the hearth,
And the high old corner woodbox
Was a warm and heavenly berth.
With our backs against the chimney
We would listen to the wind
As it swung the stovepipe damper
Up and down and back again.

Many crops were planned and planted
As the winter lingered on.
Near the hearth the neighbors gathered
Till the glowing coals were gone.
Woolen socks were always drying
Near the kitchen range back home.
The iron kettle hummed a love song
Folks today have never known.

I see the kitchen of my childhood,
Feel the warmth of that old range.
To have known its glow and comfort
Is a joy I'd not exchange.

I'm just happy that the sentiments recorded in the above poem can still be reality today!

* This is a very nifty book which I purchased for a dime when it was being purged from the Avoca Public Library's collection--probably the best thing I've ever bought for ten cents.  It is full of pictures of people using woodburning cookstoves of every shape and variety and has some general instructions on how to not only cook on a wood cookstove, but also in a fireplace.  It has quite a few wood cookstove memoirs in it, too.

Sunday, May 20, 2012

"I Even Like Raisins in Gravy!"

As I look over this blog, I notice that many of the recipes which I have included here so far are for sweets and desserts.  In my experience, most general cookbooks and recipe boxes reflect this lop-sided phenomenon, but I think that it is because many cooks simply put the nutritional part of their meal together according to their own taste and do not rely on recipes for the standard fare of a meat, a staple, a vegetable, and a fruit.  At least, that is certainly what happens for most of the meals in our household. 

My grandma Marian is no exception to this rule.  For all of her married life, she routinely put huge dinners on the table at noon--first for her family and in-laws; then for family and the occasional hired man; and then for family, the occasional hired man, and a growing pile of grandchildren.  However, no written recipes exist for the succulent beef roasts, heavenly mashed potatoes, delicious fried chicken, creamed carrots, mouth-watering sweet corn, and various other midwestern traditional dishes which made a seat at her dinner table a coveted thing indeed.  Therefore, there is no written recipe for the meat dish that I'm going to share with you here, but this is one of my favorite main dishes that Grandma makes.  Even though Grandma had given up her wood cookstove about fifty years prior to concocting this recipe, this is a main dish that is particularly well suited to the wood cookstove.

One of the reasons that I like this recipe is because I am a raisin lover.  Some of my earliest food memories involve those tiny boxes of Sunmaid raisins that are the perfect size for a pre-schooler.  I like cooked raisins, raw raisins, raisins in salads, raisins in cookies, raisins in breads, raisins in cakes, raisins in sauces, and raisins on meats.  This recipe is the reason that I like raisins in gravy.  Everybody looks at me like I'm crazy when I say that, but trust me, this recipe is good.  Here is what you do:

You are going to first be browning some pork chops or pork loin slices.  If you know that your meat is lean, start with a little butter (I think a little bit of bacon grease tastes better) melting in the bottom of a skillet.  You just need enough to cover the bottom of the pan.

Butter melting in a skillet on the wood cookstove.  Excuse the ugly splotches
on the cookstop; we had fried doughnuts for our breakfast the morning before this.
Then, brown as many pork chops or boneless pork loin slices as you need to feed those who will be around your table.  Season them as you like. 


I cooked these directly over the firebox because I wanted that high heat which produces a good browned flavor.

While these are browning, mix a few tablespoons of flour into a cup of cold water.


Once the chops are nicely browned on both sides, transfer them to a baking dish and put them in the warming oven so that they will stay hot while you make the gravy.

The browned chops resting on the lowered door of the warming oven.
Unfortunately, because the stovepipe goes up through the center of the
warming oven on the Margin Gem Cookstove, I can't fit this pan inside
the warming oven and get the door closed.  It's no problem, though,
because everything still stays plenty warm resting on the open door.
Now pour a little hot water from the teakettle into the skillet, loosening the nicely browned bits of meat and drippings from the bottom with a fork or whisk. 


Pour the flour and cold water mixture into the skillet, stirring constantly with a fork or whisk to keep it from getting lumpy.  Season the resulting gravy to taste and let it boil rapidly.


Add a couple of generous handfuls of raisins.  Grandma's preference is to use golden raisins, but I like any kind of raisin.


Slice an apple or two into the gravy, too.


Pour the gravy over the chops in the casserole dish and pop the whole thing into the oven.

Pork chops are in the 9 x 13 baking dish in the back with a dish of
Grandma Ruth's scalloped corn in the front.  The oven thermometer
is registering right around 350 at this moment, but both of these
dishes will be fine if the oven temperature is a little hotter or a
little cooler.
Bake until the pork chops are cooked through.  Depending on the temperature of your oven and the doneness of the chops when you took them out of the skillet, this could take anywhere between thirty minutes to an hour.  As it cooks, the smell of it almost reminds me of Thanksgiving since my family puts raisins and apples in the turkey dressing.

The finished dinner would make Grandma proud.
I think that this meat dish holds well once it is cooked.  You can bring it back up to the warming oven to stay hot until you are ready to serve the meal.  It's also nice because it is made of things that people generally would have on hand.  Give it a try.  I bet there's a good chance that you too will "even like raisins in gravy!"

Friday, May 4, 2012

Ironing Clothes with a Wood Cookstove

Now that we have Marjorie the Margin Gem up and running, we are trying to take full advantage of her.  Just as in the days of old when the woodburning cookstove functioned as the main energy center of the home, we are using our cookstove for more than just cooking.  Marjorie is also busy heating our water, warming our house (though parts of March were awfully warm), and providing heat for ironing our clothes.

I wear a dress shirt to school every day, so the ironing pile is always quite large around here, and because time is always an issue, the process of ironing with heat from the cookstove needs to be made as efficient as possible for it to be a viable alternative to using an electric iron.  Thus, even though I have a collection of traditional sadirons and they would work just fine for this process, they remain hidden in a box somewhere. 

Instead, I heard somewhere that what some Amish do is to buy old electric irons, remove the cords, and then heat these atop the cookstove.  I have to say that even though I'm pro-old fashioned method in most areas of my life, I completely understand why the Amish would have adopted this approach.  The surface area on the bottom of an electric iron is much larger than the bottom of the traditional sadiron, and thus the process of pressing a garment is expedited.  Also, because the traditional sadiron is pointed at both ends, you cannot rest the iron on its heal while you adjust the article that is being ironed.

The pictures below show the two irons that I use.  I use two so that one can be reheating while I'm using the other.  The one on the left used to belong to my grandmother on my dad's side.  She and my grandfather married in 1939, and I suspicion that this iron was purchased not too long afterward.  It was the type that took a detachable electrical cord like those which used to be connected to waffle irons and coffee percolators.  This iron is quite heavy (in fact, when my grandparents lived in our house, I remember Granny using it as a doorstop for the kitchen door that you see in some of the kitchen pictures here on the blog), and it has a unique thumb rest which is attached to the top of the wooden handle.

The iron on the right was purchased from a thrift store simply to be used on the woodstove.  I chose an older style of iron which had the larger metal skirt above the soleplate because I was afraid that I might melt the new, mostly plastic style of iron. I paid a dollar for this iron several years ago, brought it home, and disconnected its electrical cord.  Truthfully, I still feel a little guilty about that because the iron did still work at the time that I purchased it.  It seemed wrong to ruin something that worked just fine.  I have saved the cord, though, and keep it in the basement.  I did that to assuage my guilt, telling myself that I could reconnect it if my contrition got out of control. 

Back to the point of this post:

You can see from the pictures that I put the irons on a piece of aluminum foil while they are heating on the cooktop.  I could just place them directly on the cast iron, but any food spills or other soil which doesn't get completely cleaned off the stove could travel via the soleplate of the iron to my white shirts, and that could be an unhappy and expensive event.  I have been using the piece of foil in the pictures for almost two months now.


Former electric irons heating on the wood cookstove.

The door of the firebox of the Margin Gem cookstove is open to show
the fire heating the clothes irons.


Naturally, the most "pressing" question that anyone would have about this whole process is "How do you control the heat?"  --Sorry, I just couldn't resist the play on words.

First of all, you'd be surprised at how little heat is actually needed to iron clothes.  It is very easy to get the irons too hot.  However, an iron that is not hot enough doesn't remove any wrinkles, either.  What I've learned is that an iron that is too cool or too hot does not glide smoothly over the cloth being ironed.  The "just right" window is pretty narrow, and it is the temperature at which the iron is easy to push along the fabric.

When I first learned to iron with wood heat several years ago, I turned on my electric iron, set it to the temperature that I used on my clothes, and let it heat up.  After it reached ironing temperature, I held the bottom of the iron about four inches away from my cheek to see what the heat felt like.  Then, I placed the other irons on the stove and waited until holding them up to my cheek at an equal distance showed that they had reached the same heat.  I've memorized what that felt like, and now this method is what I use to see whether the irons are at the appropriate temperature.

Some people might be able to accomplish this task by just placing their hands near the bottom of the iron, but I seem to have asbestos fingertips--convenient for taste-testing gravies and sliding hot pots and pans around on a wood cookstove, but no longer sensitive enough to tell whether it is time to strike while the iron is hot.

A cold iron is only ineffective.  An iron that is too hot can be a problem of epic proportions, so I must advise caution in the beginning.  If you do manage to scorch fabric enough that some of it sticks to the bottom of the iron, you'll have to let the iron cool completely and then rub it with steel wool until the soleplate is smooth again.

The clothing will have to be either sprayed with a little bit of water before ironing, or one could go through the process of sprinkling and rolling that our grandmothers witnessed during their childhoods.

Some who are reading this are shaking their heads and muttering that I'm crazy.  I'll not argue about my craziness, but it really isn't as inconvenient as one might think.  Plus, you'd be surprised at how nice it is to have a cordless iron that heats up for free!